

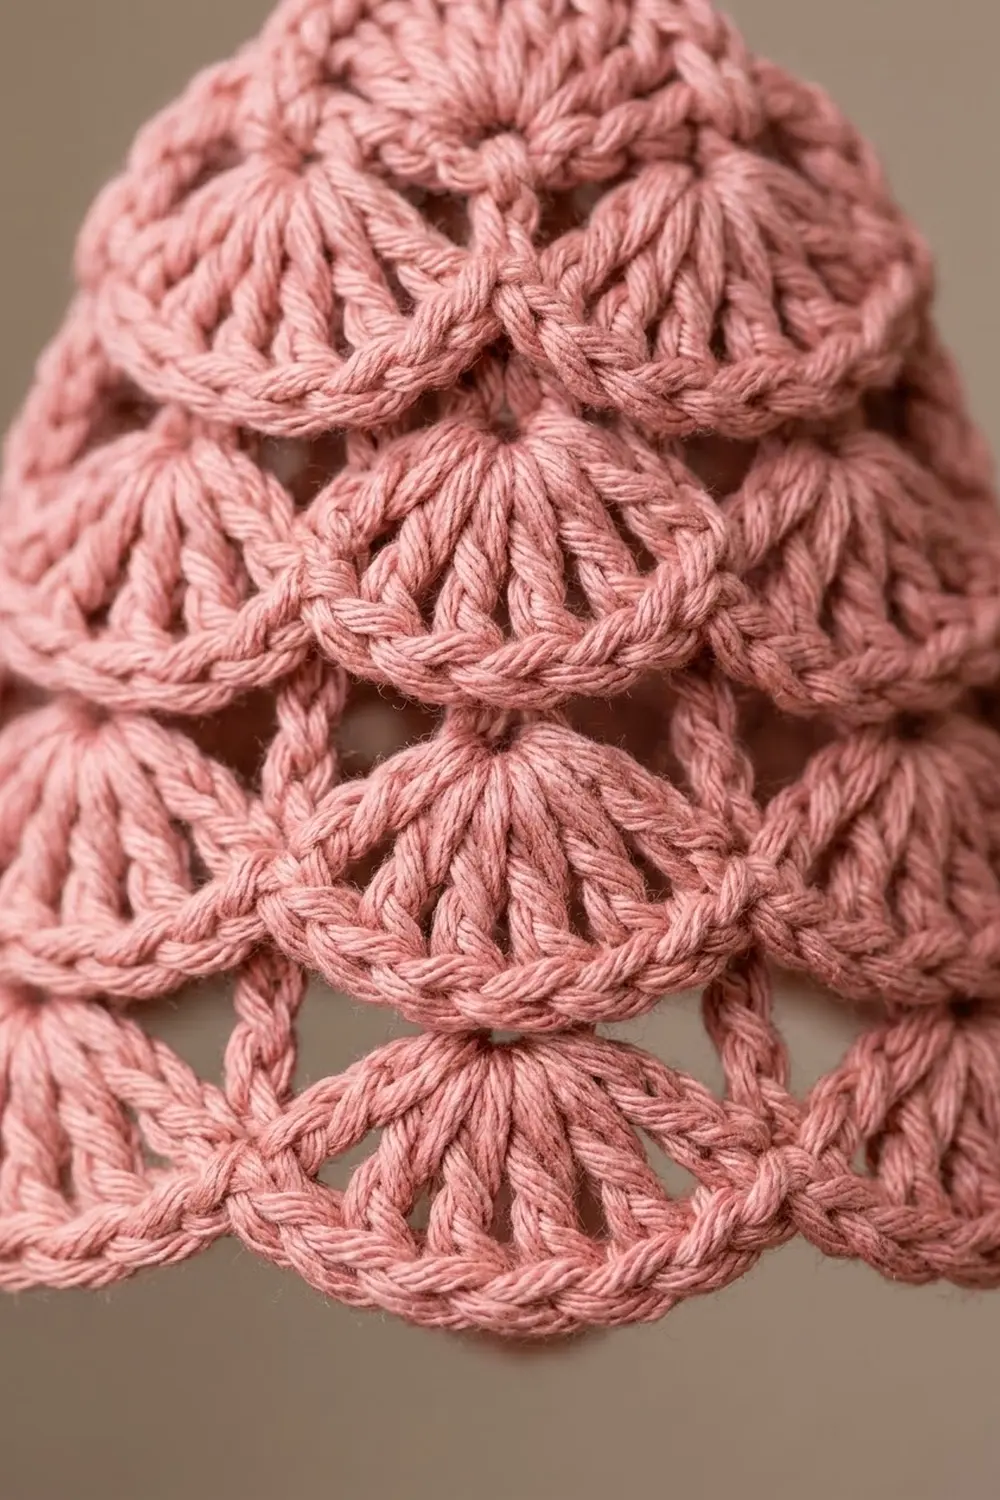
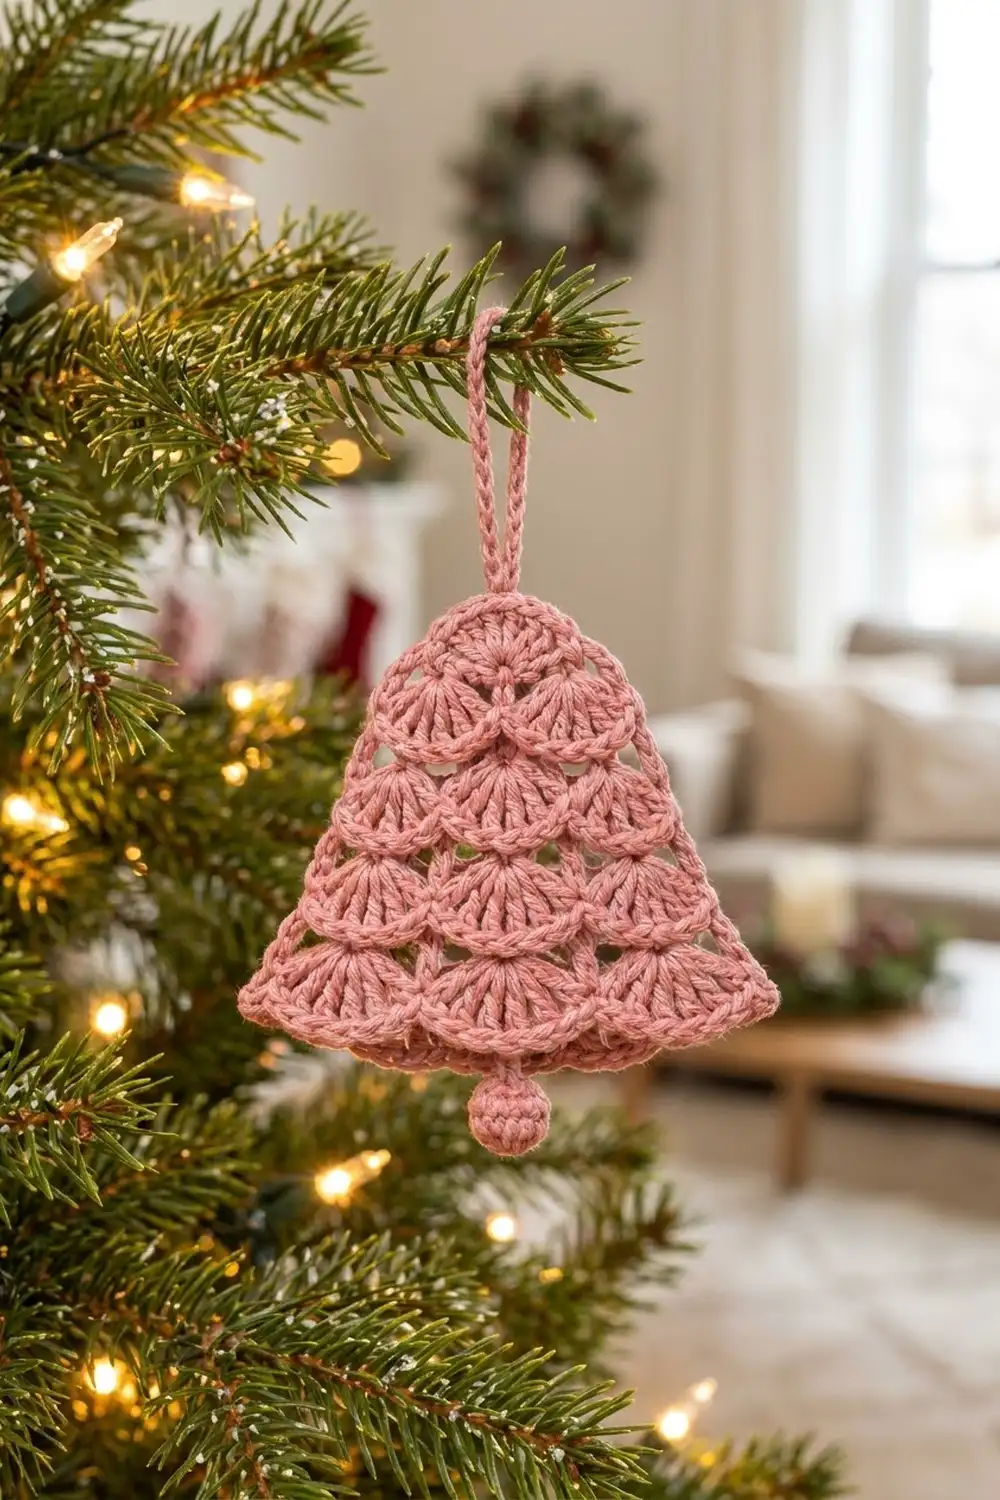
This little bell is made of soft fan shells that get wider with every tier. It lies flat but still looks lacy and textured. The dusty rose cotton gives it a vintage, cottage-style look that suits a natural or blush-toned tree.
Each ornament is one flat piece. You start with a small double-crochet disc at the top and add four tiers of 7-dc shells: 3, then 4, then 5, then 6. A single-crochet border follows the scalloped hem. To finish, you add a sturdy hanging loop and a tiny stuffed ball clapper.
The finished bell measures 4.5 in (11.4 cm) wide by 4 in (10.2 cm) tall, not counting the loop or clapper. The loop adds about 2 in (5.1 cm) on top. The clapper hangs about 0.85 in (2.2 cm) below the hem.
All terms are US crochet terms. Work the rows back and forth, turning at the end of each row. Make one bell, check it against the checkpoints, and then make as many as you like.
Finished Size and Construction
- Finished size: 4.5 in (11.4 cm) wide × 4 in (10.2 cm) tall, not counting the loop and clapper
- Skill level: Easy
- Terminology: US
- Yarn weight: DK / light worsted (#3) cotton or cotton blend
- Hook: 3.5 mm (E-4)
- Number of pieces: 1 bell body, plus 1 small ball clapper
- Layout: one flat motif, nothing joined in a grid
- Piece size before border: 4.25 in (10.8 cm) wide × 3.75 in (9.5 cm) tall
- Border depth: 0.125 in (0.3 cm) on every edge
Materials
Yarn. Choose a smooth DK-weight cotton, either mercerized or lightly brushed. Cotton keeps the shells crisp and blocks flat. Acrylic also works, but the fans will look softer and a little puffier.
- Dusty rose: 12 g / 30 m (33 yd) per bell, including the loop and the clapper
This amount includes a margin of about 25% for a gauge check and weaving in ends. Three bells, like the ones on the tree, use about 36 g / 90 m (98 yd).
Tools
- 3.5 mm (E-4) crochet hook
- Tapestry needle
- Scissors
- Stitch marker
- A pinch of yarn scraps or fiberfill for the clapper
- Rust-proof pins and a foam blocking mat
- Spray bottle with water
Abbreviations (US Terms)
- ch: chain
- sl st: slip stitch
- sc: single crochet
- dc: double crochet
- sc2tog: single crochet 2 together
- sk: skip
- st(s): stitch(es)
- sp: space
- MR: magic ring
Special stitch: Shell. Work 7 dc into the same ch-5 arc. The 4th dc is the shell’s center dc.
Gauge and Checkpoints
You measure gauge on the bell itself, so your first bell is your test piece. Stop at each checkpoint and measure before you continue.
- Disc (Rnd 1): 1.25 in (3.2 cm) across
- Shell repeat: one shell plus its sc is about 0.7 in (1.8 cm) wide
- After Row 2: 2.1 in (5.3 cm) wide; 1.4 in (3.6 cm) tall from the top of the disc
- After Row 4: 2.8 in (7.1 cm) wide; 2.2 in (5.6 cm) tall
- After Row 6: 3.5 in (8.9 cm) wide; 3 in (7.6 cm) tall
- After Row 8: 4.25 in (10.8 cm) wide; 3.75 in (9.5 cm) tall
Too big? Switch to a 3.25 mm (D-3) hook, or shorten the arcs from ch 5 to ch 4.
Too small? Switch to a 3.75 mm (F-5) hook.
For an ornament, a difference of up to 0.25 in (0.6 cm) across Row 8 is fine.
Bell Body
Top Disc
Rnd 1: Make a MR. Ch 3 (counts as dc), then work 11 dc in the ring. Sl st to the top of the beginning ch-3. Pull the ring closed, leaving a tiny center hole. (12 dc)
Number the stitches: the ch-3 is st 1, and the count runs around to st 12. Do not fasten off. Turn the disc so st 1 (the join) is at the lower left. You will now work across the lower half of the disc only, from st 1 to st 7. That covers exactly half of the 12 stitches, or 180 degrees.
Tier 1
Row 1 (arc row): Ch 1, sc in the same st as the join (st 1). Ch 5, sk 1 dc, sc in next dc. Repeat from * to * 2 more times, so the last sc lands in st 7. Turn. (4 sc, 3 ch-5 arcs)
Leave sts 8–12 unworked. They form the rounded crown of the bell.
Row 2 (shell row): Ch 1, sc in first sc. Shell in next arc, sc in next sc. Repeat from * to * 2 more times. Turn. (3 shells = 21 dc, plus 4 sc; 25 sts total)
Checkpoint: 2.1 in (5.3 cm) wide.
Tier 2
Row 3 (arc row): Ch 1, sc in first sc. Ch 5, sc in center dc of next shell. Repeat from * to * 2 more times. Ch 5, sc in last sc. Turn. (5 sc, 4 ch-5 arcs)
The two edge arcs reach out past the shells below them. This is how each tier gains one shell.
Row 4 (shell row): Ch 1, sc in first sc. Shell in next arc, sc in next sc. Repeat from * to * 3 more times. Turn. (4 shells = 28 dc, plus 5 sc; 33 sts total)
Checkpoint: 2.8 in (7.1 cm) wide.
Tier 3
Row 5 (arc row): Ch 1, sc in first sc. Ch 5, sc in center dc of next shell. Repeat from * to * 3 more times. Ch 5, sc in last sc. Turn. (6 sc, 5 ch-5 arcs)
Row 6 (shell row): Ch 1, sc in first sc. Shell in next arc, sc in next sc. Repeat from * to * 4 more times. Turn. (5 shells = 35 dc, plus 6 sc; 41 sts total)
Checkpoint: 3.5 in (8.9 cm) wide.
Tier 4
Row 7 (arc row): Ch 1, sc in first sc. Ch 5, sc in center dc of next shell. Repeat from * to * 4 more times. Ch 5, sc in last sc. Turn. (7 sc, 6 ch-5 arcs)
Row 8 (shell row): Ch 1, sc in first sc. Shell in next arc, sc in next sc. Repeat from * to * 5 more times. (6 shells = 42 dc, plus 7 sc; 49 sts total)
Do not turn or fasten off. Go straight into the border.
Checkpoint: 4.25 in (10.8 cm) wide × 3.75 in (9.5 cm) tall.
Border
Border gauge: about 5 sc per 1 in (2.5 cm) along the straight and curved edges. Along the hem, work 1 sc into the top of each dc.
Border Rnd (right side facing): Ch 1. Work the edges in this order:
- Corner A: Work 3 sc in the last sc of Row 8 (the one you just made). (3 sc)
- Side 1, going up: For each tier, work 3 sc around the post of the edge dc of the shell, then 1 sc in the end sc of the arc row. Do this for all 4 tiers, ending at disc st 1. (16 sc)
- Crown: Work 2 sc in each unworked disc st, in this order: 12, 11, 10, 9, 8. (10 sc)
- Side 2, going down: Mirror Side 1. For each tier, work 1 sc in the end sc of the arc row, then 3 sc around the post of the edge dc. (16 sc)
- Corner B: Work 3 sc in the first sc of Row 8. (3 sc)
- Hem: Working across the tops of the Row 8 stitches, sc in each of the 7 dc of the next shell, sl st in next sc. Repeat from * to * 4 more times. Then sc in each of the 7 dc of the last shell. (42 sc, 5 sl st)
Sl st to the first sc of Corner A. (90 sc + 5 sl st = 95 sts) Fasten off and weave in the end.
Why the math works: Each tier runs about 0.8 in (2.0 cm) along the slanted side, so 4 sc per tier stays close to 5 sc per inch. The outer edge of the crown is about twice as long as the base of the dc it sits on, so 2 sc per dc lets it lie flat. On the hem, 1 sc per dc follows each scallop exactly. The sl st drops into each valley, which keeps the scallops defined. Corners A and B each get 3 sc so the edge can turn from the slanted side to the hem without cupping.
Hanging Loop
Join yarn in the 5th crown sc, which is the top center. Ch 36, then sl st into the same sc to close the loop. Turn and work 1 sc in each ch around the loop (36 sc). Sl st into the base and fasten off. The loop stands about 2 in (5.1 cm) tall and feels firm, like a cord.
Ball Clapper
Rnd 1: MR, 6 sc in the ring. (6 sc)
Rnd 2: 2 sc in each st. (12 sc)
Rnd 3: Sc in each st. (12 sc)
Stuff firmly with yarn scraps.
Rnd 4: Sc2tog 6 times. (6 sts)
Fasten off, leaving an 8 in (20.3 cm) tail. Thread the tail through the front loops and pull the ball closed. It should be about 0.6 in (1.5 cm) across.
Attach: Join yarn in the 3rd hem sl st, which is the center valley between shells 3 and 4. Ch 3 to make a 0.25 in (0.6 cm) stem, then fasten off. Use the ball’s tail to sew it to the end of the stem.
Final Blocking
- Weave in any remaining ends along the border so they stay hidden.
- Lay the bell right side up on the blocking mat.
- Spray until it is damp but not dripping.
- Pin Corners A and B first, so the hem measures 4.5 in (11.4 cm) wide.
- Pin the top of the crown so the bell is 4 in (10.2 cm) tall.
- Pin the tip of each hem scallop, curving it slightly outward.
- Use your fingertips to smooth each tier’s arcs into even curves.
- Let it dry completely, about 6–8 hours, before you remove the pins.
- For a crisper ornament, mist lightly with fabric stiffener before it dries.
Final Quality-Control Checklist
- Rnd 1 has 12 dc and only a tiny center hole.
- Rows 2, 4, 6, and 8 have 3, 4, 5, and 6 shells.
- Every shell has 7 dc, and each center dc sits under an arc-row sc.
- Row 8 measures 4.25 in (10.8 cm) wide.
- The border has 90 sc and 5 sl st.
- The bell is symmetrical when you fold it in half vertically.
- The loop is centered above the crown.
- The clapper hangs from the center valley.
- All ends are woven in and invisible.
Troubleshooting
The disc ruffles or cups. The dc in the ring are too loose or too tight. Rework Rnd 1 until it measures 1.25 in (3.2 cm).
The shells overlap or buckle. The ch-5 arcs are too short for your tension. Use ch-6 arcs instead.
There are gaps between shells. The arcs are too long. Use ch-4 arcs.
One side is longer than the other. An edge arc was skipped. Every arc row must start and end with an sc in the edge sc.
The border pulls the sides in. Work 5 sc per tier instead of 4 on both sides, and update your total count.
The hem flares too much. In place of each sl st, sc2tog over the last dc of one shell and the first dc of the next.
The ball is lopsided. Add more stuffing before Rnd 4, then roll the ball between your palms.
Care
Hand wash in cool water with a mild soap, roll it in a towel to press out the water, and lay it flat to dry. If the bell loses its shape in storage, pin it back to its blocked size.
Final Notes
The measurements build in a short, easy-to-check chain. The disc is 1.25 in (3.2 cm) across. The bell then measures 2.1 in (5.3 cm) wide after Row 2, 2.8 in (7.1 cm) after Row 4, 3.5 in (8.9 cm) after Row 6, and 4.25 in (10.8 cm) after Row 8. The border brings it to 4.5 in (11.4 cm) wide by 4 in (10.2 cm) tall. If every checkpoint matches, your bell will match too. Make a few for the tree, tie one to a gift, or hang a row of them in a window.
Happy crocheting!