

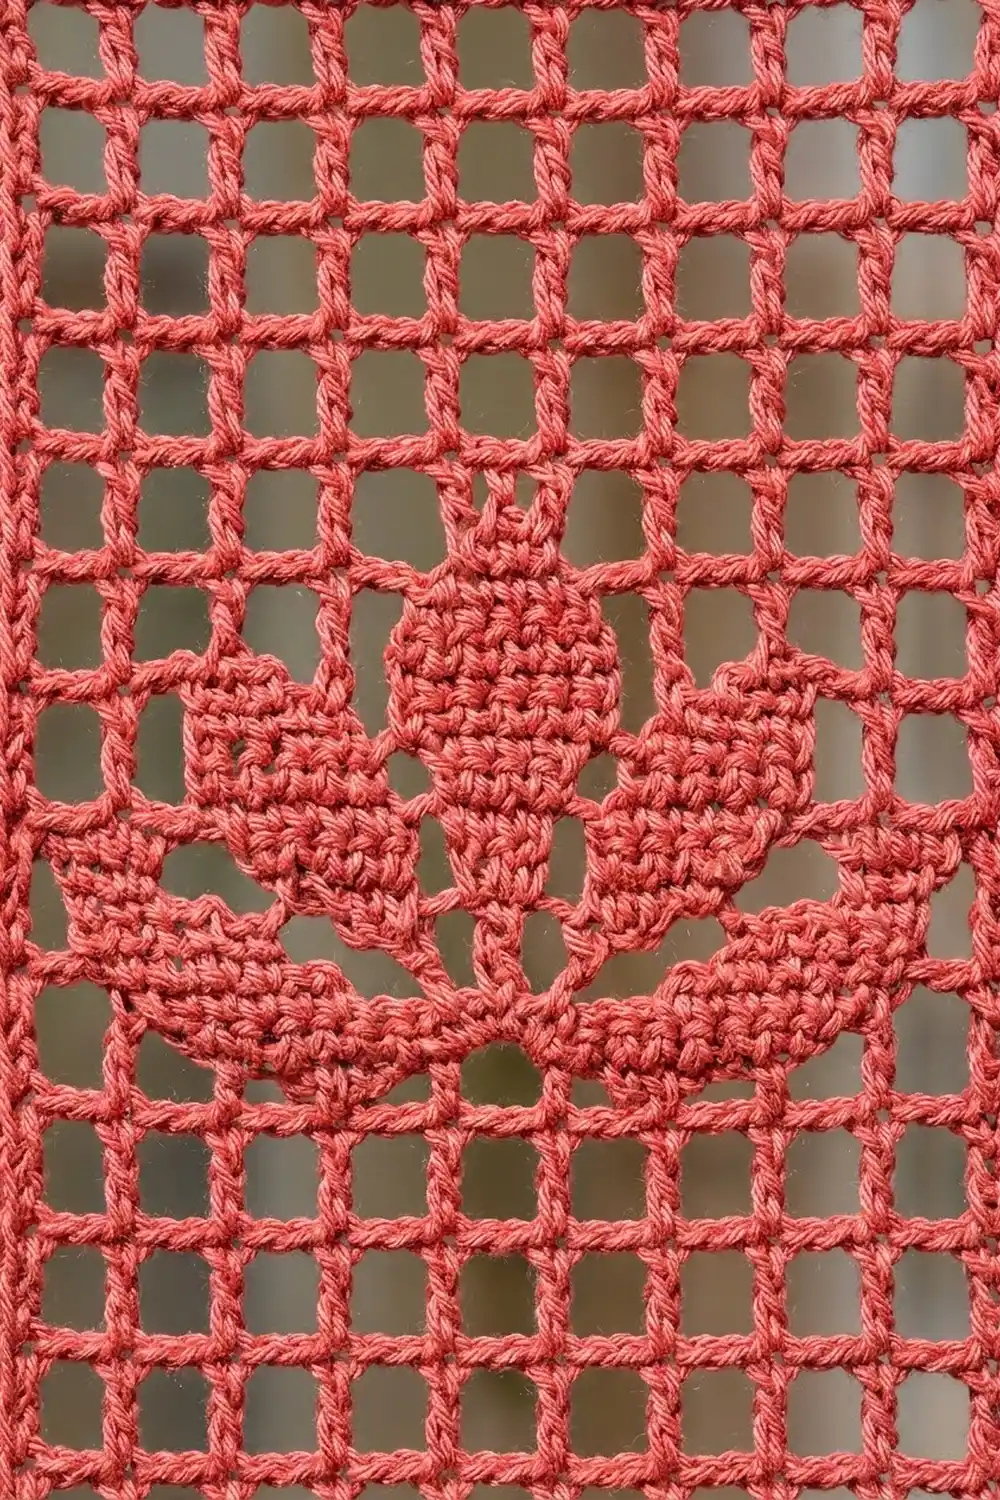
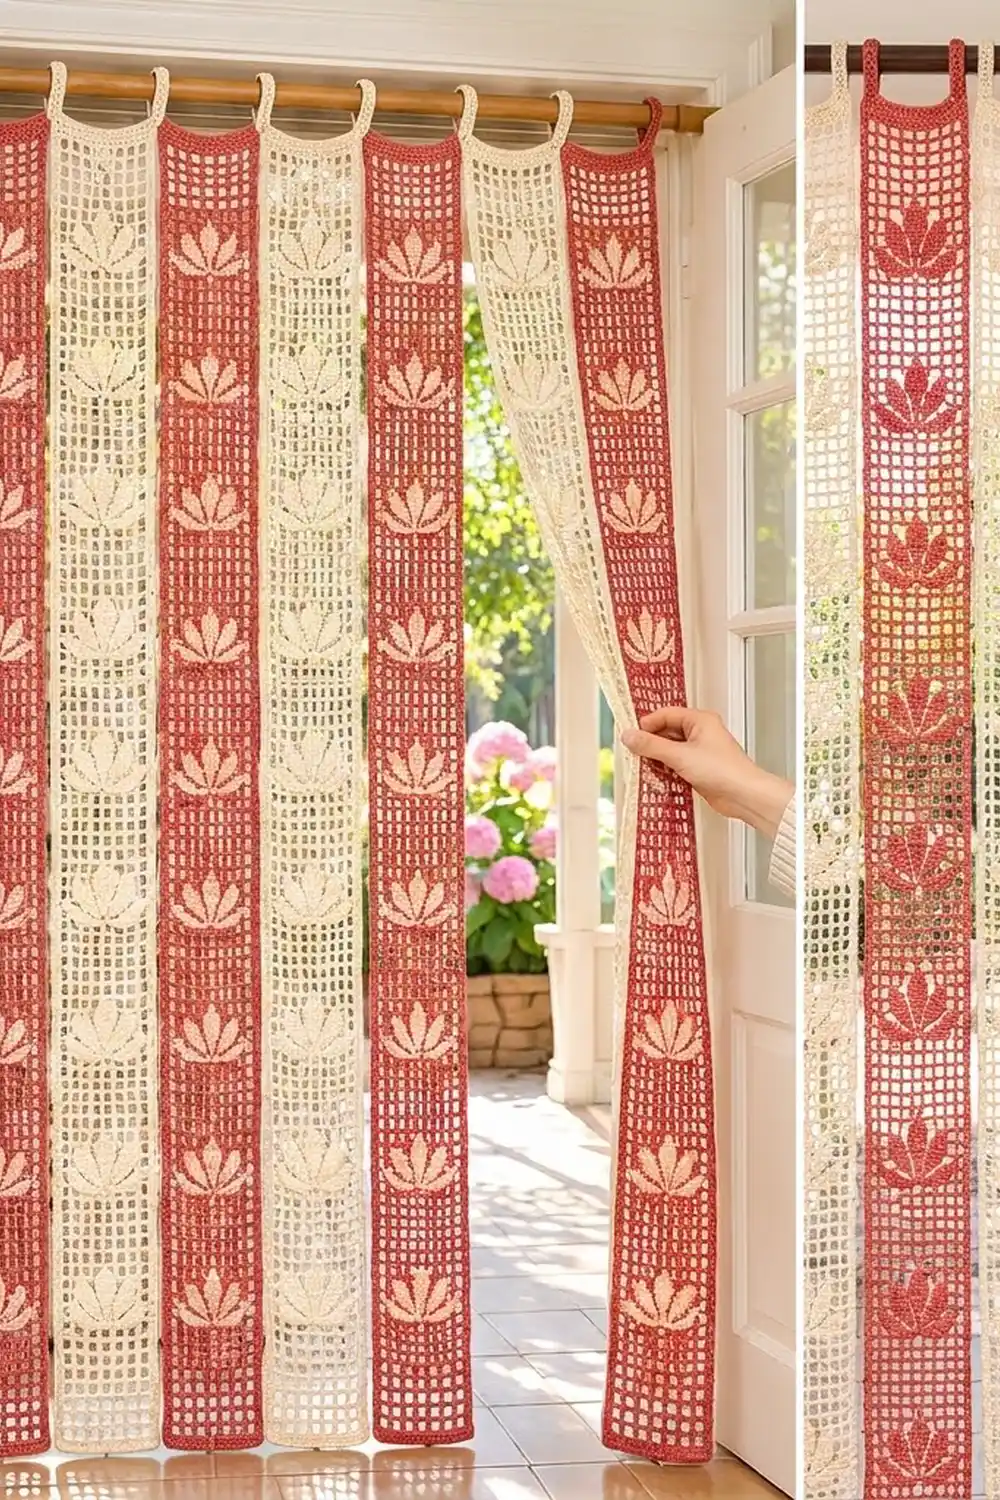
The Lotus Lane curtain is a set of seven narrow filet crochet strips. Each one is an open grid of square meshes with a column of solid lotus flowers running from top to bottom. Every lotus has a tall pointed center petal, two side petals leaning outward, and two low outer petals that sweep out toward the edges like leaves floating on water.
The strips alternate in two colors: four in a warm coral red and three in soft cream. Hung side by side from a curtain rod by two loops each, they make a light, airy door or pass-through curtain that you can push aside by hand, and the sunlight shows through every mesh.
This pattern uses US crochet terms. Each finished strip measures 6 in (15.2 cm) wide and 73.5 in (186.7 cm) long, not counting the hanging loops. With all seven strips hung edge to edge, the curtain covers about 42 in (106.7 cm) of rod.
Each strip is worked flat in rows of filet mesh from the bottom up, finished with one round of single crochet, and topped with two arched hanging loops. The strips are not sewn to each other. They hang independently, which is what lets the curtain part so easily.
Finished Size and Construction
- Finished strip size: 6 in x 73.5 in (15.2 cm x 186.7 cm), plus loops about 2 in (5.1 cm) tall
- Skill level: Intermediate (basic filet chart reading)
- Terminology: US
- Yarn weight: Worsted (#4) cotton
- Hook: 5.0 mm (H-8)
- Number of pieces: 7 strips (4 red, 3 cream)
- Layout: 7 strips in one row on a rod, colors alternating red-cream-red-cream-red-cream-red
- Piece size: 6 in x 73.5 in (15.2 cm x 186.7 cm)
- Size before border: 5.5 in x 73 in (14.0 cm x 185.4 cm)
- Border depth: 0.25 in (0.6 cm) on every edge
Materials
Choose a smooth, mercerized or combed worsted-weight cotton, about 174 m per 100 g. Cotton gives crisp mesh squares and hangs straight without stretching the way acrylic can. Avoid fuzzy or brushed yarns; they fill the open meshes and blur the lotus outline.
- Coral red: 900 g (about 1,566 m) for 4 strips
- Cream: 700 g (about 1,218 m) for 3 strips
One strip uses roughly 186 g (about 324 m). The quantities above include a margin for your gauge swatch and small tension differences.
Tools:
- 5.0 mm (H-8) crochet hook
- Tapestry needle
- Scissors
- Stitch markers (4 or more)
- Measuring tape
- Rust-proof pins and a long blocking surface (towels on a floor or bed work well)
- Spray bottle
- Curtain rod or tension rod up to 1.5 in (3.8 cm) in diameter
Abbreviations (US Terms)
- ch – chain
- sl st – slip stitch
- sc – single crochet
- dc – double crochet
- sk – skip
- sp – space
- st(s) – stitch(es)
- RS – right side
Special stitches:
- Open mesh (O): ch 2, sk next 2 sts, dc in next dc.
- Block (X): over an open mesh below, work 2 dc in the ch-2 sp, then dc in next dc. Over a block below, dc in each of the next 3 dc.
Every row begins with ch 3, which counts as the first dc. Each row is then 11 meshes, open or solid, so every row has exactly 1 + (11 x 3) = 34 sts, with each ch counted as a st.
Gauge and Checkpoints
Gauge: 8 meshes and 8 rows = 4 in (10.2 cm) in filet mesh. One mesh is 0.5 in (1.3 cm) square.
Make one full strip before starting the other six. It is your real gauge swatch, and it tells you whether your yarn quantities are right.
Checkpoints:
- After Row 1: 34 dc, width 5.5 in (14.0 cm).
- After Row 13 (first lotus repeat done): height 6.5 in (16.5 cm).
- After Row 73: height 36.5 in (92.7 cm), halfway.
- After Row 146: 5.5 in x 73 in (14.0 cm x 185.4 cm).
- After border: 6 in x 73.5 in (15.2 cm x 186.7 cm).
If your strip is too big: go down a hook size, to 4.5 mm. If it is too small: go up to 5.5 mm. If only the length is off, look at your dc height, since tall, loose dc lengthen every row. Over 146 rows, an error of 1/16 in (0.2 cm) per row adds up to more than 9 in (22.9 cm), so check the 6.5 in (16.5 cm) checkpoint carefully.
The Lotus Chart in Words
The meshes are numbered 1 to 11 across the strip. The motif is symmetrical, so it reads the same whichever direction a row travels. Any mesh not listed is open (O).
One lotus repeat is 12 rows:
- Repeat Rows 1–2: all 11 open.
- Repeat Row 3 (M1, base): blocks at 4–8. (5 blocks, 6 open)
- Repeat Row 4 (M2): blocks at 2–3, 5–7, 9–10. (7 blocks, 4 open)
- Repeat Row 5 (M3): blocks at 1–2, 4, 6, 8, 10–11. (7 blocks, 4 open)
- Repeat Row 6 (M4): blocks at 3–4, 6, 8–9. (5 blocks, 6 open)
- Repeat Row 7 (M5): blocks at 3, 5–7, 9. (5 blocks, 6 open)
- Repeat Row 8 (M6): blocks at 5–7. (3 blocks, 8 open)
- Repeat Row 9 (M7): blocks at 5–7. (3 blocks, 8 open)
- Repeat Row 10 (M8, tip): block at 6. (1 block, 10 open)
- Repeat Rows 11–12: all 11 open.
Here is how the shape forms. The outer petals rise from the base at 2–3 and 9–10 and flare out to the edges at 1–2 and 10–11. The side petals start at 4 and 8, lean out to 3–4 and 8–9, and end in tips at 3 and 9. The center petal narrows to a single block at 6, swells to 5–7 for three rows, and comes to a point at 6.
Strip Pattern
Foundation: Ch 36.
Row 1 (solid edge row): Dc in 4th ch from hook (sk ch count as first dc) and in each ch across. Turn. (34 sts: 11 blocks)
Row 2 (open): Ch 3 (counts as dc), [ch 2, sk 2, dc in next dc] 11 times, working the last dc in the top of the turning ch. Turn. (34 sts: 11 open meshes)
Rows 2–13: These rows are the first lotus repeat. Row 2 above is Repeat Row 1. Continue with Repeat Rows 2–12 from the chart, starting each row with ch 3 and working the 11 meshes in order. Every row ends with a dc in the top of the turning ch. Turn at the end of each row. (34 sts every row)
Rows 14–145: Work Repeat Rows 1–12 eleven more times. This gives 12 lotus flowers in all. (34 sts every row)
Count the solid blocks on each motif row as you go: 5, 7, 7, 5, 5, 3, 3, 1. If a count is off, the petal shape will look wrong, so check it at the end of the row before you turn.
Row 146 (solid edge row): Ch 3, [2 dc in ch-2 sp, dc in next dc] 11 times. Do not fasten off. (34 sts: 11 blocks)
Row count check: 1 solid + (12 repeats x 12 rows) + 1 solid = 146 rows. At 0.5 in (1.3 cm) per row, that is 73 in (185.4 cm).
Make All Pieces
Make 7 identical strips:
- Coral red: 4 strips
- Cream: 3 strips
Layout (left to right on the rod):
| R | C | R | C | R | C | R |
R = coral red, C = cream. The red strips sit at both outer edges, which frames the doorway in the stronger color.
Joining (Hanging, Not Seaming)
The strips are not stitched to one another. Each one hangs from its own two loops, so the curtain parts wherever a hand pushes through. The only “joining” step is adding the loops evenly, so that all seven strips hang at exactly the same height.
Loop placement: Work the loops after the border (below). With the RS facing and the top edge up, number the 34 border sc along the top edge from 1 to 34, starting from the right, and leave the corners out. Place markers in sc 3, 8, 27 and 32.
Loop (make 2 per strip):
- Row 1: Join yarn with sl st in marked sc 3. Ch 18, sk next 4 sc, sl st in sc 8. Turn.
- Row 2: Work 26 sc into the ch-18 loop, sl st in sc 3. Fasten off. (26 sc)
Repeat the loop over sc 27 to 32. Two sc sit outside each loop (sc 1–2 and 33–34), so the loops are mirror images and the strip hangs level.
Tension: The 26 sc should pack the chain firmly and make the loop arch upright. If the loop twists, your sc are too tight, so redo it with 28 sc. If it ruffles, use 24.
Size checkpoint: Each loop stands about 2 in (5.1 cm) tall and fits a rod up to 1.5 in (3.8 cm) in diameter. The total drop from rod to hem is about 75.5 in (191.8 cm).
Border
Border gauge: 1 sc per st along the short edges, and 2 sc per dc row end along the long edges.
Round 1 (RS): You are still at the end of Row 146. Ch 1, turn so the RS faces you, and work as follows:
- Top edge: sc in each of the 34 sts of Row 146. (34 sc)
- Corner: ch 1.
- Long side: work 2 sc around the post of each row end, for 146 rows. (292 sc)
- Corner: ch 1.
- Bottom edge: sc in the underside of each of the 34 foundation ch. (34 sc)
- Corner: ch 1.
- Long side: 2 sc around each row-end post, for 146 rows. (292 sc)
- Corner: ch 1, and join with sl st to the first sc.
Round total: 34 + 292 + 34 + 292 = 652 sc, plus 4 ch-1 corner spaces. Fasten off and weave in the end.
There are no extra stitches added at the corners beyond the ch-1, so each side count is exactly the number of sts or row ends it covers.
Why the math works: On the short edges, 1 sc per st keeps the width at 34 sts, so the edge neither flares nor pulls. On the long edges, a dc row is about as tall as two sc are wide, so 2 sc per row end matches the height of each row. 292 sc follow the 73 in (185.4 cm) edge exactly, without rippling or puckering. The single sc round adds 0.25 in (0.6 cm) on each edge, which takes the strip from 5.5 in x 73 in to 6 in x 73.5 in (14.0 cm x 185.4 cm to 15.2 cm x 186.7 cm).
Final Blocking
- Weave in all ends along the solid blocks or the border, never across an open mesh.
- Soak the strip in cool water for 10 minutes. Gently press out the water, then roll it in a towel.
- Lay the strip flat on your blocking surface, RS up.
- Pin the two corners at the hem 6 in (15.2 cm) apart. Then pin the top corners to the same width, 73.5 in (186.7 cm) above.
- Pin along both long edges every 4 in (10.2 cm), keeping them straight.
- Square up the meshes with your fingers so each one is 0.5 in (1.3 cm) and the vertical dc posts line up.
- Ease each lotus flat and open the gaps between the petals.
- Leave the strip to dry completely, then unpin it. Block all seven strips to the same pin marks.
Final Quality-Control Checklist
- Every row has 34 sts and 11 meshes.
- Each strip has 12 complete lotus flowers, centered on mesh 6.
- The solid edge rows (Row 1 and Row 146) are straight and even.
- Border Round 1 has 652 sc and 4 ch-1 corners.
- Each strip measures 6 in x 73.5 in (15.2 cm x 186.7 cm) after blocking.
- Both loops sit at sc 3–8 and 27–32 on the top edge.
- All seven strips are within 0.5 in (1.3 cm) of each other in length.
- There are 4 red and 3 cream strips, and the layout starts and ends with red.
Troubleshooting
The strip leans or twists. You may be skipping the turning-ch dc at the row end. The last dc of every row goes in the top of the ch-3.
The meshes are rectangles, not squares. Your dc are taller than 2 ch are wide. Try ch 2 slightly looser, or use a dc with a shorter yarn-over pull-up.
The lotus looks lopsided. A block is in the wrong column. Count the meshes from the edge on each motif row, and compare your block count to 5, 7, 7, 5, 5, 3, 3, 1.
The long edges ripple after the border. You have more than 2 sc per row end. Pull back and recount to 292.
The long edges pull in. Your sc are too tight around the posts. Loosen your tension, but do not add stitches.
The strips are different lengths. Re-block the long ones shorter and the short ones longer. Cotton gives about 1 in (2.5 cm) either way.
Care
Hand wash or machine wash on a cool gentle cycle inside a mesh bag. Then reshape the strips and dry them flat so the length stays true.
Final Notes
The whole curtain rests on a short measurement chain: 0.5 in (1.3 cm) meshes give a 5.5 in (14.0 cm) strip width over 11 meshes and 73 in (185.4 cm) of length over 146 rows. One sc border round brings each strip to 6 in x 73.5 in (15.2 cm x 186.7 cm). Seven strips span about 42 in (106.7 cm) of rod. Check your gauge on the first strip, keep the 34-stitch count steady, and the lotuses will line up from top to bottom on every strip.
Happy crocheting!