

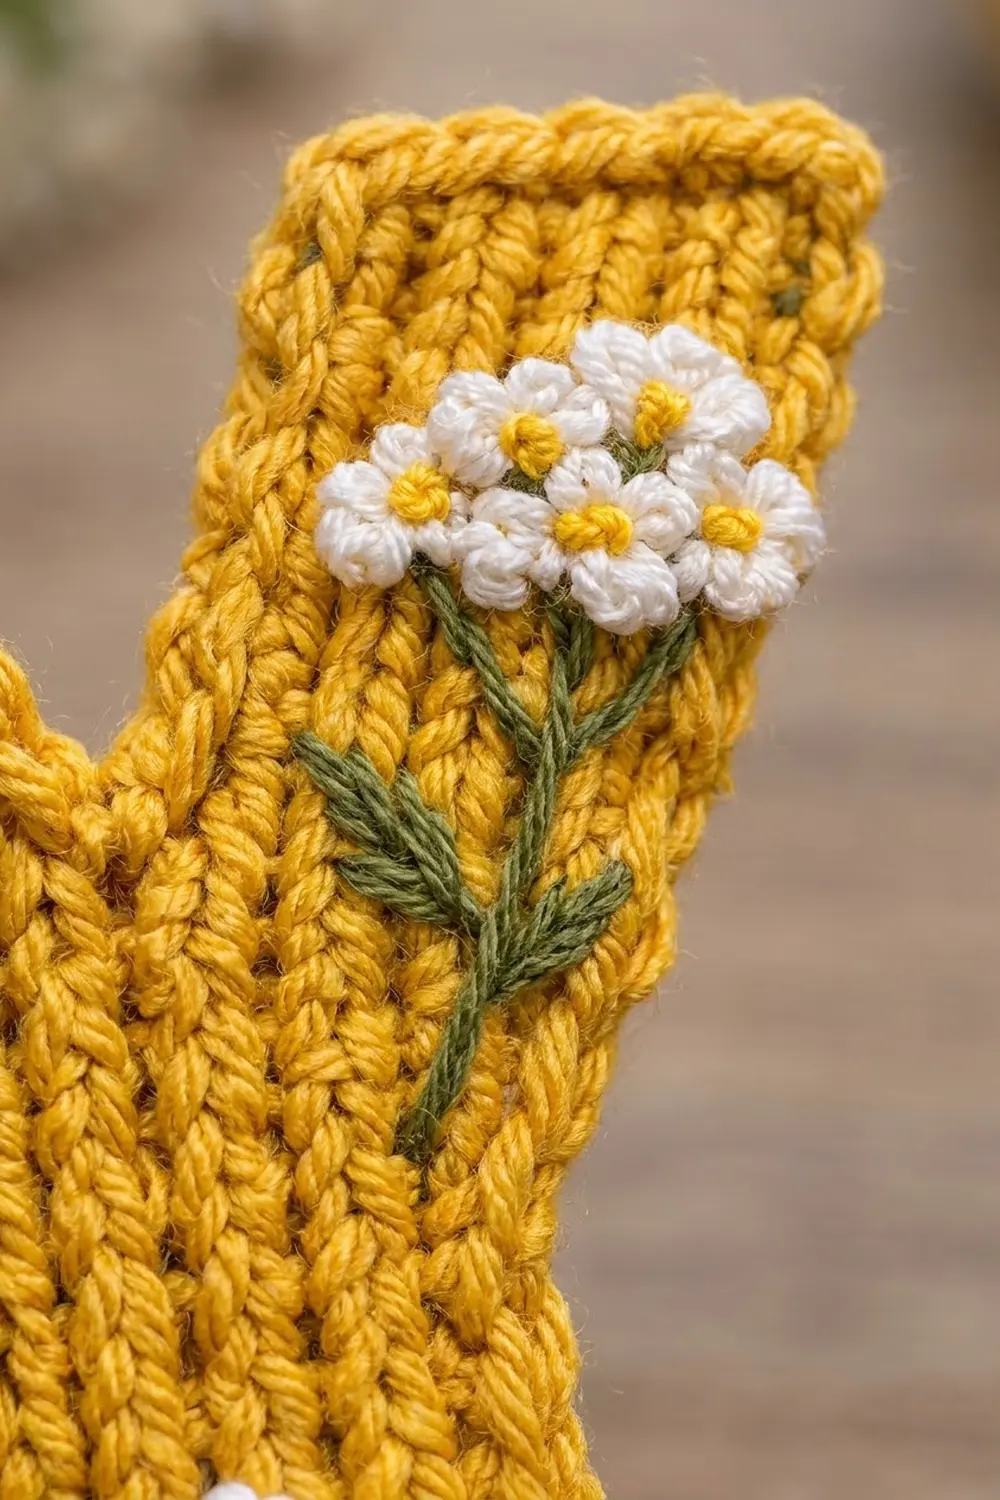
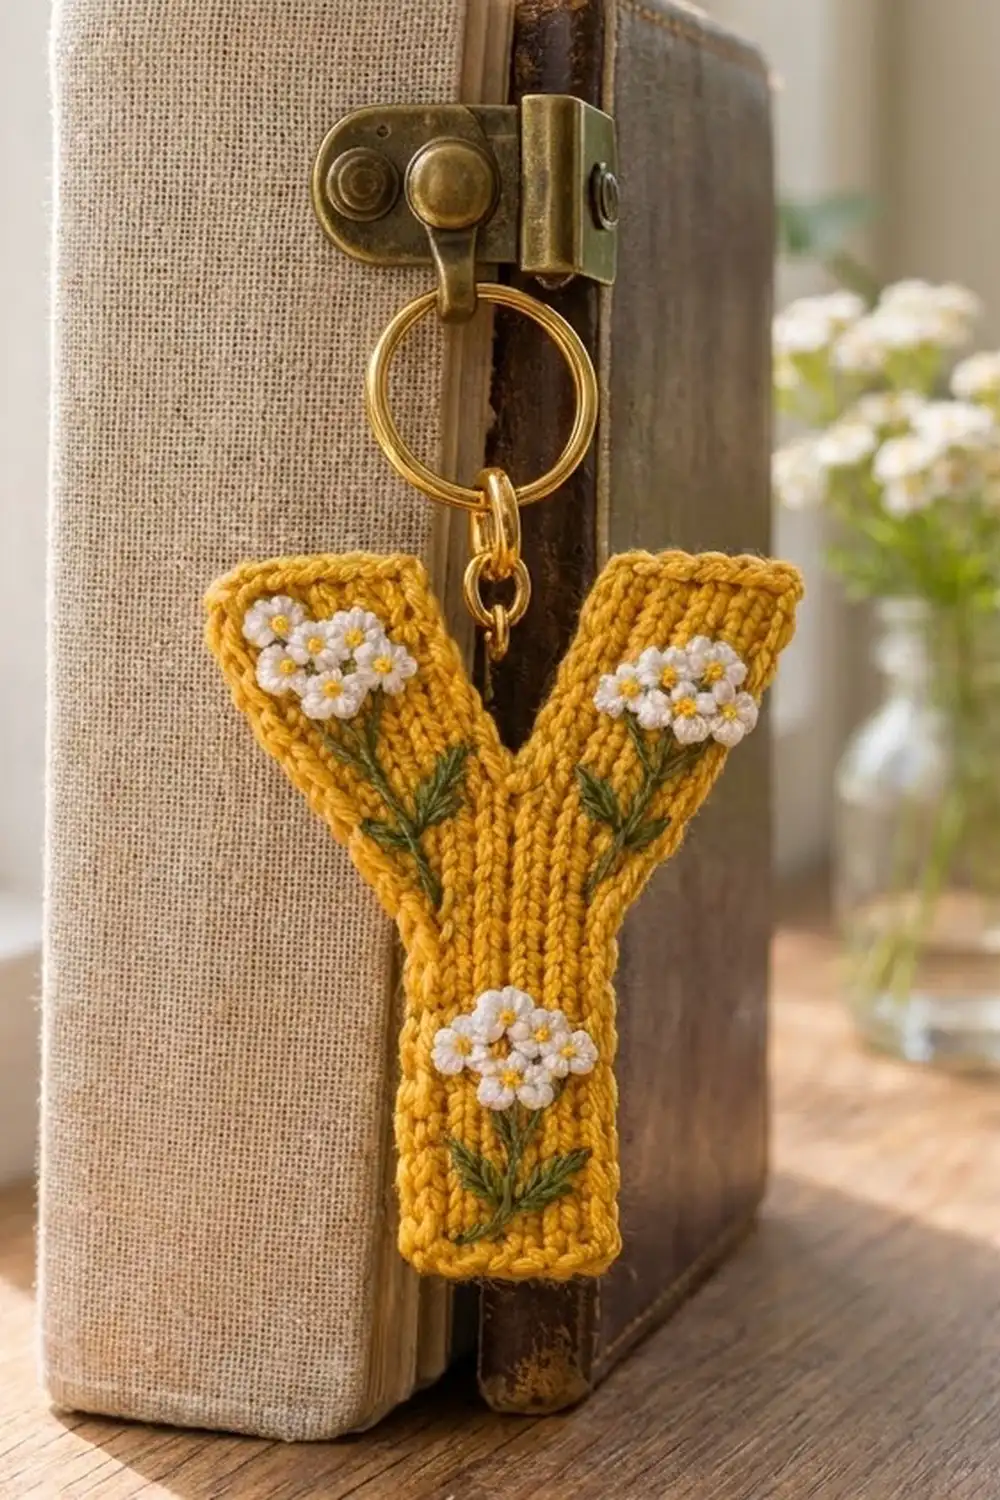
This little letter Y keychain combines a warm mustard yellow with a sprinkle of white yarrow-style flowers. The fabric looks knitted, with neat vertical columns of V’s that run straight up the stem and lean outward along each arm. It works well as a personalized bag charm, a bookmark tag, or a small gift for anyone whose name starts with Y.
The palette is short and cheerful: mustard for the letter, white for the petals, golden yellow for the flower centers, and olive green for the stems and leaves. The style is cottagecore and botanical. Simple embroidery sits on a crisp, structured base.
The pattern uses US crochet terms. The finished keychain measures 3.8 in (9.7 cm) wide across the arm tops and 4.0 in (10.2 cm) tall, not counting the ring.
Construction is simple. You work the letter in one piece in Tunisian knit stitch, from the bottom of the stem up. You widen it for three rows, then split it and work each arm separately with a gentle outward slant. One round of single crochet frames the outline. After that you embroider the flowers, block the piece, and attach the ring.
Finished Size and Construction
- Finished size: 3.8 in (9.7 cm) wide x 4.0 in (10.2 cm) tall
- Skill level: Intermediate (basic Tunisian crochet plus simple embroidery)
- Terminology: US crochet terms
- Yarn weight: DK (light, #3)
- Hooks: 4.0 mm Tunisian hook (short or standard length) and a 3.5 mm standard hook
- Number of pieces: 1
- Layout: a single letter Y, worked bottom to top
- Piece size before border: 3.4 in (8.6 cm) wide x 3.6 in (9.1 cm) tall
- Border depth: 0.2 in (0.5 cm) on every edge, which adds 0.4 in (1.0 cm) to each overall dimension
Materials
Pick a smooth DK yarn with good stitch definition. Cotton blends and soft acrylics both work well. Avoid fuzzy or very splitty yarn, because the knit-look columns are the main feature of the design.
Yarn and thread:
- Mustard yellow (main color, DK): 8 g / 18 m
- White or cream (petals), embroidery floss or fingering cotton: 1 g / 4 m
- Golden yellow (flower centers), embroidery floss: 1 g / 1 m
- Olive green (stems and leaves), embroidery floss: 1 g / 3 m
All quantities include a comfortable margin for a gauge swatch and weaving in ends.
Tools:
- 4.0 mm Tunisian hook
- 3.5 mm standard crochet hook
- Blunt tapestry needle for weaving in ends
- Sharp embroidery needle
- Gold split key ring, about 1.25 in (3.2 cm) across, with a short chain and a jump ring
- Small pliers for opening the jump ring
- Rust-proof pins, a blocking board, and a steamer or spray bottle
- Scissors and a ruler
Abbreviations (US Terms)
- ch – chain
- sc – single crochet
- sl st – slip stitch
- st(s) – stitch(es)
- FwP – forward pass
- RetP – return pass
- Tss – Tunisian simple stitch
- Tks – Tunisian knit stitch
- Tks2tog – Tunisian knit stitch two together
- M1 – make one (Tunisian increase)
- RS – right side
Special stitches
- Standard RetP: Yo, pull through 1 loop. *Yo, pull through 2 loops; repeat from * until 1 loop remains on the hook.
- Tks: Insert the hook from front to back between the front and back vertical bars of the next st, below the horizontal chain. Yo and pull up a loop.
- Tks2tog: Insert the hook as for Tks through the next 2 sts at once. Yo and pull up 1 loop. This decreases 1 st.
- M1: Insert the hook under the horizontal strand between the current st and the next st. Yo and pull up a loop. This increases 1 st.
- Last st: Insert the hook under the final vertical bar and the strand behind it. Yo and pull up a loop.
- Bind-off: *Insert the hook as for Tks, yo, and pull through both the st and the loop on the hook; repeat from * across.
In Tunisian crochet, the loop already on the hook at the start of each FwP counts as the first stitch. The count after each row is the number of loops on the hook at the end of the FwP.
Gauge and Checkpoints
Gauge: 10 sts and 10 rows of Tks = 2 in (5.1 cm), or 5 sts and 5 rows per inch (2.5 cm). Block the swatch lightly before measuring.
Because there is only one piece, make a quick swatch first: ch 10, then work 10 rows of Tks. Steam it flat. If it measures 2 in (5.1 cm) both ways, your Y will come out at the stated size.
Checkpoints while you work (measured lightly flattened):
- After Row 8: stem is 1.0 in (2.5 cm) wide and 1.6 in (4.1 cm) tall.
- After Row 11: piece is 2.2 in (5.6 cm) wide at the top and 2.2 in (5.6 cm) tall.
- After Row 18 (both arms): piece is 3.4 in (8.6 cm) across the arm tops and 3.6 in (9.1 cm) tall.
- After the border: piece is 3.8 in (9.7 cm) x 4.0 in (10.2 cm).
If your piece is too big, go down 0.5 mm on the Tunisian hook. If it is too small, go up 0.5 mm. Tunisian knit stitch packs tightly, so many crocheters need a hook 1 mm larger than the yarn label suggests. Keep each RetP relaxed so the rows don’t squash together.
Pattern: The Letter Y
Use the 4.0 mm Tunisian hook and mustard yarn. Work every row with the RS facing you and never turn.
Stem
Foundation: Ch 5.
Row 1: FwP: Skip the first ch from the hook. Pull up a loop in the back bump of each remaining ch. (5 loops) RetP: Standard RetP.
Row 2: FwP: Tss in the next 3 sts, then work the last st. (5 sts) RetP: Standard RetP.
The Tss row gives the Tks columns a firm base.
Rows 3–8: FwP: Tks in the next 3 sts, then work the last st. (5 sts) RetP: Standard RetP.
Checkpoint: the stem should be 1.0 in (2.5 cm) wide and 1.6 in (4.1 cm) tall.
Widening
Row 9: FwP: M1, Tks in the next 3 sts, M1, then work the last st. (7 sts) RetP: Standard RetP.
Row 10: FwP: M1, Tks in the next 5 sts, M1, then work the last st. (9 sts) RetP: Standard RetP.
Row 11: FwP: M1, Tks in the next 7 sts, M1, then work the last st. (11 sts) RetP: Standard RetP.
Each widening row adds exactly 1 st at each edge, so the stem flares evenly into the crotch of the Y.
Right Arm (first arm worked)
The FwP runs right to left, so the first arm you work is the one on the right as you look at the RS.
Row 12: FwP: Using the loop on the hook as st 1, Tks in the next 3 sts. Work st 5 as a last st, inserting under both of its vertical bars. Leave sts 6–11 unworked. (5 sts) RetP: Standard RetP.
Row 13 (shift row): FwP: M1, Tks in the next st, Tks2tog, then work the last st. (5 sts) RetP: Standard RetP.
The increase is on the outer (right) edge and the decrease is on the inner (left) edge. The count stays at 5, but the arm moves 1 st outward.
Row 14: FwP: Tks in the next 3 sts, then work the last st. (5 sts) RetP: Standard RetP.
Rows 15–18: Repeat Rows 13–14 twice. (5 sts each row)
That gives three shift rows in total (Rows 13, 15, and 17), so the right arm moves 3 sts outward.
Bind-off: Bind off across all 5 sts. Fasten off, leaving a 4 in (10.2 cm) tail.
Left Arm
Row 12: With the RS facing, skip the center st (st 6) of Row 11. Insert the hook as for Tks into st 7, pull up a loop of mustard, and count this loop as st 1. Tks in sts 8–10, then work st 11 as the last st. (5 sts) RetP: Standard RetP.
The skipped center st forms the base of the V notch.
Row 13 (shift row): FwP: Tks2tog, Tks in the next st, M1, then work the last st. (5 sts) RetP: Standard RetP.
This time the decrease is on the inner (right) edge and the increase is on the outer (left) edge, so this arm mirrors the right one.
Row 14: FwP: Tks in the next 3 sts, then work the last st. (5 sts) RetP: Standard RetP.
Rows 15–18: Repeat Rows 13–14 twice. (5 sts each row)
Bind-off: Bind off across all 5 sts. Fasten off.
Width math: At Row 11 the piece is 11 sts wide. Each arm moves 3 sts outward, which adds 6 sts to the span: 11 + 6 = 17 sts, or 3.4 in (8.6 cm). The notch opens from 1 st at Row 11 to 7 sts at the top: 1 + 3 + 3 = 7. So across the top you have 5 arm sts + 7 gap sts + 5 arm sts = 17 sts.
Height math: Rows 1–11 form the stem and widening, 11 rows or 2.2 in (5.6 cm). Rows 12–18 form the arms, 7 rows or 1.4 in (3.6 cm). The total is 18 rows, or 3.6 in (9.1 cm).
Weave in the tails on the WS. Tunisian knit stitch curls, so press the piece flat under your palm and steam it lightly before starting the border.
Border
Border gauge: 5 sc per inch (2.5 cm) along every edge with the 3.5 mm hook. This matches the Tks row gauge of 5 rows per inch, so 1 sc per row-end lies flat.
Corner rule: Work 3 sc into each of the 6 outer corner sts: the 2 bottom corners of the stem and the 2 top corners of each arm. Each edge count below already includes its corner sc, so no stitch is counted twice.
Rnd 1: With the RS facing and the 3.5 mm hook, join mustard with a sl st in the bottom-right corner st of Row 1. Ch 1, then work around the outline in this order:
- Bottom edge (5 foundation sts): 3 sc in the corner st, 1 sc in each of the next 3 sts, 3 sc in the corner st. (9 sc)
- Left outer side: 1 sc in each row-end of Rows 2–17. (16 sc)
- Left arm top (5 bound-off sts): 3 sc in the corner st, 1 sc in each of the next 3 sts, 3 sc in the corner st. (9 sc)
- Notch: 1 sc in each row-end down the left arm’s inner edge (Rows 17–12, 6 sc), 1 sc in the skipped center st of Row 11, then 1 sc in each row-end up the right arm’s inner edge (Rows 12–17, 6 sc). (13 sc)
- Right arm top: 3 sc in the corner st, 1 sc in each of the next 3 sts, 3 sc in the corner st. (9 sc)
- Right outer side: 1 sc in each row-end of Rows 17–2. (16 sc)
Join with a sl st to the first sc. (72 sc total) Fasten off and weave in the ends.
Why the math works:
- Each straight edge gets exactly 1 sc per stitch or row-end.
- The extra 2 sc in each convex corner keep the corners square without flaring.
- The single sc in the notch keeps the V sharp instead of puckered.
- Adding up the edges: 9 + 16 + 9 + 13 + 9 + 16 = 72.
- The border adds 0.2 in (0.5 cm) on every side. That makes the piece 3.4 + 0.4 = 3.8 in (9.7 cm) wide and 3.6 + 0.4 = 4.0 in (10.2 cm) tall.
Embroidery
Use a sharp needle. Work through the front layer of the Tks columns only, so nothing shows on the back. Each flower is about 0.25 in (0.6 cm) across.
Flower clusters (make 3):
- Placement: Center one cluster near the top of each arm, 0.25 in (0.6 cm) below the border. Center the third on the lower stem, about 1.4 in (3.6 cm) above the bottom edge.
- Petals: With white, make 5 tiny straight stitches radiating from a shared center point, each 0.1 in (0.3 cm) long. Make 5 or 6 flowers per cluster, packed so their petals touch to form a rounded dome.
- Centers: With golden yellow, work one French knot (2 wraps) in the middle of each flower.
Stems and leaves:
- Arm clusters: Use olive green and 2 strands. Make one straight-stitch stem 0.75 in (1.9 cm) long that runs from the base of the cluster down and slightly toward the notch, following the slant of the arm.
- Stem cluster: Make a stem 0.75 in (1.9 cm) long running straight down toward the bottom edge.
- Leaves: Along each stem, work 3 or 4 small fly stitches that open upward. This gives the feathery, fern-like leaves.
Secure every floss end with a small backstitch on the WS and trim it.
Final Blocking
- Mist the piece lightly with water, or hover a steam iron 0.5 in (1.3 cm) above it. Do not press the embroidery flat.
- Lay it RS up on a gridded blocking board.
- Pin the 2 bottom corners 1.4 in (3.6 cm) apart, which is the stem width with its border.
- Pin the 2 outer top corners of the arms 3.8 in (9.7 cm) apart, 4.0 in (10.2 cm) above the bottom edge.
- Pin the bottom of the notch and both inner arm corners to sharpen the V.
- Run a ruler along each edge to check that it is straight, then leave the piece to dry completely.
- Unpin it. Open the jump ring, pass it through the border sc at the inner top corner of the left arm, add the chain and split ring, and close the jump ring firmly.
Final Quality-Control Checklist
- The finished piece measures 3.8 in (9.7 cm) x 4.0 in (10.2 cm).
- The Tks columns run straight up the stem and lean evenly along both arms.
- Each arm is 5 sts wide and has exactly 3 shift rows.
- The border has 72 sc, with 3 sc in each of the 6 outer corners.
- The notch forms a clean V with no hole.
- There are 3 flower clusters, each with 5 or 6 flowers, yellow centers, and leafy green stems.
- No floss or yarn ends show on the RS.
- The jump ring is fully closed and attached through the border, not just the edge strand.
Troubleshooting
- The piece curls badly: Tks naturally rolls. Go up 0.5 mm on the hook, keep the RetP loose, and steam firmly before adding the border.
- The arms lean unevenly: Check that every shift row pairs one M1 with one Tks2tog. The count must stay at 5 sts.
- There is a hole at the crotch: Work the notch sc snugly into the skipped center st, or catch the gap closed with a stitch of mustard on the WS.
- The border ruffles: You are adding extra sc along the sides. Recount: 16 per outer side and 6 per inner arm edge.
- The border pulls in: Use a hook 0.5 mm larger for the border round.
- The flowers look flat: Use 2 wraps per French knot and keep the petals short so they cluster tightly.
Care
Spot clean or hand wash in cool water. Then reshape the piece and dry it flat. Remove the metal ring before washing so it doesn’t rust or stain the yarn.
Final Notes
The measurement chain runs like this:
- A gauge of 5 sts and 5 rows per inch gives a 5-st stem that is 1.0 in (2.5 cm) wide.
- Three widening rows bring it to 11 sts, or 2.2 in (5.6 cm).
- Two 5-st arms with 3 shift rows each make a span of 17 sts, or 3.4 in (8.6 cm), and a height of 18 rows, or 3.6 in (9.1 cm).
- A 72-sc border adds 0.4 in (1.0 cm) each way, for a finished size of 3.8 in (9.7 cm) x 4.0 in (10.2 cm).
If you check your size at each stage, your letter Y will come out crisp, flat, and ready for its little meadow of flowers.
Happy crocheting!