
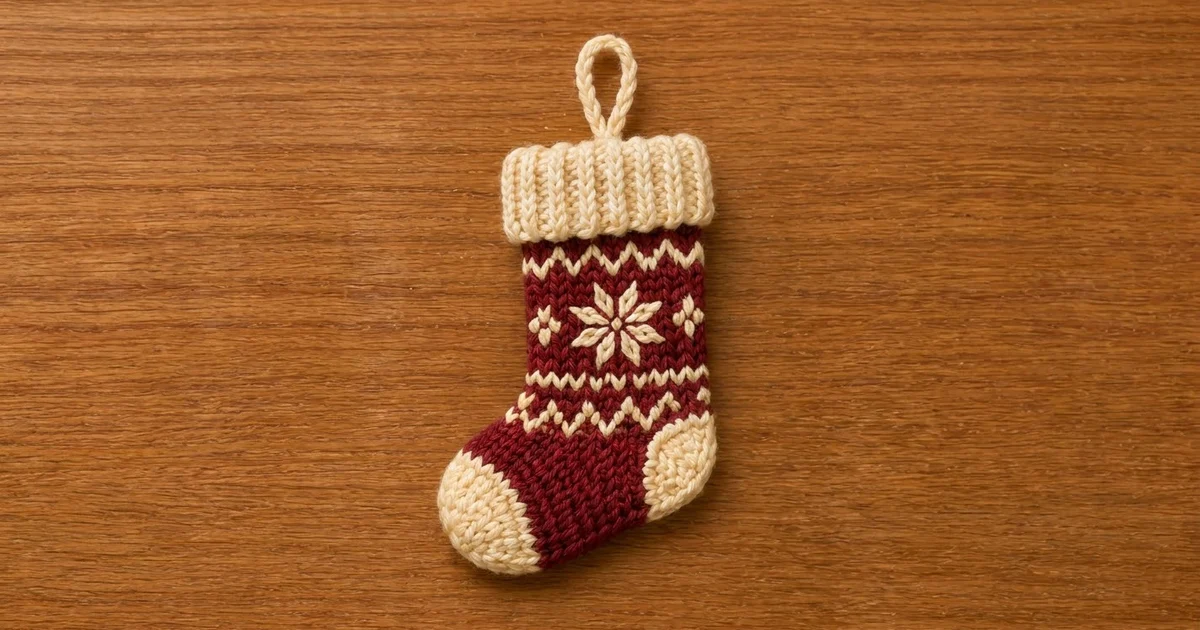
This little stocking brings a cozy Nordic sweater look to your tree. The body is a rich cranberry red worked in waistcoat stitch, which looks almost exactly like knitting. Cream accents finish the toe, the heel, the ribbed cuff and the hanging loop.
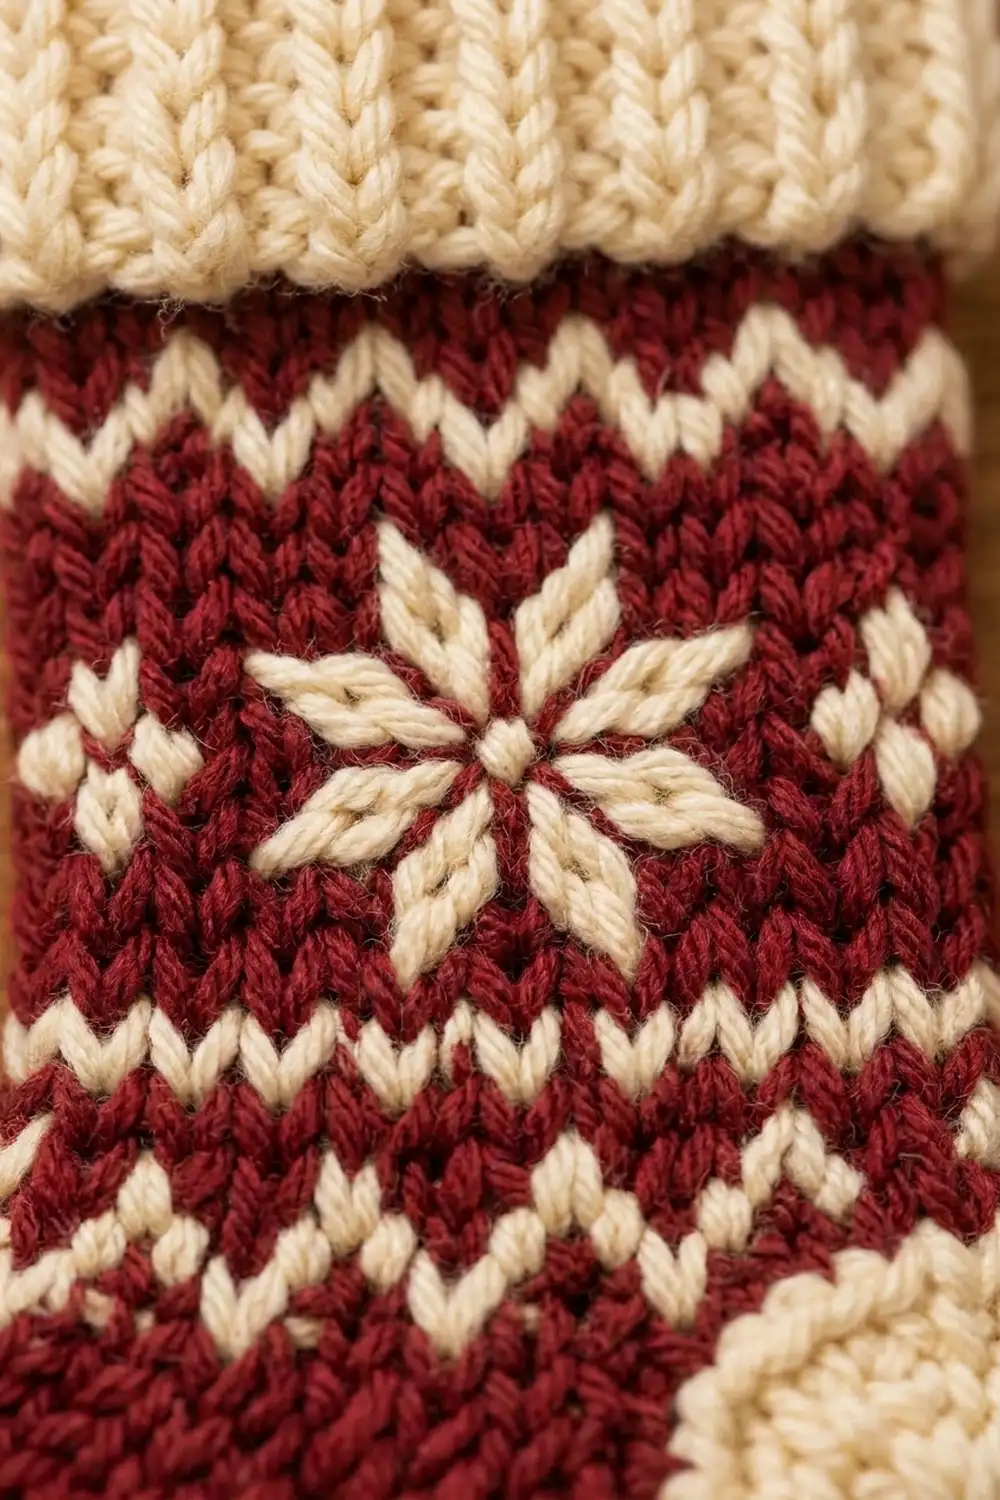
The front has a cream zigzag band, two dashed lines and a hand-embroidered eight-point snowflake with a small diamond on each side. The colors are traditional and the style is Scandinavian.
This pattern uses US crochet terms. The finished stocking is about 5.5 in (14.0 cm) tall without the loop and about 4.5 in (11.4 cm) from toe to heel. The loop adds about 1.5 in (3.8 cm).
The stocking is worked toe-up as a single seamless tube. You start with a cream toe, work the red foot, leave an open gap for the heel and continue up the leg with the colorwork bands. Then you work the cream heel into the gap and attach a sideways-ribbed cuff to the top edge. Embroidery and the hanging loop come last.
Finished Size and Construction
- Finished size: about 5.5 in (14.0 cm) tall × 4.5 in (11.4 cm) toe to heel
- Skill level: Intermediate (waistcoat stitch, simple tapestry colorwork, afterthought heel)
- Terminology: US
- Yarn weight: Worsted (#4)
- Hook: 4.0 mm (G-6)
- Number of pieces: 1 (single seamless stocking)
- Layout: one stocking, laid flat, foot pointing left
- Tube width (flat): 2.8 in (7.1 cm), from 28 sts
- Size before cuff: about 4.4 in (11.2 cm) tall from heel base to the top of the leg
- Cuff (border) depth: 1.2 in (3.0 cm); cuff width (flat) 3.2 in (8.1 cm)
Materials
Choose a smooth worsted-weight yarn with good stitch definition. Wool, wool blends and acrylic all work well. Avoid fuzzy or highly textured yarns, because they hide the V stitches and the snowflake.
- Cranberry red (main color, MC): about 12 g / 24 m (26 yd)
- Cream (contrast color, CC): about 10 g / 20 m (22 yd), which covers the toe, heel, colorwork, cuff, embroidery and loop
The quantities include a margin of roughly 20% for swatching and weaving in ends.
Tools:
– 4.0 mm (G-6) crochet hook
– Tapestry needle
– 4 locking stitch markers
– Scissors
– Measuring tape or ruler
– Pins and a foam blocking mat
– Spray bottle with water
– A little polyester fiberfill (optional, for a gentle 3D shape)
Abbreviations (US Terms)
- ch – chain
- sl st – slip stitch
- sc – single crochet
- inc – 2 sc in the same stitch
- sc2tog – single crochet 2 together
- BLO – back loop only
- st(s) – stitch(es)
- Rnd – round
- MC / CC – main color / contrast color
- wst – waistcoat stitch
Special stitch – waistcoat stitch (wst): Insert the hook through the center of the V of the stitch below, between its two vertical legs, not under the top loops. Yarn over, pull up a loop, yarn over and pull through both loops. Each wst sits directly on top of the one below and builds the knit-look columns.
Color changes: Work the last yarn over of the stitch before the change with the new color. Carry the unused color along the top of the round and work over it, keeping it inside the tube.
Gauge and Checkpoints
Gauge: 20 wst and 22 rnds = 4 in (10.2 cm) worked in the round. That is 5 sts and 5.5 rnds per inch. Plain sc in the toe and heel works up at about the same gauge.
Gauge matters because the stocking is a single tube, and every measurement depends on it. Work the toe and foot first (Rnds 1–9), then check:
- After Rnd 4: the toe circle measures about 1.6 in (4.1 cm) across when flattened.
- After Rnd 9: the tube is 2.8 in (7.1 cm) wide when flat, and the toe plus foot is about 1.6 in (4.1 cm) long.
- After Rnd 28: the distance from Rnd 10 to Rnd 28 is about 3.5 in (8.9 cm).
- After the heel: the heel cup is about 0.9 in (2.3 cm) deep.
- After the cuff: the cuff is 1.2 in (3.0 cm) tall and 3.2 in (8.1 cm) wide when flat.
If the tube is wider than 2.8 in (7.1 cm), go down to a 3.75 mm hook. If it is narrower than 2.6 in (6.6 cm), go up to a 4.5 mm hook. Waistcoat stitch tends to tighten, so keep your loops relaxed.
Pattern
The rounds are joined in a spiral. Mark the first stitch of each round and move the marker up as you go. The round begins at the instep fold, on the left side of the stocking when it lies flat. Stitches 1–14 form the front face and stitches 15–28 form the back.
Toe (CC)
Rnd 1: Magic ring, 7 sc in ring. (7)
Rnd 2: Inc in each st around. (14)
Rnd 3: (Sc 1, inc) × 7. (21)
Rnd 4: (Sc 2, inc) × 7. (28)
Rnd 5: Wst in each st around. (28)
Checkpoint: the toe is a rounded cream cup about 0.9 in (2.3 cm) deep.
Foot (MC)
Change to MC in the last stitch of Rnd 5. Cut CC, leaving a 4 in (10.2 cm) tail.
Rnds 6–9: Wst in each st around. (28)
Heel Opening (MC)
Rnd 10: Wst 7, ch 14, skip the next 14 sts, wst 7. (28: 14 wst + 14 ch)
The skipped stitches (sts 8–21) are centered on the back fold, so the heel will sit on the right when the stocking lies flat.
Rnd 11: Wst 7, sc 1 into each of the 14 ch, wst 7. (28)
Leg and Colorwork
Use waistcoat stitch throughout. All rounds have 28 sts until Rnd 28.
Rnds 12–13 (MC): Wst around. (28)
Rnd 14: (1 CC, 3 MC) × 7. (28)
Rnd 15: (1 MC, 1 CC) × 14. (28)
Rnd 16: (2 MC, 1 CC, 1 MC) × 7. (28)
Rnds 14–16 form the zigzag band. The cream point rises from the low stitch to the two side stitches and then to the peak stitch.
Rnd 17 (MC): Wst around. (28)
Rnd 18: (1 CC, 1 MC) × 14. This is the lower dashed line. (28)
Rnds 19–25 (MC): Wst around. This plain field will hold the snowflake. (28)
Rnd 26: (1 CC, 1 MC) × 14. This is the upper dashed line. (28)
Rnd 27 (MC): Wst around. (28)
Rnd 28 (MC, trim round): (Wst 6, 2 wst in next st) × 4. That is 28 sts worked once each, plus 4 extra = 32. (32)
The four increases fall at sts 7, 14, 21 and 28, so each face gets two. The top of the leg flares slightly to meet the wider cuff. Sl st to the next st and fasten off MC.
Checkpoint: the leg from Rnd 10 to Rnd 28 measures about 3.5 in (8.9 cm).
Heel (CC)
Turn the stocking so the heel opening faces you. The opening has 14 skipped stitches on one edge and the bottom loops of 14 chains on the other.
Rnd 1: Join CC at the corner where the skipped sts meet the chain. Sc 1 into that corner gap. Sc 14 across the skipped sts, sc 1 into the far corner gap, then sc 14 across the bottom loops of the chain. (30)
Place a marker in each corner sc. This divides the round into two sides of 15 sts, each including its corner st.
Rnd 2: (Sc2tog, sc 11, sc2tog) × 2. (26)
Rnd 3: (Sc2tog, sc 9, sc2tog) × 2. (22)
Rnd 4: (Sc2tog, sc 7, sc2tog) × 2. (18)
Rnd 5: (Sc2tog, sc 5, sc2tog) × 2. (14)
Close: Flatten the heel so the two sets of 7 sts line up. Sc 7 through both layers. Fasten off.
Use the tails to close the small holes at the heel corners. Checkpoint: the heel cup is about 0.9 in (2.3 cm) deep.
Snowflake and Diamond Embroidery (CC)
Lay the stocking flat with the front face (sts 1–14) up. Thread CC onto a tapestry needle. Work each stitch over whole V stitches, coming up and going down through the centers of the Vs.
- Center: The center of the snowflake is Rnd 22, between sts 7 and 8. Make one small French knot there.
- Vertical arms: Make a straight stitch from the center up to Rnd 25 and another down to Rnd 19, covering 3 rnds each.
- Horizontal arms: Make a straight stitch from the center out to st 4 and another to st 11, covering 3 sts each.
- Diagonal arms: Make four straight stitches from the center toward Rnd 24/st 5, Rnd 24/st 10, Rnd 20/st 5 and Rnd 20/st 10.
- Arm tips: On each of the four main arms, add a tiny V of two short straight stitches about 1 st below the tip. This gives the snowflake its feathered points.
- Diamonds: Centered on Rnd 22 at st 2 and at st 13, work four short straight stitches around one stitch to form a small diamond.
The finished snowflake is about 1.2 in (3.0 cm) across. Keep the stitches flat and snug, but don’t pull hard enough to pucker the fabric. Weave the ends in on the inside of the tube.
Border: Ribbed Cuff (CC)
The cuff is the border of this piece. It is worked sideways and joined to the top of the leg as you go.
Border gauge: in sc BLO, 5 rows = 1 in (2.5 cm) and 6 sts = 1.2 in (3.0 cm). Rnd 28 has 5 sts per inch, so one cuff row is attached to each leg stitch. The cuff and the leg stay the same length, with no ruffling and no pulling in.
Setup: With the outside of the stocking facing you, join CC with a sl st in st 1 of Rnd 28. Ch 7.
Row 1: Sc in the 2nd ch from the hook and in the next 5 ch (6 sc). Sl st in each of the next 2 sts of Rnd 28, which are sts 2 and 3. Turn.
Row 2: Skip the sl sts. Sc BLO in each of the 6 sc, ch 1, turn. (6)
Row 3: Sc BLO in each of the 6 sc. Sl st in each of the next 2 sts of Rnd 28. Turn. (6)
Rows 4–31: Repeat Rows 2–3. Every odd row joins to 2 new leg sts.
On Row 31, the two sl sts go into st 32 and back into st 1 (the setup st).
Row 32: Repeat Row 2 without the ch 1.
Per-side count: there are 32 rows in total, with 16 rows on the front face and 16 on the back. The odd rows (1, 3 … 31) make 16 joining visits of 2 sts each, which is 32 sts. That matches Rnd 28’s 32 sts exactly.
Close: Hold Row 32 against the foundation chain. Sl st them together through the BLO of Row 32 and the free loops of the chain (6 sl sts). Fasten off.
The finished cuff is 6.4 in (16.3 cm) around and 3.2 in (8.1 cm) wide when flat. It is 1.2 in (3.0 cm) tall, with 16 vertical ribs (one for each pair of rows).
Hanging Loop (CC)
Flatten the stocking so the folds line up with the toe and heel. Find the center of the cuff’s top edge on the back layer, at about the 24th row end.
Join CC there with a sl st and ch 20. Sl st back into the same row end, then sl st once more into the next row end to secure the loop. Fasten off.
The loop stands about 1.5 in (3.8 cm) tall.
Final Blocking
- Weave in all remaining ends on the inside. If you like, add a small pinch of fiberfill to the foot and leg for a soft 3D shape. Keep it light so the stocking stays flat.
- Lay the stocking on the blocking mat with the front face up and the foot pointing left.
- Pin the leg to 2.8 in (7.1 cm) wide and the cuff to 3.2 in (8.1 cm) wide.
- Shape the toe and heel into smooth curves, and pin the overall height to 5.5 in (14.0 cm).
- Mist evenly with water until damp, not soaked.
- Pat the snowflake flat and straighten the zigzag and dashed lines.
- Let it dry completely, which takes about 4–6 hours, then unpin.
Final Quality-Control Checklist
- [ ] Tube width is 2.8 in (7.1 cm) flat and the cuff is 3.2 in (8.1 cm) flat
- [ ] Total height is about 5.5 in (14.0 cm) without the loop
- [ ] The heel sits on the right and the toe points left
- [ ] Zigzag points are evenly spaced (7 repeats around)
- [ ] Both dashed lines are unbroken (14 cream dashes each)
- [ ] The snowflake is centered on the front, with matching diamonds on each side
- [ ] The cuff has 32 rows, with ribs running vertically
- [ ] There are no holes at the heel corners
- [ ] The loop is centered and firmly anchored
- [ ] No carried strands show on the outside
Troubleshooting
The tube is too tight or the fabric curls. Waistcoat stitch pulls in. Loosen your pull-up loop or go up a hook size for the MC rounds.
Cream shows through the red. Carry the unused color at the back of the stitch and work over it firmly.
There are gaps at the heel corners. Pick up an extra loop at each corner on Heel Rnd 1 and decrease it on Rnd 2. You can also close the gaps with the yarn tail.
The cuff ruffles or pulls in. Make sure every odd row joins to exactly 2 leg sts. Count your rows: there should be 32.
The snowflake puckers. Your embroidery is too tight. Remove it and stitch again with a relaxed tension.
The zigzag looks off. Check that Rnd 16 starts with 2 MC, so each peak sits directly above the cream stitch from Rnd 14.
Care
Hand wash in cool water, press out the water in a towel, and dry flat, reshaping as needed. Store flat or hanging, away from direct sunlight.

Final Notes
Everything in this stocking follows from one measurement chain:
- Gauge of 5 sts and 5.5 rnds per inch
- 28-st tube, 2.8 in (7.1 cm) wide when flat
- Toe and foot about 1.6 in (4.1 cm)
- Leg about 3.5 in (8.9 cm)
- Heel about 0.9 in (2.3 cm)
- Trim round to 32 sts, met by 32 cuff rows to make a 3.2 in (8.1 cm) wide cuff, 1.2 in (3.0 cm) tall
- Finished stocking about 5.5 in (14.0 cm) tall and 4.5 in (11.4 cm) long
Check your gauge first, and the rest will fall into place. Make one for the tree, a gift tag or a cozy mantel display.
Happy crocheting!