

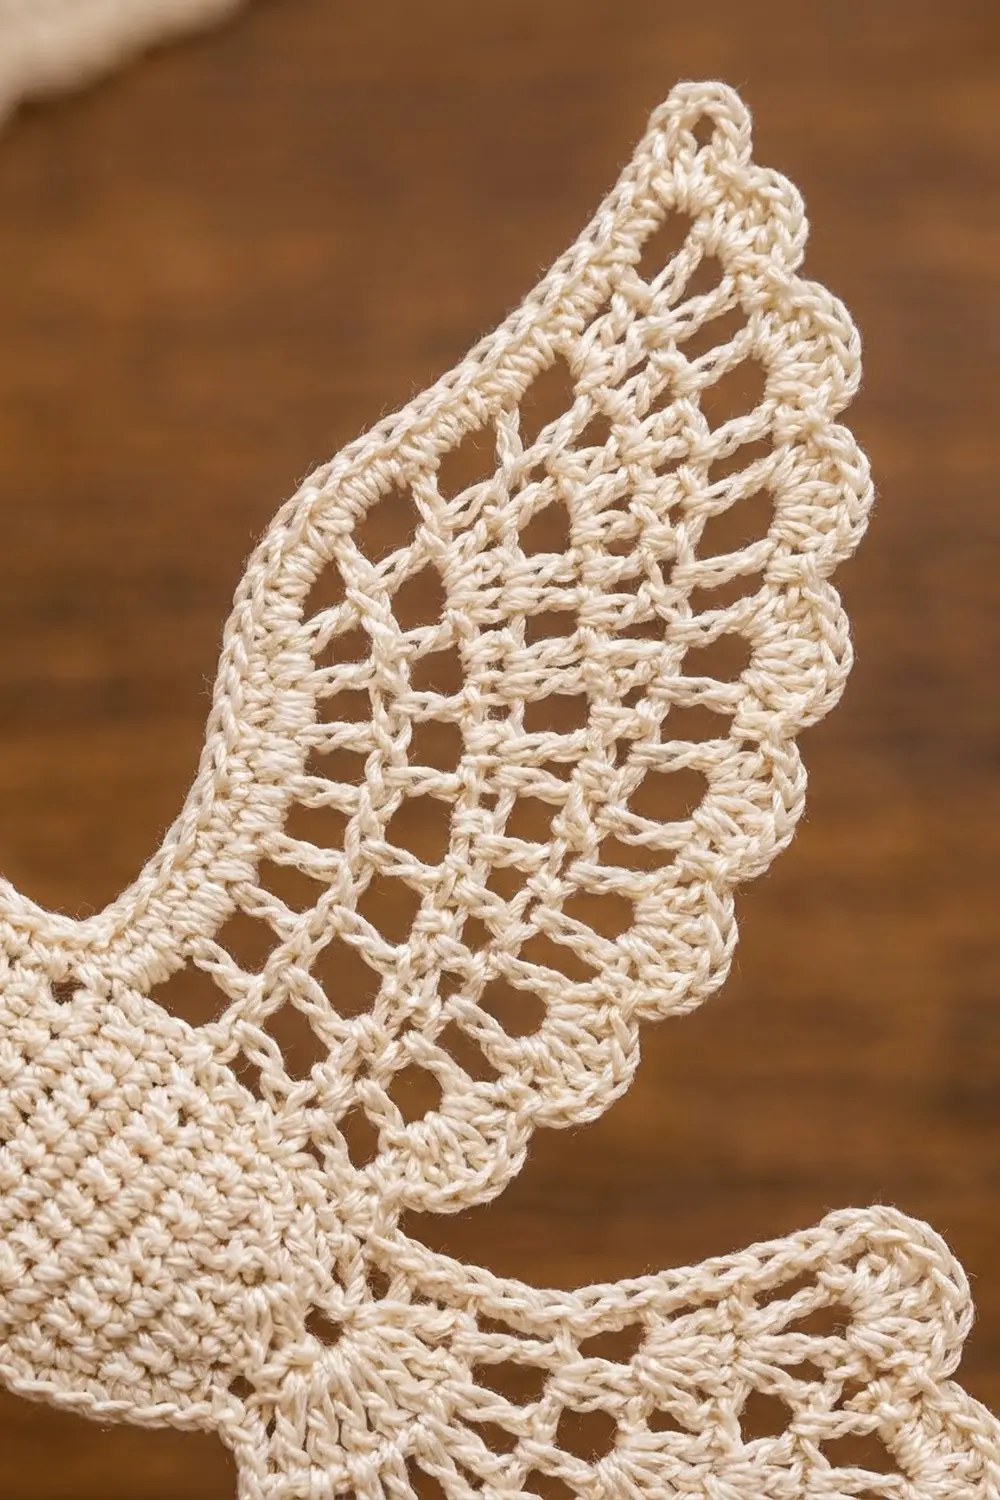
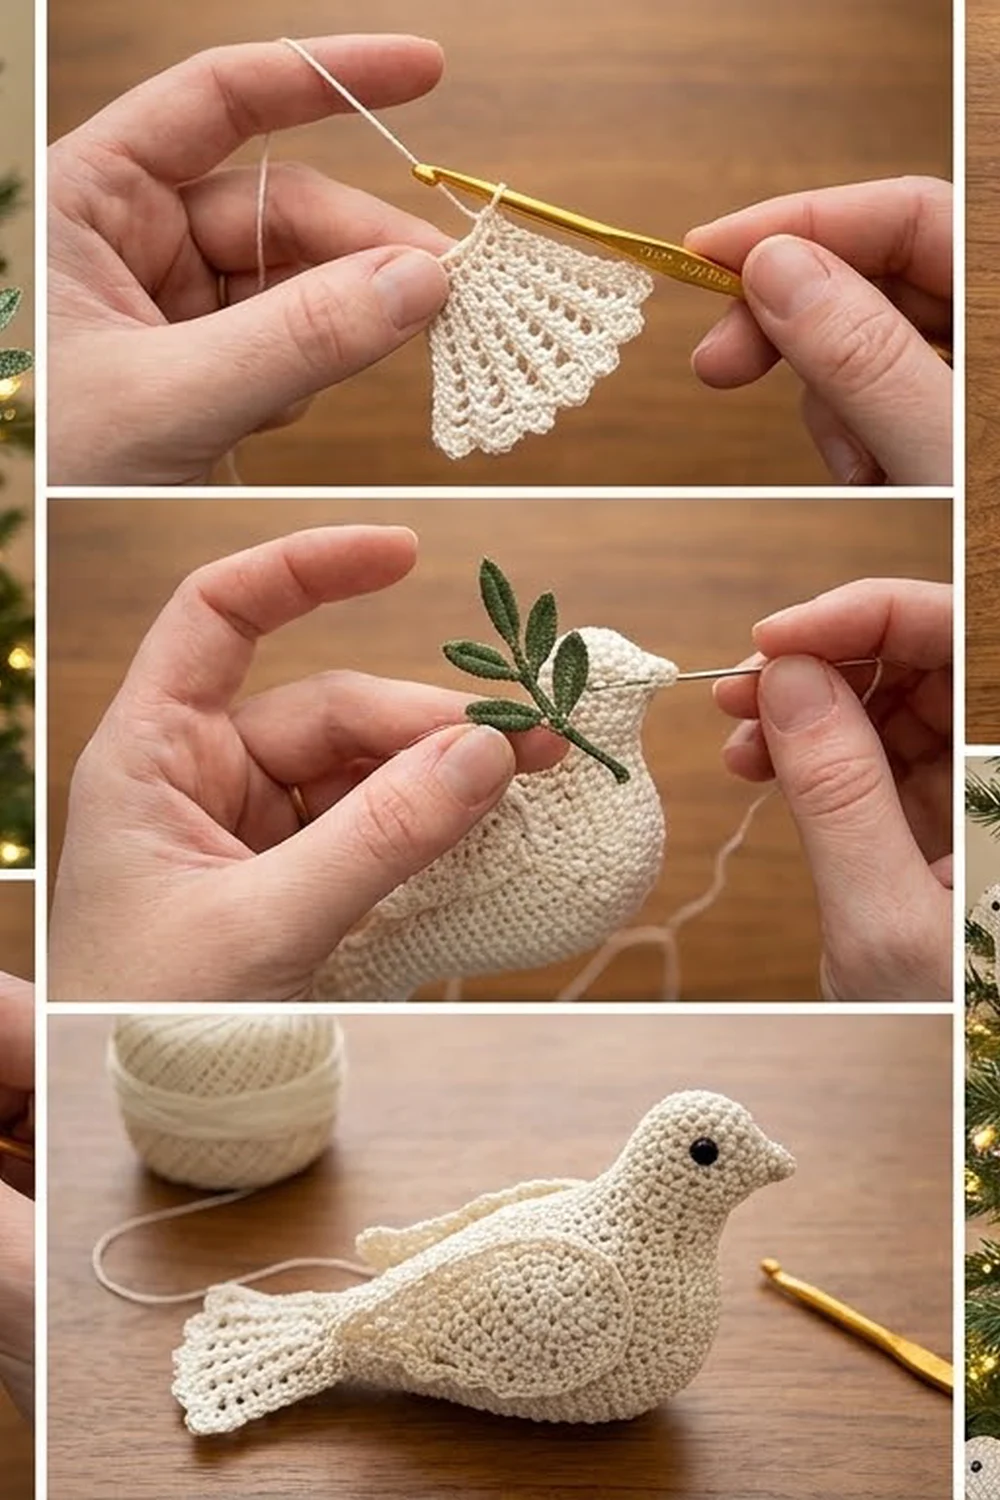
The Olive Branch Lace Dove is a small thread-crochet ornament with a vintage, heirloom look. The cream dove has a solid body, a lacy fan tail and one sweeping wing with a scalloped edge. A tiny green olive sprig is tucked into the beak.
The palette is simple: ivory or cream cotton thread, a little olive green for the leaves and a black bead or a few stitches of black thread for the eye. The ornament looks good on a tree, tied to a gift or hung in a window.
This pattern uses US crochet terms. The finished dove measures about 4.5 in (11.4 cm) wide and 5 in (12.7 cm) tall, not counting the 1.5 in (3.8 cm) hanging loop.
You’ll make the dove in four parts: a fan tail worked in rows from a ring, an oval body worked in rounds, a wedge-shaped wing worked in rows and a chain-and-leaf olive sprig. Then you’ll stack the parts, sew them together and work a slip-stitch outline around the body. The last steps are the hanging loop and blocking.
Finished Size and Construction
- Finished size: 4.5 in (11.4 cm) wide x 5 in (12.7 cm) tall, plus a 1.5 in (3.8 cm) loop
- Skill level: Intermediate (thread crochet and shaping)
- Terminology: US
- Yarn weight: Size 10 crochet cotton (lace weight)
- Hook: 1.5 mm steel hook (US 8)
- Number of pieces: 1 finished ornament made from 4 parts (tail, body, wing, sprig)
- Layout: Single motif. The tail sits behind the body, and the wing is layered on the front.
- Part sizes: Tail 3.25 in (8.3 cm) wide x 1.75 in (4.4 cm) tall. Body 2.75 in (7.0 cm) long x 1.5 in (3.8 cm) tall at the head. Wing 3.5 in (8.9 cm) across x 2 in (5.1 cm) deep. Sprig 1.5 in (3.8 cm) long.
- Size before border: 4.5 in (11.4 cm) x 5 in (12.7 cm)
- Border depth: A slip-stitch outline, under 1/16 in (0.2 cm). It does not change the overall size.
Materials
Use mercerized size 10 cotton thread. It gives crisp stitch definition and takes starch well. Avoid fuzzy or acrylic threads, because they blur the lace holes and won’t hold a blocked shape.
- Cream/ivory (main color): 6 g, about 31 m (34 yd)
- Olive green (sprig): 1 g, about 5 m (5.5 yd)
- Black: 1 small black seed bead (or 30 cm/12 in of black thread for an embroidered eye)
Tools:
– 1.5 mm steel crochet hook
– Fine tapestry needle and a beading needle
– Sewing pins and a foam blocking board
– Liquid starch or a 1:1 mix of white glue and water
– Small sharp scissors
– Ruler or tape measure
The quantities include a margin of about 20% for your gauge swatch and weaving in ends.
Abbreviations (US Terms)
- ch – chain
- sl st – slip stitch
- sc – single crochet
- hdc – half double crochet
- dc – double crochet
- tr – treble crochet
- sp – space
- st(s) – stitch(es)
- RS – right side
Special stitch – Leaf: Ch 5, sc in 2nd ch from hook, hdc in next ch, dc in next ch, sl st in last ch (the base ch of the leaf). This makes 4 sts, and the leaf is about 0.4 in (1.0 cm) long.
Gauge and Checkpoints
Gauge: 10 dc and 4 dc rows = 1 in (2.5 cm) with size 10 thread and a 1.5 mm hook.
Work the tail first and treat it as your test piece. It is small, and it shows quickly whether your tension matches.
Checkpoints:
– Tail Row 1: The half-circle is about 0.75 in (1.9 cm) across.
– Tail Row 5: The arc along the outer edge measures about 2.75 in (7.0 cm).
– Finished tail: 3.25 in (8.3 cm) wide x 1.75 in (4.4 cm) tall.
– Body Rnd 1: 2.5 in (6.4 cm) long x 0.75 in (1.9 cm) tall.
– Finished body: 2.75 in (7.0 cm) long, 1 in (2.5 cm) tall through the belly, 1.5 in (3.8 cm) at the head.
– Finished wing: 3.5 in (8.9 cm) across the scallops, 2 in (5.1 cm) deep.
If your pieces are too big: Go down to a 1.25 mm or 1.4 mm hook, and check that you’re not pulling up tall loops on your dc.
If your pieces are too small: Go up to a 1.65 mm or 1.75 mm hook. Tight thread work also makes lace cup instead of lying flat, so relax your grip.
Tail (Make 1, Cream)
The tail is a half-circle fan worked in turned rows from a small ring.
Ch 5, sl st in the first ch to form a ring.
Row 1: Ch 3 (counts as dc), 6 dc in ring. Turn. (7 dc)
Row 2: Ch 3 (counts as dc), dc in the same st, 2 dc in each dc across. Turn. (14 dc)
Row 3: Ch 4 (counts as dc + ch 1), dc in next dc, ch 1. Repeat from * across, ending with dc in the last dc and no final ch 1. Turn. (14 dc, 13 ch-1 sps)
Row 4: Ch 3 (counts as dc), dc in next ch-1 sp, dc in next dc. Repeat from * across. Turn. (27 dc: 14 worked 1 per dc + 13 worked into the ch-1 sps)
Row 5: Ch 3 (counts as dc), dc in next 2 dc, ch 1, skip next dc, dc in next 3 dc. Repeat from * 5 more times. Turn. (7 groups of 3 dc = 21 dc, plus 6 ch-1 sps)
Check: 3 + 6 x (1 skipped + 3 worked) = 27 sts used, so the row matches Row 4.
Row 6 (scallops): Ch 1, sc in first dc, 7 dc in next dc (the center of the group), sc in next dc, sc in next ch-1 sp, sc in first dc of next group. Repeat from * 5 more times, then 7 dc in the center dc of the last group and sc in the last dc. (7 scallops: 49 dc + 20 sc)
The sc count is 2 per group (7 x 2 = 14) plus 1 in each ch-1 sp (6), which makes 20.
Fasten off and leave a 15 cm (6 in) tail for sewing.
Body (Make 1, Cream)
The body is worked in joined rounds around a foundation chain. It starts as an oval, then the head is shaped in Rnd 3. Do not turn between rounds.
Ch 23.
Rnd 1: Sc in 2nd ch from hook, hdc in next 3 ch, dc in next 14 ch, hdc in next 3 ch, 5 sc in last ch (head end). Rotate and work along the other side of the chain: hdc in next 3 ch, dc in next 14 ch, hdc in next 3 ch, 4 sc in the same ch as the first sc. Join with sl st to the first sc. (50 sts)
Check: 1 + 3 + 14 + 3 + 5 + 3 + 14 + 3 + 4 = 50. The tall dc through the middle and the short sc at the ends give the oval shape.
Rnd 2: Ch 1, sc in the same st and next 20 sts, 2 sc in each of next 5 sts (head end), sc in next 20 sts, 2 sc in each of next 4 sts (tail end). Join. (59 sts: 21 + 10 + 20 + 8)
Rnd 3 (head and beak): Ch 1. Work sts 1–16 as the back: sc in the same st and next 15 sts (16).
Head bump over sts 17–23: hdc in next st, 2 dc in next st, 2 tr in each of next 2 sts, 2 dc in next st, hdc in next st, sc in next st (11).
Beak in st 24: (sc, ch 3, sc) in the same st (2 sc + ch-3 beak).
Belly, sts 25–59: sc in each of next 35 sts (35). Join.
Total: 64 sts plus the ch-3 beak. Check: Rnd 2 sts used = 16 + 7 + 1 + 35 = 59. Rnd 3 sts made = 16 + 11 + 2 + 35 = 64.
Fasten off and weave in the ends.
Wing (Make 1, Cream)
The wing is worked in rows from the root, which is sewn to the body, out to the scalloped feather edge.
Ch 10.
Row 1: Dc in 4th ch from hook (the skipped ch count as dc) and in each ch across. Turn. (8 dc)
Row 2: Ch 4 (counts as dc + ch 1), dc in next dc, ch 1. Repeat from * across, ending with dc in the last dc and no final ch 1. Turn. (8 dc, 7 ch-1 sps)
Row 3: Ch 3, 2 dc in next ch-1 sp, dc in next dc. Repeat from * across. Turn. (22 dc: 8 worked 1 per dc + 14 worked into the sps)
Row 4: Ch 5 (counts as dc + ch 2), skip next 2 dc, dc in next dc, ch 2, skip next 2 dc. Repeat from * 5 more times, then dc in the last dc. Turn. (8 dc, 7 ch-2 sps)
Row 5: Ch 3, 3 dc in next ch-2 sp, dc in next dc. Repeat from * across. Turn. (29 dc: 8 worked 1 per dc + 21 worked into the sps)
Row 6 (feather spaces): Ch 7 (counts as tr + ch 3), skip next 3 dc, tr in next dc, ch 3, skip next 3 dc. Repeat from * 5 more times, then tr in the last dc. Turn. (8 tr, 7 ch-3 sps)
Check: 1 + 7 x 4 = 29.
Row 7 (scallops): Ch 1, sc in first tr, 7 dc in next ch-3 sp, sc in next tr. Repeat from * across. (7 scallops: 49 dc + 8 sc)
Fasten off and leave a 25 cm (10 in) tail for sewing.
Olive Sprig (Make 1, Green)
Ch 12 for the stem. Work 1 Leaf from the last ch made. That is the tip leaf.
Work back down the stem: sl st in next 3 stem ch, make 1 Leaf pointing to one side, make 1 Leaf pointing to the other side. Repeat from * once more. Sl st in the remaining 5 stem ch. (5 leaves: 1 tip leaf + 2 pairs, plus a 5-ch bare stem end)
Check: 1 tip ch + 6 + 5 = 12 stem ch.
Fasten off and leave a 15 cm (6 in) tail.
Assembly
- Tail: Lay the body RS up with the beak pointing right. Slide the ring end of the tail behind the lower tail end of the body, overlapping about 0.5 in (1.3 cm). Angle the fan down and slightly left. Whipstitch the tail’s Row 1 and Row 2 to the back of the body.
- Wing: Place the wing root (the foundation chain) across the front of the body over Rnd 2, running from about st 4 to st 14. Angle the scalloped edge up and back toward the upper left. Backstitch along the foundation chain through the body only.
- Sprig: Thread the bare stem end through the ch-3 beak from front to back. Tack it on the back so the leaves fan forward from the beak.
- Eye: Sew the black bead on the head, about 2 sts behind the beak and 1 round in from the edge. If you’re not using a bead, make a black French knot with 3 wraps.
Border
The border is a slip-stitch outline that defines the silhouette, the way the raised edge does in the photo. It is worked around the body after the tail and wing are attached. The outline runs along the body’s own edge, so neither part gets in the way.
Border gauge: 10 sl sts = 1 in (2.5 cm), which matches the sc gauge of Body Rnd 3.
Border Rnd 1: With the RS facing, join cream with a sl st in st 1 of Body Rnd 3 (at the tail end of the back). Work 1 sl st in each st around, keeping the sl sts loose:
– Back (sts 1–16): 16 sl sts
– Head (11 sts): 11 sl sts
– Beak: sl st in the first sc. Skip the ch-3 beak so it stays free. Sl st in the second sc. (2 sl sts)
– Belly and tail end (35 sts): 35 sl sts. Where the tail sits behind, go through both layers to lock the tail in place.
Join to the first sl st. Total: 64 sl sts. Fasten off.
Why the math works: Rnd 3 already lies flat with 64 sts. One sl st per st adds no stitches, so the edge can’t ruffle or cup. Sl sts also add almost no height, so the body keeps its measured size of 2.75 in (7.0 cm). The 64 = 16 + 11 + 2 + 35 breakdown matches Rnd 3 exactly.
Hanging loop: Join cream at the back edge where the wing root meets the body, at about st 12. Ch 30, then sl st in the same st. Sl st in each ch back along the loop for a firm cord (30 sl sts). Fasten off. The loop doubles to about 1.5 in (3.8 cm). Twist it gently once before blocking.
Final Blocking
- Weave in all ends except the very last trim.
- Soak the dove in starch solution for 1 minute. Gently squeeze out the extra. Don’t wring it.
- Lay it RS up on the foam board and pat it into shape.
- Pin the 7 tail scallops into an even half-circle that measures 3.25 in (8.3 cm) across.
- Pin each wing scallop point to open up the feather spaces, so the wing measures 3.5 in (8.9 cm) across.
- Smooth the body, shape the head into a dome and point the beak.
- Spread the olive leaves and pinch each tip to a point.
- Check that the overall size is 4.5 in (11.4 cm) x 5 in (12.7 cm).
- Let it dry completely, for 6–12 hours, then unpin. Trim the ends close.
Final Quality-Control Checklist
- Tail: 7 even scallops, 20 sc and 49 dc in Row 6
- Body Rnd 3: 64 sts plus the ch-3 beak
- Wing: 7 scallops and 7 open ch-3 spaces in Row 6
- Sprig: 5 leaves, stem secured through the beak
- Border: 64 sl sts with the beak left free
- Tail and wing stitches don’t show on the front
- Eye is firmly attached
- Loop is centered over the wing root and the ornament hangs level
- Finished size is 4.5 in (11.4 cm) x 5 in (12.7 cm)
Troubleshooting
- Tail cups instead of lying flat: Your Row 2 increases are too tight. Use a hook one size larger or loosen your tension.
- Tail ruffles: Check that Row 4 has exactly 27 dc, not 2 dc in each sp.
- Body curls at the ends: Your Rnd 2 tension is tight. Block firmly, or work Rnd 2 with a slightly larger hook.
- Head looks flat: Make sure you worked 2 tr into each of the 2 center head sts.
- Wing spaces are uneven: Recount the 3 skipped dc in each Row 6 repeat.
- Border puckers: Your sl sts are too tight. Pull out the round and rework it with looser loops.
- Ornament tilts: Move the loop 1–2 sts toward the heavier side.
Care
Hand wash in cool water with mild soap only when needed. Re-starch and re-block to restore the shape, and store flat in tissue paper.
Final Notes
Each stage of this dove has its own measurement check:
- Gauge is 10 dc and 4 rows to 1 in (2.5 cm).
- The tail grows from 7 to 14 to 27 sts, then forms 7 scallops 3.25 in (8.3 cm) wide.
- The body goes from 50 to 59 to 64 sts and measures 2.75 in (7.0 cm).
- The wing grows from 8 to 22 to 29 sts and becomes 7 scallops 3.5 in (8.9 cm) across.
- The 64-st slip-stitch border keeps the assembled dove at 4.5 in (11.4 cm) x 5 in (12.7 cm).
If every checkpoint matches, your finished dove will too.
Happy crocheting!