

These twin bells are a delicate thread-crochet ornament. Two lacy lavender bells hang side by side under an open ivory bow, and each bell has a pearl-bead clapper. Every bell is built from three tiers of shell fans separated by open chain arches, so light shows through the fabric when the ornament hangs on a tree.
The colors are soft lavender with an ivory picot edge, an ivory bow, an ivory hanging loop and creamy pearl beads. The style is vintage and romantic, like old starched doily lace, and it suits a pastel or winter-white tree.
This pattern uses US crochet terms. The finished ornament is about 4.5 in (11.4 cm) wide and 5 in (12.7 cm) tall from the top of the bow to the bottom of the pearls. The hanging loop adds 2.5 in (6.4 cm). Each bell is 2.75 in (7.0 cm) tall and 2.25 in (5.7 cm) across the hem.
You work each bell flat in rows as a fan-shaped piece, then seam it into a cone with ivory thread. The seam leads straight into the ivory picot hem edging. The bow is made from two lace strips: one is folded into loops and the other forms the tails. A crocheted cord makes the hanging loop. Starch blocking sets the final shape.
Finished Size and Construction
- Finished ornament: 4.5 in (11.4 cm) wide x 5 in (12.7 cm) tall, plus a 2.5 in (6.4 cm) hanging loop
- Skill level: Intermediate
- Terminology: US crochet terms
- Yarn weight: Size 10 crochet cotton thread (Lace, category 0)
- Hook: 1.75 mm (US steel 6)
- Number of pieces: 5 crocheted pieces (2 bells, 1 bow-loop strip, 1 bow-tail strip, 1 hanging cord), plus 2 bead clappers and 1 center bead
- Layout: Two bells side by side, the bow centered over their tops, and the loop above the bow
- Piece size (bell, flat): 2.5 in (6.4 cm) tall, with a hem curve of about 7 in (17.8 cm)
- Bell size before border: 2.5 in (6.4 cm) tall and 2.25 in (5.7 cm) across the hem once seamed
- Border depth: 0.25 in (0.6 cm) of ivory picot edging, which brings each bell to 2.75 in (7.0 cm)
Materials
Choose a mercerized size 10 cotton thread. It holds starch well, shows the stitches clearly and keeps picots crisp. Avoid fuzzy or acrylic threads, because they won’t hold a bell shape.
- Lavender size 10 cotton: 12 g / about 62 m (both bells)
- Ivory size 10 cotton: 10 g / about 52 m (seams, edging, bow, cord, clapper threads)
These quantities include a margin of about 30% for a test bell’s adjustments and for weaving in ends.
Tools and notions
- 1.75 mm (US steel 6) crochet hook
- Fine tapestry needle or beading needle
- 2 pearl beads, 8 mm (clappers)
- 1 pearl bead, 4 mm (bow center)
- Liquid or spray starch
- Blocking mat and rustproof pins
- 2 small cone forms about 2.25 in (5.7 cm) across the base (rolled cardstock wrapped in plastic works)
- Scissors
Abbreviations (US Terms)
- ch = chain
- sl st = slip stitch
- sc = single crochet
- dc = double crochet
- sk = skip
- sp(s) = space(s)
- st(s) = stitch(es)
- sc2tog = single crochet 2 together
- RS = right side
Picot: ch 3, then sl st into the front loop and left vertical bar of the last sc made.
Fan: the stated number of dc, all worked into one stitch.
Gauge and Checkpoints
Gauge: 10 dc and 4 dc rows = 1 in (2.5 cm); 12 sc = 1 in (2.5 cm).
Finish one bell completely before you start the second. Thread gauge varies a lot between brands, and a real bell tells you more than a swatch does. Lay the piece flat without stretching it and check:
- After Row 3: 2.5 in (6.4 cm) wide, 0.75 in (1.9 cm) tall
- After Row 5: 1.25 in (3.2 cm) tall
- After Row 7: 1.75 in (4.4 cm) tall
- After Row 9: 2.5 in (6.4 cm) tall, with a hem curve of about 7 in (17.8 cm)
Too big: Use a 1.5 mm hook, or hold the thread more firmly while working the fans.
Too small: Use a 2.0 mm hook, and make sure your chain arches aren’t pulled tight, since tight arches make the fabric cup.
Blocking can correct a difference of up to 0.125 in (0.3 cm).
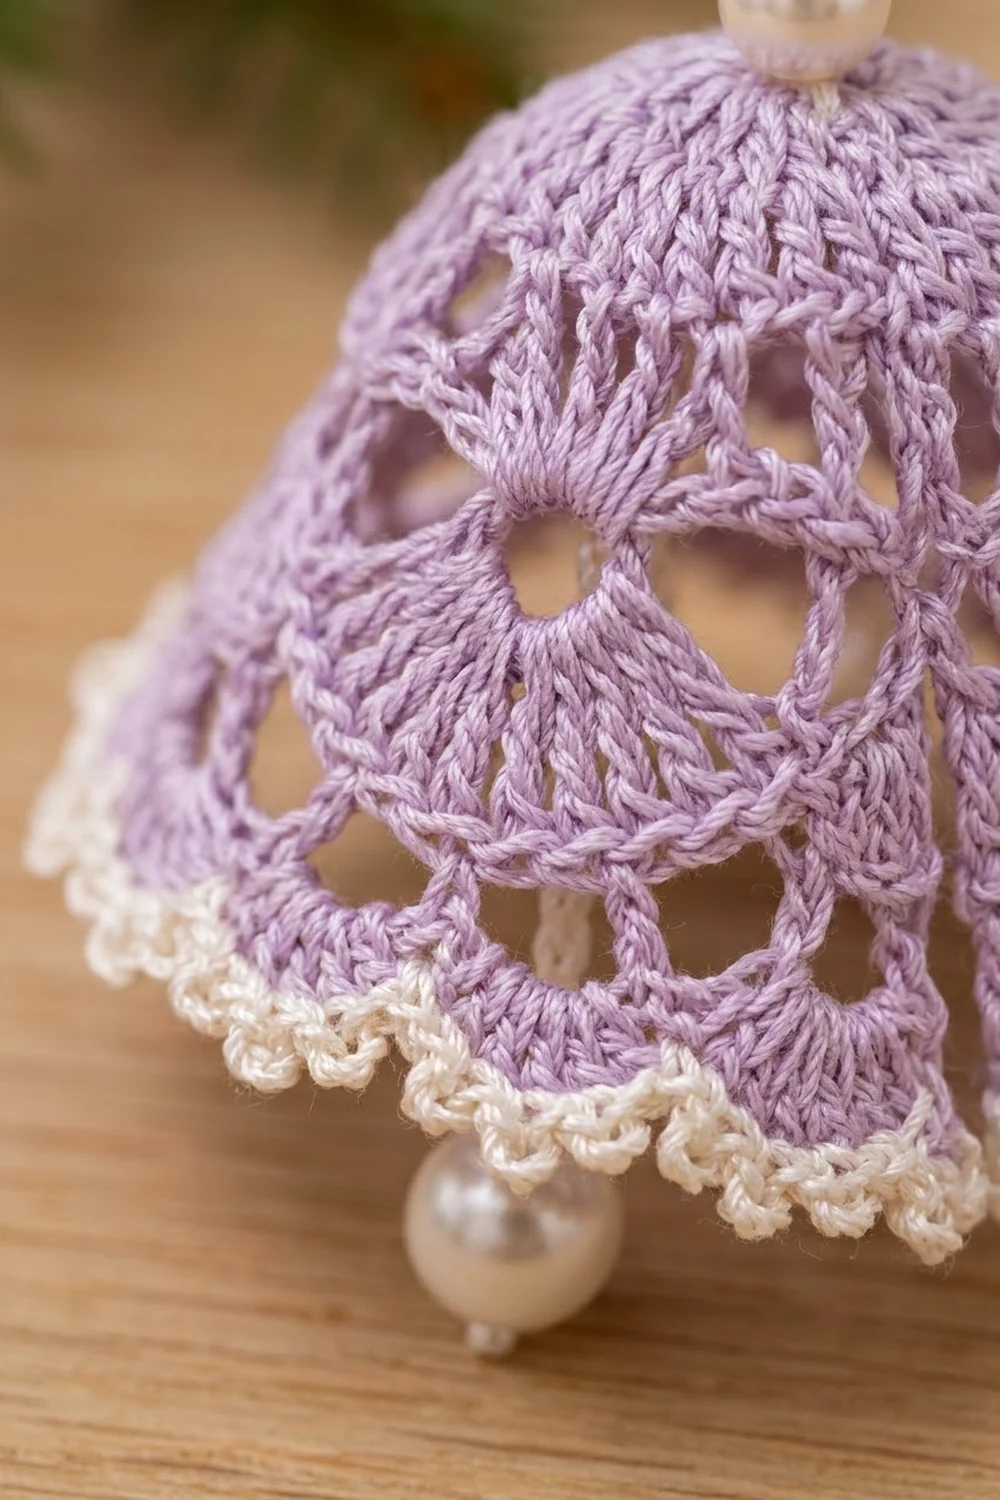
Bell (Make 2)
Use lavender. A ch-3 at the start of a row counts as a dc.
Row 1 (RS): Ch 15. Dc in the 4th ch from the hook and in each ch across. Turn. (13 dc; the skipped 3 ch count as the first dc)
Row 2: Ch 3, dc in same st, 2 dc in each of next 11 sts, dc in last st. Turn. (25 dc)
Row 3: Ch 4 (counts as dc and ch-1), sk next st, dc in next st, ch 1, sk next st 11 times, dc in last st. Turn. (13 dc, 12 ch-1 sps)
Checkpoint: 2.5 in (6.4 cm) wide, 0.75 in (1.9 cm) tall. Rows 1–3 make the solid top and the first band of open eyelets.
Row 4 (first fan tier): Ch 1, sc in first dc, 7 dc in next dc, sc in next dc 6 times. Skip all ch-1 sps. Turn. (6 fans of 7 dc + 7 sc = 49 sts)
Row 5 (arch row): Ch 6 (counts as dc and ch-3), sc in 4th dc of next fan, ch 3, dc in next sc, ch 3, sc in 4th dc of next fan, ch 3, dc in next sc 5 times. Turn. (7 dc, 6 sc, 12 ch-3 sps)
Checkpoint: 1.25 in (3.2 cm) tall.
Row 6 (second fan tier): Ch 3, 4 dc in first dc (half fan made), sc in next sc, 9 dc in next dc 5 times, sc in next sc, 5 dc in 3rd ch of turning ch-6 (half fan made). Skip all ch-3 sps. Turn. (2 half fans of 5 dc + 5 fans of 9 dc + 6 sc = 61 sts)
Each fan in this tier sits between two fans of Row 4, so the tiers are offset like scales.
Row 7 (arch row): Ch 1, sc in first dc, ch 4, dc in next sc, ch 4, sc in 5th dc of next fan, ch 4, dc in next sc 5 times, ch 4, sc in top of turning ch-3. Turn. (7 sc, 6 dc, 12 ch-4 sps)
Checkpoint: 1.75 in (4.4 cm) tall.
Row 8 (hem fan tier): Ch 1, sc in first sc, 11 dc in next dc, sc in next sc 6 times. Skip all ch-4 sps. Turn. (6 fans of 11 dc + 7 sc = 73 sts)
Row 9 (lavender loop trim, conversion row): Ch 1, sc in first sc, sc in first dc of next fan, (ch 3, sk 1 dc, sc in next dc) 5 times, sc in next sc 6 times. Fasten off, leaving a 6 in (15.2 cm) tail.
Count for Row 9: 43 sc worked one per existing stitch (6 per fan + 7 between and at the edges; 30 dc skipped) + 30 ch-3 loops added = 43 sc and 30 loops.
Checkpoint: 2.5 in (6.4 cm) tall, hem curve about 7 in (17.8 cm). The flat piece now looks like a wide fan, with the narrow top at Row 1.
Close the top: Thread the starting tail onto the needle and weave it through the 13 foundation loops of Row 1. Leave it loose for now. You’ll cinch it after seaming.
Make All Pieces
Lavender: 2 bells.
Ivory:
- Bow-loop strip: Ch 82. Sc in 2nd ch from hook and in each ch across (81 sc). Ch 1 and turn. Sc in first sc, ch 3, sk 1 sc, sc in next sc 40 times (41 sc, 40 loops). Rotate the strip and work along the opposite side of the foundation chain the same way: ch 1, sc in first ch, ch 3, sk 1 ch, sc in next ch 40 times (41 sc, 40 loops). Fasten off. The strip measures 6.75 in (17.1 cm).
- Bow-tail strip: Ch 42. Sc in 2nd ch from hook and in each ch across (41 sc). Edge both long sides as for the loop strip, working the bracketed repeat 20 times per side (21 sc, 20 loops per side). Fasten off. The strip measures about 3.5 in (8.9 cm).
- Hanging cord: Ch 61. Sl st in 2nd ch from hook and in each ch across (60 sl st). Fasten off. The cord is 5 in (12.7 cm) long and folds into a 2.5 in (6.4 cm) loop.
Layout:
          [ hanging loop ]
          [  ivory bow   ]
      [ bell 1 ][ bell 2 ]
         (pearl)   (pearl)
Joining
The joining happens in two stages. First, seam each bell into a cone and work its Border (next section). Then assemble the ornament.
Seam each bell: Fold the bell so the two side edges meet, RS facing out. Join ivory at the Row 1 end. Working through both edges at once, work 2 sc into each row end of Rows 1–8 (16 sc). Don’t fasten off. You are now at the hem, ready for the Border. Keep each sc snug but not tight, and stop to check that the seam lies straight and doesn’t ripple. Pull the lavender top tail to close the top, leaving a hole just big enough for a needle. Knot the tail inside.
Assemble the ornament:
- Clappers: Cut 6 in (15.2 cm) of ivory, thread an 8 mm pearl to the middle, and knot the doubled thread right above the bead. Pass both ends up through the inside of the bell and out through the top hole. Adjust so the pearl hangs 0.25 in (0.6 cm) below the hem, which makes the clapper 3 in (7.6 cm) from the bell top. Knot securely.
- Bow: Fold both ends of the loop strip to the center, overlapping them by 0.25 in (0.6 cm), and tack. Center the tail strip under the loops at an angle so the tails point down and out. Wrap ivory thread 8 times around the middle to pinch it, then sew the 4 mm pearl over the wrap.
- Bells: Place the bells side by side with their seams at the back and their tops angled slightly toward each other. Tack them together with 3 small stitches where the hems touch, and with 2 stitches 1 in (2.5 cm) above the hem.
- Final join: Sew both bell tops to the back of the bow center. Fold the cord in half and sew both ends behind the bow.
Use small, firm tacking stitches that don’t pull the lace. If a stitch dimples the fabric, loosen it.
Size checkpoint: The assembled ornament measures 4.5 in (11.4 cm) across the two hems and 5 in (12.7 cm) from the top of the bow to the bottom of the pearls.
Border: Ivory Picot Hem Edging
Border gauge: One (2 sc, picot, 2 sc) group covers one ch-3 loop. One fan section (5 groups + 1 valley stitch) measures about 1.17 in (3.0 cm), so 6 sections fill the 7 in (17.8 cm) hem.
Continue from the seam with the same ivory thread.
Rnd 1: Sc2tog over the two Row 9 edge sc (seam valley). [(2 sc, picot, 2 sc) in each of next 5 ch-3 loops], sc in next valley sc 5 times, (2 sc, picot, 2 sc) in each of last 5 ch-3 loops. Sl st to the sc2tog. Skip all sc on the fans; work only into loops and valleys. Fasten off and weave in.
Count: 6 fan sections x (20 sc + 5 picots) = 120 sc and 30 picots, plus 6 valley stitches (5 sc + 1 sc2tog) = 126 sts and 30 picots in total.
Why the math works: Row 9 has exactly 30 loops (6 fans x 5 loops) and 6 valleys: 5 between fans plus the seam, where the two edge sc meet. Each loop gets exactly one group, and each valley gets exactly one stitch, so no stitches are added or lost around the hem. Four sc fill a ch-3 loop without ruffling, and the single valley stitch keeps the scallop dips sharp.
Final Blocking
- Mix starch according to the package for a firm finish. Dip the bells and the bow, then press out the excess in a towel.
- Slide each bell onto a plastic-wrapped cone form. Ease the hem to 2.25 in (5.7 cm) across and pin each picot out evenly.
- Lay the bow flat on the mat. Open each loop into a teardrop about 1.75 in (4.4 cm) long and pin the picots along both edges. Pin the tails straight.
- Let everything dry for at least 12 hours.
- Remove the pins and forms. If you blocked the pieces before assembly, assemble them now. Otherwise, touch up any flat spots with spray starch.
Final Quality-Control Checklist
- Each bell is 2.75 in (7.0 cm) tall and 2.25 in (5.7 cm) across the hem
- Each hem has 30 picots, evenly spaced
- Fan tiers alternate cleanly, with 6, 5 + 2 halves, and 6 fans
- Seams sit at the back and look straight
- Pearls hang 0.25 in (0.6 cm) below each hem and swing freely
- The bow is 3.5 in (8.9 cm) wide, with matching loops
- The ornament hangs level from its 2.5 in (6.4 cm) loop
- All ends are woven in and trimmed
Troubleshooting
- The bell cups or curls: Your chain arches are too tight. Use a larger hook for Rows 5 and 7 only.
- The hem ruffles: Your fans are loose. Work Row 8 with a 1.5 mm hook.
- The fans lean sideways: Count from the edge again. Each fan must land in a dc, and each sc in an sc.
- There’s a gap at the seam valley: Work the sc2tog through both edge sc and the seam thread.
- The ornament tilts: Move the hanging cord until the ornament hangs straight.
- Picots flatten out: Re-starch them and pin each picot to a point.
Care
Spot clean only, using cool water. If the ornament loses its shape, re-starch it on cone forms and store it in a box padded with tissue.
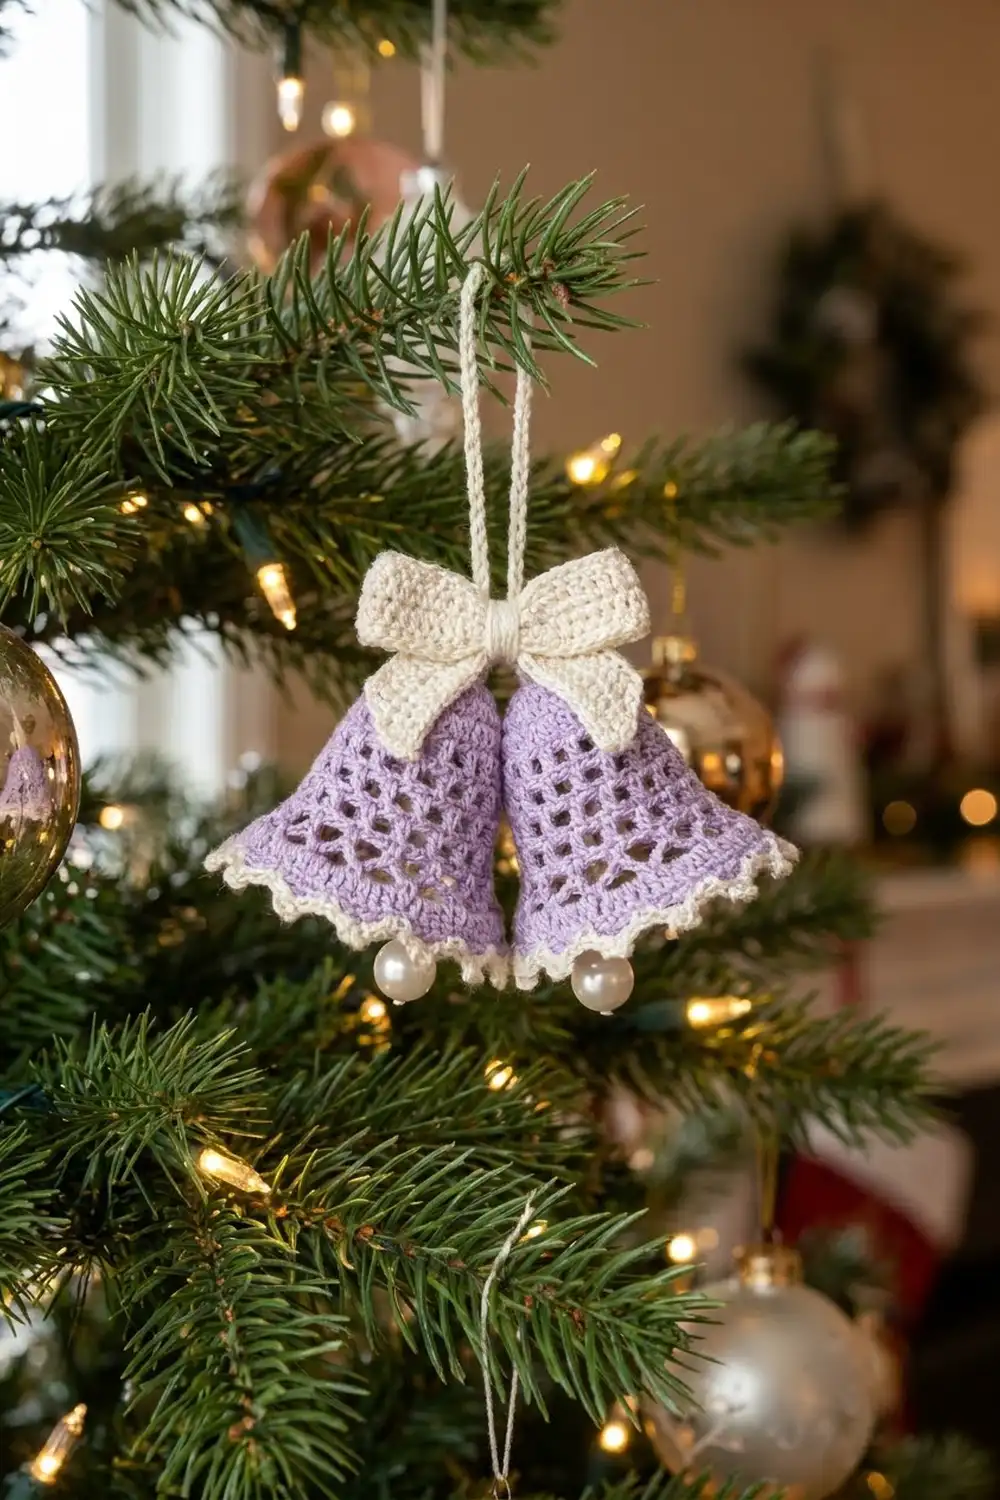
Final Notes
The measurement chain runs like this. Gauge of 10 dc per 1 in (2.5 cm) gives a 2.5 in (6.4 cm) top row. Nine rows build a 2.5 in (6.4 cm) bell with a 7 in (17.8 cm) hem. The seam turns that hem into a cone 2.25 in (5.7 cm) across. The 0.25 in (0.6 cm) picot border brings each bell to 2.75 in (7.0 cm). Two bells side by side make the 4.5 in (11.4 cm) width, and the bow above them brings the ornament to 5 in (12.7 cm). If each checkpoint matches, the final piece will too.
Happy crocheting!