

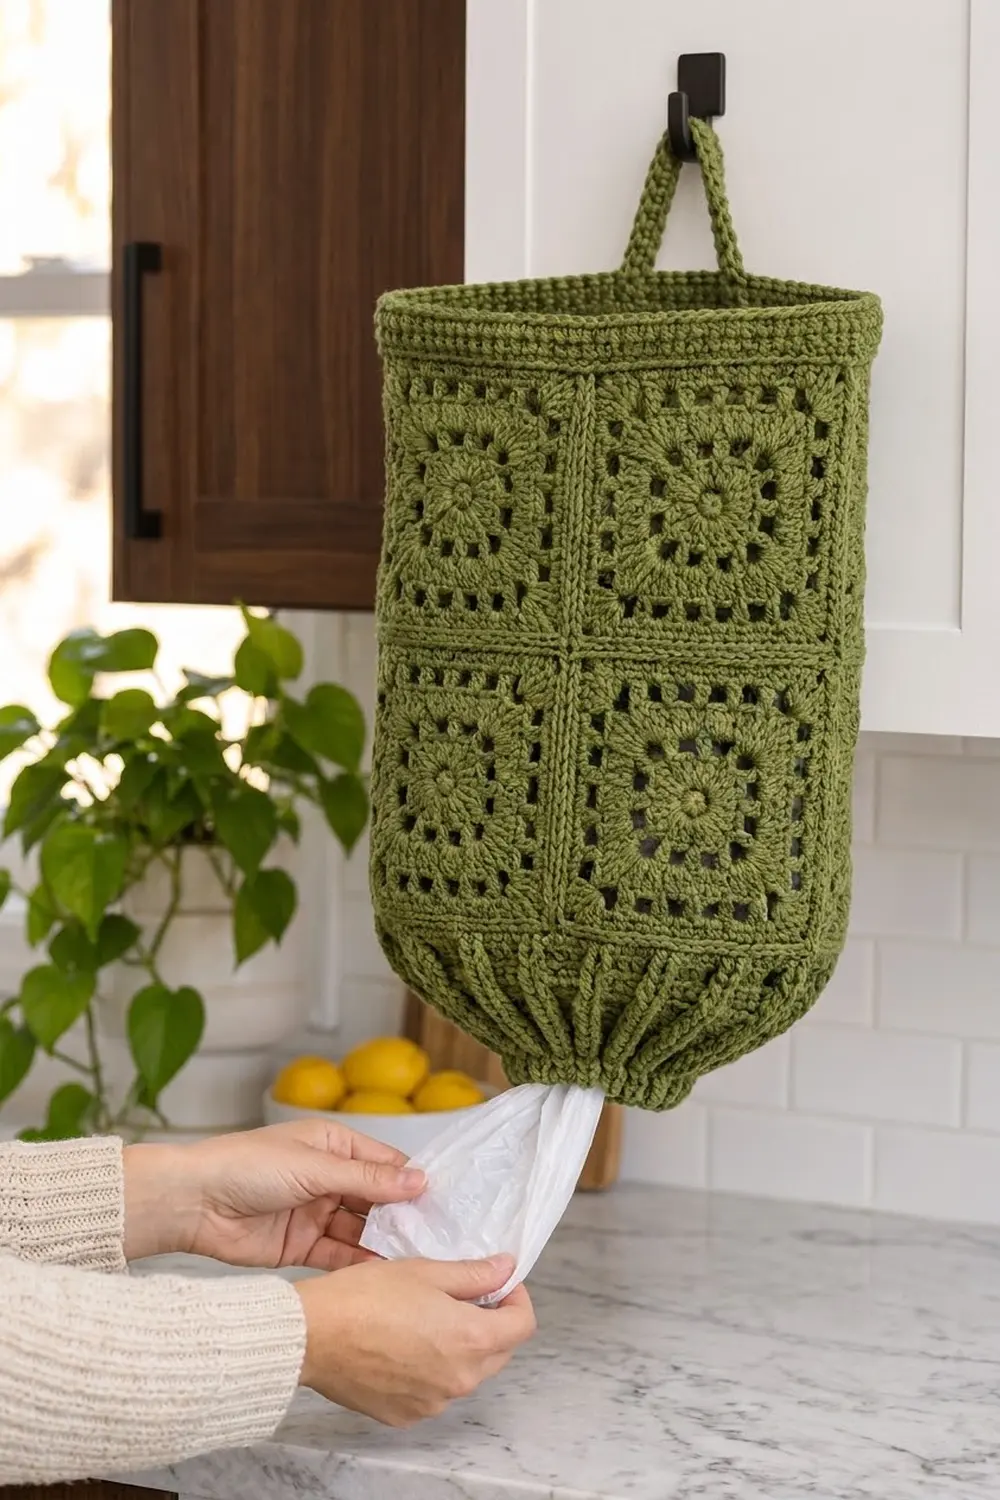
This granny square bag holder keeps grocery bags in one place: you stuff bags in at the top and pull them out one at a time from the gathered opening at the bottom. Eight lacy squares form the body, a firm band finishes the top, and vertical ribs pull the base in to a small opening.
The sample is in olive green, which suits a kitchen with wood and white cabinets. Mustard yellow, terracotta or cream also work well. Each square has a solid center, two rings of small eyelets and a smooth single-crochet frame. Raised seams outline every square.
The pattern uses US crochet terms. The finished holder measures 10 in (25.4 cm) wide when flat and 15 in (38.1 cm) tall, not counting the hanging loop. The loop adds about 3 in (7.6 cm).
To make it, you crochet eight squares, join them into a tube that is four squares around and two squares tall, then work the top band and the ribbed bottom directly into the edges of the tube. Last, you sew on a short strap as the hanging loop.
Finished Size and Construction
- Finished size: 10 in (25.4 cm) wide flat × 15 in (38.1 cm) tall; circumference 20 in (50.8 cm)
- Skill level: Easy–Intermediate
- Terminology: US
- Yarn weight: Worsted (#4)
- Hook: 4.5 mm (US 7)
- Number of pieces: 8 granny squares + 1 strap
- Layout: 4 squares around × 2 tiers tall, joined into a tube
- Piece size: 5 in × 5 in (12.7 cm × 12.7 cm)
- Size before border: 20 in (50.8 cm) around × 10 in (25.4 cm) tall
- Border depth: top band 1.25 in (3.2 cm); ribbed bottom 3.75 in (9.5 cm)
Materials
Use a smooth worsted-weight cotton or cotton blend. Cotton holds its shape when the holder is full and shows the eyelets and post-stitch ribs clearly. Acrylic also works but will stretch more under weight.
- Olive green: 160 g, about 300 m (328 yd)
These quantities include a margin of about 20%. That covers a gauge test, small differences in tension and the seams.
Tools:
– 4.5 mm (US 7) crochet hook
– Tapestry needle
– Stitch markers (at least 4)
– Scissors
– Measuring tape
– Blocking mat and rust-proof pins
– Spray bottle
Abbreviations (US Terms)
- ch – chain
- sl st – slip stitch
- sc – single crochet
- sc2tog – single crochet 2 together
- dc – double crochet
- sp – space
- sk – skip
- st(s) – stitch(es)
- RS / WS – right side / wrong side
- fpdc (front post double crochet): Yarn over, insert the hook from front to back to front around the post of the stitch, then complete a dc.
- bpdc (back post double crochet): Yarn over, insert the hook from back to front to back around the post of the stitch, then complete a dc.
Corner: (2 dc, ch 2, 2 dc) worked in the same stitch or space.
Gauge and Checkpoints
Make one complete square before anything else. A full square is the most accurate gauge test, because it includes the eyelet rounds, which stretch differently from solid rounds.
Gauge: 21 sc = 5 in (12.7 cm) along one side of the finished square, which is 4.2 sc per inch (2.54 cm).
Checkpoints for one square:
– After Round 3 (circle): 2.75 in (7.0 cm) across
– After Round 4 (first square round): 3.25 in (8.3 cm) side to side
– After Round 6: 4.5 in (11.4 cm) side to side
– After Round 7: 5 in (12.7 cm) side to side
If your square is larger than 5 in (12.7 cm), go down a hook size. If it is smaller, go up a hook size. A difference of 0.25 in (0.6 cm) per square adds up to 1 in (2.5 cm) around the tube, so fix it at this stage.
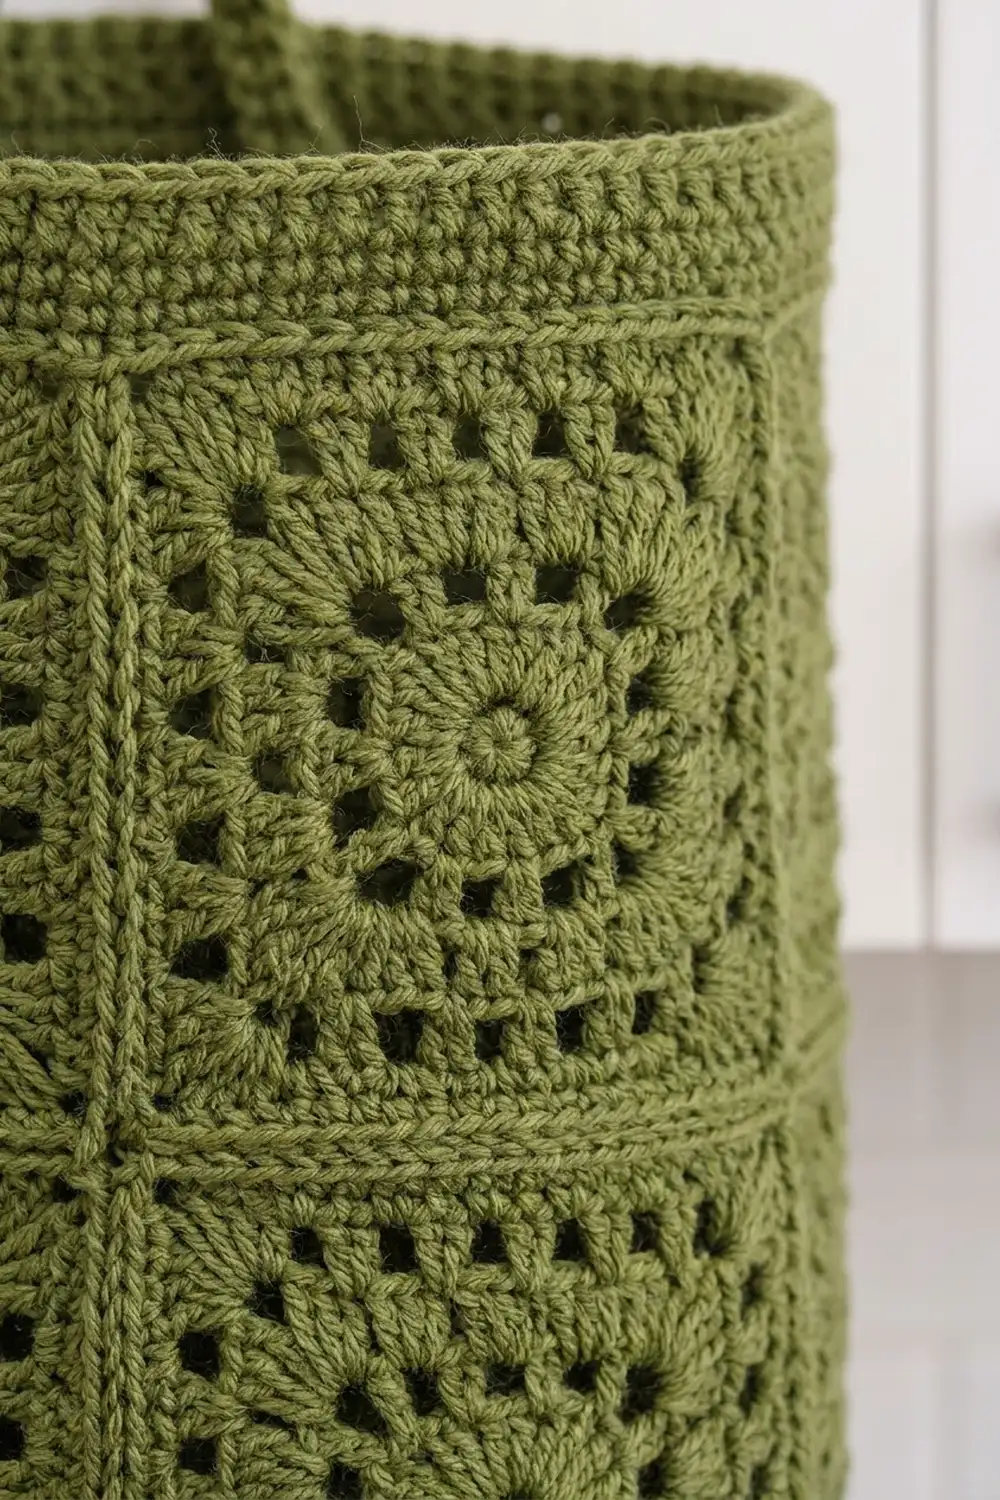
Granny Square (Make 8)
Work in joined rounds with the RS facing throughout. The ch 3 at the start of each round counts as a dc.
Round 1: Make a magic ring. Ch 3, then work 11 dc in the ring. Join with a sl st to the top of the ch-3. Pull the ring tight. (12 dc)
Round 2 (first eyelet ring): Ch 4 (counts as dc + ch 1). Dc in next st, ch 1 11 times. Join with a sl st to the 3rd ch of the ch-4. (12 dc, 12 ch-1 sps)
Round 3: Sl st into the first ch-1 sp. Ch 3, then work 1 dc in the same sp. Work 2 dc in each remaining ch-1 sp. Join. (24 dc)
This round closes the eyelets into a solid circle and gives 24 stitches, which divide evenly into four sides.
Round 4 (squaring round): Ch 3, then work (dc, ch 2, 2 dc) in the same st for the first corner. Dc in the next 5 sts. Work a corner in the next st, then dc in the next 5 sts. Repeat from * 2 more times. Join to the top of the ch-3. (36 dc and 4 corner ch-2 sps; 9 dc per side between corner spaces)
Check: 4 corner stitches + 4 × 5 side stitches = 24, which uses every stitch of Round 3.
Round 5 (second eyelet ring): Sl st in the next dc and into the corner ch-2 sp. Ch 3, then work (dc, ch 2, 2 dc) in the same sp. Ch 1, sk next dc, [dc in next dc, ch 1, sk next dc] 4 times, corner in next ch-2 sp. Repeat from * 3 more times, leaving out the last corner on the final repeat. Join. (32 dc, 20 ch-1 sps and 4 corner ch-2 sps)
Each side has 9 dc to cover: you skip 1, then work [1 dc, skip 1] 4 times. That uses all 9 and leaves 5 eyelets per side.
Round 6: Sl st in the next dc and into the corner sp. Ch 3, then work (dc, ch 2, 2 dc) in the same sp. Dc in each dc and each ch-1 sp to the next corner, then work a corner in the corner sp. Repeat around and join. (68 dc and 4 corner ch-2 sps; 17 dc per side between corner spaces)
Per side: 2 + 13 + 2 = 17. The 13 comes from 2 corner dc, 5 ch-1 sps, 4 side dc and 2 corner dc from Round 5.
Round 7 (frame): Ch 1. Sc in each dc to the corner, then work 3 sc in the corner sp. Repeat around. Join to the first sc and fasten off. (80 sc)
Stitches per side: 21, counted from one corner’s center sc to the next, including both. Check: 4 × 21 − 4 shared corners = 80. ✓
Weave in the ends on the WS of each square as you finish it.
Make All Pieces
Make 8 squares in olive green, and make the strap now too (see the Hanging Loop section).
Layout (seen from the RS, laid flat before closing the tube):
[A1][A2][A3][A4]   ← top tier
[B1][B2][B3][B4]   ← bottom tier
After joining, the right edge of A4/B4 seams to the left edge of A1/B1, which closes the tube.
Joining
Method: Single-crochet seam, worked with the squares held wrong sides together so the ridge shows on the RS, as in the sample.
Stitch-to-stitch logic: Each side has 21 sc. Line up the corner center sc of both squares, then work 1 sc through both loops of both squares in every stitch, matching stitch to stitch from one corner center to the next. That is 21 sc per square edge.
Order:
1. Horizontal seam: Join A1 to B1 along the edge where the two tiers meet. Without breaking the yarn, continue onto A2/B2, A3/B3 and A4/B4. That makes 84 sc across the flat strip.
2. Vertical seams: Join A1/B1 to A2/B2 down the full height, working 42 sc (2 × 21). Repeat for A2/A3 and A3/A4.
3. Close the tube: Join A4/B4 to A1/B1, working 42 sc.
Tension: Seam at the same tension as your squares. A tight seam puckers the squares and shortens the tube. If the seam ridge is visibly shorter than the square edge, go up half a hook size for joining.
Checkpoint: The tube should measure 20 in (50.8 cm) around and 10 in (25.4 cm) tall. Laid flat, it should be 10 in × 10 in (25.4 cm × 25.4 cm).
Border: Top Band and Ribbed Bottom
Border gauge: Same as the squares, 4.2 sc per inch (2.54 cm). Sc rounds stack about 4.8 rounds per inch.
Starting count for each edge: 4 squares × 21 sts = 84 sts. The seams add no stitches. Work into each square’s own 21 sts, including both corner sc at every seam.
Top Band
Join yarn at a seam on the top edge, with the RS facing.
Round 1: Ch 1, then sc in each st around: 21 per square, 4 squares. Join. (84 sc)
Rounds 2–6: Ch 1, sc in each st around, join. (84 sc each round)
Fasten off. The band should measure 1.25 in (3.2 cm) deep.
Why it works: 84 sc ÷ 4.2 sc per inch = 20 in (50.8 cm), which matches the tube’s circumference. The band lies flat without ruffling or pulling in.
Ribbed Bottom
Join yarn at a seam on the lower edge of the bottom tier, with the RS facing.
Round 1: Ch 1, then sc in each st around. Join. (84 sc)
Round 2: Ch 2 (does not count as a st), then dc in each st around. Join to the first dc. (84 dc)
Rounds 3–6: Ch 2 (does not count). Fpdc around the next st, bpdc around the next st. Repeat around and join. (84 sts; 42 fpdc ribs) Stack fpdc over fpdc and bpdc over bpdc so the ribs line up vertically.
Round 7 (gathering round): Ch 2 (does not count). Fpdc around the next fpdc, sk the next bpdc. Repeat around and join. (42 fpdc) The ribs now draw together, as in the photo.
Round 8: Ch 1, then sc2tog around. Join. (21 sc)
Round 9: Ch 1, then sc in each st around. Join and fasten off. (21 sc)
The ribbed section should measure about 3.75 in (9.5 cm) deep. The opening should be about 5 in (12.7 cm) around, or 1.6 in (4.1 cm) across. It is snug enough to hold bags in but stretches as you pull one out.
Why it works: The 84 stitches divide into 42 pairs, giving an even fp/bp rib. Removing the bp stitches halves the count to 42, and sc2tog halves it again to 21. Each step divides cleanly, so the gather is even all the way around.
Hanging Loop (Strap)
Ch 33.
Row 1: Sc in the 2nd ch from the hook and in each ch across. (32 sc)
Rows 2–3: Ch 1, turn, then sc in each st across. (32 sc)
Fasten off, leaving a 12 in (30.5 cm) tail. The strap measures about 7.5 in (19.1 cm) long and 0.75 in (1.9 cm) wide.
Choose the center back of the holder, between two squares. Sew each end of the strap to the inside of the top band, with the ends 1.5 in (3.8 cm) apart and overlapping the band by 0.5 in (1.3 cm). The loop rises about 3 in (7.6 cm) above the rim.
Final Blocking
- Weave in all remaining ends on the inside of the tube.
- Lay the holder flat, with the seams at the side folds and the strap at the center back.
- Mist it evenly with water until it is damp, not soaked.
- Shape the body to 10 in (25.4 cm) wide. Pin the top band straight across.
- Square up each visible square to 5 in (12.7 cm) and pin the corners.
- Smooth the ribs so they run vertically and taper evenly toward the opening. Do not stretch the ribbing.
- Let it dry completely, then flip it and repeat on the other side if the back needs shaping.
- Optional: once it is dry, stuff the holder with bags so it takes on its rounded hanging shape.
Final Quality-Control Checklist
- [ ] All 8 squares measure 5 in (12.7 cm) and have 80 sc in Round 7
- [ ] Every seam matches 21 sts to 21 sts, with no puckers
- [ ] Seam ridges sit on the RS and form a neat grid
- [ ] The tube measures 20 in (50.8 cm) around
- [ ] Top band: 84 sc, 6 rounds, 1.25 in (3.2 cm) deep
- [ ] Ribs line up vertically, with 42 fpdc ribs
- [ ] The bottom opening has 21 sc and lets a bag pull through easily
- [ ] The strap is firmly sewn on and the loop is centered
- [ ] All ends are woven in on the inside
Troubleshooting
Square cups or ruffles: Check the counts for Rounds 4 and 6. An extra or missing dc per side distorts the shape.
Corners look rounded: Make sure each corner ch-2 sp holds exactly 2 dc on each side. Pin the corners firmly when blocking.
Seams pucker: Loosen your tension or seam with a hook half a size larger.
Top band flares: You have more than 84 sts. Count again and sc2tog to correct.
Ribs spiral: Start each round directly above the previous join, and keep fpdc over fpdc.
Opening is too tight for bags: Skip Round 9, or work Round 8 as (sc2tog, sc) around for 28 sts.
Holder stretches too much when full: Use 100% cotton and tighten your gauge slightly.
Care
Hand wash in cool water, or machine wash on gentle inside a laundry bag. Reshape and lay flat to dry.
Final Notes
The measurement chain is simple. Each square has 21 sts per side and measures 5 in (12.7 cm). Four squares around make 84 sts and 20 in (50.8 cm) of circumference. Two tiers make 10 in (25.4 cm) of height. Add the 1.25 in (3.2 cm) top band and the 3.75 in (9.5 cm) ribbed bottom, and the finished holder is 15 in (38.1 cm) tall. If you check your gauge on the first square and match stitch to stitch at every seam, the band and ribbing will fit without adjustment.
Happy crocheting!