

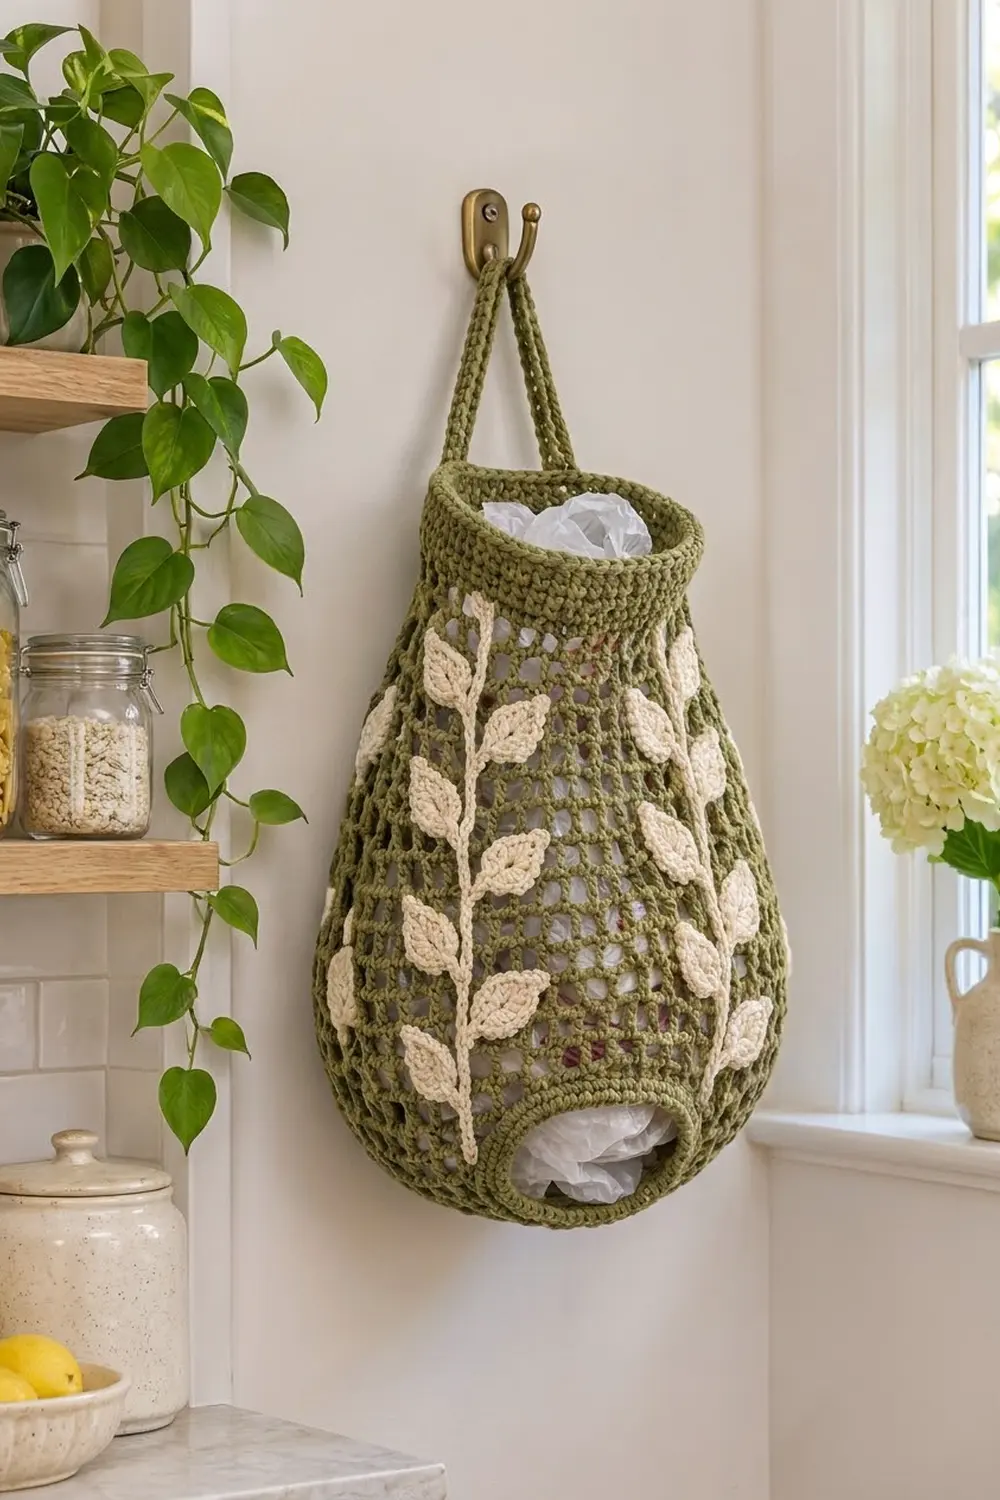
Every kitchen ends up with a pile of plastic bags somewhere. This teardrop holder turns that pile into something you won’t mind seeing. Stuff bags in through the wide top, then pull them out one at a time through the small hole at the bottom.
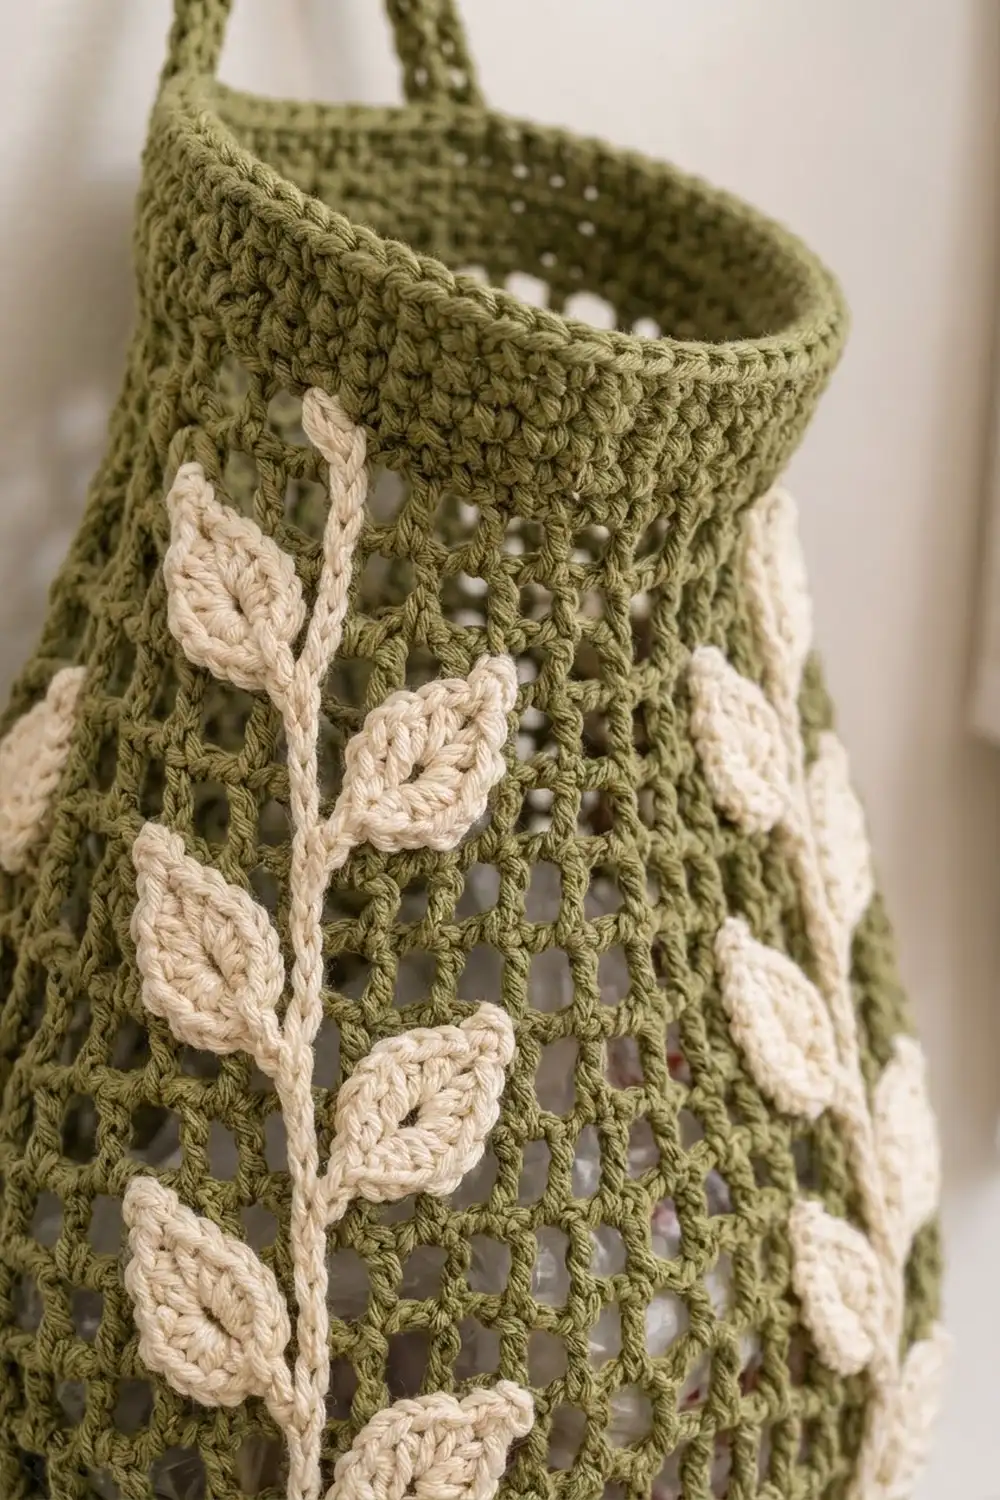
The body is an olive green filet mesh, so you can see how many bags are left. Cream leaf vines climb the mesh, and solid single-crochet bands give the top and bottom openings a firm, tidy finish. The look is calm and botanical.
The pattern uses US crochet terms. The finished holder is about 14.4 in (36.6 cm) tall, not counting the strap, and 10 in (25.4 cm) wide when laid flat at its widest point. The top opening is about 4½ in (11.4 cm) across, and the bottom dispensing hole is about 2½ in (6.4 cm) across.
You work the body as one piece in joined rounds from the bottom up. Start with a chain ring, make a solid band, switch to mesh, increase to the widest point, and then decrease toward the top band. The strap is worked straight off the rim. The cream stems and leaves are made separately and sewn on last.
Finished Size and Construction
- Finished size: 14.4 in (36.6 cm) tall × 10 in (25.4 cm) wide, laid flat at the widest point
- Skill level: Intermediate
- Terminology: US crochet terms
- Yarn weight: Worsted (#4), cotton or cotton blend
- Hook: 5.0 mm (US H-8)
- Number of pieces: 1 body with an attached strap, plus 6 stems and 48 leaves for appliqué
- Layout: Single piece worked in the round; no motif joining
- Body circumference: 8 in (20.3 cm) at the bottom, 20 in (50.8 cm) at the widest point, 14 in (35.6 cm) at the top
- Size before edging: 14.2 in (36.1 cm) tall
- Edging depth: About 0.2 in (0.5 cm) added at the bottom opening
- Strap: 1 in (2.5 cm) wide × 12 in (30.5 cm) long
Materials
Pick a smooth worsted cotton or cotton blend. Cotton holds the teardrop shape, resists stretching under the weight of the bags, and makes crisp leaves. The amounts below assume roughly 170 m per 100 g.
- Olive green (main color): 150 g, about 255 m
- Cream (appliqué): 90 g, about 153 m
These quantities include a margin of about 15% for swatching and tension differences.
Tools:
- 5.0 mm (US H-8) crochet hook
- Tapestry needle
- 2 stitch markers
- Rustproof pins
- Tape measure
- Scissors
- A balloon or rolled towel for blocking
Abbreviations (US Terms)
- ch – chain
- sl st – slip stitch
- sc – single crochet
- hdc – half double crochet
- dc – double crochet
- dc2tog – double crochet two together
- sp – space
- st(s) – stitch(es)
- rnd – round
- RS – right side
Special stitches:
- Mesh unit: A dc followed by ch 1, so (dc, ch 1). One mesh unit = 2 sts wide. At the start of a mesh round, ch 4 counts as the first dc + ch 1.
- Mesh in next: dc in next dc, ch 1.
- Mesh increase (MI): (dc, ch 1, dc, ch 1) in the same dc. This turns 1 mesh unit into 2.
- Mesh decrease (MD): dc2tog worked over the next 2 dc, skipping the ch-1 sp between them, then ch 1. This turns 2 mesh units into 1.
Gauge and Checkpoints
- Single crochet: 16 sts × 18 rnds = 4 in (10.2 cm)
- Mesh: 8 mesh units × 6 rnds = 4 in (10.2 cm)
So each sc is 0.25 in (0.6 cm) wide, and each mesh unit is 0.5 in (1.3 cm) wide.
Before you commit, work Rnds 1–8 as a test piece and measure it. That covers both gauges, and you can keep going on it if it matches.
Checkpoints:
- After Rnd 4: The ring measures 8 in (20.3 cm) around, and the band is 0.9 in (2.3 cm) tall.
- After Rnd 8: The tube measures 20 in (50.8 cm) around, or 10 in (25.4 cm) flat. The mesh is about 2.7 in (6.9 cm) tall.
- After Rnd 16: The mesh is 8 in (20.3 cm) tall.
- After Rnd 22: The mesh is 12 in (30.5 cm) tall, and the top measures 14 in (35.6 cm) around.
- After Rnd 28: The body is 14.2 in (36.1 cm) tall.
If your piece is too big, go down half a hook size. If it’s too small, go up half a size. When only the mesh is off, change hooks for the mesh rounds only.
Body
Start at the bottom opening. Join every round with a sl st to the first st, and keep the RS facing out.
Bottom Band
Foundation: With olive green, ch 32. Join with a sl st to the first ch to form a ring, making sure the chain isn’t twisted.
Rnd 1: Ch 1, sc in each ch around, join. (32 sc)
Rnds 2–4: Ch 1, sc in each st around, join. (32 sc)
Mesh Set-Up and Increases
Rnd 5 (set-up): Ch 4 (counts as dc + ch 1), skip next st, dc in next st, ch 1, skip next st 15 times, join to the 3rd ch of the beginning ch-4. (16 mesh units)
Rnd 6: Ch 4, (dc, ch 1) in the same st as the join to complete the first MI. Mesh in next. MI in next dc, mesh in next 7 times, join. (24 mesh units)
Rnd 7: Start with an MI as in Rnd 6, then mesh in next 2. MI in next dc, mesh in next 2 7 times, join. (32 mesh units)
Rnd 8: Start with an MI, then mesh in next 3. MI in next dc, mesh in next 3 7 times, join. (40 mesh units)
These quick increases make the rounded teardrop base.
Widest Section
Rnds 9–16: Ch 4 (counts as the first mesh unit), mesh in next 39 times, join. (40 mesh units)
Always work each dc into the top of the dc below, so the squares stack straight.
Decreases
Rnd 17: Ch 4, mesh in next 7, MD. Mesh in next 8, MD 3 times, join. (36 mesh units)
Each repeat uses 10 mesh units and makes 9, so 4 repeats take 40 units down to 36.
Rnd 18: Work 1 mesh unit in each mesh unit around. (36 mesh units)
Rnd 19: Ch 4, mesh in next 6, MD. Mesh in next 7, MD 3 times, join. (32 mesh units)
Rnd 20: Work even. (32 mesh units)
Rnd 21: Ch 4, mesh in next 5, MD. Mesh in next 6, MD 3 times, join. (28 mesh units)
Rnd 22: Work even. (28 mesh units)
Top Band
Rnd 23 (conversion round): Ch 1, sc in each dc and each ch-1 sp around, join. That’s 28 sc in the dc + 28 sc in the ch-1 sps + 0 extra = 56 sc.
Rnds 24–28: Ch 1, sc in each st around, join. (56 sc)
You now have a top band of 6 sc rounds, about 1.3 in (3.3 cm) tall. Don’t fasten off yet.
Border: Finishing the Openings and Strap
The edging gauge is the same as the sc gauge: 16 sts = 4 in (10.2 cm). Each edging round has exactly 1 st per existing st, so the edges keep the circumference you measured and won’t ruffle or pull in.
Top rim, Rnd 29: Sl st loosely in each st around, join. (56 sl sts)
That’s 56 sts × 0.25 in = 14 in (35.6 cm), the same as Rnd 28. Place markers on st 1 and st 29. These two sts sit directly opposite each other.
Strap, Row 1: Ch 1, sc in the marked st 1 and in the next 3 sts. (4 sc)
Rows 2–54: Ch 1, turn, sc in each st across. (4 sc)
The strap is 12 in (30.5 cm) long, because 54 rows ÷ 18 rows × 4 in = 12 in. It is 1 in (2.5 cm) wide, because 4 sts × 0.25 in = 1 in.
Fasten off, leaving an 8 in (20.3 cm) tail. Make sure the strap isn’t twisted, then whipstitch the last row to Rnd 29 sts 29–32 on the inside of the rim.
Bottom opening, Rnd B1: Turn the body upside down. Join olive green in any free loop of the foundation chain. Ch 1, sc in each free loop around, join. (32 sc)
Bottom opening, Rnd B2: Sl st loosely in each st around, join. (32 sl sts) Fasten off.
That’s 32 sts × 0.25 in = 8 in (20.3 cm), the same as the bottom band. The bottom band is now 5 sc rounds, or 1.1 in (2.8 cm) tall, so the body totals 1.1 + 12 + 1.3 = 14.4 in (36.6 cm).
Leaf Vine Appliqués
Stems (make 6)
With cream, ch 45. Sl st into the back bump of the 2nd ch from the hook and each ch across. (44 sl sts)
The stem is about 11 in (27.9 cm) long. Fasten off, leaving a 16 in (40.6 cm) tail. If your stem doesn’t fit, add or remove chains so it’s about 1 in (2.5 cm) shorter than the mesh.
Leaves (make 48)
- Ch 8.
- Sc in the 2nd ch from the hook, hdc in next ch, dc in next 3 ch, hdc in next ch, then 3 sc in the last ch. This rounded end is the base of the leaf.
- Working along the opposite side of the foundation chain, hdc in next ch, dc in next 3 ch, hdc in next ch, sc in next ch. (15 sts)
- Tip: Ch 2, sl st in the first sc.
Fasten off, leaving an 8 in (20.3 cm) tail. Each leaf is about 1¾ in (4.4 cm) long × 1¼ in (3.2 cm) wide. Working around the chain creates the raised center vein.
Placement
Space the 6 stems evenly around the body, about 3.3 in (8.4 cm) apart at the widest round. Start each stem 1 round above the bottom band and end it about 1 round below the top band.
Sew 8 leaves to each stem. Sew 7 of them alternating left and right, about 1¼ in (3.2 cm) apart, with the bases touching the stem and the tips angled upward. Sew the 8th leaf to the top of the stem, pointing up. Sew down each stem along its length and each leaf around its outline, catching the dc posts of the mesh behind it.
Final Blocking
- Weave in all ends inside the bands, where they won’t show through the mesh.
- Soak the holder in cool water for 10 minutes, then press out the water in a towel. Don’t wring it.
- Inflate a balloon to about 10 in (25.4 cm) wide, or roll a towel into a teardrop, and slide it inside.
- Straighten the mesh columns so they run vertically, and pull the squares even.
- Pin the leaves flat against the form, with the center veins straight.
- Shape both openings into neat circles.
- Let the holder dry completely, then remove the form.
Final Quality-Control Checklist
- Height: 14.4 in (36.6 cm). Widest flat width: 10 in (25.4 cm).
- Stitch counts: bottom band 32 sts, mesh 40 units at the widest, top band 56 sts.
- Mesh columns stack straight, and every square is the same size.
- The strap is 1 in (2.5 cm) wide, untwisted, and sewn to the opposite side of the rim.
- All 6 vines have 8 leaves each, and the spacing is even all the way around.
- Both openings lie flat without ruffling.
- No ends show through the mesh.
Troubleshooting
The mesh slants in a spiral. You’re working into ch-1 sps instead of into the dc. Work each dc into the top of the dc below.
The base looks pointed instead of round. The increase rounds are too tight. Loosen your tension on Rnds 6–8.
The top band flares. Your sc are looser than your mesh. Go down half a hook size for Rnds 23–29.
The bottom hole is too tight. Redo Rnd B2 more loosely, or finish with Rnd B1 only.
The leaves curl. Steam them lightly and pin them flat to dry. Sew each leaf around its whole outline.
The strap stretches. Use cotton instead of acrylic, and sew the strap end through both the band and the rim round.
Care
Hand wash in cool water with mild soap, reshape, and lay flat to dry. Don’t tumble dry, because heat can loosen the mesh and soften the leaves.
Final Notes
The measurement chain is simple. 32 sc make an 8 in (20.3 cm) bottom ring, which becomes 16 mesh units. Three increase rounds take it to 40 units, or 20 in (50.8 cm) around. Even rounds hold the widest section, then three decrease rounds bring it down to 28 units. Those convert to 56 sc for a 14 in (35.6 cm) top band. The edging rounds keep 1 st per st, so nothing ruffles. Check your gauge, then each checkpoint, and the holder will come out 14.4 in (36.6 cm) tall.
Happy crocheting!