

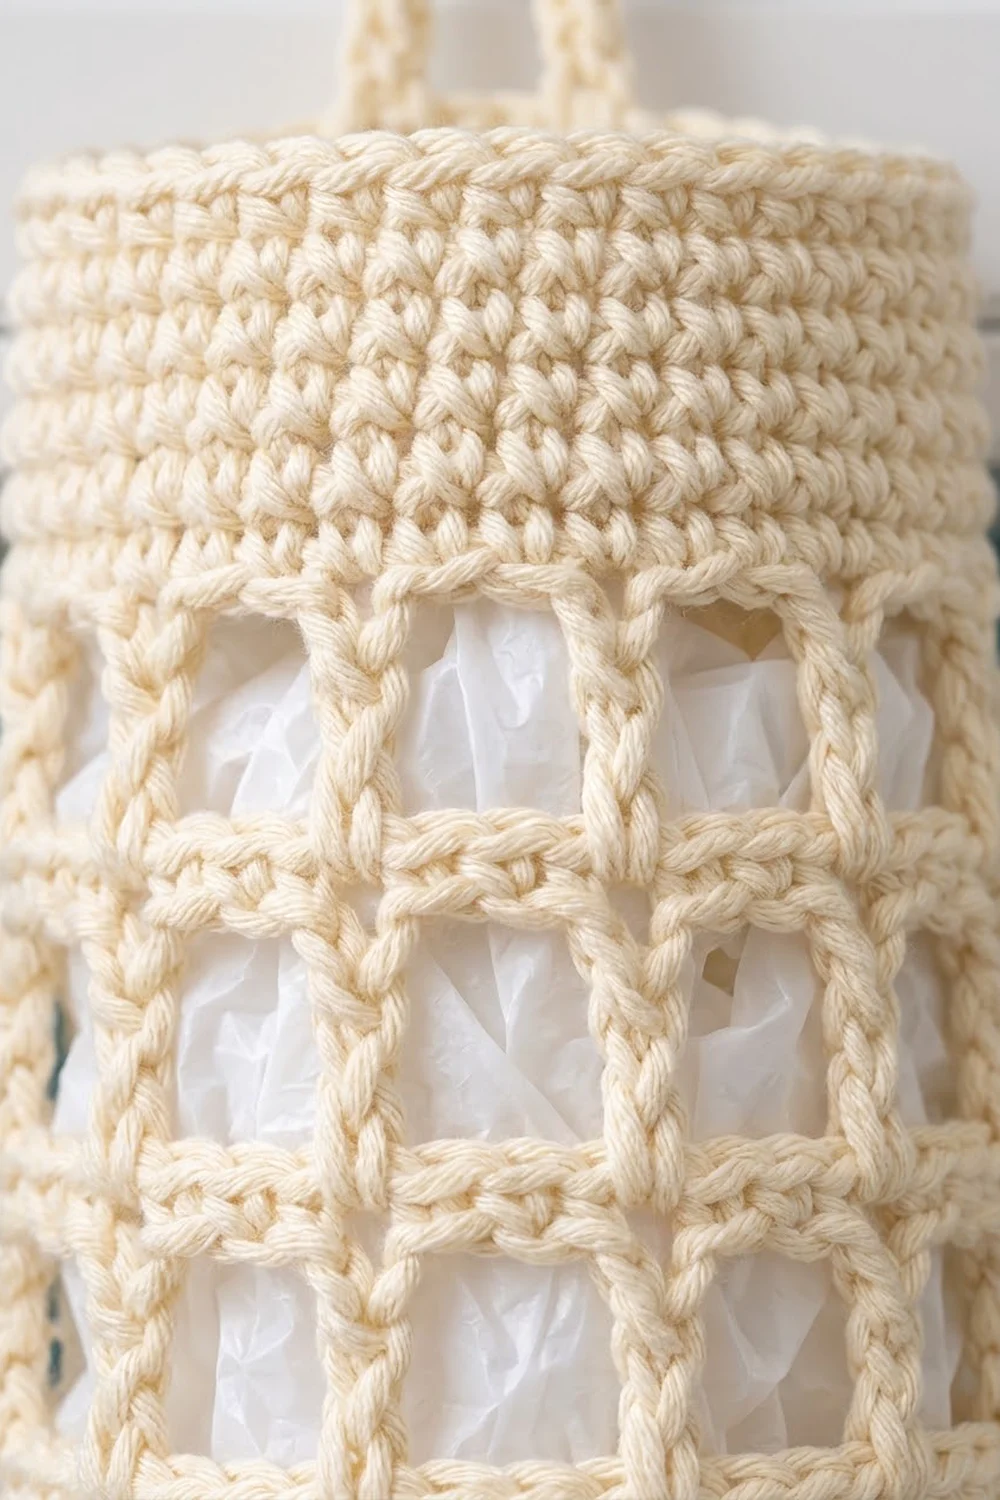
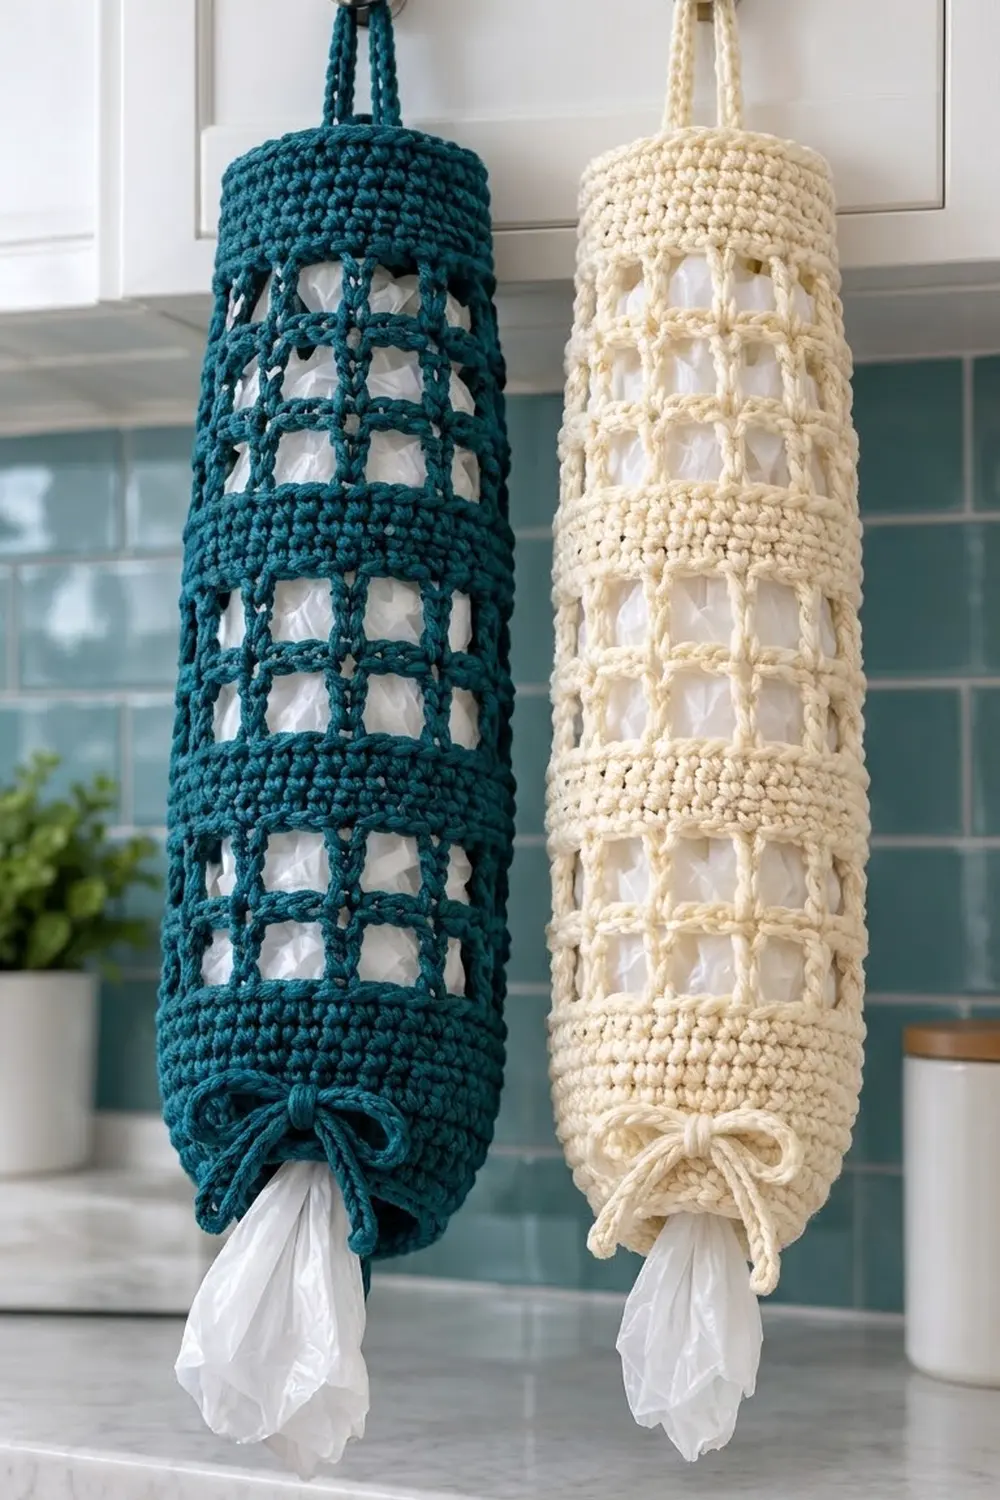
This bag holder is a slim, tall tube with a grid of open squares that shows the bags stuffed inside. Solid single crochet bands divide the grid into four mesh sections. A strap loop at the top hangs it from a cabinet knob. A chain drawstring near the bottom gathers the opening into a small spout tied with a bow. You push bags in at the top and pull them out one at a time at the bottom.
The sample photo shows two finished holders hanging side by side, one in deep teal and one in cream. They are two separate holders made from the same pattern, not one joined piece. Use one color per holder, or make a pair for a coordinated kitchen.
This pattern uses US crochet terms. The finished holder measures 6 in (15.2 cm) wide laid flat, which is 12 in (30.5 cm) around. It is 15.75 in (40.0 cm) tall, not counting the hanging loop. The loop adds about 2.5 in (6.4 cm) above the rim.
Construction is simple. You chain a ring at the top edge and work joined rounds downward, switching between single crochet bands and double crochet mesh rounds. An eyelet round near the bottom holds the drawstring. You make a narrow strap and a slip-stitch cord separately and attach them at the end. Every round has 48 stitches, so the tube stays straight from top to bottom.
Finished Size and Construction
- Finished size: 6 in (15.2 cm) wide flat x 15.75 in (40.0 cm) tall
- Circumference: 12 in (30.5 cm)
- Skill level: Easy
- Terminology: US crochet terms
- Yarn weight: Worsted (#4) cotton
- Hook: US H-8 (5.0 mm)
- Number of pieces: 1 tube body, plus 1 hanging strap and 1 drawstring cord
- Layout: Top band, then 4 mesh sections separated by 3 solid bands, then a bottom band with eyelets
- Piece size before border: 6 in (15.2 cm) flat x 15.5 in (39.4 cm) tall
- Border depth: 0.25 in (0.6 cm) at the top rim. The slip-stitch edge at the bottom adds no measurable height.
Materials
Use a smooth worsted-weight cotton or cotton blend. Cotton holds its shape, resists stretching under the weight of the bags, and washes well. A tightly plied yarn gives the crisp, rounded stitches seen in the sample. Avoid fuzzy or very stretchy acrylics, because they let the mesh sag.
Yarn (each holder uses one color):
- Teal holder: about 100 g / 180 m (197 yd) of deep teal
- Cream holder: about 100 g / 180 m (197 yd) of cream
These amounts include a margin of about 15% for your gauge check, the strap, the drawstring, and weaving in ends.
Tools:
- US H-8 (5.0 mm) crochet hook
- Stitch marker
- Tapestry needle
- Measuring tape
- Scissors
- A rolled towel or a 4 in (10.2 cm) wide bottle for blocking
Abbreviations (US Terms)
- ch – chain
- sl st – slip stitch
- sc – single crochet
- dc – double crochet
- sk – skip
- sp – space
- st(s) – stitch(es)
- rnd(s) – round(s)
- beg – beginning
Special technique – joined round: Do not turn. At the end of each round, sl st into the first stitch to close. For sc rounds, begin with ch 1 (does not count as a stitch) and work the first sc in the same stitch as the join.
Special technique – back-bump slip-stitch cord: Make a chain, then work back along it with a sl st into the back bump of each chain. This makes a firm, round cord that does not stretch.
Gauge and Checkpoints
Gauge: 16 sc and 16 rnds = 4 in (10.2 cm) in joined rounds. 8 dc mesh rnds = 4 in (10.2 cm), so each mesh round is 0.5 in (1.3 cm) tall.
Check your gauge before you go further. Chain 48, join, and work 8 rounds of sc (Rnds 1–8 below). This is the real top band, so you can keep it if it measures correctly.
Checkpoints:
- After Rnd 8: the tube measures 6 in (15.2 cm) flat and 2 in (5.1 cm) tall.
- After Rnd 12: 4 in (10.2 cm) tall.
- After Rnd 16: 5 in (12.7 cm) tall.
- After Rnd 36: 13 in (33.0 cm) tall.
- After Rnd 42: 14.5 in (36.8 cm) tall.
- After Rnd 46: 15.5 in (39.4 cm) tall, before the border.
If your piece is too big (wider than 6.25 in / 15.9 cm flat), go down one hook size. If it is too small (narrower than 5.75 in / 14.6 cm flat), go up one hook size. Change the hook, not the stitch count. The mesh repeat needs a multiple of 3 stitches, and 48 divides evenly by 3.
Body
The body is worked from the top rim down, in joined rounds, without turning.
Top Band
Foundation: Ch 48. Sl st into the first ch to form a ring. Make sure the chain is not twisted.
Rnd 1: Ch 1, sc in each ch around, sl st to first sc. (48 sts)
Rnds 2–8: Ch 1, sc in each st around, sl st to first sc. (48 sts)
Place a marker in the join of Rnd 8. The join line runs down one side of the tube. That side becomes the back, where you attach the strap.
Mesh Section 1
Rnd 9 (first mesh round): Ch 5 (counts as dc + ch 2), sk next 2 sts, dc in next st, ch 2, sk next 2 sts; repeat from * 14 more times, sl st to 3rd ch of beg ch-5. (16 dc + 16 ch-2 sps = 48 sts)
Each dc plus its ch-2 makes one square, so you have 16 squares around.
Rnds 10–12: Ch 5 (counts as dc + ch 2), sk ch-2 sp, dc in next dc, ch 2, sk ch-2 sp; repeat from * 14 more times, sl st to 3rd ch of beg ch-5. (16 dc + 16 ch-2 sps = 48 sts)
Work each dc directly on top of the dc below so the vertical bars of the grid stay in straight lines.
Solid Band 2
Rnd 13 (conversion round): Ch 1, sc in same st as join, 2 sc in next ch-2 sp, sc in next dc, 2 sc in next ch-2 sp; repeat from * around, sl st to first sc. (16 sc worked 1-per-dc + 32 sc worked into the 16 spaces = 48 sts)
Rnds 14–16: Ch 1, sc in each st around, sl st to first sc. (48 sts)
Mesh Section 2
Rnd 17: Work as Rnd 9. (16 dc + 16 ch-2 sps = 48 sts)
Rnds 18–20: Work as Rnds 10–12. (48 sts)
The dc posts of Rnd 17 should line up with those of Rnd 9. Start Rnd 17 in the join stitch, just as Rnd 9 did, and skip exactly 2 sts each time. The grid columns will then line up through every section.
Solid Band 3
Rnd 21: Work as Rnd 13. (16 + 32 = 48 sts)
Rnds 22–24: Work as Rnds 14–16. (48 sts)
Mesh Section 3
Rnd 25: Work as Rnd 9. (48 sts)
Rnds 26–28: Work as Rnds 10–12. (48 sts)
Solid Band 4
Rnd 29: Work as Rnd 13. (16 + 32 = 48 sts)
Rnds 30–32: Work as Rnds 14–16. (48 sts)
Mesh Section 4
Rnd 33: Work as Rnd 9. (48 sts)
Rnds 34–36: Work as Rnds 10–12. (48 sts)
Checkpoint: the tube now measures 13 in (33.0 cm) from the top edge.
Bottom Band with Eyelets
Rnd 37: Work as Rnd 13. (16 + 32 = 48 sts)
Rnds 38–42: Ch 1, sc in each st around, sl st to first sc. (48 sts)
Rnd 43 (eyelet round): Ch 1, sc in next 4 sts, ch 2, sk next 2 sts; repeat from * 7 more times, sl st to first sc. (32 sc + 8 ch-2 sps = 48 sts)
The 8 eyelets are spaced 1.5 in (3.8 cm) apart around the tube.
Rnd 44: Ch 1, sc in each sc and 2 sc in each ch-2 sp around, sl st to first sc. (32 sc worked 1-per-sc + 16 sc worked into the 8 spaces = 48 sts)
Rnds 45–46: Ch 1, sc in each st around, sl st to first sc. (48 sts)
Do not fasten off. Continue straight into the bottom border.
Border
The border uses the same gauge as the body: 16 sts = 4 in (10.2 cm). When the tube is flattened, each side (front and back) holds 24 stitches, which equals 6 in (15.2 cm). A tube has no corners, so you never add corner stitches. Every border round keeps the same 48 stitches.
Bottom Edge
Rnd 47: Sl st loosely in each st around. (48 sl sts: 24 front + 24 back)
Fasten off. This round firms up the bottom opening so it does not stretch when bags are pulled through.
Top Rim
Turn the tube upside down. Join yarn with a sl st in any loop of the foundation chain, on the back side next to the Rnd 8 marker.
Rnd T1: Ch 1, sc in each foundation ch loop around, sl st to first sc. (48 sc: 24 front + 24 back)
Rnd T2: Sl st loosely in each sc around. (48 sl sts: 24 front + 24 back)
Fasten off. Rnd T1 adds 0.25 in (0.6 cm), so the total height is now 15.75 in (40.0 cm).
Why the math works: The foundation chain has 48 loops, and every body round has 48 stitches. Working exactly one border stitch into each one keeps the rim at 12 in (30.5 cm) around. Too many stitches would make it flare, and too few would make it pucker. Each flat side stays at 24 stitches, or 6 in (15.2 cm).
Hanging Strap
Row 1: Ch 4, sc in 2nd ch from hook and in each remaining ch. (3 sc)
Rows 2–28: Ch 1, turn, sc in each st across. (3 sc)
Fasten off, leaving a 12 in (30.5 cm) tail. The strap measures 0.75 in (1.9 cm) wide and 7 in (17.8 cm) long.
Attaching: Flatten the tube with the marker at center back. On the inside of the back, place the strap ends side by side, 1 in (2.5 cm) apart. Each end should overlap the top band by 1 in (2.5 cm). Sew each end down firmly with the tail, stitching through the sc rounds only so the stitches do not show on the front. The loop will stand 2.5 in (6.4 cm) above the rim.
Drawstring
Chain about 110, until the chain measures 26 in (66.0 cm). Sl st in the back bump of the 2nd ch from hook and in each ch back to the start. Fasten off and trim the ends to 0.5 in (1.3 cm).
Starting at the front center, weave the cord in and out through all 8 eyelets of Rnd 43. Both cord ends should come out at the front through neighboring eyelets. Pull to gather the bottom to a 2 in (5.1 cm) opening and tie a bow. Tie an overhand knot in each cord end so it cannot slip back through.
Final Blocking
- Remove the drawstring.
- Soak the holder in cool water with a little mild soap for 10 minutes.
- Gently press out the water, then roll the holder in a towel to remove more. Do not wring it.
- Slide the tube over a rolled towel or a 4 in (10.2 cm) wide bottle so it keeps its round shape.
- Smooth the tube to 15.75 in (40.0 cm) tall and 12 in (30.5 cm) around.
- Use your fingers to square up each mesh opening and straighten the dc columns.
- Let it dry completely, then rethread the drawstring.
Final Quality-Control Checklist
- Every round has 48 stitches.
- Each mesh round has 16 dc and 16 ch-2 spaces.
- The dc columns line up vertically through all 4 mesh sections.
- The top band is 8 rounds, each middle band is 4 rounds, and the bottom band is 10 rounds.
- The flat width is 6 in (15.2 cm) at the top, middle, and bottom.
- The total height is 15.75 in (40.0 cm).
- The strap is sewn securely at center back, with no stitches showing on the front.
- The drawstring passes through all 8 eyelets and ties at the front.
- All ends are woven in through the solid sc bands, not through the mesh.
Troubleshooting
The tube spirals or the join line slants. Joined rounds tend to drift a little. Always work the first stitch into the same stitch as the join, not the next one.
The mesh squares are uneven. Keep the ch-2 at a steady tension and don’t pull the dc tight. Count the 2 skipped stitches carefully in each first mesh round.
The grid columns don’t line up between sections. Start each first mesh round (Rnds 9, 17, 25, 33) at the join and skip exactly 2 sts each time.
The sc bands pucker above the mesh. Recount your conversion round. You need 2 sc in each ch-2 space, for 48 stitches.
The top rim flares. You may have worked 2 sc into some foundation loops. Pull out Rnd T1 and work exactly 1 sc per loop.
Bags slip out on their own. Pull the drawstring tighter, to about 1.5 in (3.8 cm), and double-knot the bow.
The holder stretches longer over time. Cotton relaxes a little when it carries weight. Wash it and block it back to 15.75 in (40.0 cm).
Care
Remove the drawstring first so it does not tangle. Machine wash cold on a gentle cycle in a mesh bag, then reshape the holder and lay it flat or hang it to dry.
Final Notes
The whole design rests on one number: 48 stitches. At 16 sts per 4 in (10.2 cm), that gives 12 in (30.5 cm) around and 6 in (15.2 cm) flat. Sixteen mesh rounds add 8 in (20.3 cm), and thirty sc rounds add 7.5 in (19.1 cm). That makes the body 15.5 in (39.4 cm), and the top border brings it to 15.75 in (40.0 cm). The strap adds a 2.5 in (6.4 cm) loop, and the 26 in (66.0 cm) drawstring closes the bottom.
If your gauge is right on the top band, every later checkpoint will fall into place. Make one in teal and one in cream, and your plastic bags finally have a tidy home.
Happy crocheting!