

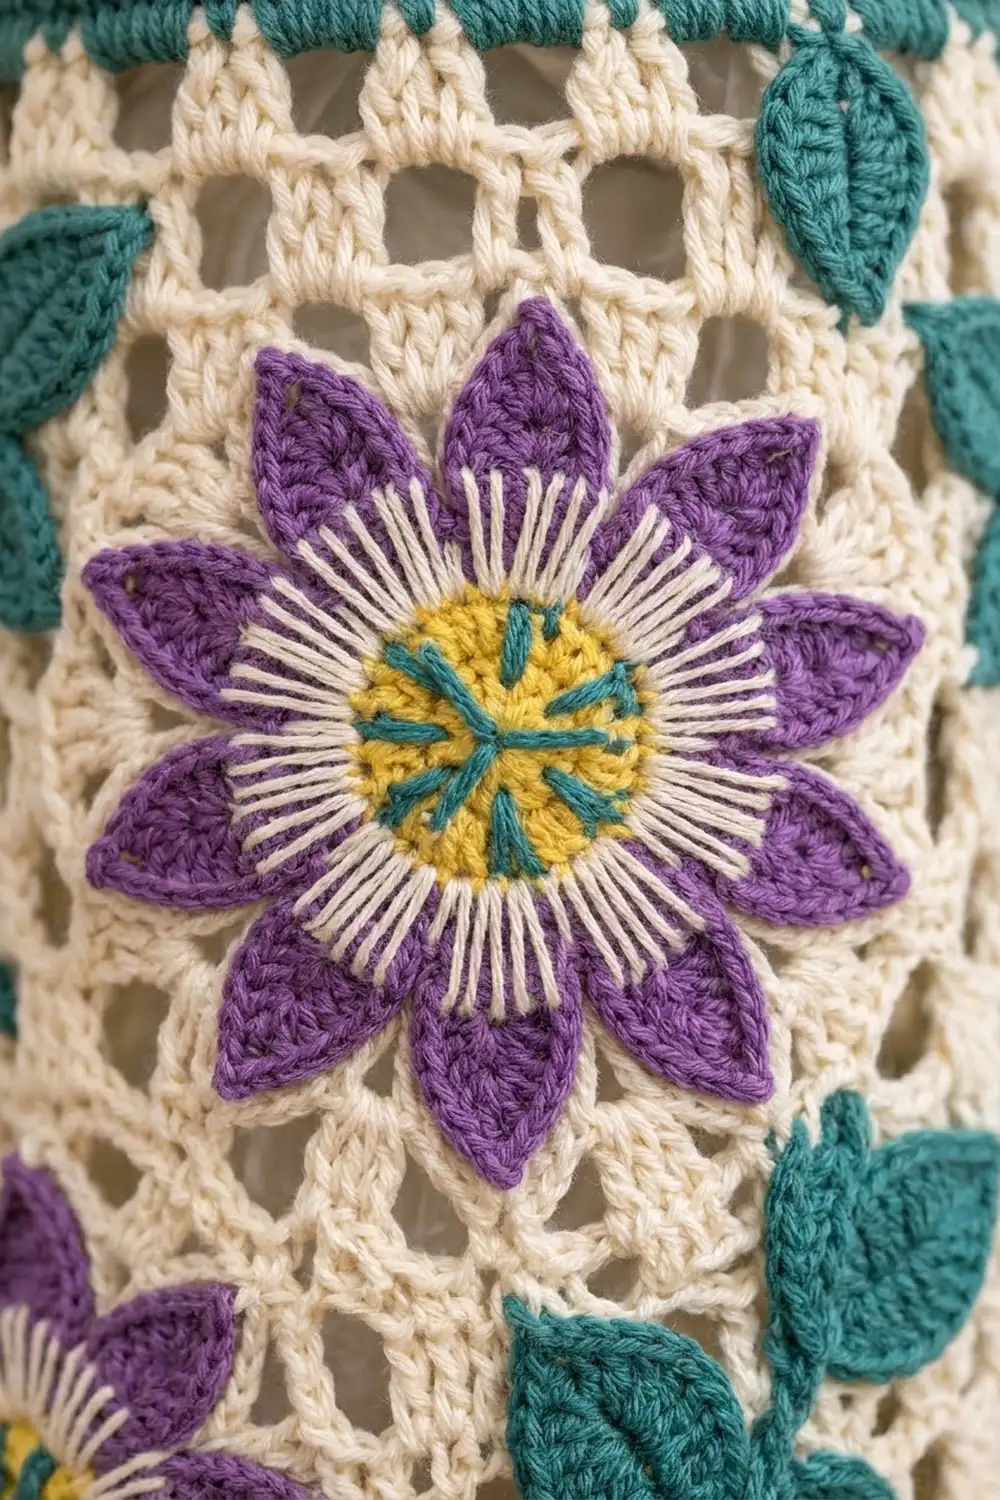
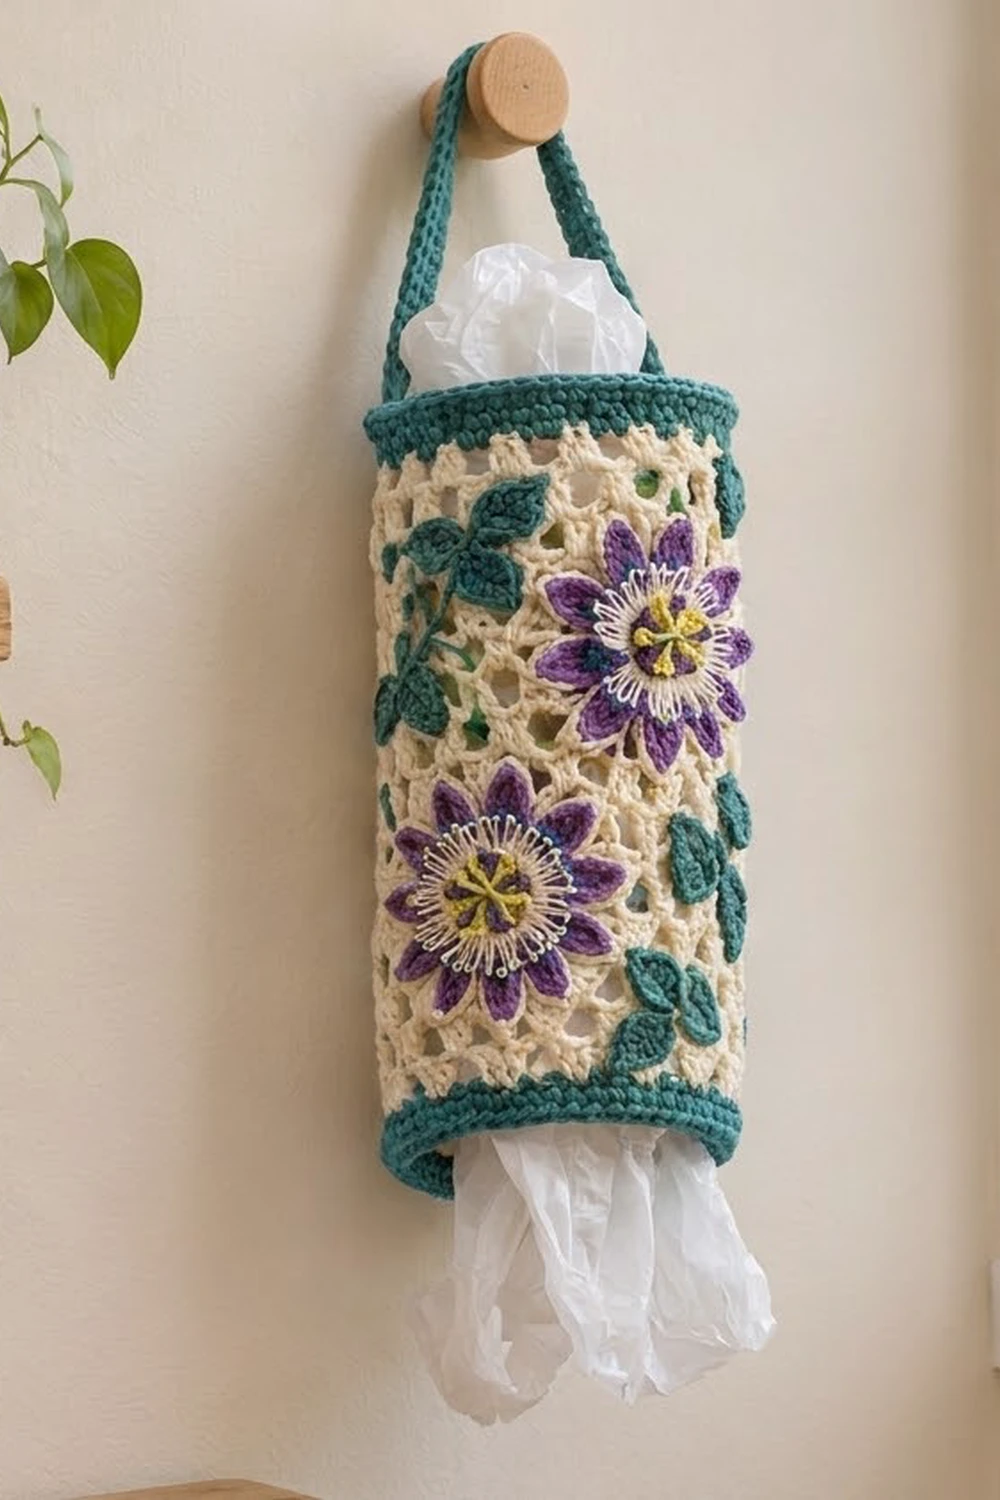
The Passiflora Pantry Bag Holder turns a pile of loose grocery bags into something you will be happy to see on the wall. It is a tall, open tube with a cream lattice body, teal bands at each end, and a teal strap for a hook or peg. Passionflowers and leaves scattered over the mesh make it look like a climbing vine.
The colors are cream, teal, purple, and soft yellow. The flowers have pointed purple petals, a fringed cream crown, and a yellow center with teal stamens. The look is cottage-style and botanical, and still practical for a kitchen or laundry room.
This pattern uses US crochet terms. The finished holder measures 16 in (40.6 cm) around, about 5 in (12.7 cm) in diameter, 8 in (20.3 cm) wide when flattened, and 13 in (33.0 cm) tall, not counting the strap.
You work the tube in joined rounds from the bottom up: first a teal band, then the cream mesh, then a teal top band. The strap is worked straight off the top band and seamed to the opposite side. Last, you crochet the flowers and leaves separately and sew them on.
Finished Size and Construction
- Finished size: 16 in (40.6 cm) circumference × 13 in (33.0 cm) tall
- Flattened width: 8 in (20.3 cm)
- Skill level: Easy-Intermediate
- Terminology: US
- Yarn weight: Worsted (#4), cotton or cotton blend
- Hook: 4.5 mm (US 7)
- Number of pieces: 1 tube body with strap, plus 4 flower appliqués and 12 leaf appliqués
- Layout: Vertical tube; 2 flowers on the front and 2 on the back, placed diagonally, with leaves around them
- Body size before top band: 12 in (30.5 cm) tall
- Band (border) depth: 1 in (2.5 cm) at the top and at the bottom
- Strap: 14 in (35.6 cm) long × 0.75 in (1.9 cm) wide
Materials
Use a smooth worsted-weight cotton or cotton blend. Cotton holds the tube’s shape, does not stretch much under the weight of bags, and makes crisp petals. Avoid fuzzy acrylic, because it blurs the mesh holes.
- Cream: 65 g / 110 m (body mesh and flower fringe)
- Teal: 35 g / 60 m (bands, strap, leaves, stamens)
- Purple: 15 g / 25 m (petals)
- Yellow: 5 g / 9 m (flower centers)
These quantities include a margin of about 15% for swatching and sewing tails.
Tools:
– 4.5 mm (US 7) crochet hook
– Tapestry needle
– 4 locking stitch markers
– Scissors
– Measuring tape
– Rustproof pins
– A cylinder about 5 in (12.7 cm) across, or a rolled towel, for blocking
Abbreviations (US Terms)
- ch – chain
- sl st – slip stitch
- sc – single crochet
- hdc – half double crochet
- dc – double crochet
- sk – skip
- st(s) – stitch(es)
- sp – space
- FLO / BLO – front loop only / back loop only
- Rnd – round
Special stitch – Mesh group: 2 dc worked into the same ch-2 sp, followed by ch 2.
Gauge and Checkpoints
Gauge in sc: 16 sc and 16 rnds = 4 in (10.2 cm).
Gauge in mesh: 4 mesh groups (each 2 dc + ch 2) = 4 in (10.2 cm) wide; 4 mesh rnds = 2 in (5.1 cm) tall.
The bottom band is your gauge test, so check it before you move on.
- Checkpoint 1 (after the bottom band): Flattened width 8 in (20.3 cm), height 1 in (2.5 cm).
- Checkpoint 2 (after mesh Rnd 10): Total height 6 in (15.2 cm).
- Checkpoint 3 (after mesh Rnd 22): Total height 12 in (30.5 cm).
- Checkpoint 4 (after the top band): Total height 13 in (33.0 cm).
If your flattened band is wider than 8 in (20.3 cm), go down half a hook size. If it is narrower, go up half a size. If the width is right but the mesh rounds are taller than 0.5 in (1.3 cm) each, work 1 or 2 fewer mesh rounds to land on the 12 in (30.5 cm) checkpoint.
Body
Bottom Band (Teal)
With teal, ch 64. Join with a sl st to the first ch, making sure the chain is not twisted.
Rnd 1: Ch 1, sc in each ch around, join with sl st to first sc. (64 sc)
Rnds 2–4: Ch 1, sc in each st around, join. (64 sc)
Place a marker in the first stitch. This is your side fold line, and all round joins will stack near it. Check Checkpoint 1 now. Fasten off teal.
Mesh Body (Cream)
Rnd 1 (set-up): Join cream in the marked st. Ch 3 (counts as dc), dc in next st, ch 2, sk 2 sts, *dc in next 2 sts, ch 2, sk 2 sts; repeat from * 14 more times, join with sl st to top of ch-3. (16 groups: 32 dc + 16 ch-2 sps)
Each group with its ch 2 uses 4 base stitches, and 16 × 4 = 64, so the round closes evenly.
Rnd 2: Sl st in next dc, sl st in next ch-2 sp, ch 3 (counts as dc), dc in same sp, ch 2, *2 dc in next ch-2 sp, ch 2; repeat from * 14 more times, join to top of ch-3. (16 groups: 32 dc + 16 ch-2 sps)
Because each new group sits over the space below, the holes shift half a group every round. That offset is what creates the lattice look.
Rnds 3–22: Repeat Rnd 2. (16 groups each round: 32 dc + 16 ch-2 sps)
The joins will drift slightly around the tube, which is normal. Keep the drift close to the side fold so it hides at the edge when the holder hangs flat. Check Checkpoint 2 after Rnd 10 and Checkpoint 3 after Rnd 22. Fasten off cream.
Border: Top Band and Strap
Border Gauge
The top band uses the same gauge as the bottom band: 16 sc = 4 in (10.2 cm). With 64 stitches around, the circumference is 16 in (40.6 cm). Flattened, that is 32 stitches on the front and 32 on the back, so each face is 8 in (20.3 cm) wide.
Top Band (Teal)
Rnd 1 (conversion): Join teal in the first dc of any group near the side fold. Ch 1, *sc in each of the next 2 dc, 2 sc in next ch-2 sp; repeat from * around, join. (32 sc in dc + 32 sc in sps = 64 sc)
Flattened, that gives 32 sc on the front and 32 sc on the back.
Rnds 2–4: Ch 1, sc in each st around, join. (64 sc)
Do not fasten off. Check Checkpoint 4: total height 13 in (33.0 cm).
Why the Math Works
The bottom band, the mesh, and the top band all sit on the same 64-stitch base. The mesh uses 4 base stitches per group (16 groups × 4 = 64). The conversion round puts those 64 stitches back exactly: 2 sc on each pair of dc plus 2 sc in each space gives 4 sc per group, and 16 × 4 = 64.
No stitches are gained or lost from bottom to top. That keeps the tube straight-sided instead of flaring or pulling in.
Hanging Strap
Lay the tube flat with the side fold on one edge. Number the top-band stitches 1–64 starting at the join. Stitches 1–3 sit on one fold, and stitches 33–35 sit directly opposite on the other fold.
Row 1: Ch 1, sc in sts 1–3, turn. (3 sc)
Rows 2–56: Ch 1, sc in each st across, turn. (3 sc)
The strap now measures 14 in (35.6 cm). Without twisting it, bring the end across the top opening and line it up with stitches 33–35. Sl st through each strap stitch and the matching band stitch together, 3 sl sts in total. Fasten off and weave in the end.
When the holder hangs, the strap rises about 6.5 in (16.5 cm) above the rim.
Passionflower Appliqué (Make 4)
Rnd 1 (Yellow): Make a magic ring. Ch 1, 8 sc in ring, pull the ring closed, join. (8 sc) Fasten off.
Rnd 2 (Cream): Join cream in any st. Ch 1, 2 sc in each st around, join. (16 sc)
Rnd 3 (Cream fringe, FLO): Working in the front loops of Rnd 2: *ch 5, sl st in 2nd ch from hook and in next 3 ch, sl st in next st; repeat from * around, ending with a sl st in the first st. (16 spikes) Fasten off.
The unused back loops of Rnd 2 are left free for the petals, which will sit behind the fringe.
Rnd 4 (Purple petals, BLO of Rnd 2): Join purple in any free back loop of Rnd 2, working behind the fringe. *Sc in the current st. Ch 8, then work back down the chain: sl st in 2nd ch from hook, sc in next ch, hdc in next ch, dc in next 2 ch, hdc in next ch, sc in last ch. Sc in next st of Rnd 2. Move to the next free st; repeat from * 7 more times, join. (8 petals, 2 base sts each = 16 sts used)
Each petal has 7 worked stitches, which makes a tapered, pointed shape about 1.5 in (3.8 cm) long. Fasten off, leaving a 12 in (30.5 cm) purple tail for sewing.
Stamens: With teal, embroider 5 straight stitches across the yellow center in a star shape, each about 0.25 in (0.6 cm) long.
The finished flower measures about 3.5 in (8.9 cm) across.
Leaf Appliqué (Make 12)
With teal, ch 7.
Leaf: Sc in 2nd ch from hook, hdc in next ch, dc in next 2 ch, hdc in next ch, (sc, ch 2, sc) in last ch for the tip. Working along the other side of the foundation chain: hdc in next ch, dc in next 2 ch, hdc in next ch, sc in last ch, sl st to first sc. (12 sts + ch-2 tip)
Each leaf is about 1.5 in (3.8 cm) long and 0.75 in (1.9 cm) wide. Fasten off, leaving an 8 in (20.3 cm) tail.
Final Assembly of Appliqués
Slide the blocking cylinder or a rolled towel into the tube so the mesh stays open while you sew.
- Front: Pin 1 flower in the upper right, about 3 in (7.6 cm) below the top band. Pin a second flower in the lower left, about 3 in (7.6 cm) above the bottom band.
- Back: Mirror the front layout.
- Leaves: Place 3 leaves around each flower, in pairs or singles, with tips pointing up and out.
Sew each flower through the back loops of Rnd 4 only, so the petals and fringe stay free. Tack the tip of each petal down with one small stitch so it does not catch on bags. Sew each leaf along its center line. Do not pull the stitches tight, or the mesh will pucker.
Final Blocking
- Weave in all ends inside the tube.
- Lightly mist the whole holder with water until it is evenly damp, not soaked.
- Slide the holder onto a 5 in (12.7 cm) cylinder or a firmly rolled towel.
- Smooth the mesh so the holes line up in straight diagonals and the side fold runs straight.
- Ease each petal and leaf into a flat point with your fingers, and spread the fringe evenly.
- Pin the strap straight on a flat surface beside the holder.
- Let it dry completely, about 24 hours.
- Remove it from the form and check the final measurements: 13 in (33.0 cm) tall and 8 in (20.3 cm) wide when flattened.
Final Quality-Control Checklist
- Both bands have 64 sc and measure 8 in (20.3 cm) when flattened.
- Every mesh round has 16 groups, with no doubled or missing groups.
- The mesh holes form clean, offset diagonals.
- The tube is 13 in (33.0 cm) tall and straight-sided.
- The strap has 56 rows, is not twisted, and is seamed at stitches 33–35.
- There are 4 flowers, each with 8 petals, 16 fringe spikes, and 5 stamens.
- There are 12 leaves, each with a pointed ch-2 tip.
- The appliqués are secure, the petal tips are tacked down, and nothing is puckered.
- All ends are woven in on the inside.
Troubleshooting
The tube flares at the top. You probably added stitches in the conversion round. Count it: it should have 64 sc, 4 per group.
The mesh slants in a spiral. Some drift is normal. Make sure every round begins with a sl st into the ch-2 sp, not into a dc.
The bottom band is twisted. Check the chain before you join. If the band is already twisted, you will need to restart.
The petals curl. Work the turning chain more loosely, and steam-block the petals flat.
The strap stretches. Go down one hook size for the strap only, or line it with grosgrain ribbon.
The holder sags with heavy loads. Stuff fewer bags in it, or work the bands in BLO for extra firmness.
Care
Hand wash in cool water with mild soap, press out the water in a towel, and reshape over a cylinder to dry. Do not tumble dry.
Final Notes
Everything in this pattern comes back to the 64-stitch base. At 16 sc to 4 in (10.2 cm), the bands are 16 in (40.6 cm) around and 8 in (20.3 cm) wide when flattened. Sixteen mesh groups of 4 base stitches keep that same width. Twenty-two mesh rounds at 0.5 in (1.3 cm) each add 11 in (27.9 cm), and with the two 1 in (2.5 cm) bands the holder reaches 13 in (33.0 cm). The 14 in (35.6 cm) strap hangs it from a peg, and the passionflowers finish it.
Happy crocheting!