

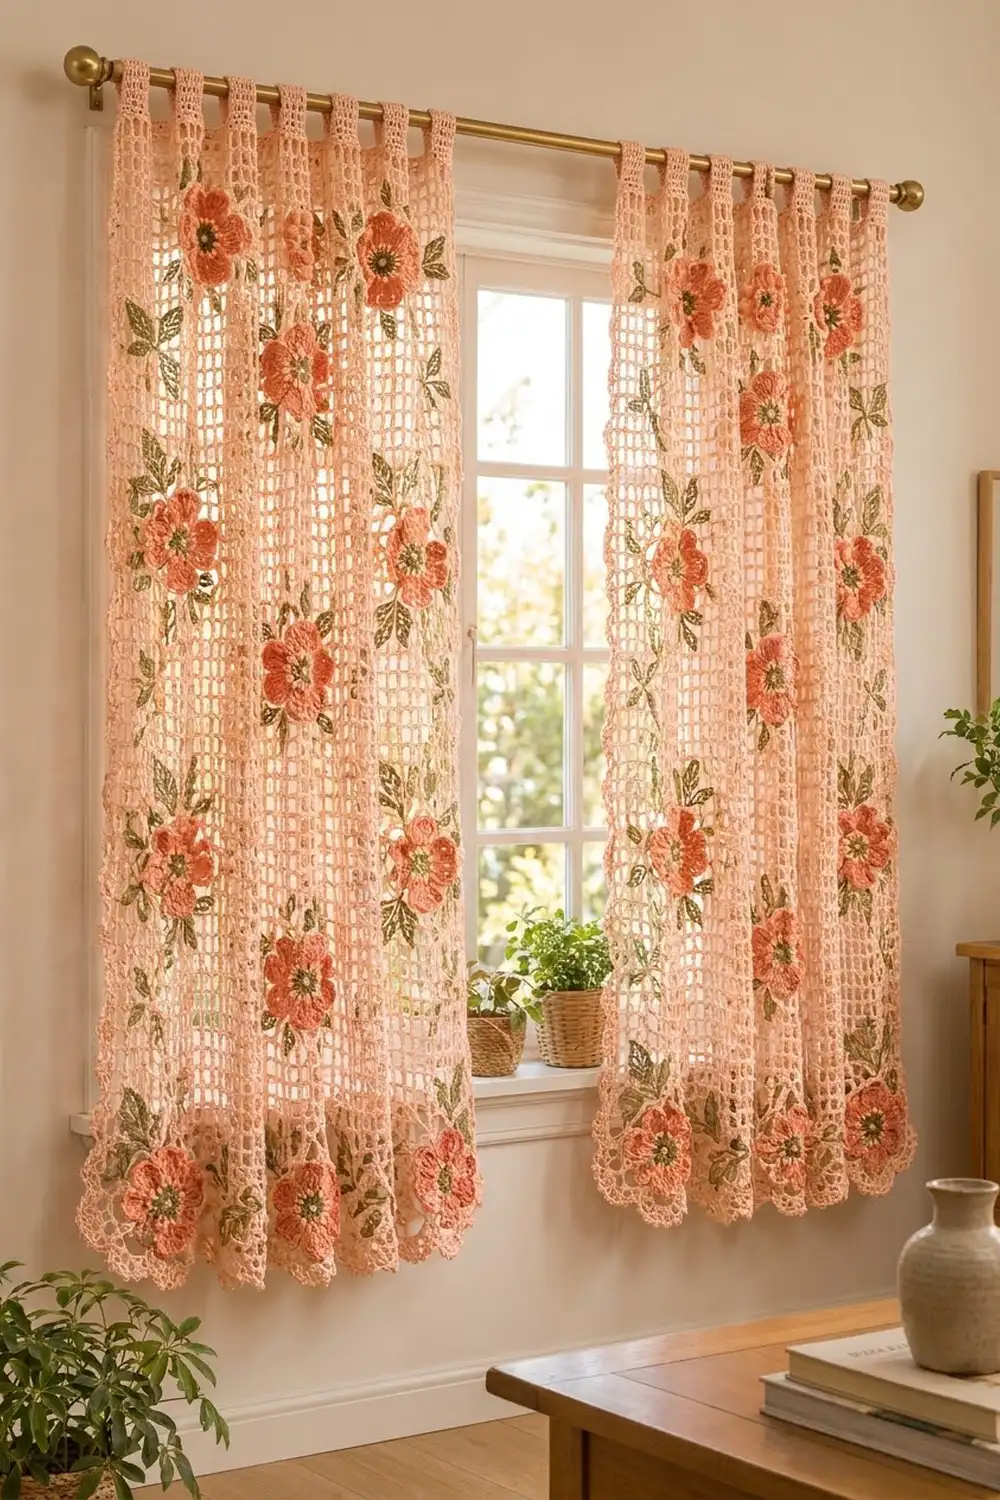
These curtains pair a soft peach filet mesh with raised coral flowers and green leaves. Light comes through the open mesh, and the sewn-on flowers add color and texture. Each flower has an olive center with a ring of tiny peach bobbles, so the flowers still stand out from across the room.
The colors are warm and soft: light peach for the mesh, coral for the petals, and olive green for the centers and leaves. The style is cottage-romantic, with tab tops and a lacy scalloped hem.
This pattern uses US crochet terms. One finished panel measures 30.5 in (77.5 cm) wide and 63.5 in (161.3 cm) long from the top edge to the scallop points. With the tab loops it is about 67 in (170.2 cm) tall. The photo shows two matching panels, so make the pattern twice for a pair.
Each panel is crocheted in one piece of filet mesh, starting at the bottom. Then you add the tab tops, the scalloped hem, and the side edging. The flowers and leaves are made separately and sewn onto the mesh in staggered rows.
Finished Size and Construction
- Finished panel size: 30.5 in x 63.5 in (77.5 cm x 161.3 cm), plus tab loops of about 3.5 in (8.9 cm)
- Skill level: Intermediate
- Terminology: US
- Yarn weight: DK (#3 light), cotton
- Hook: 4.0 mm (G-6)
- Number of pieces: 2 panels; each panel is 1 mesh body + 18 flowers + 36 leaves
- Layout: 7 staggered tiers of flowers per panel (3-2-3-2-3-2-3)
- Piece sizes: flower 4 in (10.2 cm) across; leaf 2.25 in (5.7 cm) long
- Size before border: 30 in x 61 in (76.2 cm x 154.9 cm)
- Border depth: scalloped hem 2.5 in (6.4 cm); side edging 0.25 in (0.6 cm) per side
Materials
Choose a smooth mercerized or combed cotton in DK weight. Cotton holds its shape on a rod and doesn’t stretch much. Quantities assume about 230 m per 100 g and are for the pair of panels.
- Light peach (mesh, tabs, hem, bobble rings): 1,300 g / 2,990 m
- Coral (petals): 250 g / 575 m
- Olive green (flower centers and leaves): 200 g / 460 m
All quantities include about 15% extra to allow for gauge differences and swatching.
Tools:
– 4.0 mm (G-6) crochet hook
– Tapestry needle
– Stitch markers
– Rust-proof pins
– Measuring tape
– Blocking mats or a large clean towel
– Spray bottle
Abbreviations (US Terms)
- ch – chain
- sl st – slip stitch
- sc – single crochet
- hdc – half double crochet
- dc – double crochet
- tr – treble crochet
- sp – space
- st(s) – stitch(es)
- MR – magic ring
- rep – repeat
Special stitch – bobble: *Yarn over, insert hook in st, pull up a loop, yarn over, pull through 2 loops; rep from * 2 more times in the same st (4 loops on hook), yarn over, pull through all 4 loops. Counts as 1 st.
Gauge and Checkpoints
Mesh gauge: 5 mesh squares x 5 rows = 3 in x 3 in (7.6 cm x 7.6 cm). One mesh square is 0.6 in (1.5 cm) each way.
Solid gauge: about 5 dc = 1 in (2.5 cm).
Test one piece first. Crochet a mesh swatch 10 squares wide and 10 rows tall. After a light steam it should measure 6 in x 6 in (15.2 cm x 15.2 cm). Then make one flower and one leaf.
Checkpoints:
– Swatch: 6 in (15.2 cm) square
– Flower: 4 in (10.2 cm) across
– Leaf: 2.25 in (5.7 cm) long
– After Row 1: 30 in (76.2 cm) wide
– After Row 50: 30 in (76.2 cm) tall
– After Row 100: 60 in (152.4 cm) tall
– After Row 102: 61 in (154.9 cm) tall
If your swatch is too big, go down a hook size. If it is too small, go up a hook size. Check row height separately: each dc row should be 0.6 in (1.5 cm) tall. If your rows come out shorter, add rows until you reach each checkpoint, and move the flower tiers to match.
Panel Body (Filet Mesh)
With light peach, ch 155.
Row 1: Dc in 8th ch from hook (the 7 skipped ch count as dc, ch 2 and the base of the first mesh square), ch 2, sk 2 ch, dc in next ch; rep from * across. Turn. (50 mesh squares: 51 dc + 50 ch-2 sps = 151 sts)*
Row 2: Ch 5 (counts as dc + ch 2), sk first ch-2 sp, dc in next dc, ch 2, dc in next dc; rep from * across, working last dc in 3rd ch of turning ch. Turn. (50 mesh squares, 151 sts)*
Rows 3–100: Rep Row 2. (50 mesh squares, 151 sts in every row)
Checkpoint: 30 in x 60 in (76.2 cm x 152.4 cm).
Row 101 (conversion row): Ch 3 (counts as dc), 2 dc in next ch-2 sp, dc in next dc; rep from * across, working last dc in 3rd ch of turning ch. Turn. (51 dc worked into dc + 100 dc worked into ch-2 sps = 151 dc)*
Row 102: Ch 1, sc in each st across. Turn. (151 sc)
Checkpoint: 30 in x 61 in (76.2 cm x 154.9 cm).
Tab Tops
Split the 151 sc of Row 102 into 8 tabs of 11 sts with 7 gaps of 9 sts between them. Since 8 x 11 + 7 x 9 = 88 + 63 = 151, the first and last tabs line up with the side edges. Mark the sections before you start.
Tab Row 1: Continue from Row 102 (or join light peach in st 1), ch 3 (counts as dc), dc in next 10 sts. Turn. (11 dc)
Tab Rows 2–12: Ch 3, dc in each st across. Turn. (11 dc)
Fasten off, leaving a 12 in (30.5 cm) tail. Skip 9 sts and work the next tab. Tabs start on sts 1, 21, 41, 61, 81, 101, 121, and 141.
Each tab is 2.2 in (5.6 cm) wide and 7.2 in (18.3 cm) long, and each gap is 1.8 in (4.6 cm). Fold each tab to the back and whipstitch its last row to the top of Row 101. This makes a loop about 3.5 in (8.9 cm) tall.
Flower Appliqué
Make 18 per panel (36 for the pair).
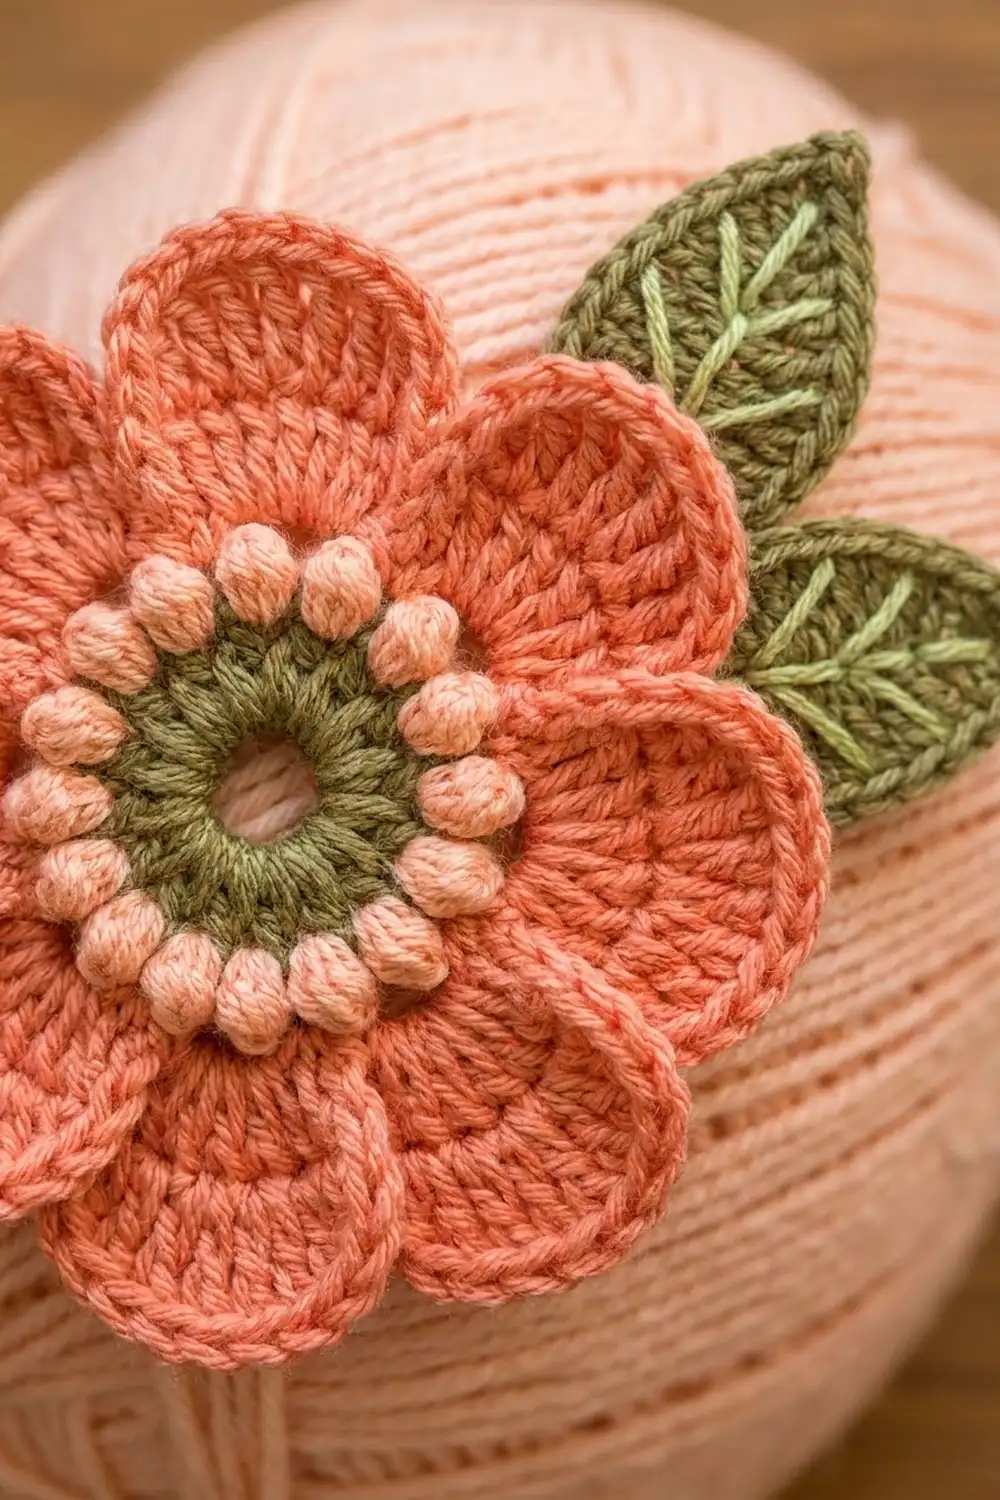
Rnd 1: With olive green, MR, ch 1, 8 sc in ring, sl st to first sc. (8 sc)
Rnd 2: Ch 1, 2 sc in each st around, sl st to first sc. Fasten off. (16 sc)
Rnd 3: Join light peach in any st, ch 1, bobble in next st, sc in next st; rep from * around, sl st to first bobble. Fasten off. (8 bobbles + 8 sc = 16 sts)*
This makes the ring of peach dots around the olive center, about 1.5 in (3.8 cm) across.
Rnd 4: Join coral in any sc, ch 1, sc in sc, 2 sc in next bobble; rep from * around, sl st to first sc. (8 sc worked 1 per sc + 16 sc worked 2 per bobble = 24 sc)*
Rnd 5: Ch 1, sc in first st, ch 3, sk 3 sts, sc in next st; rep from * 4 more times, ch 3, sk last 3 sts, sl st to first sc. (6 sc + 6 ch-3 sps)*
Rnd 6 (petals): In each ch-3 sp work (sc, hdc, 2 dc, 3 tr, 2 dc, hdc, sc). Sl st to first sc. (6 petals, 11 sts each = 66 sts)
Fasten off, leaving a 20 in (50.8 cm) coral tail for sewing. The flower measures 4 in (10.2 cm) across.
Leaf Appliqué
Make 36 per panel (72 for the pair).
With olive green, ch 10.
Rnd 1: Sc in 2nd ch from hook, hdc in next ch, dc in next 4 ch, hdc in next ch, sc in next ch, 3 sc in last ch. Working along the opposite side of the chain: sc in next ch, hdc in next ch, dc in next 4 ch, hdc in next ch, sc in next ch. Sl st to first sc. (8 + 3 + 8 = 19 sts)
Fasten off, leaving a 12 in (30.5 cm) tail. The leaf is 2.25 in (5.7 cm) long with a pointed tip.
Vein: With light peach, surface sl st up the center from base to tip, then add 2 short side veins of 2 sl sts each.
Make All Pieces
Per panel: 1 mesh body with tabs, 18 flowers, 36 leaves.
For the pair: 2 mesh bodies, 36 flowers (coral, olive, light peach), 72 leaves (olive with light peach veins).
Flower layout per panel, tiers numbered from the bottom. F marks the mesh column (1–50, counted left to right) for each flower center:
Tier 7 (Row 90):  F col 9    .    F col 25-26    .    F col 42
Tier 6 (Row 76):      .   F col 17     .     F col 34     .
Tier 5 (Row 62):  F col 9    .    F col 25-26    .    F col 42
Tier 4 (Row 48):      .   F col 17     .     F col 34     .
Tier 3 (Row 34):  F col 9    .    F col 25-26    .    F col 42
Tier 2 (Row 20):      .   F col 17     .     F col 34     .
Tier 1 (Row 6):   F col 9    .    F col 25-26    .    F col 42
Tiers are 14 rows, or 8.4 in (21.3 cm), apart. The layout is symmetrical: columns 9 and 42 each sit 8 squares in from their edge.
Attaching the Appliqués
Pin each flower with its center over the mesh square given in the layout. Pin 2 leaves per flower, one angled to the upper left and one to the lower right. Tuck each leaf base 0.25 in (0.6 cm) under a petal.
Sew with the matching tail. Make a small running stitch through the back of Rnd 4, then tack every petal tip to the nearest dc post. Whipstitch around the edge of each leaf. Catch only mesh posts or chains, and never stretch the yarn across an open space.
Keep your tension relaxed. Each stitch should hold the appliqué flat without pulling the mesh together. Lay the panel flat after each tier and check that it still measures 30 in (76.2 cm) wide at that height. If it measures less, your sewing is too tight.
Border
Border gauge: 5 sc = 1 in (2.5 cm). One scallop covers 15 sc, or 3 in (7.6 cm).
Work the hem into the underside of the Row 1 foundation chain, right side facing.
Row A (conversion row): Join light peach at the right corner, ch 1, sc in base of dc, 2 sc in next ch-2 sp; rep from * across, sc in base of last dc. Turn. (51 sc worked 1 per dc base + 100 sc worked 2 per ch-2 sp = 151 sc)*
Row B: Ch 1, sc in first st, ch 5, sk 4 sts, sc in next st; rep from * across. Turn. (31 sc + 30 ch-5 sps)*
Row C: Ch 1, sc in first sc, 4 sc in next ch-5 sp, sc in next sc, 9 dc in next ch-5 sp, sc in next sc, 4 sc in next ch-5 sp, sc in next sc; rep from * 9 more times. Turn. (1 + 10 x 20 = 201 sts; 10 scallops)*
Row D: Ch 1, sc in first sc, sc in next 5 sts, [dc in next dc, ch 1] 8 times, dc in next dc, sc in next 6 sts; rep from * 9 more times. Turn. (1 + 10 x 28 = 281 sts)*
Row E: Ch 1, sc in first sc, sc in next 5 sc, [sc in next dc, (sc, ch 3, sc) in next ch-1 sp] 8 times, sc in next dc, sc in next 6 sc; rep from * 9 more times. Fasten off. (8 picots per scallop, 80 picots total)*
Why the math works: 151 = 1 + 30 x 5, so Row B makes exactly 30 arches. Each scallop uses 3 arches (flat, fan, flat), so 30 ÷ 3 = 10 scallops. Ten scallops of 3 in (7.6 cm) each span exactly 30 in (76.2 cm). The hem is 2.5 in (6.4 cm) deep.
Side edging: Right side facing, join light peach at the top of Row 102. Work 1 sc in the Row 102 end, 3 sc around the Row 101 end, then 3 sc around each mesh row-end post for Rows 100 to 1. Fasten off. (1 + 3 + 300 = 304 sc) Repeat on the other side. Each side adds 0.25 in (0.6 cm), for a finished width of 30.5 in (77.5 cm).
Final Blocking
- Weave in all ends through at least 2 in (5.1 cm) of solid stitches.
- Soak the panel in cool water for 15 minutes.
- Roll it in a towel to remove the water; do not wring.
- Lay flat and pin to 30.5 in x 63.5 in (77.5 cm x 161.3 cm).
- Pin each scallop point so the fans open evenly.
- Use a ruler to keep the mesh columns straight.
- Mist the flowers and shape each petal by hand.
- Dry completely, about 24 hours, before unpinning.
Final Quality-Control Checklist
- Panel measures 30.5 in x 63.5 in (77.5 cm x 161.3 cm)
- Every mesh row has 50 squares
- 8 tabs, evenly spaced and sewn at the same height
- 10 scallops, each with 8 picots
- 18 flowers and 36 leaves per panel, matching the layout
- No puckering around appliqués
- Second panel matches the first within 0.5 in (1.3 cm)
Troubleshooting
- Mesh leans diagonally: Work the last dc of each row into the 3rd ch of the turning ch.
- Panel narrows: You may be dropping the last mesh square. Count 51 dc every 10 rows.
- Scallops ruffle: The Row C dc are too loose. Use a hook one size smaller for the hem.
- Flowers cup: Rnd 6 is too tight. Work the tr more loosely or steam-block the flower flat.
- Bobbles hide: Push each bobble to the right side before working Rnd 4.
- Tabs uneven: Recount the 11-st and 9-st sections on Row 102.
Care
Hand wash in cool water with mild soap and dry flat. If the mesh loosens after hanging for a long time, block it again lightly.
Final Notes
Here is how the measurements add up. Each mesh square is 0.6 in (1.5 cm), so 50 squares make 30 in (76.2 cm). One hundred rows bring the body to 60 in (152.4 cm), the top rows add 1 in (2.5 cm), and the hem adds 2.5 in (6.4 cm), for a 63.5 in (161.3 cm) panel. Side edging brings the width to 30.5 in (77.5 cm). Check your swatch and keep your appliqué stitches relaxed, and the pair will hang straight and even.
Happy crocheting!