

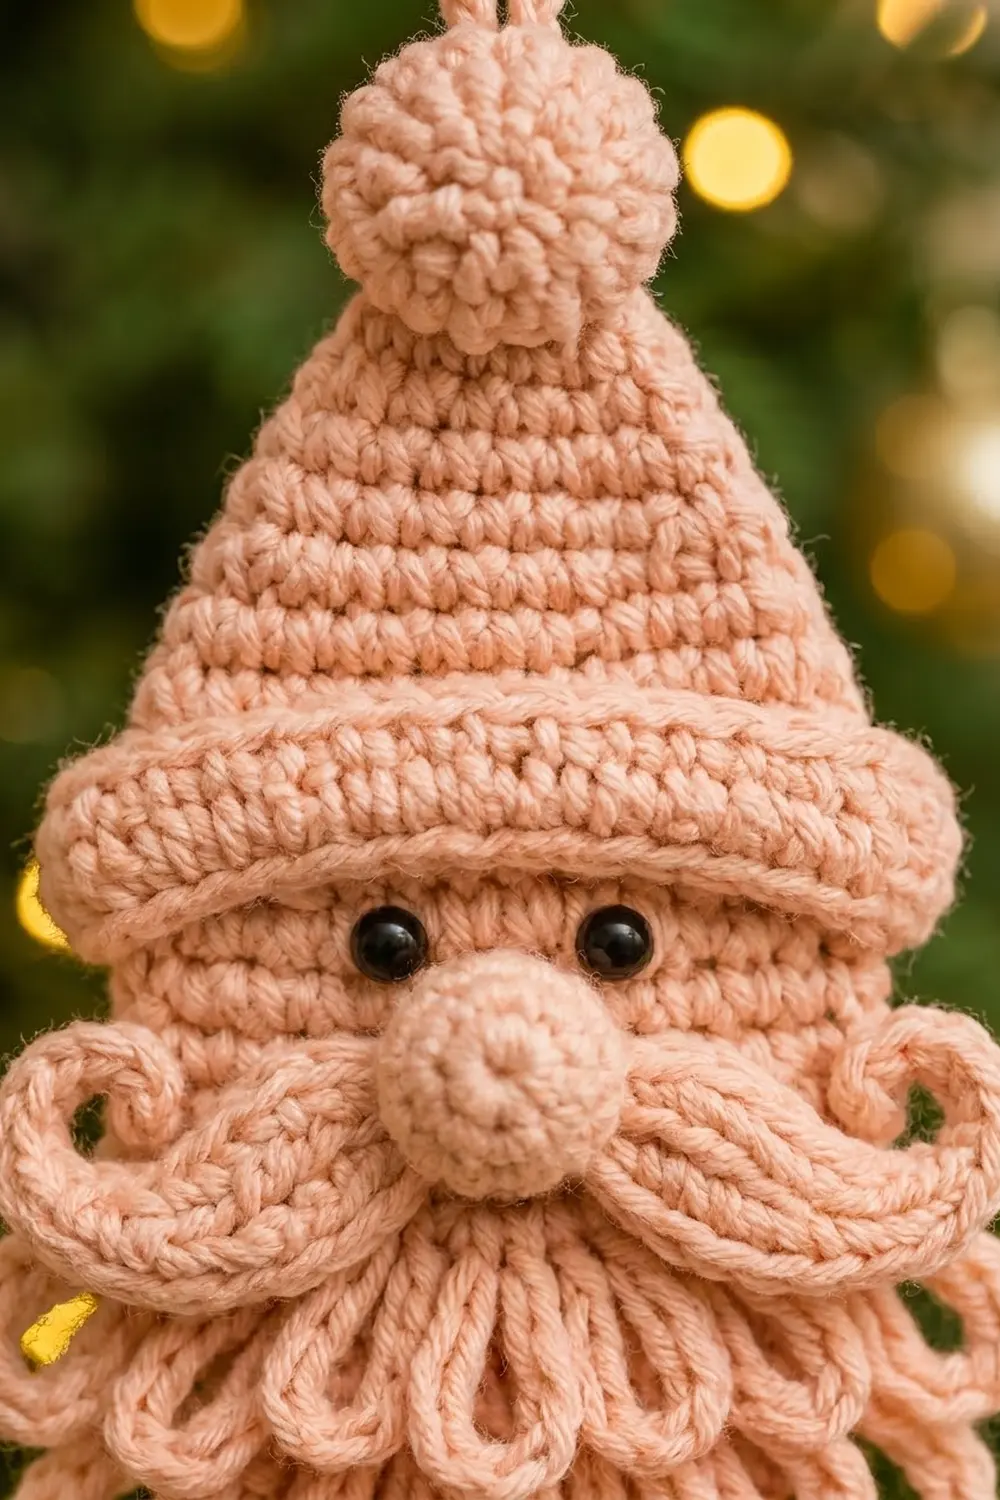
This little Santa is all texture and no fuss. A tall pointed hat with a puffy pom-pom sits above a ridged brim. Below that are bead eyes, a round button nose, and a curled two-piece mustache. The beard is a cascade of open chain loops that layer like feathers and fan out at the bottom.
The whole ornament is worked in one soft blush-peach yarn. That gives it a modern, tone-on-tone look against green branches and gold lights. The only accent is a pair of 6 mm black eyes.
This pattern uses US crochet terms. The finished ornament measures about 3.5 in (8.9 cm) wide and 8 in (20.3 cm) tall, plus a 1.25 in (3.2 cm) hanging loop.
Construction is simple. You work the face in flat rows from the top down, leaving free front loops for two beard tiers. The hat is worked upward from the other side of the same foundation chain. One border round outlines the whole shape, adds the third (lowest) beard tier, and forms the hanging loop. The brim, pom-pom, nose, and mustache are made separately and sewn on.
Finished Size and Construction
- Finished size: 3.5 in (8.9 cm) wide x 8 in (20.3 cm) tall, plus a 1.25 in (3.2 cm) loop
- Skill level: Easy-intermediate
- Terminology: US
- Yarn weight: Worsted (#4)
- Hook: 4.0 mm (G-6)
- Number of pieces: 1 ornament (main body plus 5 small sewn-on parts: brim, pom-pom, nose, 2 mustache halves)
- Layout: Single vertical ornament
- Main body before border: 3.1 in (7.9 cm) wide x 6.6 in (16.8 cm) tall
- Border depth: 1 round of sc, about 0.2 in (0.5 cm) per side
Materials
Choose a smooth worsted yarn with good stitch definition. Cotton blends and soft acrylic both work. Fuzzy yarns hide the beard loops, so avoid them.
- Blush peach: 12 g, about 24 m (26 yd)
- Black safety eyes: two 6 mm eyes (or black embroidery floss for a child-safe version)
- Tools:
- 4.0 mm (G-6) hook
- Tapestry needle
- Scissors
- A pinch of fiberfill for the pom-pom and nose
- Rustproof pins
- Spray bottle
All yarn quantities include about a 30% margin for your gauge swatch and sewing tails.
Abbreviations (US Terms)
- ch: chain
- sl st: slip stitch
- sc: single crochet
- hdc: half double crochet
- dc: double crochet
- sc2tog: single crochet 2 together
- inc: 2 sc in the same stitch
- BLO / FLO: back loop only / front loop only
- FL: front loop
- MR: magic ring
- st(s): stitch(es)
- RS / WS: right side / wrong side
Special stitch: Beard loop (lp-X). Work (sc, ch X, sc) in the same stitch. X is the number of chains given in the instructions. Each lp-X counts as 1 worked stitch.
Gauge and Checkpoints
Gauge: 18 sc x 20 rows = 4 in (10.2 cm). That is 4.5 sts and 5 rows per inch.
The ornament is small, so make the face first and treat it as your swatch. Check these measurements as you go:
- After face Row 2: 3.1 in (7.9 cm) wide
- After face Row 12: 2.4 in (6.1 cm) tall
- After face Row 17: 3.4 in (8.6 cm) tall
- After hat Row 16: 3.2 in (8.1 cm) tall, so the body measures 6.6 in (16.8 cm) total
- After border: 3.5 in (8.9 cm) wide
If the face is more than 0.2 in (0.5 cm) too wide, go down to a 3.5 mm hook. If it is too narrow, go up to a 4.5 mm hook. Tight stitches matter here: they keep the ornament flat and stop stuffing from showing.
Face and Beard Base
On this piece, even-numbered rows are the RS. That way the free front loops from the BLO rows sit on the front of the face.
Row 1 (WS): Ch 13. Sc in 2nd ch from hook and in each ch across. Turn. (12 sts)
Row 2 (RS): Ch 1. Inc in first st, sc in next 10 sts, inc in last st. Turn. (14 sts)
Rows 3–11: Ch 1. Sc in each st across. Turn. (14 sts per row)
Row 12 (RS): Ch 1. Working in BLO, sc in each st across. Turn. (14 sts) This leaves the 14 front loops of Row 11 free on the RS.
Row 13: Ch 1. Sc in both loops of each st across. Turn. (14 sts)
Row 14 (RS): Ch 1. Working in BLO, sc2tog, sc in next 10 sts, sc2tog. Turn. (12 sts) This leaves the 14 front loops of Row 13 free.
Row 15: Ch 1. Sc2tog, sc in next 8 sts, sc2tog. Turn. (10 sts)
Row 16: Ch 1. Sc2tog, sc in next 6 sts, sc2tog. Turn. (8 sts)
Row 17: Ch 1. Sc2tog, sc in next 4 sts, sc2tog. (6 sts) Fasten off.
The face is now a rounded shield 3.1 in (7.9 cm) wide and 3.4 in (8.6 cm) tall.
Beard Tiers 1 and 2
Hold the face RS facing you with the chin pointing down. The loops will hang downward over the rows below.
Tier 1 (into Row 11’s free front loops, 14 FL): Skip the first FL. Join with a sl st in the 2nd FL. Then work [lp-7 in next FL, sl st in next FL] 6 times. Leave the last FL unworked. Fasten off.
Count: 1 skipped + 1 join + 12 = 14 FL used, giving 6 loops. The loops hang about 0.6 in (1.5 cm) and cover Rows 12–14.
Tier 2 (into Row 13’s free front loops, 14 FL): Join with a standing sc in the first FL, ch 9, sc in the same FL, sl st in next FL. Then work [lp-9 in next FL, sl st in next FL] 6 times. Fasten off.
Count: 7 x 2 = 14 FL used, giving 7 loops. The loops hang about 0.8 in (2.0 cm) and reach the chin edge.
Hat
Turn the face upside down so the foundation chain is on top and the RS faces you.
Row 1: Join yarn in the first free loop of the foundation chain. Ch 1, sc in the same st and in each free loop across. Turn. (12 sts)
Row 2: Ch 1, sc across. Turn. (12)
Row 3: Ch 1, sc2tog, sc in next 8, sc2tog. Turn. (10)
Rows 4–5: Ch 1, sc across. Turn. (10)
Row 6: Ch 1, sc2tog, sc in next 6, sc2tog. Turn. (8)
Rows 7–8: Ch 1, sc across. Turn. (8)
Row 9: Ch 1, sc2tog, sc in next 4, sc2tog. Turn. (6)
Rows 10–11: Ch 1, sc across. Turn. (6)
Row 12: Ch 1, sc2tog, sc in next 2, sc2tog. Turn. (4)
Rows 13–14: Ch 1, sc across. Turn. (4)
Row 15: Ch 1, sc2tog twice. Turn. (2)
Row 16: Ch 1, sc2tog. (1) Fasten off.
The hat measures 2.7 in (6.9 cm) across the base and 3.2 in (8.1 cm) tall.
Eyes
Insert the safety eyes between face Rows 4 and 5, with 4 sts between them, centered. Snap the backs on firmly. For an embroidered version, work 3 tight French knots in black floss for each eye.
Small Pieces
Brim (make 1): Ch 18.
– Row 1: Sc in 2nd ch from hook and across. Turn. (17 sts)
– Rows 2–3: Ch 1, sc in BLO across. Turn. (17)
Fasten off and leave a 12 in (30.5 cm) tail. The BLO rows create the horizontal ridges. The brim is 3.8 in (9.7 cm) long and 0.6 in (1.5 cm) tall.
Pom-pom (make 1):
– Rnd 1: 6 sc in MR. (6)
– Rnd 2: Inc in each st. (12)
– Rnds 3–4: Sc around. (12)
– Rnd 5: Sc2tog around. (6)
Stuff lightly. Close the hole and leave a tail. The finished pom-pom is about 0.9 in (2.3 cm) across.
Nose (make 1):
– Rnd 1: 6 sc in MR. (6)
– Rnd 2: [Sc, inc] 3 times. (9)
– Rnd 3: Sc around. (9)
– Rnd 4: [Sc, sc2tog] 3 times. (6)
Stuff with a tiny pinch of fiberfill, close, and leave a tail. The finished nose is about 0.5 in (1.3 cm) across.
Mustache half (make 2): Ch 11. Starting in the 2nd ch from hook, work into the next 10 ch:
– Sl st in the next ch
– Sc in each of the next 2 ch
– Hdc in each of the next 2 ch
– Dc in each of the next 3 ch
– Hdc in the next ch
– (sc, sl st) in the last ch
That gives 11 sts. Fasten off and leave a tail. Roll the thin sl st end toward the RS and tack it in place to form the curl. Each finished half is about 1.5 in (3.8 cm) long.
Border
Border gauge: Work 1 sc per row end. Along the edges this gives about 5 sc per inch, which matches the row gauge (5 rows per inch). The edge lies flat without cupping or rippling.
This shape has no square corners. The only turning point is the hat tip, and its stitches are counted once, at the start of the round.
Border round: With RS facing, join yarn in the single stitch at the hat tip (hat Row 16). Work the round in this order:
- Tip and hanging loop: Sc, ch 15, sc, all in the tip stitch. (2 sc + loop)
- Hat right side: Work down the row ends of hat Rows 15 to 1, with 1 sc in each row end and 2 sc in the row ends of Rows 10 and 5. (17 sc)
- Face right side: 1 sc in each row end of face Rows 1 to 12. (12 sc)
- Beard edge (Tier 3): This covers 16 edge sts: the row ends of face Rows 13–17 (5), the 6 sts of Row 17, and the row ends of Rows 17–13 on the left side (5). Work [lp-11 in next edge st, sl st in next edge st] 8 times. (8 loops)
- Face left side: 1 sc in each row end of face Rows 12 to 1. (12 sc)
- Hat left side: Work up the row ends of hat Rows 1 to 15, with 1 sc in each row end and 2 sc in the row ends of Rows 5 and 10. (17 sc)
Sl st to the first sc and fasten off. Total: 60 sc + 8 beard loops + hanging loop.
Why the math works:
– Hat sides: Each side runs on a diagonal. The rise is 3.2 in (8.1 cm) and the run is 1.3 in (3.3 cm), so the diagonal is about 3.5 in (8.9 cm). At 5 sc per inch that needs about 17 sc, which is 15 row ends plus 2 extras.
– Face sides: These run straight down: 12 rows = 2.4 in (6.1 cm) = 12 sc.
– Beard edge: 16 edge sts / 2 sts per loop = 8 loops. Each lp-11 hangs about 1 in (2.5 cm) below the chin, so the beard widens from 6 to 7 to 8 loops.
Attach the Appliqués
- Brim: Center it over the seam between the face and the hat. Its lower edge sits on face Row 2. Whipstitch both long edges. The ends extend about 0.15 in (0.4 cm) past the border on each side.
- Nose: Sew it centered on face Rows 6–8.
- Mustache: Place the two halves with their thick sc ends meeting under the nose. Their curled tips point up and out over Rows 8–10. Tack them through the middle so the curls stay raised.
- Pom-pom: Sew it to the front of the hat tip. The hanging loop comes out from behind it.
Final Blocking
- Lightly mist the ornament until it is damp, not wet.
- Pin it RS up on a foam board at 3.5 in (8.9 cm) wide.
- Shape the hat edges into straight lines meeting at the tip.
- Separate the beard loops with your fingers. Pin each Tier 3 loop into a teardrop, fanning them outward.
- Leave the pom-pom, nose, and mustache unpinned so they keep their dimension.
- Let it dry fully, about 4 hours, then unpin.
Final Quality-Control Checklist
- [ ] Width is 3.5 in (8.9 cm). Height is 8 in (20.3 cm), not counting the loop.
- [ ] The hat edges are straight, and the border has 17 sc on each hat side.
- [ ] There are 12 sc on each face side.
- [ ] Beard tiers have 6, 7, and 8 loops, from top to bottom.
- [ ] The eyes are level, with 4 sts between them.
- [ ] Both mustache curls face upward and mirror each other.
- [ ] The brim is centered and covers the face–hat seam.
- [ ] The hanging loop is secure, and all tails are woven in on the WS.
Troubleshooting
- Hat edges wave: You added too many extra sc. Remove them and work exactly 17 per side.
- Hat edges pull inward: Add 1 more extra sc on each side, around Row 13.
- Beard loops flip upward: You worked them from the WS. Redo the tier with the RS facing and the chin pointing down.
- Tier loops look crowded: Make sure you used the FL of the correct row (Row 11 for Tier 1, Row 13 for Tier 2).
- Face cups: Your tension is too tight on the decrease rows. Use invisible sc2tog and loosen up slightly.
- Stuffing shows through the nose: Go down 0.5 mm for the small parts.
Care
Spot clean with cool water and mild soap, then lay flat to dry. Store the ornament flat so the beard loops keep their shape.

Final Notes
Here is the measurement chain:
– A gauge of 18 sc x 20 rows = 4 in (10.2 cm) gives a 12-st, 3.1 in (7.9 cm) face top.
– The 17-row face is 3.4 in (8.6 cm) tall, and the 16-row hat is 3.2 in (8.1 cm) tall.
– Together they make a 6.6 in (16.8 cm) body.
– One border round adds 0.2 in (0.5 cm) per side, bringing the width to 3.5 in (8.9 cm).
– The 8 longest beard loops and the pom-pom bring the total height to 8 in (20.3 cm).
Check each step against its number, and the whole Santa comes together. Happy crocheting!