

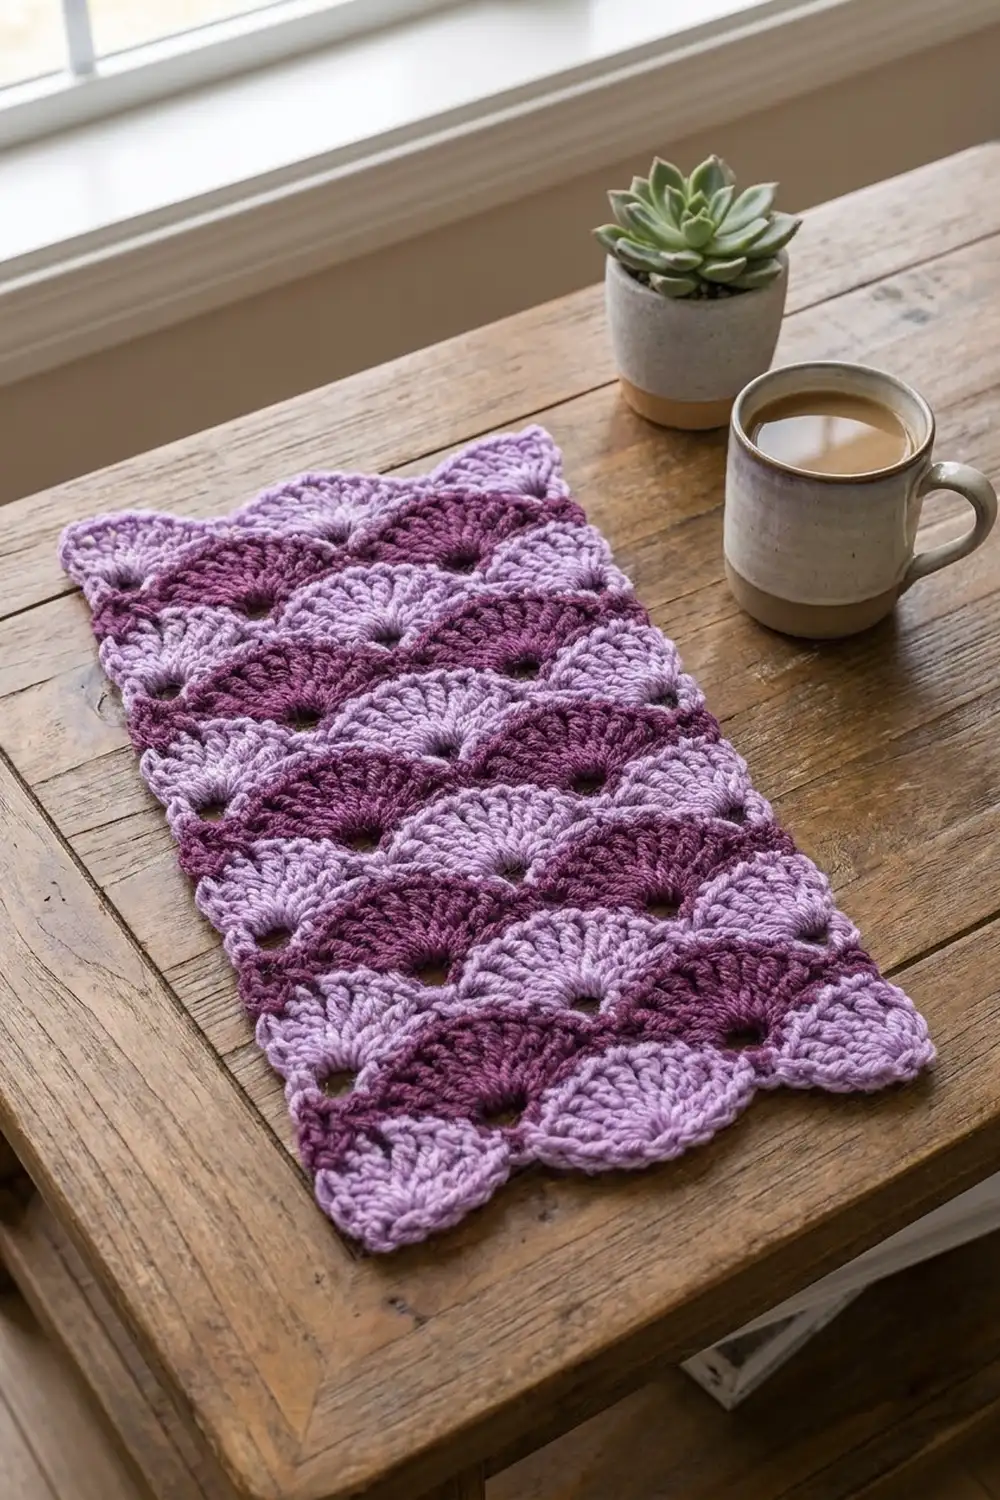
The Lilac Tide Panel is a single rectangle of fan shells worked in one-row stripes of soft lavender and deep plum. Each fan sits in the valley of the row below, so the shells stack in an offset, fish-scale pattern. A small round eyelet opens at the base of every fan. This makes the fabric look light and lacy while keeping it firm.
The two colors alternate every row. Lavender is used for the odd rows and the border, and plum for the even rows. The top and bottom edges end in rounded scallops. The long sides stay straight under one round of lavender single crochet.
This pattern uses US crochet terms. The finished panel measures 7.75 in x 12 in (19.7 cm x 30.5 cm) after blocking. You can use it as a table mat, a dresser runner or a wall hanging, or keep it as a reference swatch for the stitch.
Construction is simple. Chain a foundation and work 15 rows of shells, cutting the yarn at the end of each row. Then work one border round. It covers the yarn tails along the sides and adds matching scallops along the bottom.
Finished Size and Construction
- Finished size: 7.75 in x 12 in (19.7 cm x 30.5 cm)
- Skill level: Easy (advanced beginner)
- Terminology: US crochet terms
- Yarn weight: Worsted (#4)
- Hook: 5.0 mm (US H-8)
- Number of pieces: 1
- Layout: One flat rectangle, worked in rows from the bottom edge up
- Piece size before border: 7.25 in x 11.25 in (18.4 cm x 28.6 cm)
- Border depth: 0.25 in (0.6 cm) on the sides and top; 0.5 in (1.3 cm) bottom scallops
Materials
Choose a smooth worsted yarn with good stitch definition. Cotton or a cotton blend shows the eyelets clearly and suits a table mat. Soft acrylic works well for a decorative piece. Avoid fuzzy or textured yarn, which blurs the fan outlines and fills in the eyelets.
Pick two shades with clear contrast. A pale lilac next to a dark berry or plum gives the strongest scale effect. Two shades that are close in value will look blurry from a distance.
The amounts below assume a yarn of about 180 m per 100 g.
- Color A, Lavender: 35 g (about 63 m), for the odd rows and the border
- Color B, Plum: 25 g (about 45 m), for the even rows
Quantities include a margin of about 20% for the test panel, row tails, and small differences in tension.
Tools:
- 5.0 mm (US H-8) crochet hook
- Tapestry needle
- Scissors
- Rustproof pins and a blocking mat
- Spray bottle
- Ruler or tape measure
Abbreviations (US Terms)
- ch: chain
- sc: single crochet
- dc: double crochet
- sl st: slip stitch
- sk: skip
- sp(s): space(s)
- st(s): stitch(es)
- rep: repeat
- RS: right side
Special stitches:
- Fan: 9 dc worked into the same stitch or space.
- Half fan: 5 dc worked into the same stitch. At the start of a row, ch 3 counts as the first dc, so you work ch 3 plus 4 dc.
- Valley: sc in next dc, ch 2, sk next dc, sc in next dc. Over a fan, this puts the two sc on the 4th and 6th dc and skips the center (5th) dc. The ch-2 space becomes the eyelet under the next row’s fan.
Gauge and Checkpoints
Gauge is measured on the pattern itself. Make a test panel first: chain 30 and work Rows 1–4. The test panel is the full width of the real piece, so it also works as your gauge swatch. If it matches, you can keep going and use it as the start of the panel.
- Foundation: 16 ch = 4 in (10.2 cm), measured gently without stretching.
- After Row 1: the row measures 7.25 in (18.4 cm) wide.
- After Row 4: the piece measures 3 in (7.6 cm) from the foundation edge to the top of the Row 4 fans.
- After Row 8: 6 in (15.2 cm) tall.
- After Row 15: 11.25 in (28.6 cm) tall.
If your piece is too big, go down one hook size to 4.5 mm (US 7) and make a new test panel. If it is too small, go up to 5.5 mm (US I-9). Width matters more than height here, because the top and bottom border counts are fixed. If only the height is off by 0.25 in (0.6 cm) or less, blocking will correct it.

Pattern
Joining colors: Fasten off at the end of every row, leaving a 4 in (10.2 cm) tail. Turn the work, then join the new color in the first stitch with a sl st. You will crochet over these tails in the border, so do not weave them in yet.
You cannot carry the yarn up the side here. With one-row stripes, each color ends on the opposite side from where its next row begins.
Before you start: Count the stitches in each fan as you go. Most problems in shell patterns come from a fan with 8 or 10 dc, or a valley placed one stitch off center. A quick count at the end of each row catches these before they build up.
Row 1 (RS, Lavender)
With Lavender, ch 30.
Sc in 2nd ch from hook, sk next 3 ch, 9 dc in next ch (fan made), sk next 3 ch, sc in next ch, ch 2, sk next ch, sc in next ch; rep from * once more; sk next 3 ch, 9 dc in next ch, sk next 3 ch, sc in last ch. Fasten off.
Count: 3 fans (27 dc) + 6 sc = 33 sts, plus 2 ch-2 sps.
Check: 1 ch + 2 repeats of 10 ch + 8 ch = 29 ch worked, plus the 1 skipped ch = 30 ch.
Row 2 (Plum)
Turn. Join Plum with a sl st in the first sc. Ch 3 (counts as dc), 4 dc in same sc (half fan made).
Sk next 3 dc, sc in next dc, ch 2, sk next dc, sc in next dc (valley made), sk next 3 dc and next sc, 9 dc in next ch-2 sp, sk next sc; rep from * once more.
Sk next 3 dc, sc in next dc, ch 2, sk next dc, sc in next dc, sk next 3 dc, 5 dc in last sc. Fasten off.
Count: 2 half fans (10 dc) + 2 fans (18 dc) = 28 dc, + 6 sc = 34 sts, plus 3 ch-2 sps.
Each new fan is worked into a ch-2 space, which leaves a small round eyelet at its base. Each valley sits on the center of a Row 1 fan.
Row 3 (Lavender)
Turn. Join Lavender with a sl st in the first dc. Ch 1, sc in same st.
Sk next 4 dc and next sc, 9 dc in next ch-2 sp, sk next sc.
Sk next 3 dc, sc in next dc, ch 2, sk next dc, sc in next dc, sk next 3 dc and next sc, 9 dc in next ch-2 sp, sk next sc; rep from * once more.
Sk next 4 dc, sc in top of beginning ch-3. Fasten off.
Count: 3 fans (27 dc) + 6 sc = 33 sts, plus 2 ch-2 sps.
Row 3 matches Row 1. Its three fans sit above the three Row 2 valleys, and its two valleys sit on the centers of the two Row 2 fans.
Rows 4–15
Rep Rows 2 and 3 alternately. Even rows use Plum and follow Row 2 (34 sts, 3 ch-2 sps). Odd rows use Lavender and follow Row 3 (33 sts, 2 ch-2 sps).
You finish with Row 15 in Lavender. That makes 8 Lavender rows and 7 Plum rows, with full Lavender fans along the top edge.
Measure now: 7.25 in x 11.25 in (18.4 cm x 28.6 cm).
Border
Border gauge: 4 sc = 1 in (2.5 cm) on a straight edge.
Each corner is 3 sc worked into one stitch, and the middle sc is the corner stitch. The total for each side below includes both of its corner stitches.
Round 1 (RS, Lavender)
With RS facing, join Lavender with a sl st in the first sc of Row 15 (top right corner). Ch 1.
Top edge: 3 sc in same sc (corner). Sc in each of next 9 dc. Sc in next sc, sc in next ch-2 sp, sc in next sc, sc in each of next 9 dc; rep from * once more. 3 sc in last sc (corner).
Top: 27 sc over the fans + 6 sc over the valleys = 33 sc between corners; 37 sts including both corners.
Left side: Work down the row ends of Rows 14 to 2, crocheting over the yarn tails as you go. Work 4 sc in each Plum row end (around the post of the half-fan dc) and 2 sc in each Lavender row end.
Left side: 7 Plum rows x 4 sc = 28, + 6 Lavender rows (Rows 3–13) x 2 sc = 12, for 40 sc between corners; 44 sts including both corners.
Bottom edge: Work into the free loops of the foundation chain. Work 3 sc in the first ch (the one holding the last sc of Row 1) for the corner. Sk next 3 ch, 7 dc in next ch (the ch holding a fan), sk next 3 ch, sc in each of next 3 ch (under the valley); rep from * once more. Sk next 3 ch, 7 dc in next ch, sk next 3 ch, 3 sc in last ch (corner).
Bottom: 3 scallops x 7 dc = 21 dc, + 2 valleys x 3 sc = 6 sc, for 27 sts between corners; 31 sts including both corners.
Right side: Work up the row ends of Rows 2 to 14 the same way as the left side: 4 sc in each Plum row end and 2 sc in each Lavender row end.
Right side: 40 sc between corners; 44 sts including both corners.
Join with a sl st to the first sc. Fasten off.
Round total: 12 corner sc (4 groups of 3) + 33 + 27 + 40 + 40 = 152 sts.
Why the math works: The top edge follows Row 15 stitch for stitch. The 27 dc become 27 sc, and each valley (sc, ch-2 sp, sc) becomes 3 sc. This keeps the fan curves round instead of flattening them. The bottom edge uses the same 29 foundation chains as Row 1. Each scallop has 3 skipped chains on either side, just like the Row 1 fans, so the bottom scallops line up under the Row 1 fans. On the sides, each pair of rows (one Plum, one Lavender) measures about 1.5 in (3.8 cm) and gets 6 sc. That is exactly 4 sc per inch, which matches the border gauge. The 40 side sc plus the corner groups cover the full 11.25 in (28.6 cm) side.
Final Blocking
- Weave in the two border tails. Trim the row tails close to the border; the sc already hold them in place.
- Lay the panel RS up on a blocking mat.
- Pin the four corners to 7.75 in x 12 in (19.7 cm x 30.5 cm).
- Pin the long sides straight, with a pin every 1 in (2.5 cm).
- Pin each top fan and each bottom scallop at its highest point so the curves are even.
- If any eyelets look closed, open them with a fingertip.
- Mist the panel until it is damp, not soaked. For acrylic, hold a steam iron just above the fabric instead, without touching it.
- Let it dry completely before unpinning, usually 6–12 hours.
Final Quality-Control Checklist
- The finished panel measures 7.75 in x 12 in (19.7 cm x 30.5 cm).
- There are 15 rows in total, 8 Lavender and 7 Plum, alternating every row.
- Odd rows have 3 full fans. Even rows have 2 full fans and 2 half fans.
- Every fan in Rows 2–15 has a visible eyelet at its base.
- Each valley sits on the center dc of the fan below.
- The border counts are: top 37, bottom 31, each side 44 (corners included).
- The side edges lie straight, without rippling or pulling in.
- The top fans and bottom scallops are all the same height.
- All tails are secured and hidden.
Troubleshooting
Fans look crowded or ruffled. Your dc may be too tight. Try a larger hook, and check that you skipped exactly 3 stitches on each side of every fan.
Fans drift sideways. A valley is probably off center. Count the dc of the fan below and make sure the valley sc land on the 4th and 6th dc.
No eyelet under a fan. You probably worked the fan into a sc instead of the ch-2 sp. Work all 9 dc into the space itself.
Sides ripple. There are too many border sc on the row ends. Use 3 sc per Plum row end instead.
Sides pull in. There are too few border sc. Use 5 sc per Plum row end, and block firmly.
Stitch count is off. Check each row against 33 (odd rows) or 34 (even rows) before you move on.
Half fans look loose. Pull the ch-3 snug, and tighten the yarn slightly on the last dc of each even row.
Tails show through the border. Hold the tails along the edge and crochet the border sc snugly around them.
Care
Hand wash in cool water with a mild detergent. Roll the panel in a towel to press out the water, then dry it flat. If the scallops need reshaping, pin them again while the panel is damp.
Final Notes
Each stage of this panel has a measurement you can check. A 30-ch foundation gives a Row 1 width of 7.25 in (18.4 cm). Four rows measure 3 in (7.6 cm), eight rows 6 in (15.2 cm), and 15 rows 11.25 in (28.6 cm). The border adds 0.25 in (0.6 cm) to each side and the top, plus 0.5 in (1.3 cm) of scallops at the bottom. That gives a finished panel of 7.75 in x 12 in (19.7 cm x 30.5 cm).
If each checkpoint matches, the border counts will work out and the fans will stack neatly from bottom to top.
Happy crocheting!