

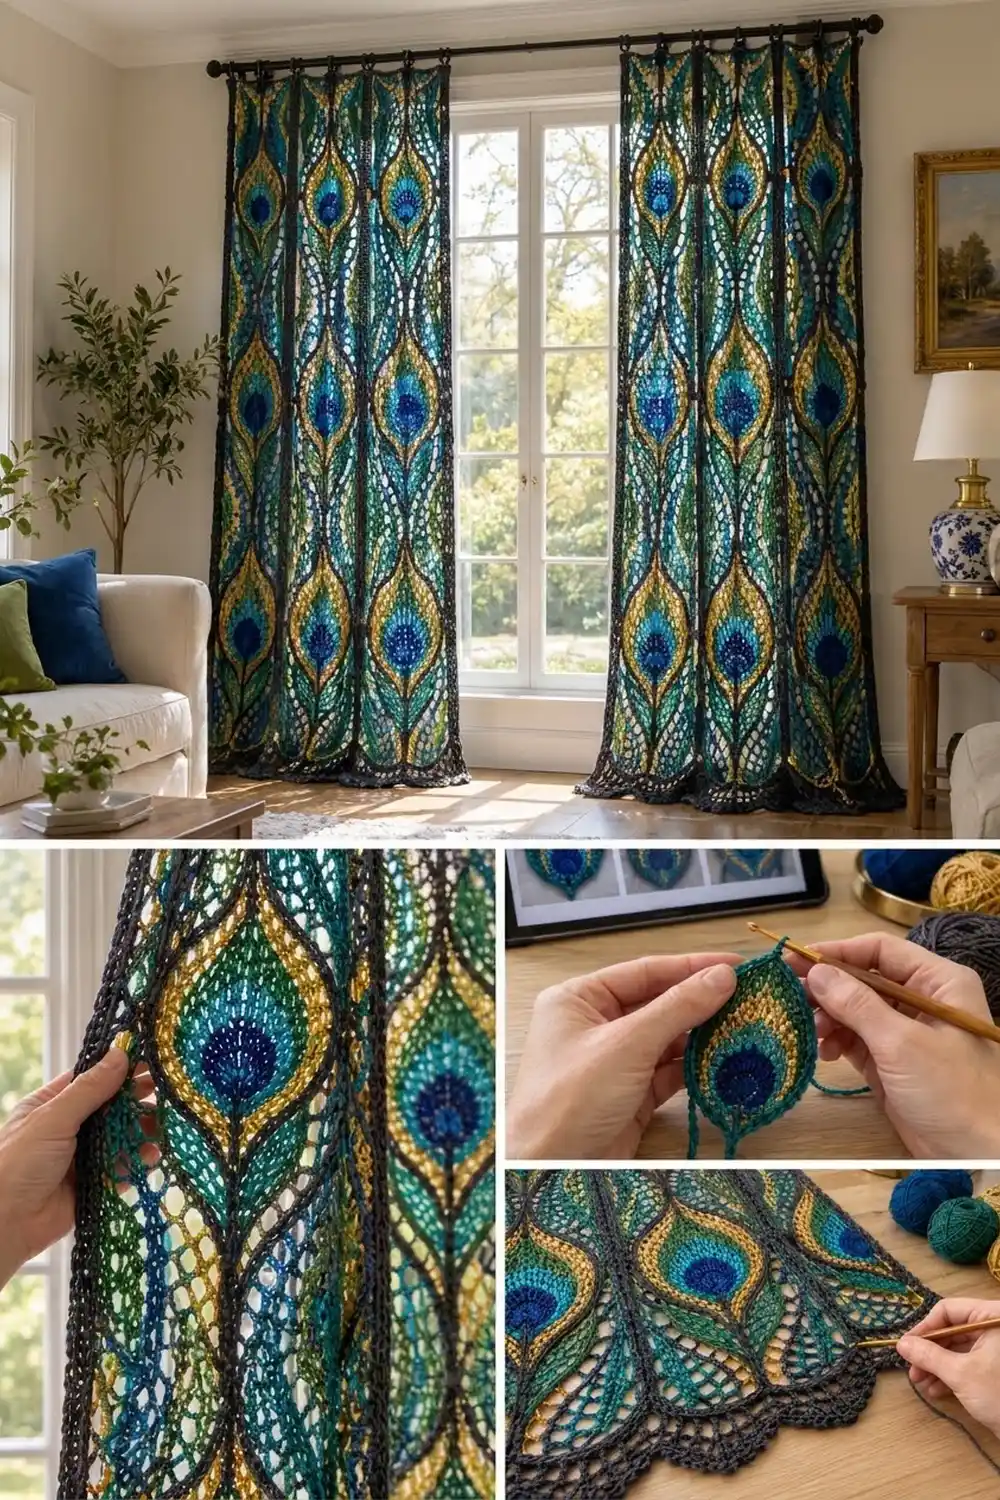
These curtain panels are built from peacock feathers. Each feather is a long teardrop with a deep navy eye, then rings of turquoise, emerald, gold and emerald, closed by a firm charcoal outline. Charcoal mesh around each feather squares it into a rectangle. With light behind them, the panels read as a column of jewel-toned plumes on dark lace.
The palette is navy, turquoise, emerald, gold and charcoal. The style is part Art Nouveau and part bohemian. The lace is open enough to let light through but still gives some privacy.
This pattern uses US crochet terms. Each finished panel measures 24 x 74 in (61.0 x 188.0 cm). The materials list covers a pair.
You make 32 rectangular feather blocks per panel. Join them on the right side with single crochet, so the seams form raised charcoal lines. Then work a border with a scalloped lace hem.
Finished Size and Construction
- Finished panel size: 24 x 74 in (61.0 x 188.0 cm)
- Skill level: Intermediate
- Terminology: US
- Yarn weight: DK (3) cotton
- Hook: 3.75 mm (F-5)
- Number of pieces: 32 blocks per panel, 64 for a pair
- Layout: 4 blocks across x 8 blocks down per panel
- Block size: 5.8 x 9 in (14.7 x 22.9 cm)
- Size before border: 23.2 x 72 in (58.9 x 182.9 cm)
- Border depth: 0.4 in (1.0 cm) at the top and sides, 1.6 in (4.1 cm) at the scalloped hem
Materials
Use a smooth, mercerized DK cotton, about 110 m per 50 g. Cotton keeps the mesh crisp, holds the stitch definition and shrugs off sunlight better than acrylic.
Quantities for a pair of panels (halve them for one panel):
- Color A, Navy: 70 g (154 m)
- Color B, Turquoise: 75 g (165 m)
- Color C, Emerald: 140 g (308 m)
- Color D, Gold: 95 g (209 m)
- Color E, Charcoal: 440 g (968 m)
All quantities include a margin of about 10-15% for swatching, tails and tension differences.
Tools: 3.75 mm (F-5) hook, tapestry needle, scissors, stitch markers, blocking mats, rust-proof pins, spray bottle, measuring tape, and 8 curtain clip rings per panel.
Abbreviations (US Terms)
- ch – chain
- sl st – slip stitch
- sc – single crochet
- hdc – half double crochet
- dc – double crochet
- tr – treble crochet (yarn over twice)
- dtr – double treble crochet (yarn over 3 times)
- sk – skip
- sp – space
- st(s) – stitch(es)
- RS – right side
Standing dc: Start with a slip knot on the hook, then work a dc as normal. It replaces a ch-3 start and counts as 1 dc. Work a standing sc or standing dtr the same way.
Picot: Ch 3, sl st in 3rd ch from hook.
Gauge and Checkpoints
Gauge: 20 sc = 4 in (10.2 cm) with a 3.75 mm hook.
Make one complete block and block it before starting the rest. Check it at each stage:
- After Rnd 2: about 0.75 x 2.75 in (1.9 x 7.0 cm)
- After Rnd 5: about 3 x 6 in (7.6 x 15.2 cm)
- After Rnd 7: about 4 x 7 in (10.2 x 17.8 cm)
- After Rnd 9, blocked: 5.8 x 9 in (14.7 x 22.9 cm)
If your block is more than 0.25 in (0.6 cm) too big, go down half a hook size. If it is too small, go up half a size. If the eye cups, your dc rounds are tight, so loosen up rather than changing the stitch counts. If the eye ruffles, your sc rounds are loose.
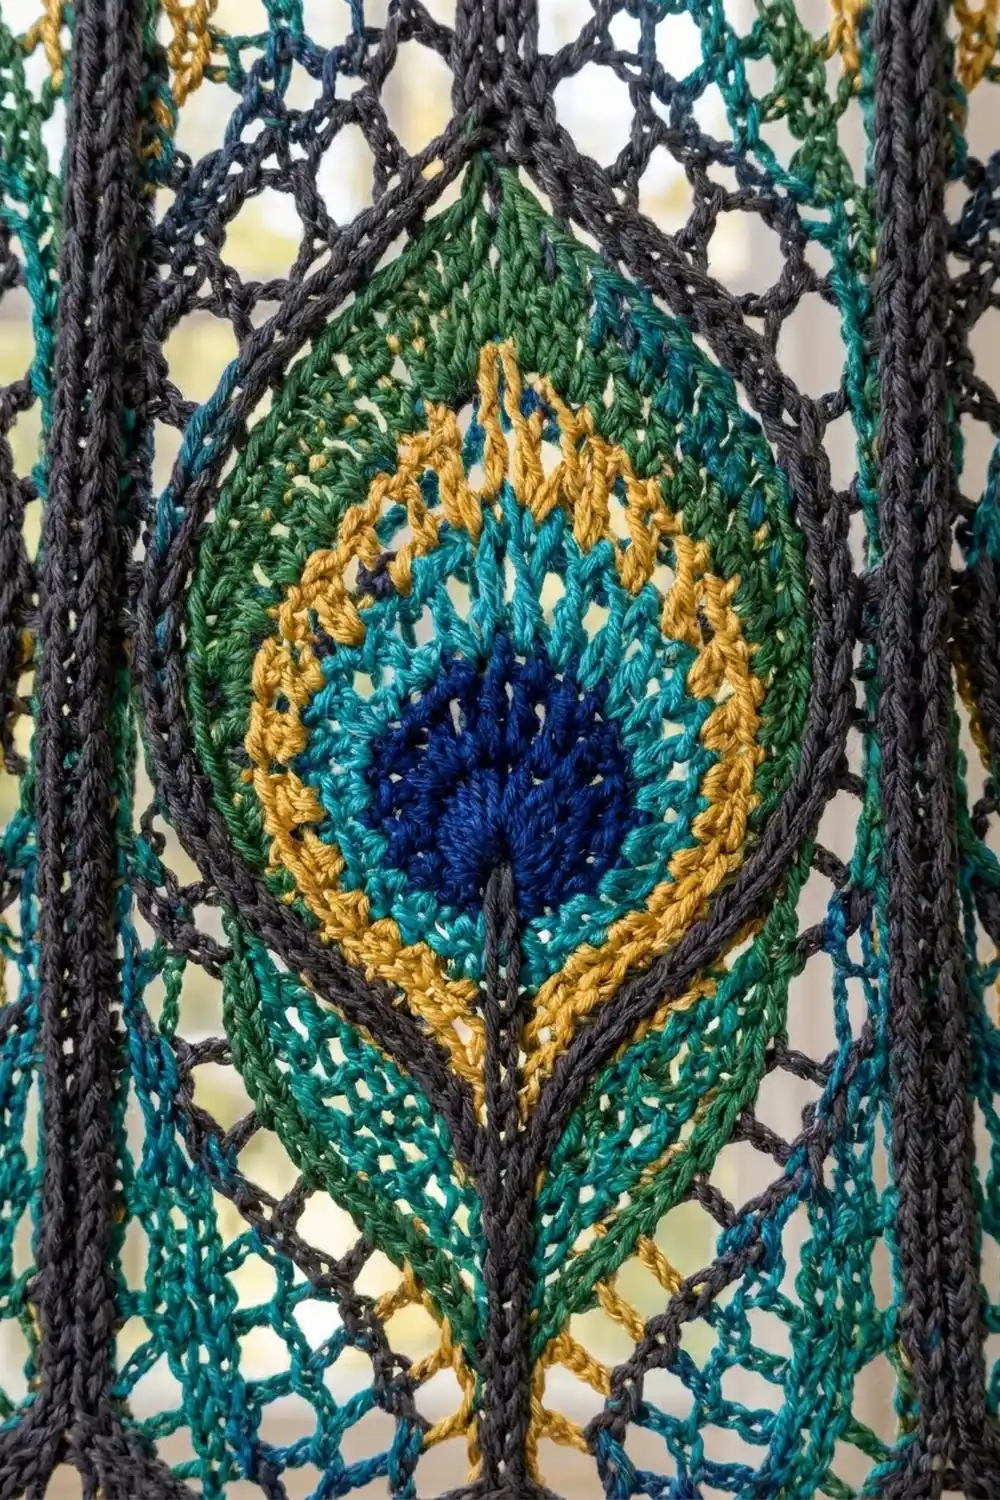
Feather Block (make 64)
Each round starts at the first stitch of the bottom curve. Change colors by fastening off and joining the new color with a standing stitch.
Rnd 1 (A): Ch 13. Sc in 2nd ch from hook (this end is the bottom), sc in next 10 ch, 3 sc in last ch (top). Working along the underside of the foundation, sc in next 10 ch, then 2 sc in the same ch as the first sc. Join with a sl st to the first sc. (26 sc: 3 at the bottom, 10 on each side, 3 at the top)
Rnd 2 (A): Ch 1, 2 sc in first st, sc in next 10 sts, sc in next st, (sc, ch 2, sc) in next st for the tip, sc in next st, sc in next 10 sts, 2 sc in each of last 2 sts. Join. Fasten off. (30 sc + ch-2 tip sp: bottom 6, sides 10 each, top 2 on each side of the tip)
The 6 bottom sts are the last 4 sts of the round plus the first 2. From here on, “first st” means the first of the last 4 sts of Rnd 2, which is the start of the bottom curve.
Rnd 3 (B): Standing dc in first st, dc in same st, 2 dc in each of next 5 sts (bottom). Dc in next 10 sts (side). Dc in next 2 sts, (2 dc, ch 2, 2 dc) in tip sp, dc in next 2 sts (top). Dc in next 10 sts (side). Join. Fasten off. (40 dc: bottom 12, sides 10 each, top 4 on each side of the tip)
Rnd 4 (C): Standing dc in first st, then 2 dc in next st, and repeat [dc in next st, 2 dc in next st] 5 more times for 18 bottom sts. Dc in next 10 sts. Dc in next 4 sts, (2 dc, ch 2, 2 dc) in tip sp, dc in next 4 sts. Dc in next 10 sts. Join. Fasten off. (50 dc: bottom 18, sides 10, top 6 on each side of the tip)
Rnd 5 (D): Repeat [dc in next 2 sts, 2 dc in next st] 6 times, starting with a standing dc (24 bottom sts). Dc in next 10 sts. Dc in next 6 sts, (2 dc, ch 2, 2 dc) in tip sp, dc in next 6 sts. Dc in next 10 sts. Join. Fasten off. (60 dc: bottom 24, sides 10, top 8 on each side of the tip)
Rnd 6 (C): Join with a standing sc in first st. Repeat [sc in next 7 sts, 2 sc in next st] 3 times, counting the standing sc as the first sc (27 bottom sts). Sc in next 10 sts. Sc in next 8 sts, (sc, ch 2, sc) in tip sp, sc in next 8 sts. Sc in next 10 sts. Join. Fasten off. (65 sc: bottom 27, sides 10, top 9 on each side of the tip)
Rnd 7 (E): Repeat [sc in next 8 sts, 2 sc in next st] 3 times, starting with a standing sc (30 bottom sts). Sc in next 10 sts. Sc in next 9 sts, (sc, ch 2, sc) in tip sp, sc in next 9 sts. Sc in next 10 sts. Join. Fasten off. (70 sc + tip sp)
This is the firm charcoal outline. Number the Rnd 7 stitches 1-70 from the start of the round: sts 1-30 are the bottom curve, 31-40 a side, 41-50 the top, then the tip, 51-60 the top and 61-70 the other side. The block corners will sit at sts 4 and 27 (bottom) and sts 47 and 54 (top).
Rnd 8 (E), mesh frame:
– Corner: Standing dtr in st 4, ch 3, dtr in same st.
– Bottom: Ch 1, sk 1, dc in next st. Work [ch 1, sk 1, hdc in next st] 9 times. Ch 1, sk 1, dc in next st. Ch 1, then work (dtr, ch 3, dtr) in next st (st 27) for the corner.
– First side: Ch 3, sk 1, hdc in next st. Work [ch 3, sk 1, sc in next st] 5 times. Ch 3, sk 1, dc in next st. Ch 3, sk 1, tr in next st. Ch 3, sk 1, dtr in next st. Ch 3, sk 1, then work (dtr, ch 3, dtr) in next st (st 47) for the corner.
– Top: Ch 5, sk 1, tr in next st. Ch 5, sk 1, hdc in tip sp. Ch 5, sk 1, tr in next st. Ch 5, sk 1, then work (dtr, ch 3, dtr) in next st (st 54) for the corner.
– Second side: Ch 3, sk 1, dtr in next st. Ch 3, sk 1, tr in next st. Ch 3, sk 1, dc in next st. Work [ch 3, sk 1, sc in next st] 5 times. Ch 3, sk 1, hdc in next st (st 2). Ch 3, sk st 3, then join to the first dtr.
(40 posts; 4 corner ch-3 sps, 12 ch-1 sps, 20 side ch-3 sps, 4 ch-5 sps)
Each stretch uses exactly its share of Rnd 7: 22 sts on the bottom, 6 sts plus the tip on the top, and 19 sts on each side. Add the 4 corner sts and you have all 70.
Rnd 9 (E): Ch 1. Sc in each post. In each sp, work as many sc as it has chains: 1 sc in each ch-1 sp, 3 sc in each ch-3 sp and 5 sc in each ch-5 sp. The middle sc of each corner group of 3 is the corner st. Join. Fasten off, leaving a 6 in (15.2 cm) tail. (144 sc)
Each block has 29 sts across the top and bottom and 45 sts on each long side, counting both corner sts. Check: 2 x 29 + 2 x 45 – 4 shared corners = 144.
Make All Pieces
Make 64 blocks for a pair, or 32 per panel. Every block uses all five colors in the same order. Block each one to 5.8 x 9 in (14.7 x 22.9 cm), with the tip pointing up.
Layout for one panel, where F means one feather block with its tip up:
F F F F   row 1 (top)
F F F F
F F F F
F F F F
F F F F
F F F F
F F F F
F F F F   row 8 (hem)
Joining
Method: Hold two blocks wrong sides together with the RS facing you. With E, sc through both loops of both layers. This makes a raised charcoal ridge on the front that continues the outline around each feather.
Columns first: Join 8 blocks into a vertical strip, joining the bottom edge of one block to the top edge of the next. Work 29 sc per seam, one stitch into one stitch, corner to corner. Make 4 strips.
Then the long seams: Join the strips side by side. Each strip edge has 8 x 45 = 360 sts. Join 360 to 360, one stitch into one stitch. Work straight across the small gaps at the horizontal seams without adding stitches.
Tension: Keep the joining stitches as loose as the Rnd 9 stitches. A tight seam puckers the long columns and shortens the curtain.
Checkpoint: Before the border, the panel should measure 23.2 x 72 in (58.9 x 182.9 cm). Each seam takes up almost no width, because the joining sc sit on top of the edge stitches.
Border
Border gauge: The same as the blocks, 20 sc = 4 in (10.2 cm). Each sc round adds about 0.2 in (0.5 cm).
Starting counts: The top and bottom edges each have 4 x 29 = 116 sts. The long sides each have 8 x 45 = 360 sts. Both counts include the panel corners, and nothing is added at the seams.
Rnd 1 (E): With the RS facing, join E at any st. Sc in each st around, working 3 sc in each of the 4 outer corner sts. Join. (Top and bottom 118 sts each, long sides 362 sts each, 956 sts total)
Rnd 2 (E), scallop hem and edge: Join E in the bottom corner st that starts the bottom edge.
– Bottom: Sc in the corner st. Then work [sk 3, 4 dc in next st, ch 1, 4 dc in next st, sk 3, sc in next st] 13 times, ending in the opposite corner st. This uses 1 + (13 x 9) = 118 sts.
– Long side: Sc in next 360 sts.
– Top corner: 3 sc in the corner st.
– Top: Sc in next 116 sts.
– Top corner: 3 sc in the corner st.
– Other long side: Sc in next 360 sts.
– Join to the first sc.
(13 scallops; top 120 sts; long sides 363 sts each, counting the bottom corner sc and the middle sc of the top corner)
Row 3 (E), picot trim on the hem only: Join E with a sl st in the first bottom corner sc. Then work [sc in next 4 dc, (sc, picot, sc) in ch-1 sp, sc in next 4 dc, sl st in next sc] 13 times. Fasten off. (130 sc, 13 picots, 14 sl sts)
Why the math works: Rnd 1 adds 2 sts to every side, one at each corner, so the bottom edge goes from 116 to 118 sts. The scallop repeat is 9 sts plus 1 st to start, and 118 = 1 + (9 x 13), so the scallops start and end exactly in the corners. The top and sides grow by 1-2 sts per round only at the corners, so they stay flat.
Final Blocking
- Weave in all ends along the charcoal outlines, where they won’t show against the light.
- Wet the panel completely in cool water and press out the water in a towel. Don’t wring it.
- Lay it flat on mats and pin the edges to 24 x 74 in (61.0 x 188.0 cm).
- Pin out each scallop and its picot, about 1.8 in (4.6 cm) apart.
- Run your fingers along the column seams so they stay straight and the ridges stand up.
- Leave it to dry completely, then unpin.
- Clip 8 rings evenly along the top edge, about 3.4 in (8.6 cm) apart, with one at each corner.
Final Quality-Control Checklist
- Every block measures 5.8 x 9 in (14.7 x 22.9 cm), with its tip pointing up
- Every block has 29 / 45 / 29 / 45 sts on its Rnd 9 edges
- All tips line up in straight columns
- The strips have 8 blocks and the panel has 4 strips
- Before the border the panel measures 23.2 x 72 in (58.9 x 182.9 cm)
- Border Rnd 1 has 118 / 362 sts per side
- There are 13 even scallops, starting and ending in the corners
- The finished panel measures 24 x 74 in (61.0 x 188.0 cm) and both panels match
Troubleshooting
- The eye cups: Your dc rounds are tight. Loosen your yarn-overs, or go up a hook size for Rnds 3-5 only.
- The eye ruffles: Your sc rounds are loose. Work Rnds 6-7 more firmly.
- The tip twists sideways: Recount the top stitches. Both sides of the tip must match on every round.
- The block won’t square up: Recount Rnd 8 against the 22 / 19 / 6-plus-tip / 19 st split, then block it firmly.
- The seams pucker: Rip back and rejoin more loosely, or use a hook half a size larger.
- The scallops don’t end in the corner: Recount Rnd 1. It must have 118 sts across the bottom.
Care
Hand wash in cool water with mild detergent and dry flat. Never hang the panels while wet, because their weight will stretch them.
Final Notes
Everything depends on the measurements adding up. Work to a gauge of 20 sc = 4 in (10.2 cm) to get a 4 x 7 in (10.2 x 17.8 cm) feather and a 5.8 x 9 in (14.7 x 22.9 cm) block. Thirty-two blocks make a 23.2 x 72 in (58.9 x 182.9 cm) panel, and the border brings it to 24 x 74 in (61.0 x 188.0 cm). If you check each stage as you go, both panels will hang straight and match.
Happy crocheting!