
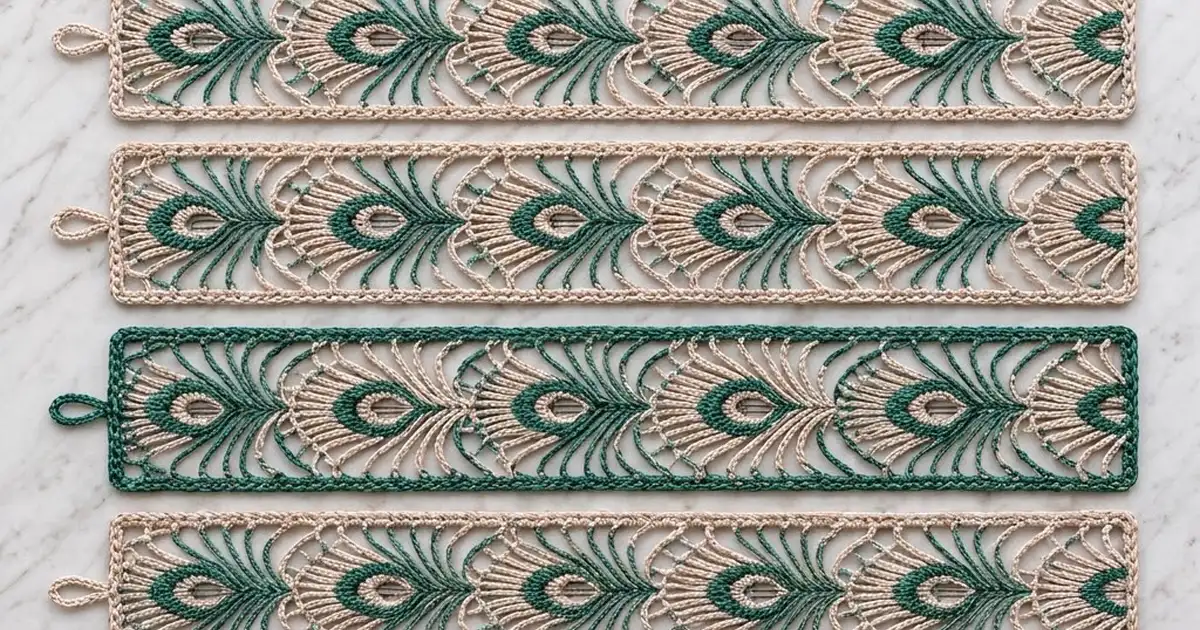
The Peacock Plume Strip Curtain is a lacy doorway curtain made of six separate vertical strips. Each strip has a column of ten stacked peacock feathers. Each feather is a fan of chain loops that opens out from a slim stem and narrows into a teardrop “eye.” The strips hang side by side from a rod, each on its own loop.
Two colors do all the work. Color A, a soft beige, is used for every feather body. Color B, a deep teal, outlines each eye, traces each stem, and edges every other strip. Because the borders alternate teal and beige, the curtain reads as a rhythm of dark and light columns.
This pattern uses US crochet terms. Each finished strip measures 6 in wide x 65 in long (15.2 x 165.1 cm), plus a 2 in (5.1 cm) hanging loop. Six strips side by side make a curtain about 36 in (91.4 cm) wide.
The construction is simple. You crochet each strip body in rows from the bottom up as one continuous piece. Then you add a three-round border and a hanging loop, and sew a small two-color eye onto every feather. The strips are never sewn to each other.
Finished Size and Construction
- Finished strip size: 6 x 65 in (15.2 x 165.1 cm), plus a 2 in (5.1 cm) loop
- Full curtain: about 36 in (91.4 cm) wide, 67 in (170.2 cm) hanging length
- Skill level: Intermediate
- Terminology: US
- Yarn weight: DK (light #3) cotton
- Hook: 4.0 mm (G-6)
- Number of pieces: 6 strips, plus 60 eye appliqués (10 per strip)
- Layout: 6 strips in one row, hung separately, not joined
- Strip body before border: 5 x 64 in (12.7 x 162.6 cm)
- Border depth: 1/2 in (1.3 cm) on every side
Materials
Use a smooth, tightly plied mercerized or combed cotton. Plied cotton shows off the chain loops well and keeps its shape while hanging. Avoid stretchy acrylic: a 65 in (165.1 cm) strip will slowly lengthen under its own weight.
- Color A (beige): 800 g, about 1,840 m
- Color B (teal): 300 g, about 690 m
Both amounts include a margin of roughly 15% to cover your gauge swatch and differences in tension.
Tools:
– 4.0 mm (G-6) crochet hook
– Tapestry needle
– Rust-proof pins and a blocking surface
– Tape measure
– Stitch markers
– Curtain rod up to 1 in (2.5 cm) in diameter
Abbreviations (US Terms)
- ch – chain
- sl st – slip stitch
- sc – single crochet
- hdc – half double crochet
- dc – double crochet
- tr – treble crochet (yarn over twice)
- rev sc – reverse single crochet
- sp(s) – space(s)
- st(s) – stitch(es)
Reverse sc (crab stitch): Work from left to right. Insert the hook into the next stitch to the right, yarn over and pull up a loop, then yarn over and draw through both loops.
Surface slip stitch: Hold the yarn behind the work. Insert the hook from front to back through the fabric, pull up a loop, and draw it through the loop on your hook.
Gauge and Checkpoints
Gauge: 20 sc and 20 sc rows = 4 in (10.2 cm). In pattern, one 12-row feather repeat measures 5 in wide x 6.4 in tall (12.7 x 16.3 cm).
Before you start all six strips, make one test piece: ch 26, work Rows 1–12 once, steam lightly, and measure.
Checkpoints:
– After Row 1: 5 in (12.7 cm) wide
– After the first repeat: 6.4 in (16.3 cm) tall
– After 5 repeats: 32 in (81.3 cm) tall
– After 10 repeats: 64 in (162.6 cm) tall
– After the border: 6 x 65 in (15.2 x 165.1 cm)
– Each eye: 1 3/4 x 1 1/4 in (4.4 x 3.2 cm)
If your piece is too big, go down to a 3.5 mm hook. If it’s too small, go up to 4.5 mm. Check the width first. Lace rows stretch in length when you block them, but your 25 base stitches set the width.
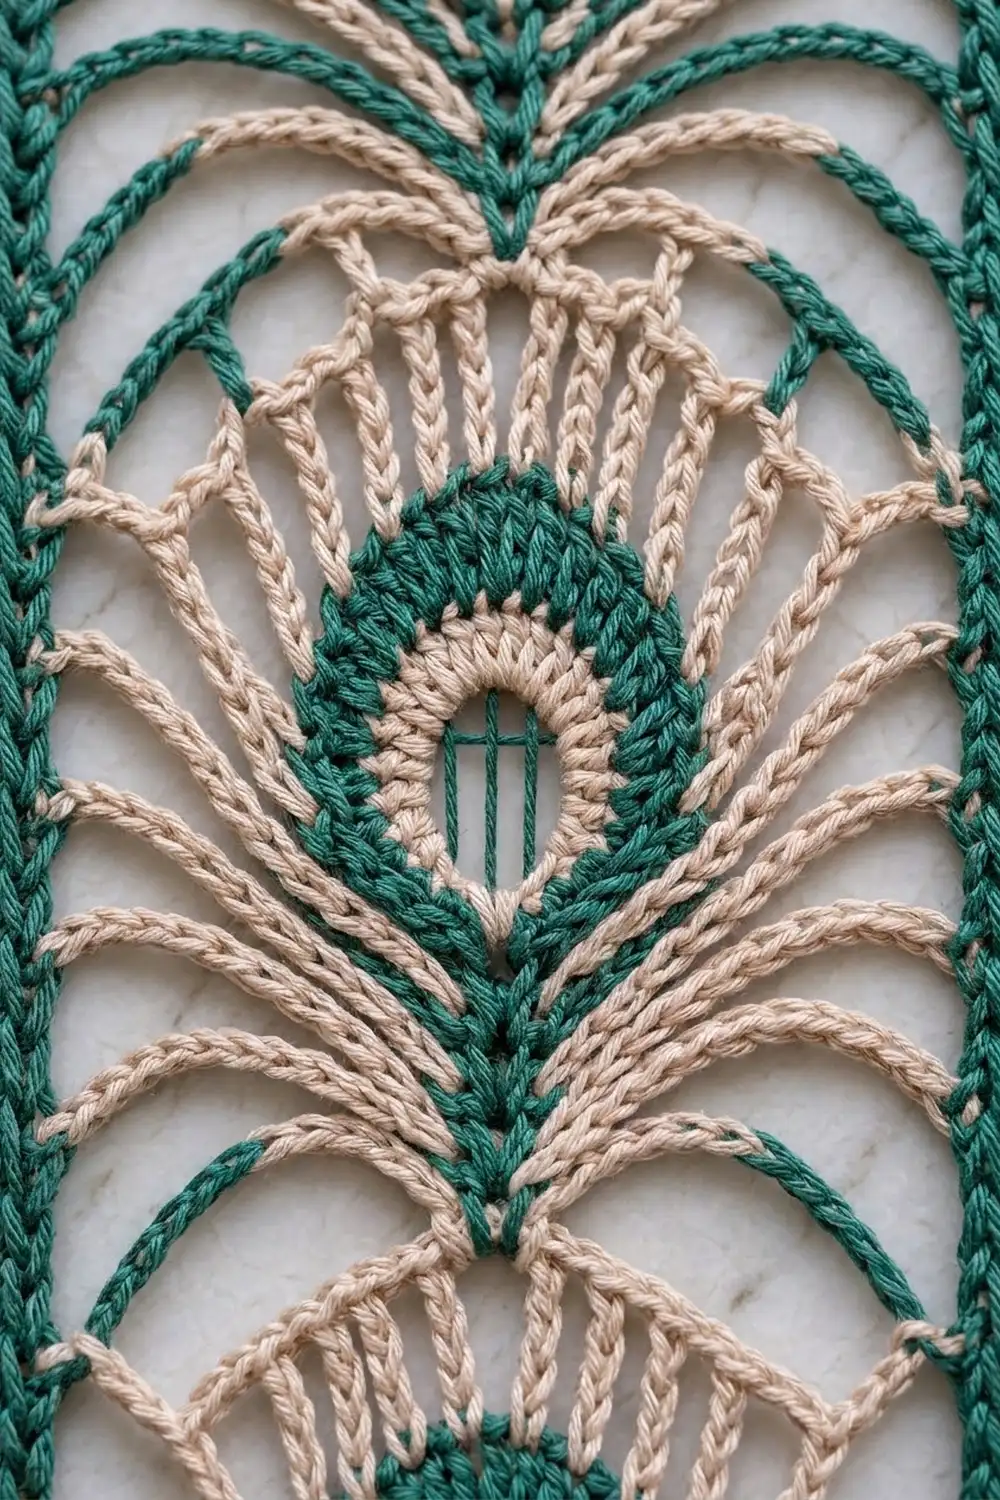
Strip Body (Make 6, Color A)
The ch 4 at the start of a row counts as a tr. On tr rows, work the last tr into the top of the turning ch. Each lace row has three parts: a left side zone, a center fan, and a right side zone that mirrors the left.
Foundation: With A, ch 26.
Row 1 (RS): Sc in 2nd ch from hook and in each ch across, turn. (25 sc)
On every later repeat, work Row 1 as: ch 1, sc in each st across, turn. (25 sc)
Row 2: Ch 4, tr in next st, ch 4, sk 4 sts, sc in next st (st 7), ch 4, sk 5 sts, (tr, ch 2, tr, ch 2, tr) in next st (st 13), ch 4, sk 5 sts, sc in next st (st 19), ch 4, sk 4 sts, tr in last 2 sts, turn. (29 sts: 7 tr, 2 sc, 4 ch-4 sps, 2 ch-2 sps)
Row 3: Ch 4, tr in next tr, ch 4, sc in next ch-4 sp, ch 4, sc in next ch-4 sp, ch 2, tr in first fan tr, [ch 2, tr in next ch-2 sp, ch 2, tr in next tr] twice, ch 2, sc in next ch-4 sp, ch 4, sc in next ch-4 sp, ch 4, tr in last 2 sts, turn. (41 sts; fan = 5 tr and 4 ch-2 sps)
Row 4: Ch 4, tr in next tr, ch 4, sc in next ch-4 sp, ch 4, sc in next ch-4 sp, ch 3, sk ch-2 sp, tr in first fan tr, [ch 2, tr in next ch-2 sp, ch 2, tr in next tr] 4 times, ch 3, sk ch-2 sp, sc in next ch-4 sp, ch 4, sc in next ch-4 sp, ch 4, tr in last 2 sts, turn. (55 sts; fan = 9 tr and 8 ch-2 sps)
Row 5: Ch 4, tr in next tr, ch 4, sc in next ch-4 sp, ch 4, sc in next ch-4 sp, ch 3, sk ch-3 sp and first fan tr, sc in next ch-2 sp, [ch 5, sc in next ch-2 sp] 7 times, ch 3, sc in next ch-4 sp, ch 4, sc in next ch-4 sp, ch 4, tr in last 2 sts, turn. (73 sts; fan = 8 sc and 7 ch-5 loops)
Rows 6–11 (narrowing rows): Ch 4, tr in next tr, ch 4, sc in next ch-4 sp, ch 4, sc in next ch-4 sp, ch X, sk connector sp, sc in first ch-5 loop, [ch 5, sc in next ch-5 loop] across fan, ch X, sc in next ch-4 sp, ch 4, sc in next ch-4 sp, ch 4, tr in last 2 sts, turn.
X = 3 on Rows 6–7 and 5 on Rows 8–11. The longer connectors let the side arches open up as the fan narrows. Each row has one fewer fan loop than the row before:
- Row 6: 7 sc, 6 loops (67 sts)
- Row 7: 6 sc, 5 loops (61 sts)
- Row 8: 5 sc, 4 loops (59 sts)
- Row 9: 4 sc, 3 loops (53 sts)
- Row 10: 3 sc, 2 loops (47 sts)
- Row 11: 2 sc, 1 loop (41 sts)
Row 12 (reset row): Ch 1, sc in first 2 tr, 3 sc in each of next 2 ch-4 sps, 4 sc in ch-5 connector, 1 sc in center ch-5 loop, 4 sc in next ch-5 connector, 3 sc in each of next 2 ch-4 sps, sc in last 2 sts, turn. (25 sc: 12 + 1 + 12)
Row 12 brings the width back to exactly 25 sts. Work Rows 1–12 ten times in total, ending with Row 12. Fasten off.
Eye Appliqué (Make 60)
Ring: With A, ch 12 and sl st to the first ch to form a ring.
Rnd 1 (A): Ch 1. Into the ring, work 3 sc, 3 hdc, 2 dc, (dc, ch 2, dc), 2 dc, 3 hdc, 3 sc. Join with a sl st to the first sc and fasten off. (18 sts + ch-2 tip)
Rnd 2 (B): Join B in the first sc, ch 1, [2 sc in next st, sc in next st] 4 times, sc in next st, (sc, ch 2, sc) in tip, sc in next st, [sc in next st, 2 sc in next st] 4 times. Join, then fasten off with a 12 in (30.5 cm) tail. (28 sc + ch-2 tip)
Bars: With B, embroider 3 vertical straight stitches across the center opening.
Stems and Eye Placement
With B, work a surface slip stitch line up the center column of each feather from Row 2 to Row 6, about 3 in (7.6 cm). Sew on one eye, tip up, centered over Rows 7–10, with its base touching the top of the stem. Whipstitch through the back loops of Rnd 2.
Make All Pieces
- Strip bodies: 6 in A
- Eyes: 60 (Rnd 1 in A, Rnd 2 in B)
- Borders: 3 strips in B, 3 in A
Layout (left to right, by border color):
| B | A | B | A | B | A |
Joining (Hanging the Strips)
The strips are never sewn together. Each strip hangs from its own loop, so the curtain parts easily when someone walks through.
Because there is no seam, there is no stitch-to-stitch joining. Each border starts from that strip’s own edge count, with nothing added for seams.
Keep the hanging loops firm. A loose loop stretches and makes its strip hang lower than its neighbors. Slide the loops onto the rod in layout order, leaving a small gap between strips so they can move.
Size checkpoint: six strips at 6 in (15.2 cm) each = 36 in (91.4 cm). Every strip should hang 67 in (170.2 cm) from the top of its loop.
Border
Border gauge: 5 sc per inch (2.54 cm), the same as the body gauge.
In every round, the corner st is the middle sc of each 3-sc corner group. Each side count includes both of that side’s corner sts.
Rnd 1: With the border color and RS facing, join in the first st of Row 12, ch 1. Along the top edge, work 3 sc in the first st, sc in the next 23 sts, and 3 sc in the last st. Down the long side, work 32 sc per repeat, for 320 sc in total: 1 sc in each sc row-end and 3 sc in each tr row-end. Along the bottom, work into the free loops of the foundation ch: 3 sc in the first loop, sc in the next 23, and 3 sc in the last. Work 320 sc up the other long side and join. (698 sts: 27 per short side, 324 per long side)
Rnd 2: Ch 1, sc in each st, working 3 sc in each corner st. Join. (706 sts: 29 per short side, 326 per long side)
Rnd 3: Ch 1, rev sc in each st around. Join and fasten off. (706 sts)
Hanging loop: With the border color, join with a sl st in the 14th st of the top side. Ch 20, sk 1 st, sl st in the 16th st, turn. Work 28 sc into the ch-20 loop, sl st in the 14th st, and fasten off.
Why the math works: 320 sc ÷ 5 = 64 in (162.6 cm) of body length, and 25 sts ÷ 5 = 5 in (12.7 cm) of width. The three rounds add 1/2 in (1.3 cm) on every side, giving 6 x 65 in (15.2 x 165.1 cm). Rnd 2 adds exactly 2 sts per side at the corners, 8 in all (698 + 8 = 706). Rnd 3 adds no sts.
Final Blocking
- Weave in all ends.
- Soak each strip in cool water for 10 minutes. Press the water out in a towel; don’t wring.
- Lay the strip flat. If your board is too short, block the strip in two halves.
- Pin the straight edges to 6 in (15.2 cm) wide and 65 in (165.1 cm) long.
- Pin each fan loop and side arch open so the rays spread out evenly.
- Shape each eye into a teardrop with the tip pointing up.
- Let the strip dry completely before unpinning.
Final Quality-Control Checklist
- Each strip has 10 feathers, each with a stem and an eye
- Each strip measures 6 x 65 in (15.2 x 165.1 cm)
- Corners are square and borders lie flat
- All hanging loops are the same size
- Border colors alternate B, A, B, A, B, A
- Eye bars are straight and even
- All ends are secured
Troubleshooting
- Border ruffles: You have too many side sts. Recount to 32 sc per repeat.
- Border pulls in: You have too few sts. Make sure every tr row-end got 3 sc.
- Fan looks crowded: Work looser chains, or go up half a hook size for the ch-5 loops.
- Eye cups: Rnd 2 is too tight. Rework it with looser tension.
- Strips hang unevenly: Re-block them all to the same length, and check that the loops match.
Care
Hand wash in cool water with mild soap and dry flat, re-blocking if needed. Don’t tumble dry: heat can shrink cotton and distort the lace.

Final Notes
Here is how the measurements build: 25 base sts give 5 in (12.7 cm) of width. Each 12-row feather adds 6.4 in (16.3 cm), so ten feathers make 64 in (162.6 cm). The 1/2 in (1.3 cm) border brings each strip to 6 x 65 in (15.2 x 165.1 cm). Six strips make a 36 in (91.4 cm) curtain. If every step measures correctly, the curtain will hang straight.
Happy crocheting!