

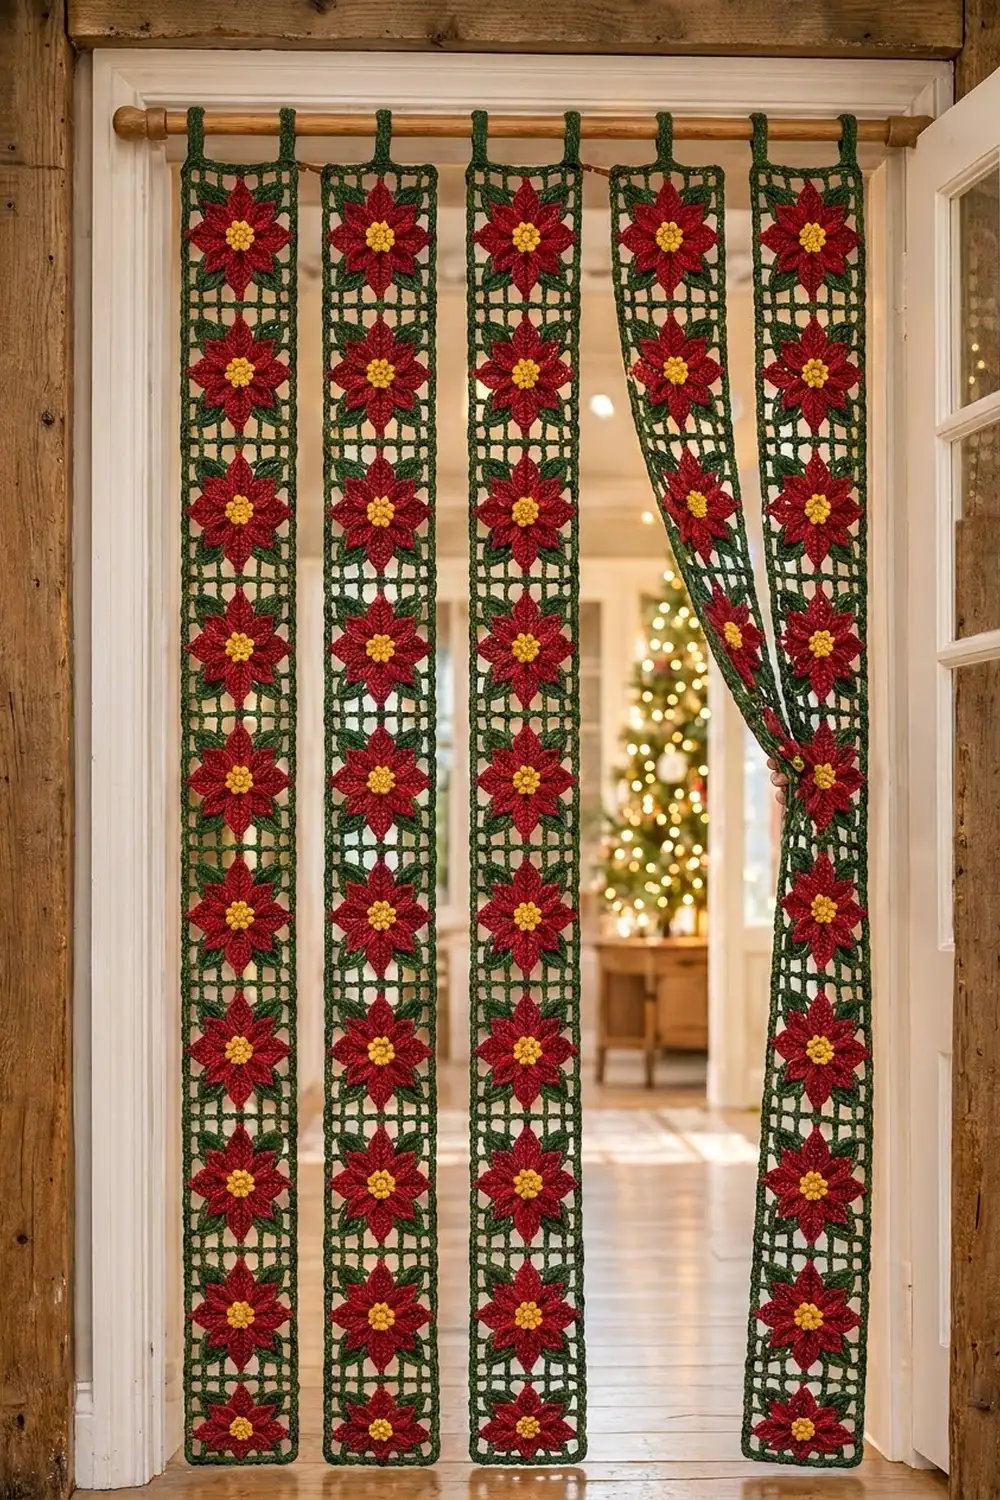
This holiday door curtain hangs as five slim strips. Each strip is a column of airy green filet-mesh squares, and every square carries a layered poinsettia. Light passes through the mesh while the flowers stay bold and dimensional.
The palette is classic Christmas: deep crimson petals, a bobbled golden-yellow center, and forest-green leaves and lattice. The style is traditional and cozy, like a vintage filet doily in festive colors.
This pattern uses US crochet terms. Each finished strip measures 6¾ in x 58½ in (17.1 cm x 148.6 cm) before the loops. The hanging loops add about 1½ in (3.8 cm).
Here’s how it’s built. You work each mesh square in rows and finish it with a single-crochet edging. Then you make a leaf layer and a flower and sew them on. Ten squares are slip-stitched into a strip, and the strip gets a two-round border with hanging loops. You need five strips in total.
Finished Size and Construction
- Finished strip size: 6¾ in x 58½ in (17.1 cm x 148.6 cm), plus 1½ in (3.8 cm) loops
- Full curtain: 5 strips, about 33¾ in (85.7 cm) wide when hung edge to edge
- Skill level: Intermediate
- Terminology: US
- Yarn weight: Worsted (#4)
- Hook: 5.0 mm (H-8)
- Number of pieces: 50 squares (10 per strip), each with 1 leaf layer and 1 flower
- Layout: 5 strips, each 1 square wide x 10 squares long
- Square size: 5¾ in (14.6 cm) including its edging
- Strip size before border: 5¾ in x 57½ in (14.6 cm x 146.1 cm)
- Border depth: ½ in (1.3 cm), which is 2 rounds of sc
Materials
Choose a smooth worsted-weight cotton or cotton blend. Cotton gives you crisp mesh and well-defined petals. The amounts below assume about 200 m per 100 g.
- Forest green: 750 g (about 1,500 m) for the mesh, edgings, leaves, joining and borders
- Crimson red: 250 g (about 500 m) for the petals
- Golden yellow: 100 g (about 200 m) for the centers
All quantities include a margin of about 15%.
Tools:
– 5.0 mm (H-8) hook
– Tapestry needle
– Stitch markers
– Rust-proof pins and blocking mats
– Spray bottle
– Measuring tape
– Curtain rod, at least 36 in (91.4 cm)
Abbreviations (US Terms)
- ch – chain
- sl st – slip stitch
- sc – single crochet
- hdc – half double crochet
- dc – double crochet
- tr – treble crochet
- sk – skip
- sp(s) – space(s)
- BLO – back loop only
- RS / WS – right side / wrong side
Bobble: (Yarn over, insert hook in st, pull up a loop, yarn over, pull through 2 loops) 3 times in the same st, then yarn over and pull through all 4 loops on the hook.
Beginning bobble: Ch 2, then work the bobble with only 2 repeats instead of 3.
Picot: Ch 3, sl st in 3rd ch from hook.
Gauge and Checkpoints
Mesh gauge: 4 blocks x 4 rows = 3 in (7.6 cm) square. A block is one ch-2 space plus one dc post, and it measures ¾ in (1.9 cm) each way.
Sc gauge: 16 sc = 4 in (10.2 cm).
Make one complete square, flower included, before you start the rest. Check these measurements:
- After mesh Row 7: 5¼ in (13.3 cm) square
- After the edging: 5¾ in (14.6 cm) square
- Flower, from one large petal tip to the opposite tip: about 5 in (12.7 cm)
- Leaf length: about 1¾ in (4.4 cm)
Too big? Go down half a hook size. Too small? Go up half a size. Stay within ¼ in (0.6 cm) of the target. Ten squares stack in each strip, so a small error per square adds up fast.
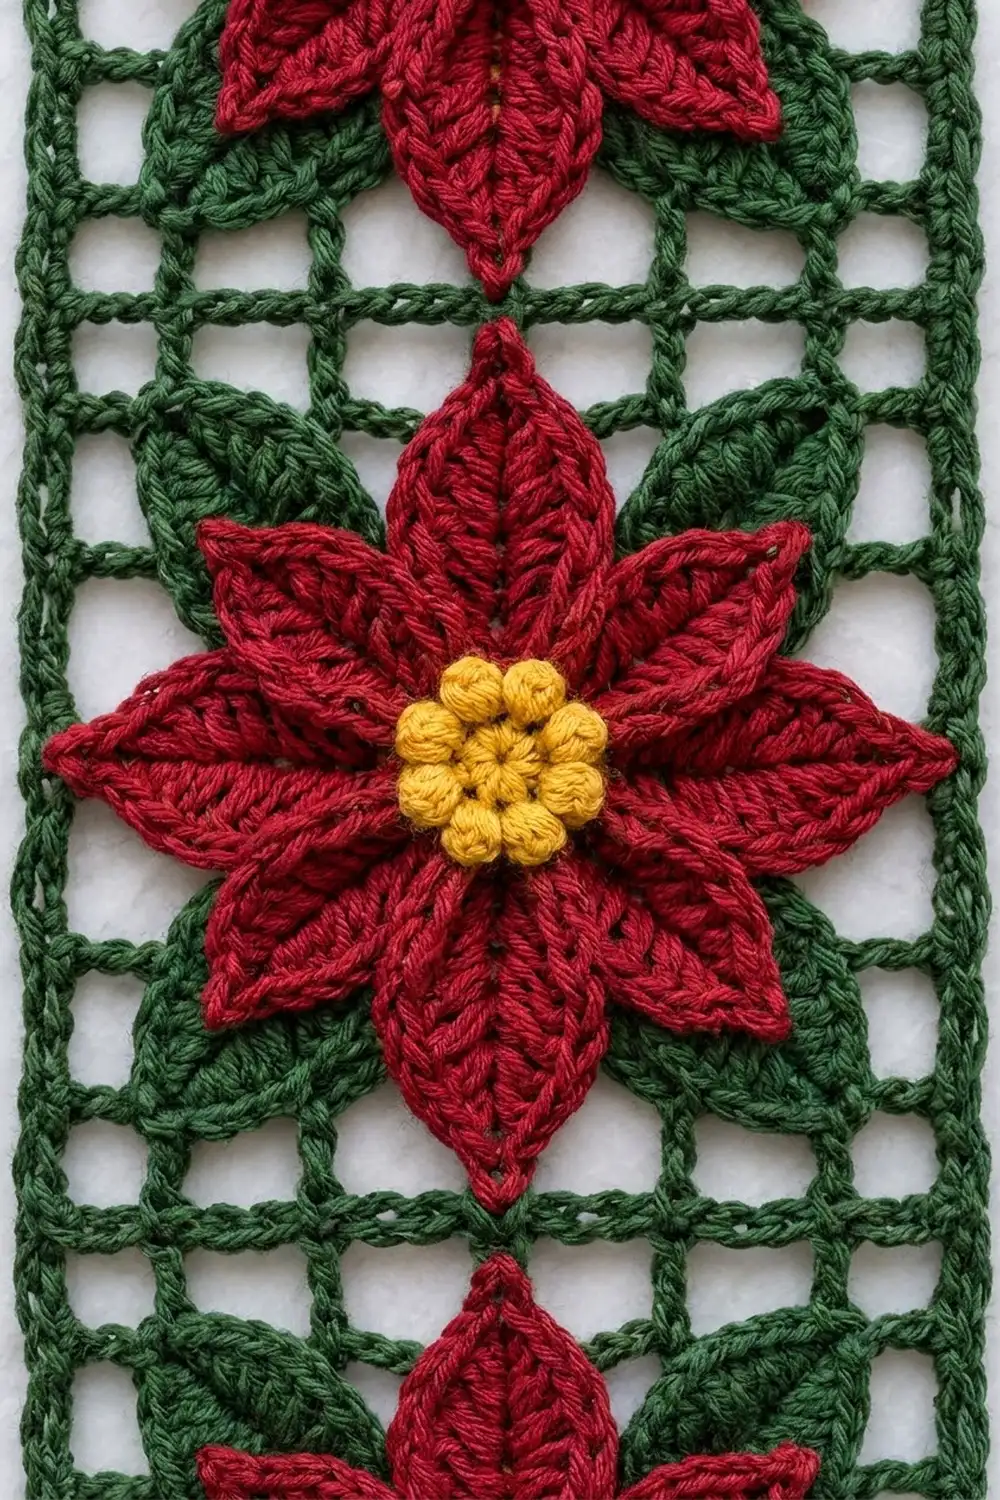
Mesh Square (make 50, green)
Ch 26.
Row 1: Dc in 8th ch from hook. The 7 skipped chains count as the first dc, ch 2 and the skipped base chains. Ch 2, sk 2 ch, dc in next ch 6 times. Turn. (7 blocks, 8 dc posts)
Row 2: Ch 5 (counts as dc + ch 2). Dc in next dc. Ch 2, dc in next dc 5 times. Ch 2, then work the last dc into the top of the turning post from Row 1. Turn. (7 blocks)
Rows 3–7: Ch 5 (counts as dc + ch 2). Dc in next dc. Ch 2, dc in next dc 5 times. Ch 2, dc in 3rd ch of the turning ch-5. Turn. (7 blocks each)
Checkpoint: 7 x 7 blocks, 5¼ in (13.3 cm) square.
Edging Round: Don’t turn. Ch 1 (does not count), then work around the square:
- Side: 3 sc around each row-end post down the side (21 sc), ch 2.
- Bottom: 3 sc in each block along the foundation, with the hook under the 2 skipped base chains (21 sc), ch 2.
- Side: 3 sc around each row-end post (21 sc), ch 2.
- Top: 3 sc in each ch-2 sp of Row 7 (21 sc), ch 2.
Sl st to first sc. Fasten off. (84 sc: 21 sc per side, plus 4 corner ch-2 sps)
The corner ch-2 spaces are not stitches, so “21 sc per side” counts only the sc between them.
Leaf Layer (make 50, green)
Make a magic ring.
Rnd 1: Ch 1, 8 sc in ring, sl st to first sc. (8 sc)
Rnd 2: Sc in next sc, ch 3, sk 1 sc 4 times, sl st to first sc. (4 sc, 4 ch-3 loops)
Rnd 3 (leaves): Work this in each ch-3 loop:
- Sl st in loop, ch 8.
- Side 1: Starting in 2nd ch from hook: sc, hdc, dc, tr, tr, dc, hdc (7 sts).
- Side 2: In the opposite loops of the same chain: hdc, dc, tr, tr, dc, hdc, sc (7 sts).
- Tip: Picot.
- Vein: Surface sl st down the center line back to the loop, then sl st in the loop.
Fasten off. (4 leaves, 14 sts each plus a picot)
Poinsettia Flower (make 50)
Center (yellow): Make a magic ring.
Rnd 1: Ch 1, 8 sc in ring, sl st to first sc. (8 sc)
Rnd 2: Beginning bobble in first sc, ch 1. Bobble in next sc, ch 1 7 times. Sl st to top of beginning bobble. Fasten off. (8 bobbles, 8 ch-1 sps)
Rnd 3 (red): Join red in any ch-1 sp. Ch 1. Sc in ch-1 sp, ch 3 8 times. Sl st to first sc. (8 sc, 8 ch-3 loops)
Rnd 4 (petals): Work one petal in each ch-3 loop, alternating large and small.
Large petal:
- Sl st in loop, ch 9.
- Side 1: Starting in 2nd ch from hook: sc, hdc, dc, dc, tr, tr, dc, hdc (8 sts).
- Side 2: In the opposite loops of the chain: hdc, dc, tr, tr, dc, dc, hdc, sc (8 sts).
- Tip: Picot.
- Vein: Surface sl st down the center, then sl st in the loop.
Small petal:
- Sl st in loop, ch 7.
- Side 1: Starting in 2nd ch from hook: sc, hdc, dc, tr, dc, hdc (6 sts).
- Side 2: In the opposite loops of the chain: hdc, dc, tr, dc, hdc, sc (6 sts).
- Tip: Picot.
- Vein: Surface sl st down the center, then sl st in the loop.
Work large petal, small petal 4 times. Fasten off, leaving a 12 in (30.5 cm) tail. (8 petals: 4 large with 16 sts each, 4 small with 12 sts each)
The surface slip stitches sit over the foundation chain and form the raised vein on each petal.
Assembling Each Square
- Lay the mesh square RS up with Row 1 at the bottom.
- Center the leaf layer with the leaves pointing to the corners. Tack its ring to the mesh with green yarn.
- Place the flower on top. The large petals point to the midpoints of the sides, and the small petals sit over the leaves.
- Use the red tail to sew around Rnd 3 and through each petal picot. Petal tips should land about ⅜ in (1.0 cm) inside the edging.
Weave in the ends on the WS.
Make All Pieces
| Component | Per square | Total | Color |
|---|---|---|---|
| Mesh square + edging | 1 | 50 | Green |
| Leaf layer | 1 | 50 | Green |
| Flower center | 1 | 50 | Yellow |
| Petal rounds | 1 | 50 | Red |
Layout grid (S = strip, numbers = square position from the top):
S1   S2   S3   S4   S5
[1]  [1]  [1]  [1]  [1]
[2]  [2]  [2]  [2]  [2]
 ...  rows 3 to 9 continue the same way ...
[10] [10] [10] [10] [10]
All squares face the same way, with Row 1 at the bottom.
Joining
Join the squares of each strip with green yarn, using a flat sl st seam.
- Place square 1 above square 2, both RS up, with their edges touching.
- Sl st through both right-hand corner ch-2 sps.
- Sl st through the BLO of each matching pair of sc (21 sl sts).
- Sl st through both left-hand corner sps. Fasten off. (23 sl sts per seam)
Each strip needs 9 seams.
Stitch-to-stitch logic: Each edge has 21 sc, so the stitches pair one to one and the mesh grids stay aligned.
Tension: Keep your sl sts as loose as the sc beneath them. Tight seams make the strip pucker and shorten it.
Checkpoint: 5¾ in x 57½ in (14.6 cm x 146.1 cm), ±½ in (1.3 cm).
Border
Border gauge: 16 sc = 4 in (10.2 cm).
Rnd 1: With RS facing, join green in the top-right corner ch-2 sp. Ch 1, then (sc, ch 2, sc) in the same sp.
- Long side: Sc in each of the 21 sc of the square. At the seam, sc in this square’s corner ch-2 sp, then sc in the next square’s corner ch-2 sp. Repeat 9 times. Sc in the 21 sc of the last square. Work (sc, ch 2, sc) in the corner sp.
- Short side: Sc in each of the 21 sc, then (sc, ch 2, sc) in the corner sp.
Repeat both sides, omitting the final corner. Sl st to first sc.
Count per side, including the corner sc:
– Long side: 1 + (10 x 21) + (9 x 2) + 1 = 230 sc
– Short side: 1 + 21 + 1 = 23 sc
– Total: 506 sc and 4 corner ch-2 sps
Rnd 2: Sl st into the corner sp, ch 1. Work (sc, ch 2, sc) in each corner sp and sc in each sc.
On the top short edge, work the loops between the corners: sc in next 3 sc, ch 14, sc in next 17 sc, ch 14, sc in next 3 sc. No stitches are skipped.
Sl st to first sc. (232 sc on each long side and 25 sc on each short side, 514 sc total)
Loops: Join green at the base of each ch-14 loop. Work 20 sc over the loop, sl st at the base, and fasten off.
Why the math works: At 4 sc per inch:
– 57½ in x 4 = 230 sc for the long side.
– 5¾ in x 4 = 23 sc for the short side.
Each square’s 21 sc cover its 5¼ in (13.3 cm) of mesh. The 2 seam sc cover the two ¼ in (0.6 cm) edgings that meet at each seam, and the corner sc cover the outer edgings. After the border, the strip measures 6¾ in x 58½ in (17.1 cm x 148.6 cm).
Final Blocking
- Soak the strip in cool water and press out the water in a towel. Don’t wring it.
- Lay it flat and pin it to 6¾ in x 58½ in (17.1 cm x 148.6 cm).
- Pin each seam line square to the edges.
- Open each mesh block to ¾ in (1.9 cm).
- Shape the petal and leaf points and lift the bobbles.
- Let it dry fully, then hang the strip for a day before you check its length.
Final Quality-Control Checklist
- Each square has 7 x 7 blocks, 21 sc per side and 4 corner ch-2 sps
- Each flower has 8 bobbles, 4 large and 4 small petals, and visible veins
- Each square has 4 leaves pointing to its corners
- All flowers face the same way
- Each strip has 10 squares and 9 seams with aligned grids
- Border Rnd 1 has 230/23 sc per side, and Rnd 2 has 232/25
- The loops are reinforced and evenly placed
- All five strips match within ½ in (1.3 cm)
- All ends are woven in
Troubleshooting
Mesh blocks aren’t square: Adjust the height of your dc. If the blocks are too wide, work ch 1 instead of ch 2.
Edging ruffles: Use a hook one size smaller for the edging only, and keep 21 sc per side.
Petals curl: The veins are too tight. Rework them more loosely and block the petals flat.
Strip twists when hung: Sew the flowers through the mesh as well as around the edges, then re-block.
Strips differ in length: Re-block the shorter strip. If it’s more than 1 in (2.5 cm) short, check for tight seams.
Care
Hand wash in cool water and dry flat. Store the strips rolled, not folded, to protect the petals.
Final Notes
The measurement chain:
– One block is ¾ in (1.9 cm).
– 7 blocks plus edging make a 5¾ in (14.6 cm) square.
– 10 squares make 57½ in (146.1 cm).
– 2 border rounds bring each strip to 6¾ in x 58½ in (17.1 cm x 148.6 cm).
– Five strips fill a doorway.
Check your first square carefully, and the rest will follow.
Happy crocheting!