
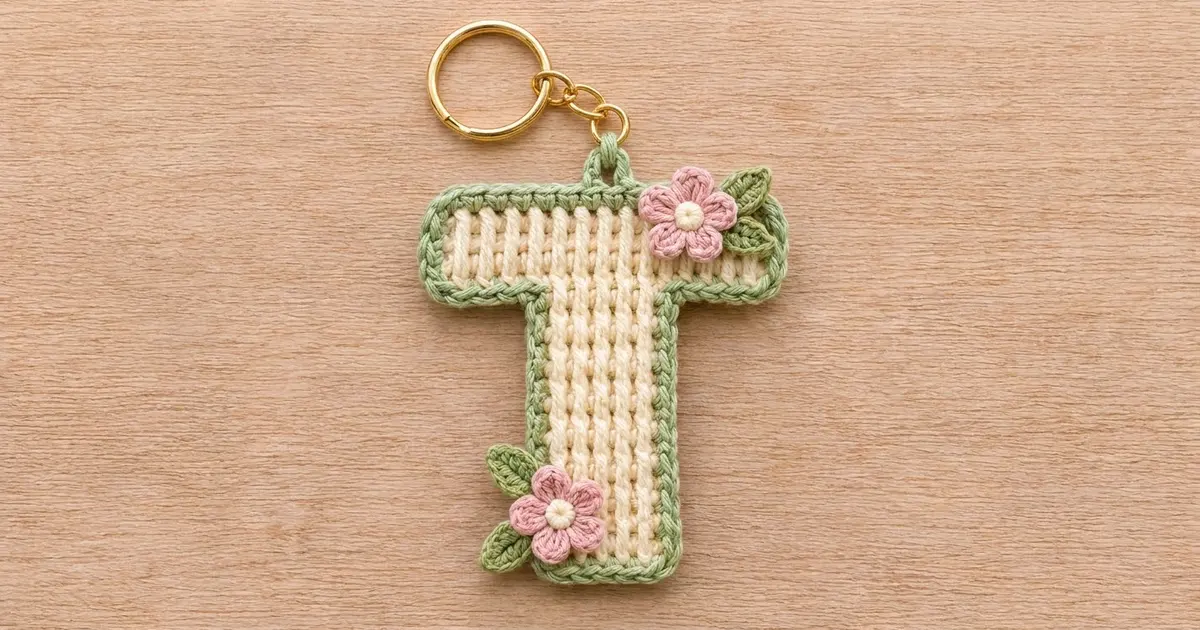
The Petal Garden Letter T Keychain is a small monogram charm with a sweet cottage look. It has a soft cream body, a sage green rope edge, and two dusty pink flowers resting on little green leaves. Clip it to a tote bag, a backpack, or a set of keys, or give it as a personalized gift.
The body is worked in rows of double crochet, which gives the letter neat vertical columns that read clearly from a distance. Two border rounds frame the shape: a round of single crochet, then a round of reverse single crochet (crab stitch) for the twisted, rope-like edge.
This pattern uses US crochet terms. The finished keychain measures 3.7 in (9.4 cm) wide by 4.5 in (11.4 cm) tall, not counting the hanging loop and hardware.
Construction is simple. You work the stem from the bottom up, extend both sides to make the crossbar, add the green border and hanging loop in one go, and then sew on the flowers and leaves.
Finished Size and Construction
- Finished size: 3.7 in (9.4 cm) wide x 4.5 in (11.4 cm) tall
- Skill level: Easy / advanced beginner
- Terminology: US crochet terms
- Yarn weight: DK (light worsted, #3), cotton or cotton blend
- Hook: 3.5 mm (E-4)
- Number of pieces: 1 letter body, plus 2 flowers and 4 leaves as appliqués
- Layout: Single piece shaped as a capital T, with one flower at the top right corner and one at the bottom left corner
- Piece size before border: 3.2 in (8.1 cm) wide x 4.0 in (10.2 cm) tall
- Crossbar: 3.2 in (8.1 cm) wide x 1.2 in (3.0 cm) tall
- Stem: 1.2 in (3.0 cm) wide x 2.8 in (7.1 cm) tall
- Border depth: 0.25 in (0.6 cm) on every edge
Materials
Use a smooth, mercerized or combed cotton in DK weight. Cotton holds its shape well and shows the stitch columns clearly, and it won’t fuzz much with daily handling. Choose a sage green that contrasts with the cream body so the outline stays crisp.
- Cream (body and flower centers): 8 g, about 18 m
- Sage green (border, hanging loop, leaves): 5 g, about 12 m
- Dusty pink (flower petals): 3 g, about 7 m
These quantities include a safety margin. The actual keychain uses a little less.
Tools:
- 3.5 mm (E-4) crochet hook
- Tapestry needle
- Scissors
- Stitch markers (2)
- 1 in (2.5 cm) gold split key ring with a short chain and jump ring
- Ruler or tape measure
- Pins and a blocking surface
Abbreviations (US Terms)
- ch – chain
- sl st – slip stitch
- sc – single crochet
- hdc – half double crochet
- dc – double crochet
- rev sc – reverse single crochet (crab stitch)
- st(s) – stitch(es)
- RS – right side
Special stitch – Extended edge dc (edc): Yo, insert hook under the 2 strands at the base of the last st made, yo and pull up a loop (3 loops on hook), yo and pull through 1 loop (this forms a small “chain” at the base), [yo and pull through 2 loops] twice. For each following edc, insert the hook into the base chain of the edc just made. This adds stitches to the end of a row without a separate chain.
Reverse single crochet (rev sc): Working from left to right (right-handers), insert hook into the next st to the right, pull up a loop, yo and pull through both loops.
Gauge and Checkpoints
Gauge: 20 dc and 10 rows = 4 in (10.2 cm) in pattern. That equals 5 sts and 2.5 rows per 1 in (2.5 cm). Each dc row is 0.4 in (1.0 cm) tall.
Because the letter is small, the letter itself is your gauge swatch. Work the first 3 rows of the stem and measure before going on.
Checkpoints:
- After Row 1: 1.2 in (3.0 cm) wide
- After Row 7: stem is 1.2 in (3.0 cm) wide x 2.8 in (7.1 cm) tall
- After Row 8: crossbar row is 3.2 in (8.1 cm) wide
- After Row 10: whole letter is 3.2 in (8.1 cm) wide x 4.0 in (10.2 cm) tall
- After Border Round 1: about 3.5 in (8.9 cm) x 4.3 in (10.9 cm)
- After Border Round 2: 3.7 in (9.4 cm) x 4.5 in (11.4 cm)
If your piece is too big, go down a hook size, to 3.25 mm or 3.0 mm. If it is too small, go up to a 3.75 mm or 4.0 mm hook. A difference of 0.1 in (0.3 cm) is fine for a keychain, but bigger gaps will throw off the border corners.

Letter Body
Use cream. The turning ch 3 counts as the first dc in every row.
Stem
Row 1 (RS): Ch 8. Dc in 4th ch from hook (the skipped 3 ch count as the first dc) and in each of the next 4 ch. (6 dc)
Rows 2–7: Ch 3, turn. Skip the first st, dc in each st across, working the last dc into the top of the turning ch. (6 dc)
At this point the stem is 7 rows tall, 1.2 in (3.0 cm) wide x 2.8 in (7.1 cm) tall. Don’t fasten off.
Crossbar
The crossbar adds 5 sts on each side of the 6 stem sts: 5 + 6 + 5 = 16.
Row 8: Ch 7, turn. Dc in 4th ch from hook and in each of the next 3 ch: the first 5 new sts, counting the skipped 3 ch as 1 dc. Dc in each of the 6 stem sts, working into the first st as well, because the new chain replaces the usual turning chain. Then work 5 edc at the end of the row. (16 dc)
Place a stitch marker in the first and last st of Row 8 so you can find the wing corners later.
Rows 9–10: Ch 3, turn. Skip the first st, dc in each st across. (16 dc)
Fasten off. The letter body now measures 3.2 in (8.1 cm) x 4.0 in (10.2 cm). The crossbar is 3 rows tall, 1.2 in (3.0 cm), and each wing extends 1.0 in (2.5 cm) beyond the stem.
Border
Border Gauge and Logic
The border uses 5 sc per 1 in (2.5 cm), the same width as the dc body. That means:
- Along stitch edges (top, bottom, wing undersides), work 1 sc per st.
- Along row-end edges, work 2 sc per dc row, because each row is 0.4 in (1.0 cm) tall and 2 sc cover 0.4 in.
- At each of the 6 outer corners, work 3 sc in the corner st. This adds 2 sts per corner to turn the 90-degree angle.
- At the 2 inner corners (where the stem meets the crossbar underside), add nothing. Just pull the stitches snug.
Base stitches around the T: bottom 6 + stem side 14 + wing underside 5 + crossbar end 6 + top 16 + crossbar end 6 + wing underside 5 + stem side 14 = 72.
Corner extras: 6 corners x 2 = 12.
Round 1 total: 72 + 12 = 84 sc.
Round 1 (sc and hanging loop)
With RS facing, join green with a sl st in the first foundation st at a bottom corner of the stem.
- Bottom edge (6 sts): Ch 1, 3 sc in the first st, sc in the next 4 sts, 3 sc in the last st. (10 sc)
- Stem side (7 rows): 2 sc in each row-end. (14 sc)
- Wing underside (5 sts): Sc in the next 4 sts, 3 sc in the last st at the wing tip. (7 sc)
- Crossbar end (3 rows): 2 sc in each row-end. (6 sc)
- Top edge (16 sts): 3 sc in the first st, sc in the next 6 sts, sc in the 8th st, ch 10 for the hanging loop, sc in the 9th st, sc in the next 6 sts, 3 sc in the last st. (20 sc, plus the ch-10 loop)
- Crossbar end (3 rows): 2 sc in each row-end. (6 sc)
- Wing underside (5 sts): 3 sc in the first st at the wing tip, sc in the next 4 sts. (7 sc)
- Stem side (7 rows): 2 sc in each row-end. (14 sc)
Join with a sl st to the first sc. Total: 84 sc, plus the ch-10 loop, which isn’t counted.
Check: 10 + 14 + 7 + 6 + 20 + 6 + 7 + 14 = 84.
On one wing, the underside sts are the foundation chains from Row 8. On the other wing, they are the base chains of the edc stitches. Both give exactly 5 sts.
Round 2 (rope edge)
Ch 1. Don’t turn. Work rev sc in each sc around. When you reach the ch-10 loop, work 14 rev sc into the loop space, spreading them evenly to cover the chain completely. Then continue with rev sc in each remaining sc.
Join with a sl st to the first rev sc. Total: 84 rev sc along the edge, plus 14 rev sc on the loop.
Fasten off and weave in the ends.
This round adds the raised, twisted rope texture. The combined border depth is 0.25 in (0.6 cm) on every edge. That’s why the finished size is 3.2 + 0.5 = 3.7 in (9.4 cm) wide and 4.0 + 0.5 = 4.5 in (11.4 cm) tall.
Flowers (make 2)
Round 1 (cream): Make a magic ring. Ch 1, work 5 sc in the ring, pull the ring tight and join with a sl st to the first sc. (5 sc) Fasten off.
Round 2 (pink): Join pink in any sc. In each sc around work (ch 2, 2 dc, ch 2, sl st). (5 petals)
Fasten off, leaving a 10 in (25.4 cm) tail for sewing. Each flower measures about 1.0 in (2.5 cm) across.
Leaves (make 4)
With green, ch 5.
- Side 1: Sc in 2nd ch from hook, hdc in next ch, dc in next ch.
- Tip: In the last ch work (dc, ch 2, sl st in 2nd ch from hook, dc). This makes a small pointed picot.
- Side 2: Working along the opposite side of the foundation chain, hdc in the next ch, sc in the next ch, sl st in the first sc.
That’s 8 sts plus the picot. Fasten off, leaving an 8 in (20.3 cm) tail. Each leaf is about 0.75 in (1.9 cm) long.
Assembly of Appliqués
- Top right cluster: Pin 2 leaves at the top right corner of the crossbar so they fan out: one pointing up and to the right, one pointing down and to the right. Their bases should overlap the inner edge of the green border.
- Bottom left cluster: Pin 2 leaves at the bottom left corner of the stem: one pointing up and to the left, one pointing down and to the left.
- Sew the leaves down along their center lines with small running stitches. Leave the tips free.
- Place a flower over the base of each leaf pair so it covers the leaf ends and overlaps the border corner by about 0.25 in (0.6 cm).
- Sew around the cream center and through the base of each petal. Leave the petal tips loose so they stand up a little.
- Weave all tails into the back of the cream body.
- Open the jump ring, thread it through the green hanging loop, and close it firmly.
Final Blocking
- Lightly mist the keychain with water, or steam it from above without letting the iron touch the yarn.
- Lay it flat on a blocking mat, RS up.
- Pin the 6 outer corners first: 3.7 in (9.4 cm) across the crossbar and 4.5 in (11.4 cm) from top to bottom.
- Check that the stem is 1.7 in (4.3 cm) wide including the border, and centered under the crossbar.
- Push the inner corners into sharp right angles with your fingers.
- Don’t pin through the flowers. Fluff the petals with your fingertips instead.
- Leave it to dry completely before attaching the key ring.
Final Quality-Control Checklist
- Body measures 3.2 in (8.1 cm) x 4.0 in (10.2 cm) before the border
- Row 8 and later rows have exactly 16 dc; stem rows have exactly 6 dc
- Border Round 1 has 84 sc, and the hanging loop is centered between top sts 8 and 9
- Border Round 2 has 84 rev sc on the edge plus 14 on the loop
- All 6 outer corners are square, with no cupping
- Inner corners are snug, with no gaps or ruffles
- Finished size is 3.7 in (9.4 cm) x 4.5 in (11.4 cm)
- Flowers and leaves are secure, with no tails showing on the front
- Jump ring is fully closed
Troubleshooting
The crossbar wings lean or curl. The edc stitches are probably tighter than the regular dc. Work them more loosely, pulling each first loop up to full dc height.
The border ruffles along the stem. Your row-ends may be shorter than 0.4 in (1.0 cm). Try a smaller hook for the border, or work 3 sc over every 2 rows.
The border pulls in and the edges cup. Use a larger hook for the border only, and make sure you work 3 sc in every outer corner.
Rev sc looks lumpy. Keep each loop the same height and don’t twist the hook. Turn the piece a little as you go.
The hanging loop is floppy. Pack the rev sc stitches closer together, or add 1–2 more so the chain is completely hidden.
The flowers droop. Sew through the center more than once and anchor the base of each petal.
Care
Hand wash in cool water with mild soap, press out the water in a towel, and dry flat. Remove the metal hardware first if you can, so it doesn’t tarnish.

Final Notes
The measurement chain is short and reliable: 5 dc = 1 in (2.5 cm), so 6 sts make a 1.2 in (3.0 cm) stem and 16 sts make a 3.2 in (8.1 cm) crossbar. Ten rows at 0.4 in (1.0 cm) each give a 4.0 in (10.2 cm) letter. Then 72 base sts plus 12 corner sts give an 84-st border, and 0.25 in (0.6 cm) of border on each edge brings the finished T to 3.7 in (9.4 cm) x 4.5 in (11.4 cm).
Once you’ve made one, the same edging and flowers will dress up any letter you design.
Happy crocheting!