

This letter Z keychain combines two rows of soft shell stitch, a neat pink outline, and two small flower appliqués. It is quick to make, uses only a few grams of yarn, and looks good clipped to a tote, backpack, or set of keys.
The palette is dusty pink and cream, with sage-green leaves and tiny yellow flower centers. Each bar of the letter has a cream row of fan shells topped by an offset pink row, so the stripe looks like rows of small tulips. The pattern uses US crochet terms throughout.
The finished keychain measures 3 in (7.6 cm) wide and 3.75 in (9.5 cm) tall, not counting the hanging loop and hardware.
Construction is simple. You make three identical two-row shell strips and seam them into a Z. One continuous round of pink single crochet then turns them into a single solid letter. Last, you add a hanging loop, sew on two flowers with leaves, and attach the key ring.
Finished Size and Construction
- Finished size: 3 in (7.6 cm) wide × 3.75 in (9.5 cm) tall
- Skill level: Easy / advanced beginner
- Terminology: US crochet terms
- Yarn weight: DK / light (#3), cotton or cotton blend
- Hook: 3.5 mm (E-4)
- Number of pieces: 1 letter body, built from 3 identical strip sections, plus 2 flowers and 4 leaves
- Layout: top bar, slanted bar and bottom bar in a Z shape
- Strip size: 2.75 in × 0.75 in (7.0 cm × 1.9 cm)
- Size before edging: 2.75 in (7.0 cm) wide × 3.5 in (8.9 cm) tall
- Edging depth: 0.125 in (0.3 cm) on every side
Materials
Choose a smooth, mercerized or soft cotton in DK weight. Cotton shows the shell texture clearly and holds its shape on a keychain that gets handled a lot. Avoid fuzzy yarns, because they blur the fan shapes.
- Dusty pink: 6 g (about 15 m). Used for the top row of each strip, the edging, and the loop.
- Cream: 4 g (about 10 m). Used for the bottom row of each strip and the flower petals.
- Sage green: 2 g (about 5 m). Used for the leaves.
- Yellow: 1 g (about 2.5 m). Used for the flower centers.
Tools:
– 3.5 mm (E-4) crochet hook
– Tapestry needle
– Scissors
– Stitch markers (2)
– Rustproof pins
– One 1 in (2.5 cm) split key ring with a 2 in (5.1 cm) length of chain and a jump ring
– Small pliers
All quantities include a margin of roughly 25% for swatching and seams.
Abbreviations (US Terms)
- ch – chain
- sl st – slip stitch
- sc – single crochet
- hdc – half double crochet
- dc – double crochet
- sc2tog – single crochet 2 together
- MR – magic ring
- st(s) – stitch(es)
- sp – space
Special stitches
- Shell: 5 dc in the same stitch.
- Half shell: 3 dc in the same stitch. At the start of a row, ch 3 and 2 dc count as a half shell.
- Edging sc2tog: Insert the hook in the last stitch of one section, yarn over and pull up a loop. Insert the hook in the first stitch of the next section, yarn over and pull up a loop. Yarn over and pull through all 3 loops. This turns an inside corner smoothly.
Gauge and Checkpoints
Make one strip first and use it as your gauge swatch. It becomes part of the keychain, so nothing is wasted.
Gauge: one shell repeat (6 stitches) = 0.55 in (1.4 cm). Two rows of shells = 0.75 in (1.9 cm).
Checkpoints:
- After Row 1 of the first strip: the length should be 2.75 in (7.0 cm).
- After Row 2: the strip should be 2.75 in × 0.75 in (7.0 cm × 1.9 cm).
- After assembly: the letter should be 2.75 in (7.0 cm) wide × 3.5 in (8.9 cm) tall.
- After edging: the letter should be 3 in (7.6 cm) wide × 3.75 in (9.5 cm) tall.
A difference of up to 0.125 in (0.3 cm) is fine.
If your strip is too long, go down to a 3.25 mm hook. If it is too short, go up to a 3.75 mm hook. If the strip is the right length but taller than 0.75 in (1.9 cm), your double crochets are loose. Pull each yarn-over snug before drawing through. Get the first strip right before making the other two, because all three must match for the seams to line up.
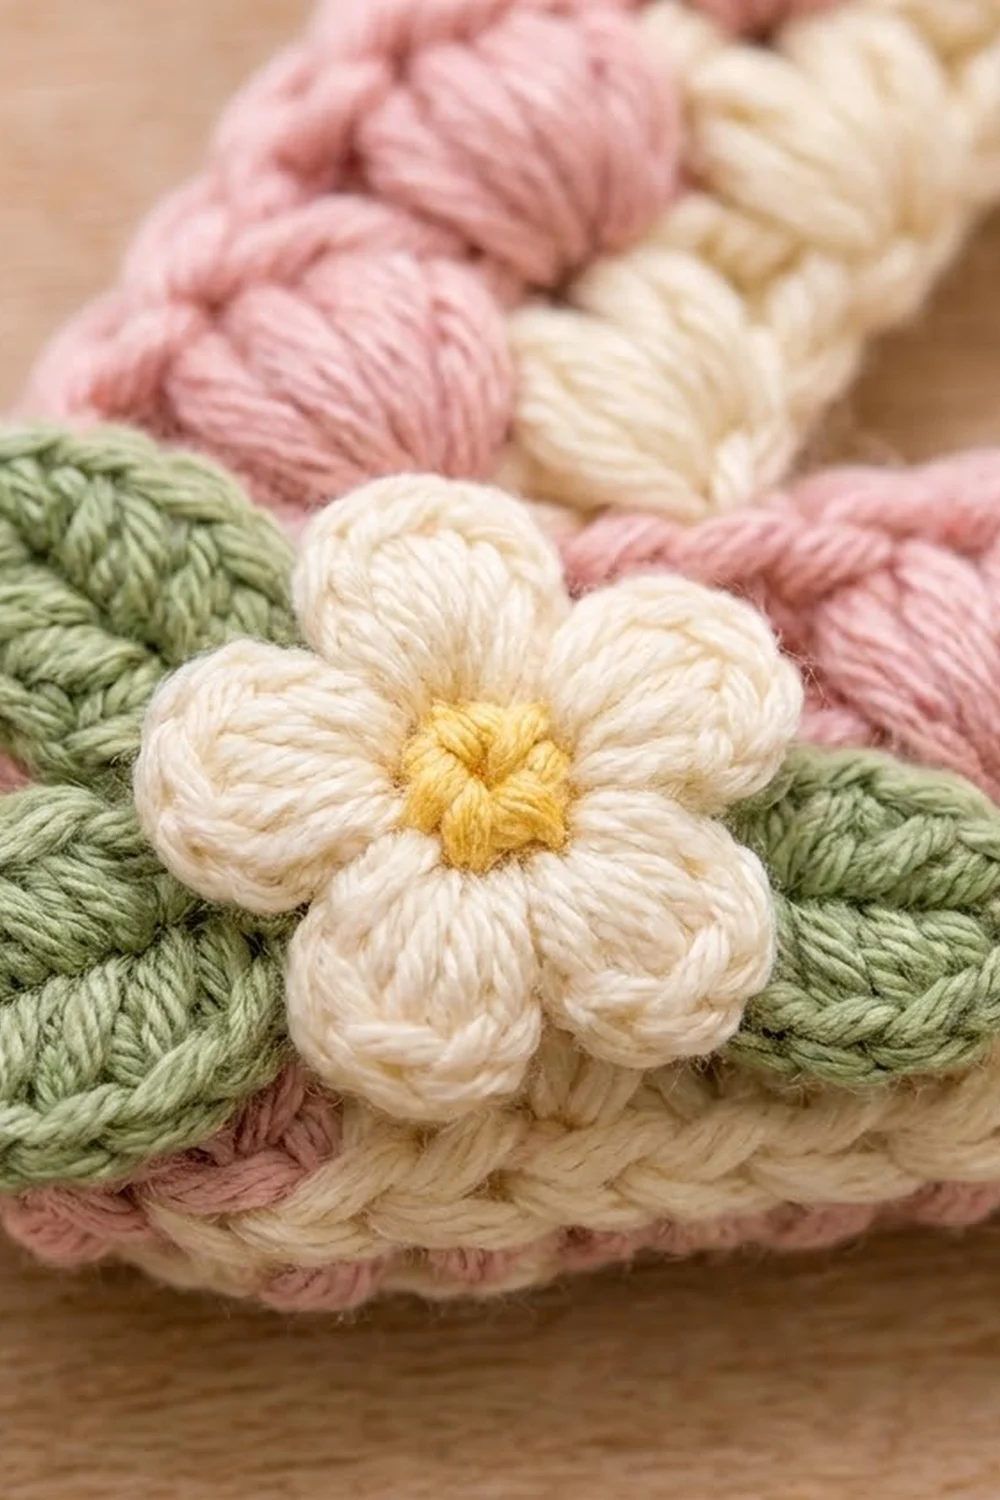
Shell Strip (Make 3)
Each strip has a cream base row and a pink top row. All three strips are identical.
Foundation: With cream, ch 32.
Row 1 (cream): Sc in the 2nd ch from the hook. Skip 2 ch, shell in the next ch, skip 2 ch, sc in the next ch. Repeat from * to * 4 more times. [5 shells, 6 sc = 31 sts]
Fasten off cream, leaving a 6 in (15.2 cm) tail. Do not turn.
Row 2 (pink): Turn the strip so you can work back across Row 1. Join pink with a sl st in the last sc.
- Ch 3 (counts as dc), then 2 dc in the same sc (half shell).
- Sc in the center (3rd) dc of the next shell.
- Shell in the next sc, sc in the center dc of the next shell. Repeat from * to * 3 more times.
- 3 dc in the last sc (half shell).
[2 half shells, 4 shells, 5 sc = 3 + 5 + 20 + 3 = 31 sts]
Fasten off, leaving a 6 in (15.2 cm) tail.
The pink shells sit between the cream shells, which gives the staggered tulip look. Weave in the tails on two of the strips. On the third strip, leave the pink tail long; this strip becomes the slanted bar.
Checkpoint: each strip should measure 2.75 in × 0.75 in (7.0 cm × 1.9 cm), with 31 stitches along the top edge and 31 foundation chains along the bottom edge.
Assembling the Z
Lay all three strips right side up.
- Top bar: Place one strip horizontally with the pink row on top.
- Bottom bar: Place a second strip horizontally with the pink row on top, about 2 in (5.1 cm) below the top bar.
-
Slanted bar: Lay the third strip diagonally between them, running from the top bar’s right end down to the bottom bar’s left end. Its pink row should face upper-left and its cream (foundation) edge lower-right.
-
Top seam: The upper end of the slanted bar sits under the right end of the top bar. Its 4 row-end positions (2 per row) cover the last 11 foundation chains of the top bar. Its cream edge should line up with the top bar’s right end. Pin it in place.
-
Bottom seam: The lower end of the slanted bar sits on top of the left end of the bottom bar. It covers the first 11 stitches of the bottom bar’s top edge, and its pink edge lines up with the bottom bar’s left end. Pin it in place.
-
Sew the seams: With pink yarn and a tapestry needle, whipstitch each seam on the wrong side. Ease the 4 row-end positions evenly across the 11 stitches, taking about 3 small stitches per row-end position. Keep the tension firm but flat. The seam should not pucker or pull the bar into a curve.
This leaves 20 stitches exposed on the top bar’s bottom edge (left of the seam). It also leaves 20 stitches exposed on the bottom bar’s top edge (right of the seam).
Checkpoint: the letter should measure 2.75 in (7.0 cm) wide × 3.5 in (8.9 cm) tall. If the slanted bar is crooked, unpick and re-pin before edging, because the edging will lock in the angle.
Edging
The edging is worked in pink as one round with the right side facing. Work 1 sc in each stitch or foundation chain and 2 sc in the end of each row. Where you meet an outer square corner, work 3 sc in the corner stitch. At each inside corner, work an edging sc2tog.
Edging gauge: 1 sc per existing stitch keeps the same 0.55 in (1.4 cm) per 6-stitch spacing, so the edge lies flat. The edging adds 0.125 in (0.3 cm) on every side.
Edging round: Join pink with a sl st in the first stitch of the top bar’s top edge (the top-left corner). Ch 1, then work:
- Top bar, top edge: 3 sc in the first st (corner A), sc in the next 29 sts, 3 sc in the last st (corner B). [35]
- Top bar, right end: 4 sc across the row ends. [4]
- Slanted bar, lower-right (foundation) edge: Sc in the first 30 foundation ch. Then sc2tog over the last ch and the first exposed stitch of the bottom bar’s top edge. [31]
- Bottom bar, top edge (exposed part): Sc in the next 18 sts, then 3 sc in the last st (corner C). [21]
- Bottom bar, right end: 4 sc. [4]
- Bottom bar, bottom edge: 3 sc in the first ch (corner D), sc in the next 29 ch, 3 sc in the last ch (corner E). [35]
- Bottom bar, left end: 4 sc. [4]
- Slanted bar, upper-left (pink) edge: Sc in the first 30 sts. Then sc2tog over the last st and the first exposed foundation ch of the top bar. [31]
- Top bar, bottom edge (exposed part): Sc in the next 18 ch, then 3 sc in the last ch (corner F). [21]
- Top bar, left end: 4 sc. [4]
Join with a sl st to the first sc. [190 sc]
Why the math works:
- Stitches worked 1 per existing stitch: the long bar edges have 31 each (top bar top, bottom bar bottom), the slanted edges have 31 each, and the exposed bar edges have 20 each. That makes 31 + 31 + 31 + 31 + 20 + 20 = 164.
- Row ends: 4 ends × 4 sc = 16. Total so far: 164 + 16 = 180 base stitches.
- Corners: the 6 outer corners (A–F) each add 2 extra stitches, which gives +12.
- Inside corners: the 2 sc2tog merge 2 stitches into 1 each, which gives −2.
180 + 12 − 2 = 190 sc, which matches the per-section counts above. The corners where the slanted bar meets the bar ends are wide, open angles, so they need no extra stitches.
Hanging loop:
- With pink still on the hook, sl st along the top edge to the center sc of corner B.
- Ch 12, then sl st in the same sc.
- Work 18 sc over the ch-12 loop and sl st in the base stitch.
- Fasten off and weave in the tail.
The loop stands about 0.75 in (1.9 cm) tall.
Flowers (Make 2)
Rnd 1 (yellow): MR, ch 1, 5 sc in the ring, pull the ring closed, then sl st to the first sc. [5 sc] Fasten off.
Rnd 2 (cream): Join cream in any sc. (Ch 2, 3 dc, ch 2, sl st) in the same sc, then sl st in the next sc. Repeat from * to * 4 more times, working the last sl st into the joining st. [5 petals]
Fasten off, leaving a 10 in (25.4 cm) tail for sewing. Each flower measures about 1 in (2.5 cm) across.
Leaves (Make 4)
With sage green, ch 7.
- Sc in the 2nd ch from the hook, then hdc, dc, dc, hdc in the next 4 ch.
- In the last ch, work (sc, ch 2, sc). This forms the tip.
- Rotate the work. Working along the remaining loops of the foundation chain, work hdc, dc, dc, hdc, sc.
- Sl st in the first sc.
[12 sts + ch-2 tip]
Fasten off, leaving an 8 in (20.3 cm) tail. Each leaf is about 0.75 in (1.9 cm) long. For a central vein, you can surface-slip-stitch a line of green from the base toward the tip.
Attaching the Appliqués
- Flower 1: Center it on the right end of the top bar, about 0.5 in (1.3 cm) in from the right edge. Tuck one leaf under its left side and one leaf under its lower-right side, so the tip extends past the edging.
- Flower 2: Place it so it overlaps the bottom-left corner of the letter. Tuck one leaf under its left side, extending beyond the edge, and one under its right side, lying along the bottom bar.
Sew the leaves first, then the flowers, using small stitches through the back loops only so nothing shows on the front. Stitch around the flower center to keep the petals free.
Finally, open the jump ring with pliers. Thread it through the pink loop and the end of the chain, then close it firmly.
Final Blocking
- Lightly mist the keychain with water. Do not soak it, so the shells keep their puff.
- Pin it right side up on a blocking mat to 3 in (7.6 cm) × 3.75 in (9.5 cm).
- Check that both horizontal bars are parallel and that the slanted bar runs straight from corner to corner.
- Shape each shell lightly with your fingertips so the fans look even.
- Pin the leaf tips flat.
- Let it dry completely, at least 2 hours.
- Unpin it and re-check the measurements.
Final Quality-Control Checklist
- Each strip has 31 stitches per long edge.
- The pink shells sit centered between the cream shells.
- The slanted bar has pink facing upper-left and cream facing lower-right.
- The seams are flat and invisible from the front.
- The edging round has exactly 190 sc, with the corners squared and the inside corners smooth.
- The finished size is 3 in × 3.75 in (7.6 cm × 9.5 cm), ±0.125 in (0.3 cm).
- The hanging loop is firmly anchored at corner B.
- Each flower is 1 in (2.5 cm) across, with five even petals.
- All tails are woven in and the hardware is closed securely.
Troubleshooting
The strip curls: your foundation chain is too tight. Chain with a hook one size larger, then switch back for Row 1.
The pink shells lean sideways: you are working into the wrong stitch. Each pink sc must go into the center (3rd) dc of a cream shell.
The letter is taller than 3.5 in (8.9 cm) before edging: the slanted bar was pinned too steeply. Re-pin it so its ends overlap exactly 11 stitches on each bar.
The edging ripples: you are adding extra stitches along the row ends. Use exactly 2 sc per row end.
The inside corners gape: the sc2tog wasn’t worked across both sections. Redo it with one loop pulled up from each section.
The flower petals cup: loosen the ch-2 at each side of the petal, or block the flower flat before sewing.
Care
Hand-wash in cool water with mild soap, press out the water in a towel, and dry flat. Remove the metal hardware first if you plan to soak the keychain.

Final Notes
The measurements build step by step:
- One shell repeat = 0.55 in (1.4 cm).
- Five repeats make a 2.75 in × 0.75 in (7.0 cm × 1.9 cm) strip.
- Three strips seamed into a Z make a 2.75 in × 3.5 in (7.0 cm × 8.9 cm) letter.
- One 190-stitch pink edging round adds 0.125 in (0.3 cm) per side, for a finished keychain of 3 in × 3.75 in (7.6 cm × 9.5 cm).
Check each measurement in turn and the letter will come out square, flat and sturdy. It’s a lovely small gift, especially paired with a matching initial for a friend.
Happy crocheting!