

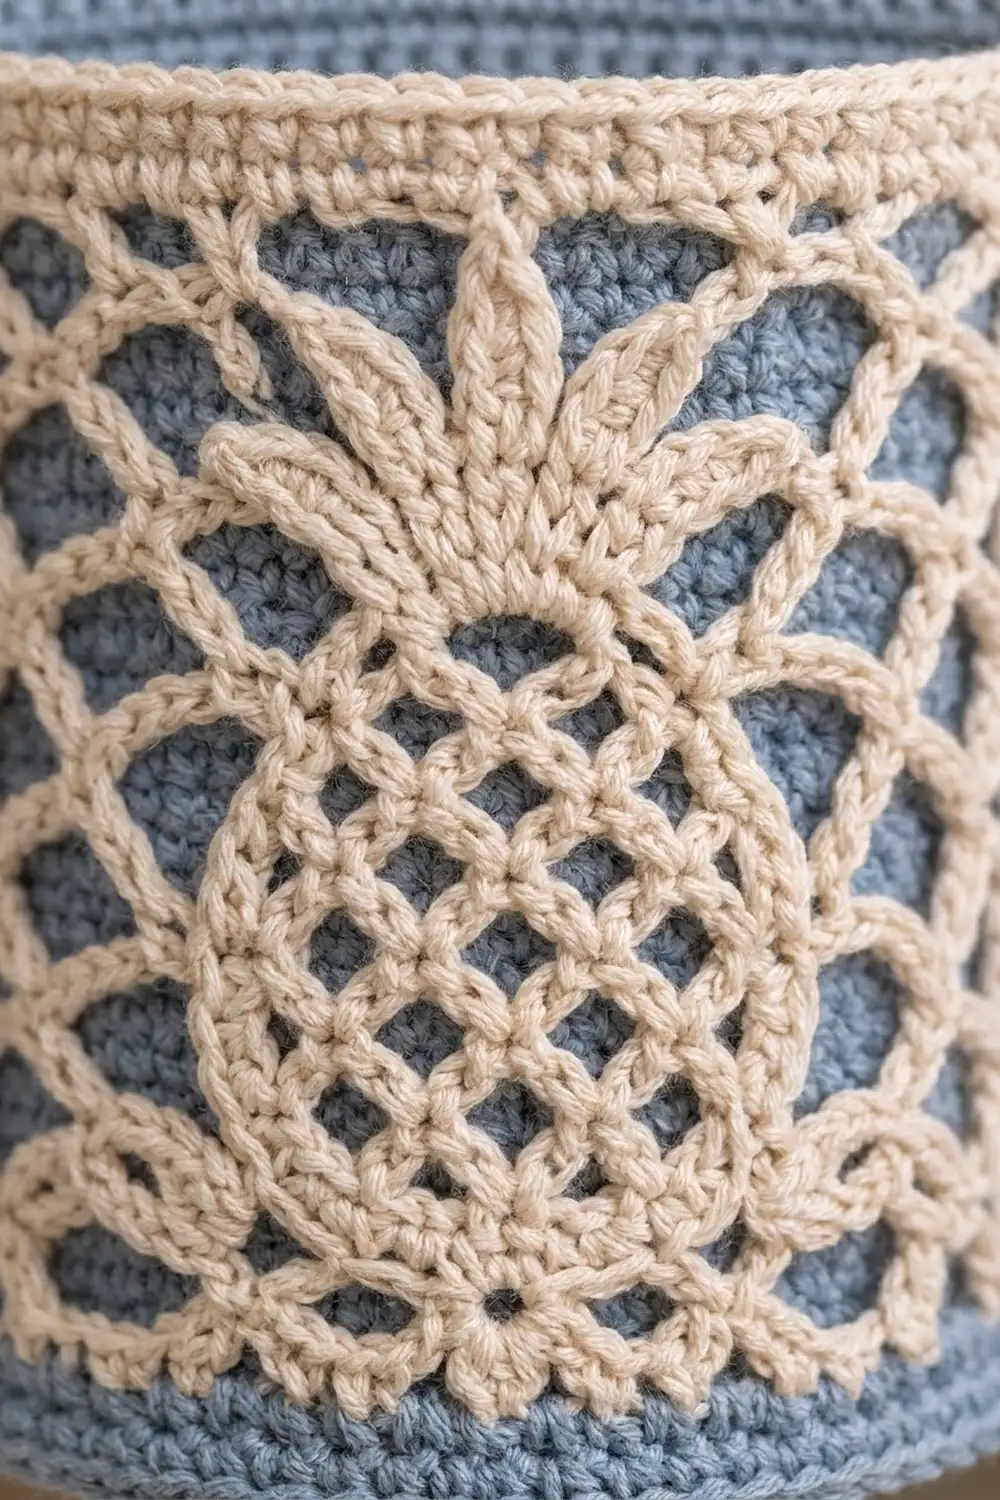
This hanging holder stores two spare rolls in a soft coastal style. A dusty-blue backing panel with an arched top holds two round pockets. Each pocket is wrapped in cream diamond-mesh lace, with a pineapple appliqué on the front.
The colors are calm and easy to place in a bathroom: muted blue for the solid structure and warm cream for the lace. Because the blue lining shows through the open mesh, the pineapple stands out clearly.
The pattern uses US crochet terms. The bordered panel measures 13 in (33.0 cm) wide by 11 in (27.9 cm) tall. Each pocket is about 5 in (12.7 cm) across with a 4.5 in (11.4 cm) wall.
Construction overview: you crochet the panel in turned rows around a short foundation chain, which forms the arch on its own. Each pocket is a blue cup with a separate cream lace sleeve, and the pineapple is sewn onto the sleeve. You sew the pockets to the panel, add a two-round border, then attach the hanging tab and ring.
Finished Size and Construction
- Finished size: 13 in × 11 in (33.0 × 27.9 cm) panel; pockets stick out about 5 in (12.7 cm) from the wall
- Skill level: Intermediate
- Terminology: US
- Yarn weight: Worsted (#4) cotton
- Hook: 4.0 mm (G-6)
- Number of pieces: 8 (1 panel, 2 liners, 2 lace sleeves, 2 pineapples, 1 tab) plus a wooden ring
- Layout: two pockets side by side, centered on the panel
- Panel size before border: 12 in × 10 in (30.5 × 25.4 cm)
- Border depth: 0.5 in (1.3 cm), 2 rounds
Materials
Use a smooth, firm, mercerized or combed worsted cotton. Cotton keeps its shape when loaded with rolls and handles bathroom humidity well. Avoid acrylic for the liners, because it sags.
- Blue (dusty blue): 150 g, about 255 m
- Cream (natural): 100 g, about 170 m
These quantities include a safety margin of roughly 25%.
Tools:
– 4.0 mm (G-6) crochet hook
– Tapestry needle
– 4 locking stitch markers
– Wooden ring, 2 in (5.1 cm) across
– Rust-proof pins and a blocking mat
– Spray bottle
– Measuring tape
Abbreviations (US Terms)
- ch – chain
- sl st – slip stitch
- sc – single crochet
- hdc – half double crochet
- dc – double crochet
- BLO – back loop only
- sp – space
- st(s) – stitch(es)
- rnd – round
- rep – repeat
Special stitch – rev sc (reverse single crochet, or crab stitch): Working from left to right (right-handers), insert the hook into the next stitch to the right, yarn over, pull up a loop, yarn over, and pull through both loops. It makes a raised, corded edge.
Gauge and Checkpoints
Solid sc gauge (blue): 16 sc and 16 rows = 4 in (10.2 cm). Work firmly. The square gauge keeps the arch flat and lets the pockets sew on stitch for stitch.
Net gauge (cream): 4 ch-4 loops and 6 rows = 2 in × 2 in (5.1 × 5.1 cm).
Make one liner first as your test piece. It is small and it confirms your solid gauge.
Checkpoints:
– Liner base after Rnd 10: about 4.75 in (12.1 cm) across
– Panel after Row 8: 4 in (10.2 cm) wide
– Panel after Row 16: 8 in (20.3 cm) wide
– Panel after Row 24: 12 in × 10 in (30.5 × 25.4 cm)
– Lace sleeve before seaming: 15 in (38.1 cm) wide, 3 in (7.6 cm) tall
If your piece is too big, go down 0.5 mm in hook size. If it is too small, go up 0.5 mm. Don’t change stitch counts: every piece is matched to the others stitch for stitch.
Backing Panel (make 1, Blue)
Each row starts and ends at the flat bottom edge. Each row wraps up one side, around the arch, and down the other side. Each side always has 16 straight stitches. Only the arch section grows, by 3 stitches per row.
Ch 18.
Row 1: Sc in 2nd ch from hook and next 15 ch (16 sc), 5 sc in last ch. Rotate and work along the other side of the foundation chain: sc in next 16 ch. Leave the first chain (the one nearest the hook) unworked at the bottom center. (37 sts: 16 + 5 + 16)
Row n (Rows 2–24): Ch 1, turn. Sc in first 16 sts, sc in next st, [sc in next (n − 2) sts, 2 sc in next st] 3 times, sc in next st, sc in last 16 sts. Row n total = 3n + 34 sts.
For example, Row 2 reads: sc in first 16, sc in next, [2 sc in next] 3 times, sc in next, sc in last 16. (40 sts)
Stitch counts:
– Row 2: 40
– Row 8: 58
– Row 12: 70
– Row 16: 82
– Row 20: 94
– Row 24: 106 (16 side + 74 arch + 16 side)
Fasten off after Row 24 and weave in the ends.
The panel is now 12 in (30.5 cm) wide and 10 in (25.4 cm) tall. That is 4 in (10.2 cm) of straight sides plus a 6 in (15.2 cm) arch radius. The 74 arch stitches measure about 18.5 in (47.0 cm), which is close to the half-circle length at that radius, so the arch lies flat.
Pocket Liner (make 2, Blue)
Work in continuous spiral rounds and move a marker up each round.
Rnd 1: 6 sc in a magic ring. (6)
Rnd 2: 2 sc in each st. (12)
Rnd n (Rnds 3–10): [sc in next (n − 2) sts, 2 sc in next st] 6 times. Rnd n total = 6n sts. Rnd 3 = 18, Rnd 5 = 30, Rnd 8 = 48. Rnd 10 = 60.
Checkpoint: the base measures about 4.75 in (12.1 cm) across.
Rnd 11: Sc in BLO of each st. (60) This creates the crisp fold where the wall begins.
Rnds 12–28: Sc in each st. (60)
Sl st in the next st and fasten off. The wall is 18 rounds, or 4.5 in (11.4 cm) tall, and the circumference is 15 in (38.1 cm).
Lace Sleeve (make 2, Cream)
The sleeve is worked flat, then seamed into a tube.
Ch 121.
Row 1: Sc in 2nd ch from hook, ch 4, skip 3 ch, sc in next ch; rep from * across. (31 sc, 30 ch-4 loops)*
Row 2: Ch 5 (counts as dc + ch 2), turn, sc in first ch-4 loop, [ch 4, sc in next loop] 29 times, ch 2, dc in last sc. (29 full loops + 2 half loops)
Row 3: Ch 1, turn, sc in first dc, [ch 4, sc in next ch-4 loop] 29 times, ch 4, sc in 3rd ch of turning ch-5. (30 loops)
Rows 4–9: Rep Rows 2–3 three more times. Row 9 has 30 loops.
Checkpoint: 15 in (38.1 cm) wide and 3 in (7.6 cm) tall.
Seam: Fold the sleeve with the right side out and bring the short edges together. Whipstitch the row ends together to make a tube. The seam is the back of the pocket.
Top Rnd 1: Join Cream to any loop of Row 9. Ch 1, 2 sc in each of the 30 ch-4 loops. Join. (60 sc)
Top Rnd 2: Ch 1, rev sc in each st. Join. (60) Fasten off.
Bottom Rnd: Join Cream at the seam on the foundation edge. Ch 1, 2 sc into each of the 30 skipped 3-ch groups. Join. (60 sc) Fasten off.
The finished sleeve is 3.75 in (9.5 cm) tall: 3 in (7.6 cm) of mesh, plus a 0.5 in (1.3 cm) top edge and a 0.25 in (0.6 cm) bottom edge. Each edge has 60 stitches, the same as the liner, so the two match exactly.
Pineapple Appliqué (make 2, Cream)
Body: Ch 5.
Rnd 1: Sc in 2nd ch from hook, sc in next 2 ch, 3 sc in last ch. Working on the other side of the chain: sc in next 2 ch, 2 sc in the same ch as the first sc. Join. (10 sc)
Stitch positions: st 1 is at the bottom point, st 5 is the top center, and sts 2–4 and 6–10 run along the sides.
Rnd 2: Ch 4 (counts as dc + ch 1), (dc, ch 1) in same st. Then work (dc, ch 1) in each of the next 9 sts, but in st 5 work (dc, ch 1) twice. Join to the 3rd ch of the beginning ch-4. (12 dc, 12 ch-1 sps) This makes the open grid.
Rnd 3: Sl st into the first ch-1 sp, ch 1, 2 sc in each ch-1 sp around. Join. (24 sc)
Rnd 4: Ch 1, rev sc in each st. Join. (24) This forms the raised outline. Don’t fasten off.
Checkpoint: the body is about 2 in (5.1 cm) tall and 1.75 in (4.4 cm) wide.
Crown: Sl st across to the 3 sts on either side of the top center so that you are at the 3rd st to the right of center. Then make 5 leaves, one in each of the 5 top sts:
- Short leaf: ch 5, sl st in 2nd ch from hook, sc in next, hdc in next, dc in next, sl st in the same body st; sl st in next body st.
- Medium leaf: ch 6, sl st in 2nd ch, sc, hdc, dc, dc, sl st in the same body st; sl st in next.
- Tall leaf (center): ch 7, sl st in 2nd ch, sc, hdc, dc, dc, dc, sl st in the same body st; sl st in next.
- Medium leaf as above.
- Short leaf as above.
Fasten off with a long tail for sewing. The whole pineapple is about 2.75 in (7.0 cm) tall.
Hanging Tab (make 1, Blue)
Ch 7.
Row 1: Sc in 2nd ch from hook and across. (6)
Rows 2–16: Ch 1, turn, sc in each st. (6)
Fasten off with a long tail. The tab is 1.5 in × 4 in (3.8 × 10.2 cm).
Make All Pieces
- Blue: 1 panel, 2 liners, 1 tab
- Cream: 2 lace sleeves, 2 pineapples
- Hardware: 1 wooden ring
Assemble each pocket:
1. Pin a pineapple to the front of a sleeve, opposite the seam. Center it side to side and place the bottom of the body 0.25 in (0.6 cm) above the bottom edge. Sew it on with the tail along the Rnd 4 outline and the base of each leaf.
2. Slip the sleeve over a liner with the top edges flush. Whipstitch Top Rnd 2 to liner Rnd 28, one stitch to one stitch (60 to 60).
3. Tack the Bottom Rnd to liner Rnd 14, again 60 to 60. Liner Rnds 11–13 stay visible as a 0.75 in (1.9 cm) blue band.
Layout (front view, panel before border):
        _____________________
      /     arch (6 in)       \
     |                         |
     | [ Pocket A ][ Pocket B ]|   pockets 5 in each
     | [  roll    ][  roll    ]|   1 in side margins
     |_[__________][__________]_|  bases 0.25 in up
Joining
Placement: Lay the panel flat with the right side up. Put the two pockets side by side so they touch. Their combined width of 10 in (25.4 cm) leaves 1 in (2.5 cm) of panel on each side. Set the bases 0.25 in (0.6 cm) above the bottom edge and pin.
Method: Use Blue and a mattress-style whipstitch. On the back of each pocket, mark a strip 6 stitches wide (1.5 in / 3.8 cm), centered on the sleeve seam. Sew each long edge of the strip down to the panel, passing through the liner and the edge of the lace.
Stitch-to-stitch logic: The liner wall has 18 rounds at 4 rounds per inch. The panel’s straight side stitches also run at 4 per inch. Sew 1 liner round to 1 panel stitch, so each edge of the strip uses 18 rounds and 18 panel stitches. Then sew the bottom of the strip across 6 base stitches.
Tension: Pull each stitch only until the layers meet. If you pull tighter, the panel puckers behind the pocket.
Tack the two pockets to each other with 3 stitches at the rim and 3 at mid-height.
Checkpoint: The panel still measures 12 in × 10 in (30.5 × 25.4 cm) and lies flat.
Border (Blue)
Border gauge: The border uses the same solid sc gauge of 4 sts per inch. Each round adds 0.25 in (0.6 cm) on every side.
There is only one backing panel, so the border starts from the panel’s own edge stitches. No seams add stitches.
Rnd 1: With the right side facing, join at the first stitch of Row 24 (a bottom corner). Ch 1 and work:
– 3 sc in the first st (corner)
– Sc in next 15 sts (side)
– Across the 74 arch sts: sc in next 24, 2 sc in next, [sc in next 24, 2 sc in next] once more, sc in next 24, 2 sc in last arch st. That is 74 + 3 = 77 sts.
– Sc in next 15 sts (side)
– 3 sc in the last st (corner)
– Along the bottom edge: 1 sc in each of 24 row ends, 1 sc in the unworked center chain, and 1 sc in each of 24 row ends (49 sts)
Join. Rnd 1 total: 106 sts worked 1 per stitch + 3 arch increases + 4 corner extras + 49 bottom sts = 162.
Rnd 2: Ch 1, rev sc in each st. Join. (162) Fasten off and weave in the ends.
Why the math works:
– The 3 arch increases repeat the panel’s 3-per-row rate, so the curve stays flat.
– Each 3-sc corner turns 90 degrees without cupping.
– The panel’s rows are as tall as a stitch is wide (16 sts and 16 rows per 4 in), so 1 sc per row end fits the bottom edge exactly.
The bordered panel measures 13 in × 11 in (33.0 × 27.9 cm).
Tab: Fold the tab through the wooden ring. Center both ends on the back of the panel at the top of the arch, with 1 in (2.5 cm) of tab showing above the border. Sew the ends down securely.
Final Blocking
- Take out the rolls. Lightly mist the whole holder until it is damp, not soaked.
- Pin the panel face up to 13 in × 11 in (33.0 × 27.9 cm), keeping the arch smooth and the bottom edge straight.
- Stuff each pocket with a roll wrapped in a plastic bag so the cylinders stay round.
- Use your fingers to open the diamond mesh evenly and smooth the pineapple leaves into points.
- Let it dry completely, at least 12 hours, before you unpin it.
Final Quality-Control Checklist
- [ ] Panel is 13 in × 11 in (33.0 × 27.9 cm) and lies flat
- [ ] Border has 162 sts per round with neat corners
- [ ] Each liner has 60 sts and a 4.5 in (11.4 cm) wall
- [ ] Each sleeve’s top and bottom edges have 60 sts and the seam faces the panel
- [ ] Each pineapple is centered, with its body 0.25 in (0.6 cm) above the bottom edge
- [ ] 0.75 in (1.9 cm) of blue shows below each sleeve
- [ ] Pockets are level and tacked to each other
- [ ] Tab is secure and the ring is centered
- [ ] All ends are woven in
Troubleshooting
- The arch ruffles: your rows are shorter than your stitches are wide. Use a smaller hook, or work Rows 20–24 with 2 increases instead of 3.
- The arch cups: your rows are too tall. Use a larger hook.
- The sleeve is loose on the liner: your net is too big. Remake it with a hook 0.5 mm smaller.
- The sleeve won’t fit over the liner: use a larger hook for the net, or block the sleeve before seaming.
- The pockets droop forward: add a second line of tacking stitches 0.25 in (0.6 cm) inside each sewing strip.
- The pineapple outline is flat: work Rnd 4 more loosely so the rev sc stitches stand up.
Care
Hand wash in cool water with mild soap, press out the water in a towel, and dry flat. Reshape the pockets around rolls while they are damp.

Final Notes
Your measurements build on each other:
– The 16 × 16 sc gauge gives a panel of 12 in × 10 in (30.5 × 25.4 cm).
– The border adds 0.5 in (1.3 cm) on every side, for 13 in × 11 in (33.0 × 27.9 cm).
– The liners have 60 stitches, 15 in (38.1 cm) around and 4.5 in (11.4 cm) tall.
– The sleeves also have 60-stitch edges, so they fit the liners exactly.
– The pockets sew to the panel 1 round to 1 stitch.
Check each stage against these numbers and the finished holder will hang straight and hold its shape.
Happy crocheting!