

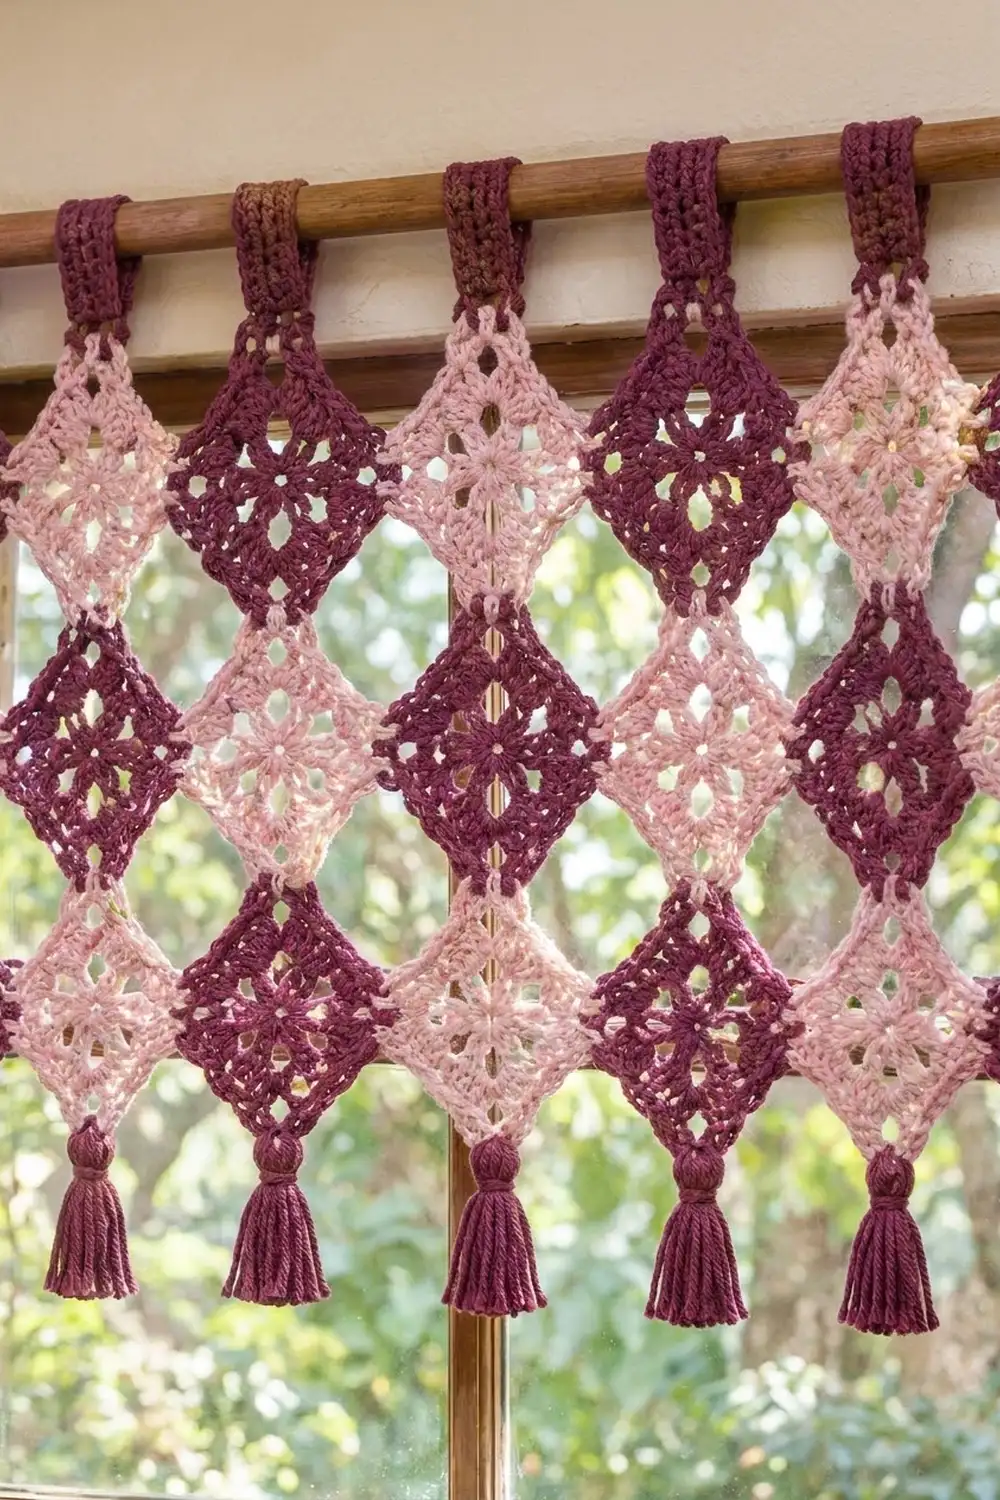
The Plum Harlequin Diamond Valance is a lacy café-style window topper made from small granny squares turned on point. Deep plum and soft blush pink diamonds alternate in a checkerboard, so every diamond meets a contrasting neighbor at each of its four points. Daylight shows through the open centers and through the small diamond-shaped gaps between pieces.
Seven solid plum tabs across the top loop over a curtain rod. Seven chunky plum tassels hang along the bottom, one from the lowest point of each column. The style is cottage-meets-boho: warm and textured, and simple enough to make in front of the TV.
This pattern uses US crochet terms. The finished lattice measures 39.2 in (99.6 cm) wide and 16.8 in (42.7 cm) tall. With tabs and tassels, the total drop is about 21.8 in (55.4 cm).
You crochet 21 identical four-round squares, block them, and join them point to point in 3 rows of 7. Then you work a tab from the top point of each top-row diamond and attach a tassel to the bottom point of each bottom-row diamond.
Finished Size and Construction
- Finished size (lattice only): 39.2 in x 16.8 in (99.6 cm x 42.7 cm)
- Total drop with tabs and tassels: about 21.8 in (55.4 cm)
- Skill level: Easy
- Terminology: US crochet terms
- Yarn weight: Worsted (CYC #4)
- Hook: US H-8 (5 mm)
- Number of pieces: 21 squares
- Layout: 7 columns x 3 rows, squares set on point and joined corner to corner
- Piece size: 4 in (10.2 cm) square, or 5.6 in (14.2 cm) point to point when turned as a diamond
- Size before border: 39.2 in x 16.8 in (99.6 cm x 42.7 cm)
- Border depth: tab loops rise about 2 in (5.1 cm) above the top points, and tassels hang 3 in (7.6 cm) below the bottom points
Materials
Choose a smooth worsted-weight yarn with good stitch definition. Cotton or a cotton blend hangs crisply and resists sagging in sunlight. Acrylic also works and puts less weight on the rod. Avoid fuzzy yarns, because they fill in the lace openings.
- Color A, deep plum: 150 g, about 270 m (11 squares, joining, 7 tabs and 7 tassels)
- Color B, blush pink: 85 g, about 155 m (10 squares)
Tools:
- US H-8 (5 mm) crochet hook
- Tapestry needle
- Stitch markers
- Scissors
- Stiff card cut 4 in (10.2 cm) wide, for tassels
- Blocking mats, rust-proof pins and a spray bottle
- Measuring tape
- Curtain rod up to 1.25 in (3.2 cm) in diameter
All quantities include a margin of about 15% for gauge differences and swatching.
Abbreviations (US Terms)
- ch: chain
- sl st: slip stitch
- sc: single crochet
- dc: double crochet
- sp(s): space(s)
- st(s): stitch(es)
- MR: magic ring
- rep: repeat
Special stitch – corner group: (3 dc, ch 2, 3 dc) worked into the same corner ch-2 sp.
Gauge and Checkpoints
Make and block one complete square before you start the rest. Every other measurement in this pattern depends on that square.
- After Round 1: about 1.5 in (3.8 cm) across
- After Round 2: about 2.5 in (6.4 cm) across
- After Round 3: about 3.5 in (8.9 cm) across
- After Round 4 (blocked): 4 in (10.2 cm) square, 5.6 in (14.2 cm) point to point
- Tab gauge: 16 sc and 16 rows = 4 in (10.2 cm) in sc rows
If your square is larger than 4 in (10.2 cm), go down one hook size. If it is smaller, go up one hook size. A difference of only 0.25 in (0.6 cm) per square changes the finished width by 1.75 in (4.4 cm), so it’s worth checking.

Square (Make 21)
Work each square in one color from start to finish. Do not turn between rounds.
Round 1: MR, ch 3 (counts as dc), 2 dc in ring, ch 2, (3 dc in ring, ch 2) 3 times. Pull the ring closed and join with sl st to top of beginning ch-3. (12 dc, 4 ch-2 sps)
Round 2: Sl st in next 2 dc and into the ch-2 sp. Ch 3 (counts as dc), (2 dc, ch 2, 3 dc) in same sp. Ch 1, corner group in next ch-2 sp; rep from * 2 more times. Ch 1, join to top of beginning ch-3. (24 dc, 4 ch-2 corner sps, 4 ch-1 sps)*
Round 3: Sl st in next 2 dc and into the corner ch-2 sp. Ch 3, (2 dc, ch 2, 3 dc) in same sp. Ch 1, 3 dc in next ch-1 sp, ch 1, corner group in next corner sp; rep from * 2 more times. Ch 1, 3 dc in last ch-1 sp, ch 1, join to top of beginning ch-3. (36 dc, 4 ch-2 corner sps, 8 ch-1 sps; each side has 9 dc and 2 ch-1 sps)*
Round 4 (trim round): Ch 1, sc in same st as join. Sc in each dc and each ch-1 sp up to the next corner, then work 3 sc in the corner ch-2 sp. Rep around, ending with sc in the last dc. Join to first sc. Fasten off and weave in ends. (44 sc worked one per existing dc and ch-1 sp + 12 corner sc = 56 sc)
Round 4 gives 15 sc per side: 11 side sc, the 2 flanking corner sc, and the corner center sc at each end. Each corner center sc is shared by two sides, so 4 sides x 15 sc − 4 shared corners = 56 sc. ✓
The corner center sc forms the tip of each diamond. On your test square, put a marker in each one so you can see how the points will line up.
Make All Pieces
- Color A (plum): 11 squares
- Color B (pink): 10 squares
- Total: 21 squares
Block all 21 squares to 4 in (10.2 cm) before joining, using the method in Final Blocking. Lay them out on point, as diamonds, in this grid:
         Col1 Col2 Col3 Col4 Col5 Col6 Col7
Row 1:    A    B    A    B    A    B    A
Row 2:    B    A    B    A    B    A    B
Row 3:    A    B    A    B    A    B    A
Row 1 has 4 A + 3 B, Row 2 has 3 A + 4 B and Row 3 has 4 A + 3 B, for a total of 11 A and 10 B. ✓
Joining
The squares touch only at their points, so there are no long seams. Each meeting point is a small 3-stitch join.
Method: Whipstitch through both loops with Color A and a tapestry needle.
Stitch-to-stitch logic: Each point is made of 3 corner sc: a flanking sc, the corner center sc and the other flanking sc. Lay two diamonds tip to tip with right sides up. Match flanking sc to flanking sc, center sc to center sc, and the last flanking sc to its partner. Work 2 whipstitches through each matched pair, then secure the yarn and weave in the tail.
Order:
- Join the vertical points first. In each column, join the bottom point of the Row 1 diamond to the top point of the Row 2 diamond. Then join the bottom point of Row 2 to the top point of Row 3. That makes 2 joins per column, 14 in total.
- Join the side points next. In each row, join the right point of each diamond to the left point of the diamond beside it. That makes 6 joins per row, 18 in total.
- You will have 32 joins altogether.
Free points: Leave these points unjoined: the top points of Row 1, the bottom points of Row 3, the left points of Column 1 and the right points of Column 7. You’ll use the top and bottom points for the tabs and tassels.
Tension: Keep the whipstitches snug but not tight. If you pull too hard, the points pucker and the diamonds tilt. If the stitches are too loose, the panel droops at the joins. Check that each pair of points lies flat on the table.
Size checkpoint: The joins add no stitches, so the panel is 7 x 5.6 in = 39.2 in (99.6 cm) wide and 3 x 5.6 in = 16.8 in (42.7 cm) tall. If you’re more than 0.5 in (1.3 cm) off, look for a square that blocked out of size.
Border: Hanging Tabs and Tassels
This valance has no edging round, because a straight border would fill in the diamond outline. Instead, the “border” is a row of tabs along the top and tassels along the bottom.
Border gauge: 16 sc and 16 rows = 4 in (10.2 cm), which is 4 sc and 4 rows = 1 in (2.5 cm).
Tabs (make 7, Color A): Hold the panel with the right side facing you and the top point of a Row 1 diamond pointing up.
Row 1: Join Color A in the second sc before the corner center sc. Ch 1, sc in the same st, sc in the next sc, sc in the corner center sc, sc in the next 2 sc. (5 sc)
Rows 2–20: Ch 1, turn, sc in each sc across. (5 sc per row)
Fasten off, leaving a 12 in (30.5 cm) tail. Fold the tab to the back and whipstitch the last row to the wrong side of Row 1. Repeat on all 7 top points. Across all 7 tabs, each row totals 35 sc (7 x 5 sc).
Why the math works: At 4 sc per inch, 5 sc make a tab 1.25 in (3.2 cm) wide. The 5 sc use only the 3 corner sc plus one side sc on each side, so the tab sits centered on the tip and doesn’t pull on the sides of the diamond. At 4 rows per inch, 20 rows make a 5 in (12.7 cm) strip. Folded, the strip forms a loop that rises about 2 in (5.1 cm) above the point and slides over a rod up to 1.25 in (3.2 cm) across. The tabs are exactly 5.6 in (14.2 cm) apart, the width of one diamond, so the panel hangs evenly.
Tassels (make 7, Color A):
- Wrap Color A 20 times around the 4 in (10.2 cm) card.
- Slide a 10 in (25.4 cm) strand under the wraps at the top and tie it tightly. Leave the ends long for attaching.
- Cut through the loops at the bottom.
- With a separate strand, wrap the tassel 5 times about 0.5 in (1.3 cm) below the top. Tie off and bury the ends inside the tassel.
- Trim the strands to 3 in (7.6 cm) below the wrap.
- Use the top ties to attach a tassel to the corner center sc of each Row 3 bottom point. Knot on the wrong side and weave in.
Final Blocking
- Lay the joined panel right side up on blocking mats.
- With a measuring tape, mark out a rectangle 39.2 in x 16.8 in (99.6 cm x 42.7 cm).
- Pin all the outer points first: 7 top points, 7 bottom points, and the far left and far right points of each row.
- Pin each inner join so the diamonds sit straight and the gaps between them stay open and even.
- Mist the panel well with water. For acrylic, steam lightly instead, holding the iron above the fabric without touching it.
- Let the panel dry completely, for at least 12 hours.
- Unpin. Smooth the tabs flat with your fingers, then comb the tassels straight and trim any uneven ends.
Final Quality-Control Checklist
- All 21 squares measure 4 in (10.2 cm) across and 5.6 in (14.2 cm) point to point.
- Round 4 of every square has 56 sc, with 15 sc per side including both corner center sc.
- The colors match the grid, and no two diamonds of the same color touch at a point.
- All 32 joins are secure and lie flat.
- The panel measures 39.2 in x 16.8 in (99.6 cm x 42.7 cm).
- All seven tabs are 5 sc wide and 20 rows long, sewn closed on the wrong side.
- All seven tassels are 3 in (7.6 cm) long and evenly trimmed.
- All ends are woven in.
Troubleshooting
Squares ruffle or cup: Ruffling usually comes from extra stitches or loose tension, so check that Round 3 has 36 dc. Cupping usually means the ch-1 sps are too tight, so loosen them slightly.
Corners look rounded instead of pointed: Make sure each corner gets 3 sc in Round 4 and each corner ch-2 sp in Round 3 has 2 full chains.
Panel slants to one side: At least one square was joined off-center. Unpick that join and rejoin it center sc to center sc.
Gaps between diamonds look uneven: Block the panel again, pinning each inner join on a straight grid line.
Tabs twist on the rod: Check that Row 1 of each tab is centered on the corner center sc and that every tab is folded to the same side.
Tassels look thin: Add 5 more wraps and cut the loops again.
Care
Hand wash in cool water with mild detergent. Gently press out the excess water and dry flat, reshaping the diamonds while damp. Keep the valance out of strong sun to stop the plum from fading.
Final Notes
The whole valance follows one chain of measurements. A 4 in (10.2 cm) square becomes a 5.6 in (14.2 cm) diamond. Seven diamonds side by side make 39.2 in (99.6 cm), and three stacked diamonds make 16.8 in (42.7 cm). The tabs add about 2 in (5.1 cm) at the top and the tassels add 3 in (7.6 cm) at the bottom, for a total drop of about 21.8 in (55.4 cm). If your first square measures correctly, the rest of the measurements will follow.
Happy crocheting!