

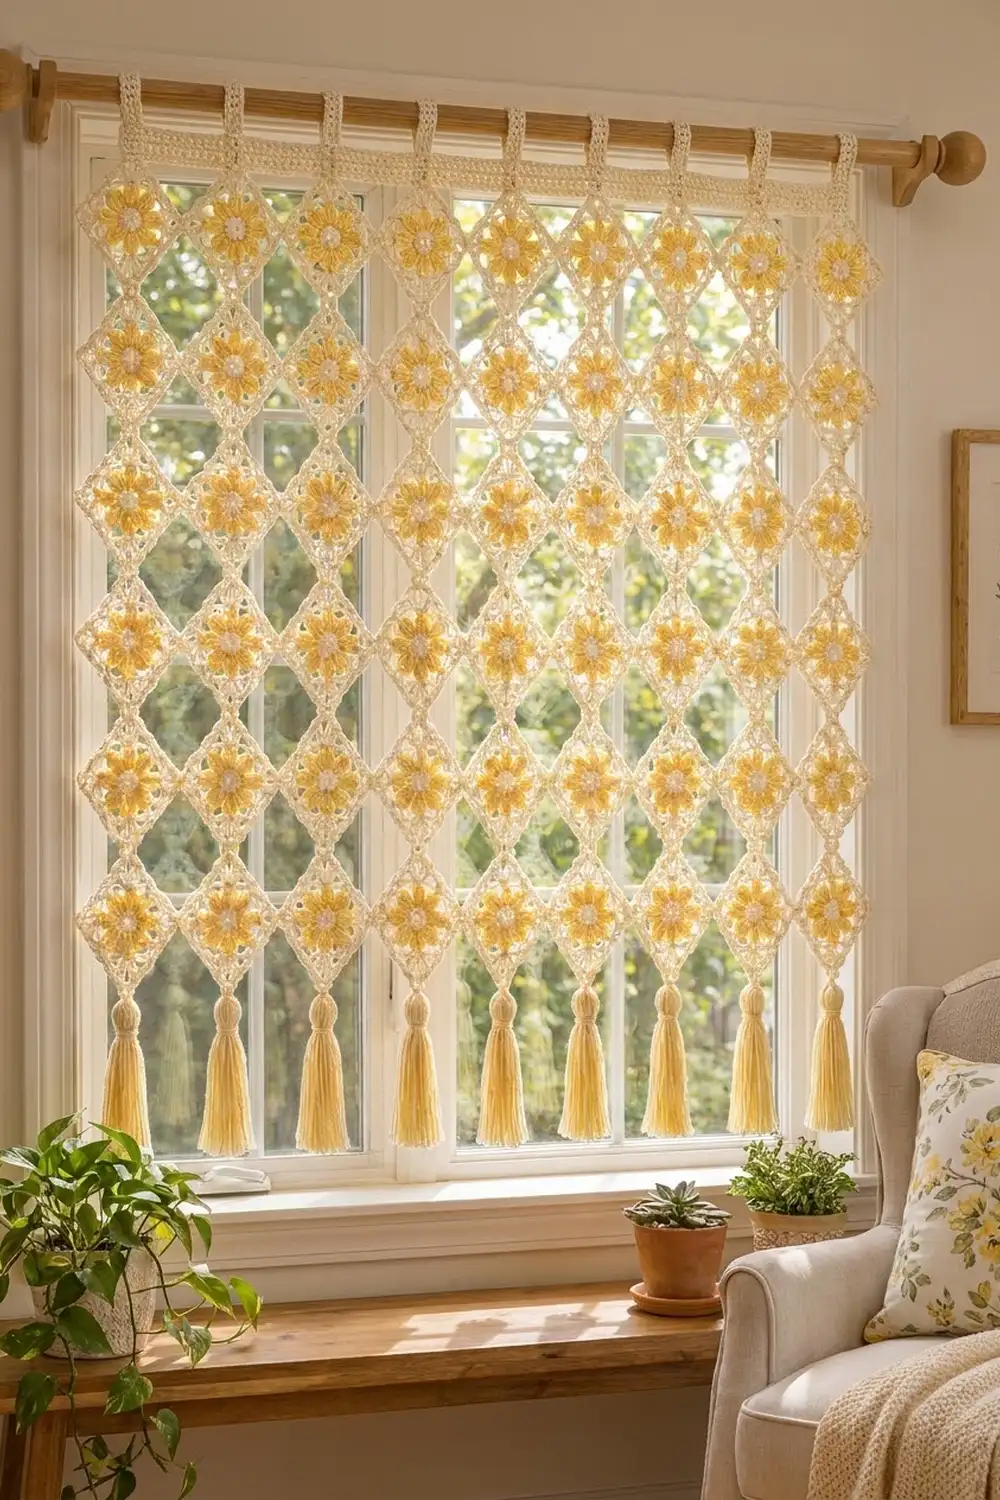
The Buttercup Lattice Window Curtain is a light, open curtain made from on-point square motifs. Each motif has a soft yellow eight-petal puff flower around a small cream center, framed by a lacy cream border. The motifs touch only at their corners, so the curtain forms a diamond lattice that lets daylight through.
The palette is two colors: cream for the centers, frames, header band, and hanging tabs, and buttercup yellow for the petals and the nine tassels along the bottom edge. The style is cottage-fresh and simple, suited to a kitchen, sunroom, or small window.
This pattern uses US crochet terms. The finished curtain body is 51.3 in (130.3 cm) wide and 41.9 in (106.4 cm) tall from the top of the header band to the lowest motif point. With tassels it measures 46.9 in (119.1 cm), and the tabs add about 2.25 in (5.7 cm) of loop above the band.
Construction is modular. You make one complete motif, then join the other 62 as you go on their last round, corner to corner, into a grid 9 motifs wide and 7 motifs tall. A solid header band is worked across the top points, hanging tabs are added, and a yellow tassel goes on the bottom point of each motif in the bottom row.
Finished Size and Construction
- Finished size: 51.3 in x 41.9 in (130.3 cm x 106.4 cm) without tabs or tassels
- Skill level: Intermediate
- Terminology: US
- Yarn weight: Worsted (#4) cotton
- Hook: US H-8 (5.0 mm)
- Number of pieces: 63 motifs, 1 header band, 9 tabs, 9 tassels
- Layout: 9 columns x 7 rows, motifs set on point and joined corner to corner
- Motif size: 4 in (10.2 cm) per side; 5.7 in (14.5 cm) point to point
- Size before border: 51.3 in x 39.9 in (130.3 cm x 101.3 cm)
- Border (header band) depth: 2 in (5.1 cm), top edge only
Materials
Choose a smooth, mercerized or combed worsted cotton with about 85 m per 50 g. Cotton keeps the stitches crisp, holds the puff petals well, and won’t fade or stretch as much as acrylic in a sunny window.
- Cream: 750 g (about 1,275 m)
- Buttercup yellow: 300 g (about 510 m)
These quantities include a margin of about 15 percent for gauge swatches, tails, and differences between dye lots. Buy all of each color from the same lot.
Tools:
- US H-8 (5.0 mm) crochet hook
- Tapestry needle
- Scissors
- Stitch markers
- Rigid card 5 in (12.7 cm) tall, for tassels
- Tape measure
- Blocking mats, rustproof pins, and a spray bottle
Abbreviations (US Terms)
- ch – chain
- sl st – slip stitch
- sc – single crochet
- dc – double crochet
- sp – space
- st(s) – stitch(es)
- sk – skip
- rep – repeat
Puff stitch (puff): (Yarn over, insert hook in stitch, yarn over and pull up a loop to 0.5 in / 1.3 cm tall) 4 times, then yarn over and pull through all 9 loops on hook. Ch 1 to close. The closing ch 1 is not counted as a stitch.
Gauge and Checkpoints
Make one full motif before you start the rest, and block it. Motif gauge is the gauge that matters most, because every curtain measurement is a multiple of it.
- After Round 1: center measures 0.75 in (1.9 cm) across.
- After Round 2: flower measures 2 in (5.1 cm) across, from petal tip to petal tip.
- After Round 3: square measures 2.75 in (7.0 cm) per side.
- After Round 4: square measures 3.5 in (8.9 cm) per side.
- After Round 5: square measures 4 in (10.2 cm) per side and 5.7 in (14.5 cm) point to point.
Header band gauge: 7 dc and 4 dc rows = 2 in (5.1 cm), so 3.5 sts per inch.
If your motif is too big, go down one hook size (4.5 mm). If it is too small, go up one size (5.5 mm). A difference of 0.25 in (0.6 cm) per motif adds up to 2.25 in (5.7 cm) across 9 columns, so adjust before you continue.
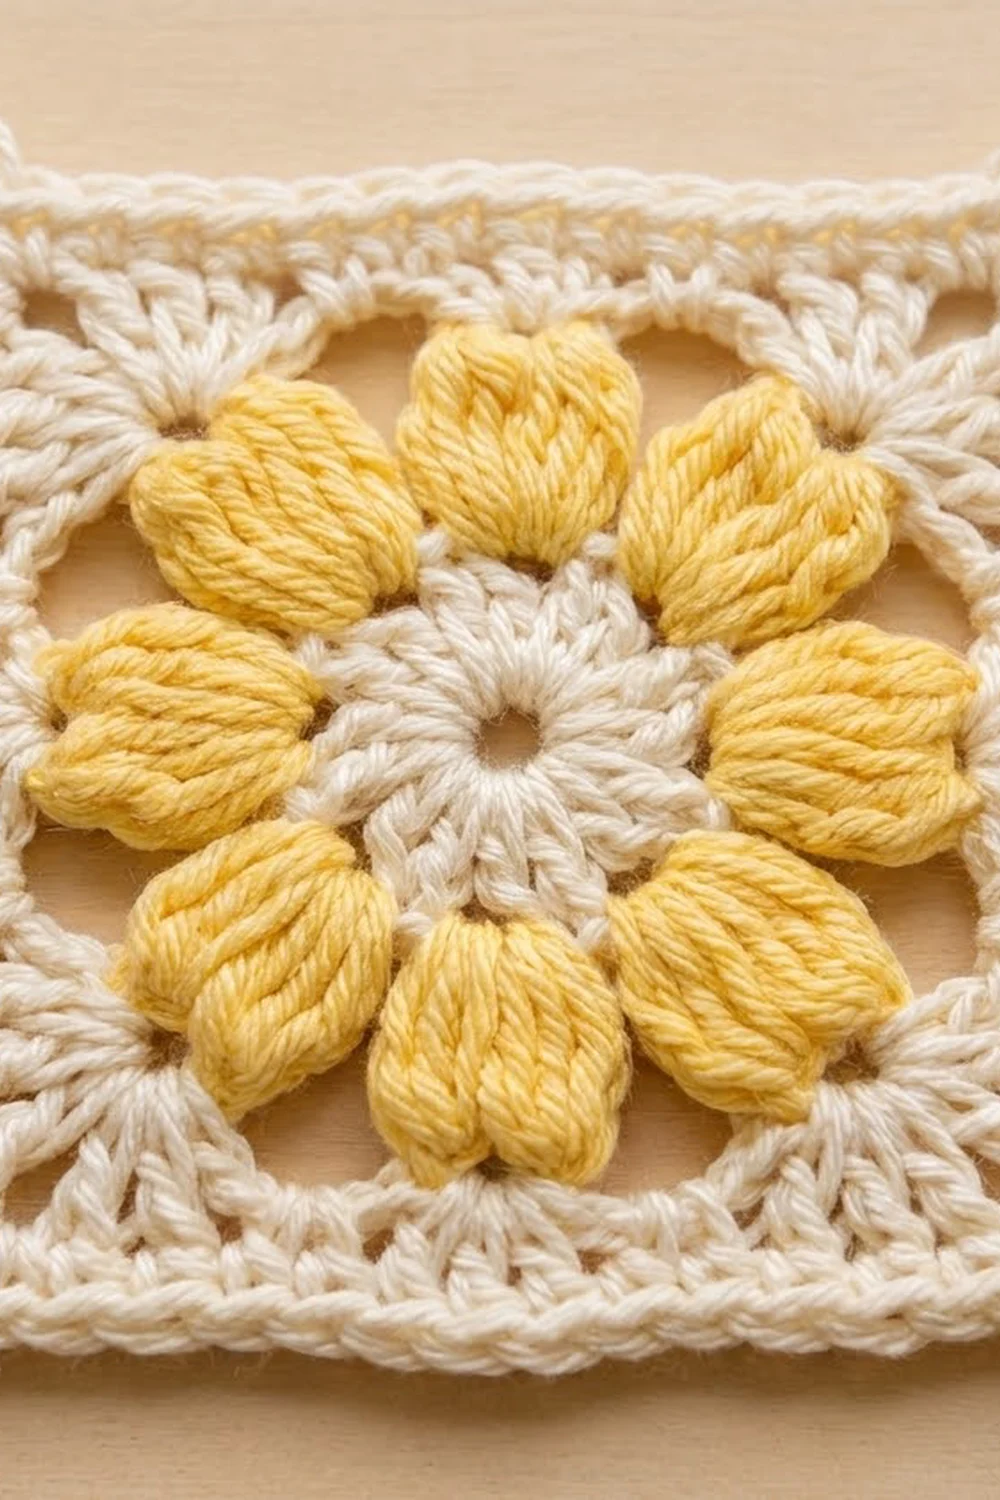
Motif (Make 63)
Each motif is worked in the round, right side facing, without turning.
Round 1 (cream): Make a magic ring. Ch 1, work 8 sc into the ring. Pull the ring closed and sl st to the first sc to join. (8 sc) Fasten off.
Round 2 (yellow): Join yellow in any sc. Ch 2, then work a puff in the same st and ch 2. Puff in the next sc, ch 2; rep from * 6 more times. Sl st to the top of the first puff to join. (8 puffs, 8 ch-2 sps)* Fasten off.
The puffs make eight rounded petals, with the ch-2 spaces separating them.
Round 3 (cream, conversion round): Join cream in any ch-2 sp. Ch 3 (counts as dc), then work (2 dc, ch 3, 3 dc) in the same sp for the first corner. Ch 1, 3 dc in the next ch-2 sp, ch 1. *(3 dc, ch 3, 3 dc) in the next ch-2 sp, ch 1, 3 dc in the next ch-2 sp, ch 1; rep from * 2 more times. Sl st to the top of the beginning ch-3 to join.
Count: (4 corners x 6 dc) + (4 side groups x 3 dc) = 24 + 12 = 36 dc, plus 4 corner ch-3 sps and 8 ch-1 sps. Each side has 9 dc between the corner sps.
Round 4 (cream, lace round): Sl st in the next 2 dc and into the corner ch-3 sp. Ch 3 (counts as dc), then (1 dc, ch 3, 2 dc) in the same sp. *Ch 2, dc in the next ch-1 sp, ch 2, dc in the center dc of the next 3-dc group, ch 2, dc in the next ch-1 sp, ch 2, then (2 dc, ch 3, 2 dc) in the next corner sp; rep from * 2 more times. To finish, work ch 2, dc in the next ch-1 sp, ch 2, dc in the center dc, ch 2, dc in the next ch-1 sp, ch 2. Sl st to the top of the beginning ch-3 to join.
Count: 7 dc per side (2 + 3 + 2), 28 dc total, plus 16 ch-2 sps and 4 corner ch-3 sps. The open ch-2 spaces give the frame its lacy look.
Round 5 (cream, edging round): Sl st in the next dc and into the corner sp. Ch 1, then (2 sc, ch 3, 2 sc) in the same corner sp. *Sc in the next 2 dc, (2 sc in the next ch-2 sp, sc in the next dc) 3 times, 2 sc in the next ch-2 sp, sc in the next 2 dc, then (2 sc, ch 3, 2 sc) in the next corner sp; rep from * 2 more times. Work the side sequence once more without a corner, then sl st to the first sc to join.
Count: each side has 2 + 2 + 9 + 2 + 2 + 2 = 19 sc, counted between the corner ch-3 loops (the loops are not counted). The total is 76 sc plus 4 corner ch-3 loops.
Fasten off the first motif and weave in all ends. Join every other motif to its neighbors during Round 5 (see Joining).
Make All Pieces
- Motifs: 63 total. All are identical, with Rounds 1, 3, 4, and 5 in cream (about 9 g) and Round 2 in yellow (about 3 g).
- Tassels: 9 in yellow (about 6 g each).
- Header band and tabs: cream, worked after the motifs are joined.
Set each motif on point, with one corner at the top. Layout grid (◇ = one motif):
Row 1: ◇ ◇ ◇ ◇ ◇ ◇ ◇ ◇ ◇
Row 2: ◇ ◇ ◇ ◇ ◇ ◇ ◇ ◇ ◇
Row 3: ◇ ◇ ◇ ◇ ◇ ◇ ◇ ◇ ◇
Row 4: ◇ ◇ ◇ ◇ ◇ ◇ ◇ ◇ ◇
Row 5: ◇ ◇ ◇ ◇ ◇ ◇ ◇ ◇ ◇
Row 6: ◇ ◇ ◇ ◇ ◇ ◇ ◇ ◇ ◇
Row 7: ◇ ◇ ◇ ◇ ◇ ◇ ◇ ◇ ◇
         (tassel under each Row 7 motif)
Joining
Method: join as you go at the corners, on Round 5.
In this on-point layout, motifs touch only at their corners. A motif’s left corner meets the right corner of the motif to its left, and its top corner meets the bottom corner of the motif above it. The diamond-shaped gaps between the motifs are left open on purpose.
To join a corner: Work Round 5 as written until you reach a corner that touches an existing motif. Work 2 sc in the corner sp, ch 1, then sl st into the neighbor’s corner ch-3 loop. Ch 1, then 2 sc in the same corner sp of the motif you’re working on. Continue Round 5.
Stitch-to-stitch logic: The ch 1, sl st, ch 1 takes the place of the ch 3. Each side still has exactly 19 sc and the corner position is unchanged, so no stitches are added or lost at a join.
Order: Work across Row 1 from left to right, joining each motif at its left corner. Starting with Row 2, join each motif at its top corner, and also at its left corner from the second column onward.
Tension: Keep the joining sl st snug but not tight. If it is too loose, the corners droop. If it is too tight, the lattice bunches up.
Size checkpoint: 2 joined motifs measure 11.4 in (29.0 cm) point to point, and 3 measure 17.1 in (43.4 cm). The full grid measures 9 x 5.7 = 51.3 in (130.3 cm) wide and 7 x 5.7 = 39.9 in (101.3 cm) tall.
Border: Header Band, Tabs, and Tassels
The border is a solid band worked across the top edge only. Use the band gauge of 3.5 sts per inch. One motif is 5.7 in wide, and 5.7 x 3.5 = 19.95, so each motif is allotted 20 sts of band width. Across 9 motifs that is 9 x 20 = 180 sts, and 180 / 3.5 = 51.4 in (130.6 cm). That matches the grid’s 51.3 in to within blocking ease.
Row 1 (cream, foundation): Make a slip knot. Ch 9, then sc in the top corner ch-3 loop of the top-left motif. *Ch 19, sc in the top corner loop of the next motif; rep from * 7 more times. Ch 10. Turn.
Count: 9 ch + 9 sc + (8 x 19 ch) + 10 ch = 9 + 9 + 152 + 10 = 180 sts. The ch-19 spans run straight across, so the motifs hang below the band from their top points.
Row 2: Ch 3 (counts as dc), sk the first st, then dc in each remaining st across. (180 dc) Turn.
Rows 3–4: Ch 3 (counts as dc), sk the first st, dc in each st across. (180 dc) Turn.
Row 5: Ch 1, sc in each st across. (180 sc) Fasten off.
The band is 2 in (5.1 cm) deep: 1.5 in (3.8 cm) for the three dc rows and 0.5 in (1.3 cm) for Rows 1 and 5 combined.
Hanging tabs (make 9): Think of Row 5 as nine 20-st units, one above each column. In each unit, join cream in the 8th st. Ch 1, then sc in that st and the next 5 sts. (6 sc, about 1.7 in / 4.3 cm wide)
Turn and work rows of 6 sc until the tab is 6 in (15.2 cm) long, about 24 rows at 4 sc rows per inch. Fold the tab to the back and whipstitch its last row to the back of Row 2, over the same 6 sts.
About 4.5 in (11.4 cm) of the tab forms the loop, which rises about 2.25 in (5.7 cm) above the band. That fits a rod up to 1.25 in (3.2 cm) in diameter.
Tassels (make 9, yellow): Wrap yellow 40 times around the 5 in (12.7 cm) card. Slide an 8 in (20.3 cm) tie strand under the top of the wraps and knot it tightly, then cut the wraps along the bottom edge. Wrap a strand around the bundle 0.75 in (1.9 cm) below the top and knot it to form the neck. Trim the ends evenly to 5 in (12.7 cm). Use the tie strand to attach one tassel to the bottom corner loop of each Row 7 motif.
Final Blocking
- Weave in any remaining ends, working them through solid stitches and never through the open ch-2 spaces.
- Lay the curtain flat on blocking mats, right side up.
- Pin the header band straight to 51.4 in (130.6 cm).
- Pin each motif point in a straight grid, spacing columns and rows 5.7 in (14.5 cm) apart.
- Pin out the ch-2 lace spaces so they open evenly.
- Mist with water until damp, then gently press the puffs into rounded petals.
- Let it dry completely, at least 24 hours, before unpinning.
- Comb out the tassels and steam them lightly so they hang straight.
Final Quality-Control Checklist
- 63 motifs, each with 76 sc and 4 corner loops on Round 5
- 19 sc per side on every motif
- Every touching corner is joined with ch 1, sl st, ch 1
- Columns and rows run straight, 5.7 in (14.5 cm) apart
- Header band has 180 sts in every row
- 9 tabs, each centered above its column
- 9 tassels, all 5 in (12.7 cm) long
- No ends visible from either side
Troubleshooting
- Puffs look flat: pull the loops up to the full 0.5 in (1.3 cm) and close each puff firmly with ch 1.
- Motif cups: your Round 3 or Round 4 tension is too tight. Go up a hook size for those rounds.
- Motif ruffles: check the Round 5 count of 19 sc per side and remove any extra sc.
- Band is wider than the grid: your dc gauge is loose. Rework Row 1 with a smaller hook.
- Curtain slants: a corner was joined to the wrong motif. Check the layout grid.
- Tabs twist: sew each tab down straight over the same 6 sts it was worked from.
Care
Hand wash in cool water with mild soap, press out the water in a towel, and dry flat with the motifs pinned back into their grid. Avoid hot dryers, which can shrink cotton and distort the lattice.
Final Notes
The measurement chain is simple. Each motif is 4 in (10.2 cm) per side and 5.7 in (14.5 cm) point to point. Nine columns give 51.3 in (130.3 cm) and seven rows give 39.9 in (101.3 cm). The 180-st header band matches the width at 20 sts per motif and adds 2 in (5.1 cm), for a curtain body of 51.3 in x 41.9 in (130.3 cm x 106.4 cm). If your first motif hits its checkpoints, the rest of the curtain will follow. Happy crocheting!