

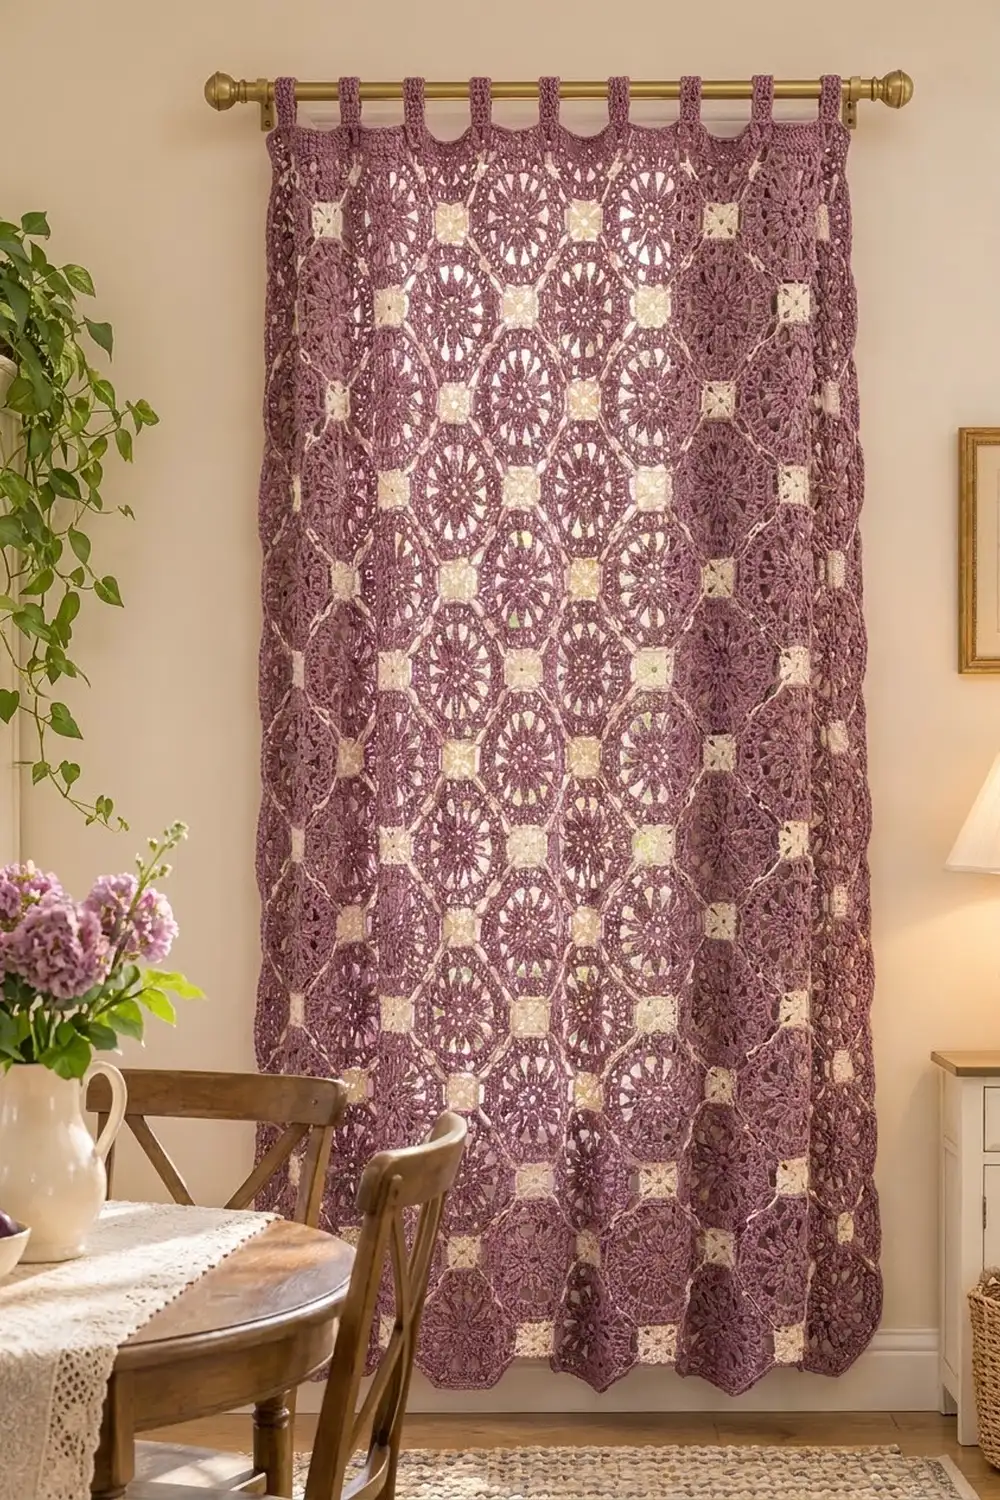
The Wisteria Window panel is a lace curtain built from mauve flower octagons and small cream squares. Each octagon has an eight-petal flower at the center, then an airy mesh ring and a solid edge. The cream squares and cream seam lines give the panel a soft, tiled look when light comes through it.
The style is cottage-classic: one main color, one accent, and a repeating motif that is easy to memorize. All instructions use US crochet terms.
One finished panel measures about 30.8 x 66.8 in (78.2 x 169.7 cm) without the tabs. The tab loops add about 3 in (7.6 cm) above the top edge. Make two panels for a standard pair.
You crochet 55 octagons, 40 squares and 24 edge triangles, then join them flat with a cream slip-stitch seam. Next you work a two-round border around the whole panel and add five tab loops along the top.
Finished Size and Construction
- Finished size (one panel): 30.8 x 66.8 in (78.2 x 169.7 cm), plus 3 in (7.6 cm) tabs
- Skill level: Intermediate
- Terminology: US
- Yarn weight: DK (light worsted, #3)
- Hook: 4.0 mm (G-6)
- Number of pieces: 119 (55 octagons, 40 squares, 24 triangles)
- Layout: 5 octagons wide x 11 octagons tall
- Octagon size: 6 in (15.2 cm) across the flats, 2.5 in (6.4 cm) per side
- Square size: 2.5 in (6.4 cm) per side
- Size before border: 30 x 66 in (76.2 x 167.6 cm)
- Border depth: 0.4 in (1.0 cm)
Materials
Use a smooth cotton or cotton-blend DK yarn. Cotton drapes well, shows the stitch detail clearly, and holds up in sunlight. Avoid fuzzy yarns because they blur the mesh.
- Color A, Mauve: 900 g / 2,070 m (octagons, triangles, border, tabs)
- Color B, Cream: 250 g / 575 m (squares and all seams)
The quantities are for one panel and include a margin of about 10–15%. Double them for a pair.
Tools: 4.0 mm (G-6) hook, tapestry needle, locking stitch markers, scissors, measuring tape, blocking mats and rust-proof pins, spray bottle.
Abbreviations (US Terms)
- ch – chain
- sl st – slip stitch
- sc – single crochet
- hdc – half double crochet
- dc – double crochet
- sp(s) – space(s)
- sk – skip
- sc2tog – single crochet 2 together
- MR – magic ring
- WS / RS – wrong side / right side
Special stitch – Petal: In one ch-4 sp work (sc, hdc, 3 dc, hdc, sc).
Gauge and Checkpoints
Gauge: 21 sc = 4 in (10.2 cm) with a 4.0 mm hook.
Make one octagon and one square first, then measure them before you continue.
Octagon checkpoints:
– After Round 3: about 2.75 in (7.0 cm) across
– After Round 5: about 4.25 in (10.8 cm) across
– After Round 7: about 5.6 in (14.2 cm) across the flats
– After Round 8: 6 in (15.2 cm) across the flats, 2.5 in (6.4 cm) per side
Square checkpoints:
– After Round 2: 1.5 in (3.8 cm)
– After Round 3: 2.1 in (5.3 cm)
– After Round 4: 2.5 in (6.4 cm)
If your octagon is too big, go down a half hook size. If it is too small, go up a half size. The octagon and the square must both have 2.5 in (6.4 cm) sides, or they will not lie flat when joined. If only the square is off, change the hook size for the squares alone.
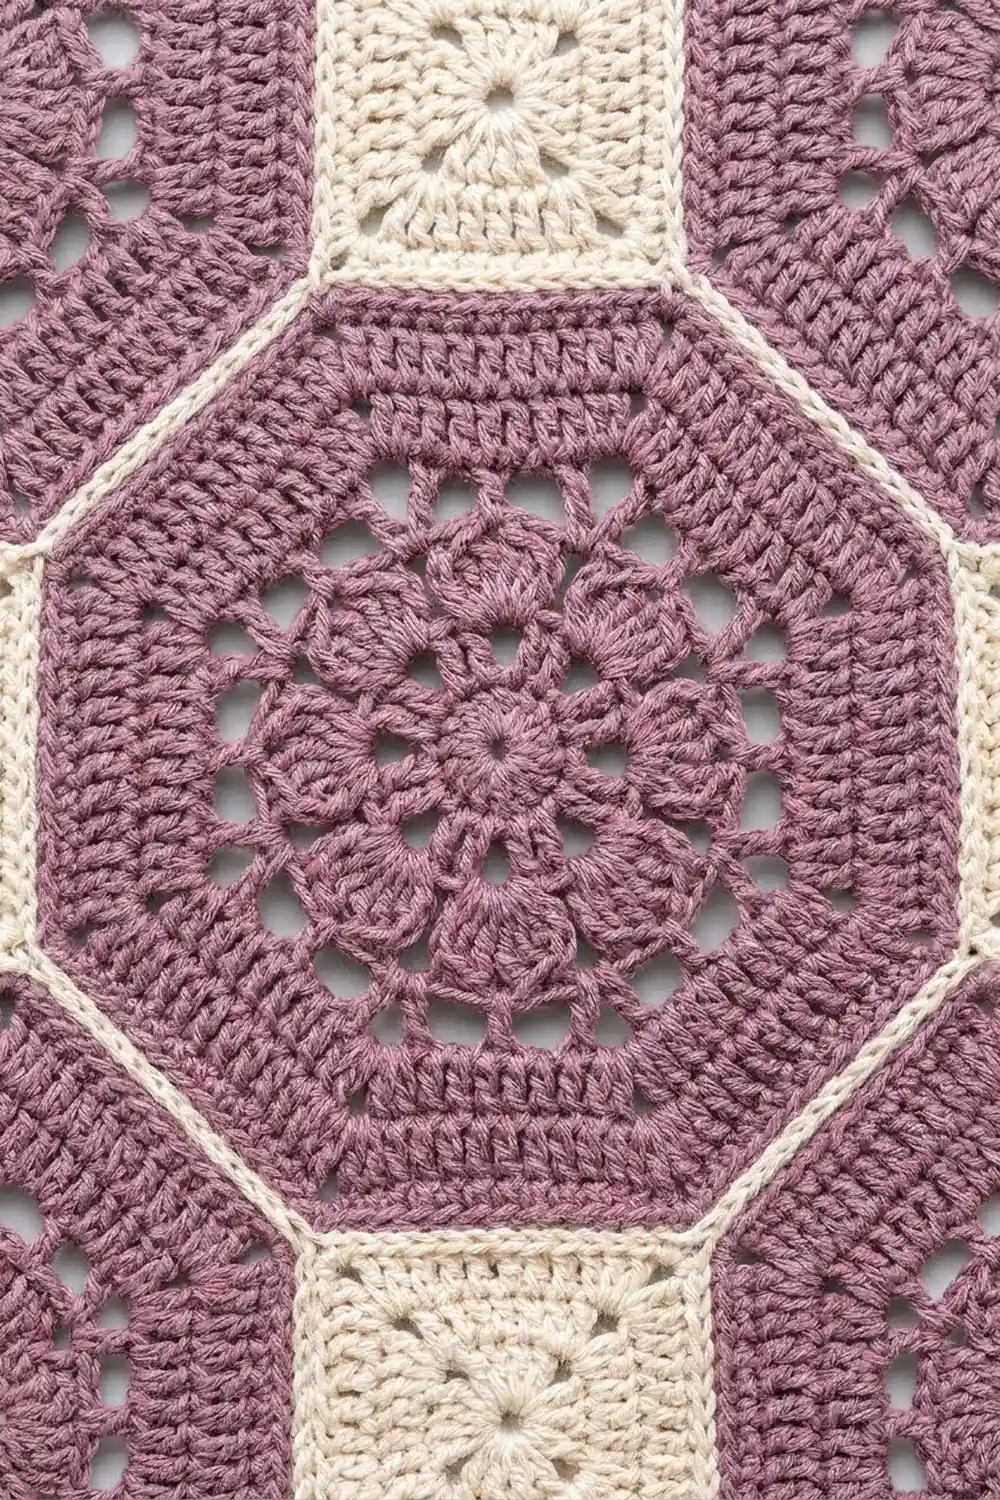
Octagon (make 55 in Color A)
Round 1: Make a MR. Ch 3 (counts as dc), work 15 dc in the ring and join with a sl st to the top of ch-3. (16 dc)
Round 2: Ch 1, sc in the same st, ch 4, sk 1. Sc in the next dc, ch 4, sk 1. Repeat from * 6 more times and join to the first sc. (8 sc, 8 ch-4 sps)
Round 3: Sl st into the first ch-4 sp. Work a Petal in each ch-4 sp around, then join. (8 petals, 56 sts)
Round 4: Work behind the petals. Ch 1, sc around the post of the first Round 2 sc, then ch 6. Sc around the post of the next Round 2 sc, ch 6. Repeat from * around and join. (8 sc, 8 ch-6 sps)
The petals now stand forward and form the flower.
Round 5: Ch 3 (counts as dc) in the same sc, then 5 dc in the next ch-6 sp. Dc in the next sc, 5 dc in the next ch-6 sp. Repeat from * 6 more times and join. (48 dc: 8 segments of 6)
Round 6 (mesh and corners): Sl st to set up if needed. Ch 5 (counts as dc + ch 2), then dc in the same st for the first corner. [Ch 1, sk 1, dc in the next dc] twice, then ch 1, sk 1.
(Dc, ch 2, dc) in the next dc, [ch 1, sk 1, dc in the next dc] twice, ch 1, sk 1. Repeat from * 6 more times. Join to the 3rd ch of the ch-5.
(32 dc, 8 ch-2 corner sps, 24 ch-1 sps)
Each side between two corner sps now holds 7 sts: 4 dc and 3 ch-1 sps.
Round 7: Sl st into the ch-2 sp. Ch 3 (counts as dc), then (dc, ch 2, 2 dc) in the same sp. [Dc in the next dc, dc in the next ch-1 sp] 3 times, dc in the next dc, then (2 dc, ch 2, 2 dc) in the next ch-2 sp. Repeat from * around, leaving off the last corner, and join.
(88 dc, 8 ch-2 sps; 11 dc per side)
Round 8: Ch 1. Sc in each dc to the corner, then (sc, ch 2, sc) in the ch-2 sp. Repeat around, join and fasten off.
(104 sc, 8 ch-2 sps; 13 sc per side, including the 2 corner sc)
Check: 8 sides x 13 = 104.
Square (make 40 in Color B)
Round 1: Make a MR. Ch 3 (counts as dc), 2 dc, ch 2, then [3 dc, ch 2] 3 times. Join. (12 dc, 4 ch-2 sps; 3 dc per side)
Round 2: Sl st to the ch-2 sp. Ch 3, then (dc, ch 2, 2 dc) in the same sp. Dc in each dc, then (2 dc, ch 2, 2 dc) in the next ch-2 sp. Repeat around and join. (28 dc; 7 per side)
Round 3: Repeat Round 2. (44 dc; 11 per side)
Round 4: Ch 1. Sc in each dc, then (sc, ch 2, sc) in each ch-2 sp. Repeat around, join and fasten off. (52 sc; 13 per side, including the 2 corner sc)
Edge Triangle (make 24 in Color A)
The triangles fill the notches along the top and side edges so those edges are straight. Work in rows and turn at the end of each row.
Row 1: Make a MR. Ch 3 (counts as dc), then work 2 dc, ch 2, 3 dc in the ring. (6 dc; 3 per arm)
Row 2: Ch 3, dc in the first st, dc in the next 2 dc, then (2 dc, ch 2, 2 dc) in the ch-2 sp. Dc in the next 2 dc, then 2 dc in the top of the turning ch. (12 dc; 6 per arm)
Row 3: Work as Row 2, with dc in each st between the increases. (18 dc; 9 per arm)
Row 4: Work as Row 3. (24 dc; 12 per arm)
Row 5: Ch 1, sc in each of the 12 dc, (sc, ch 2, sc) in the ch-2 sp, then sc in each of the 12 dc. Fasten off. (26 sc; 13 per leg)
The two legs match an octagon side at 13 sts. The row ends form the long edge, about 3.5 in (8.9 cm).
Make All Pieces
- Color A: 55 octagons, 24 triangles
- Color B: 40 squares
Layout grid (O = octagon, S = square, T = triangle). Read it from the top of the panel down:
    T   T   T   T          <- top edge triangles
  O   O   O   O   O        row 1
T   S   S   S   S   T
  O   O   O   O   O        row 2
T   S   S   S   S   T
  ... repeat ...
  O   O   O   O   O        row 11 (bottom, left open)
You have 11 octagon rows. Each gap row between them holds 4 squares plus 1 triangle at each side, and there are 10 of these gap rows. The 4 notches along the bottom are left open, which forms the scalloped hem.
Joining
Join with Color B so that each seam shows as a fine cream line. Place the pieces RS up, side by side. Work a sl st through the back loops of both edges, one stitch to one stitch. Every joined edge has 13 sts on each piece, so every seam is 13 sl sts. Anchor the start and end of each seam through the matching ch-2 corner sps.
- Columns: Join 11 octagons top flat to bottom flat to make a column. Make 5 columns. (10 seams per column)
- Columns together: Join the side flats of neighboring columns. (11 seams per column pair, 44 total)
- Squares: Set one square into each four-way gap. Sew all 4 sides to the 4 surrounding diagonal octagon sides in one continuous seam. (52 sl sts per square)
- Triangles: Set a triangle into each top and side notch. Sew both legs to the octagon diagonals, with the long edge facing out. (26 sl sts per triangle)
Tension: Keep each sl st as loose as a normal sc. If the seams pucker, go up one hook size for seaming only.
Size checkpoint: Lay the joined panel flat. It should measure 30 x 66 in (76.2 x 167.6 cm). At each top corner and on the bottom octagons, the octagon’s own diagonal sides stay exposed, giving small angled corners.
Border
Border gauge: The border uses the same gauge as the motifs, 21 sc = 4 in (10.2 cm).
Round 1 (Color A): Join at the top-left corner. Work 1 sc in each sc along every exposed motif side, and 2 sc in each dc row end of each triangle (1 in each sc row end). Where two pieces meet at the edge, skip the ch-2 sps. Where one octagon has two of its own sides on the edge, work 1 extra sc in the ch-2 sp between them.
- Top straight edge: 5 flats x 13 + 4 triangles x 18 = 137
- Each top angled corner: 13 + 2 corner sc = 15, for 30 in total
- Each side: 11 flats x 13 + 10 triangles x 18 = 323, for 646 in total
- Bottom: 15 exposed sides x 13 = 195, plus 12 corner sc = 207
Round 1 total: 137 + 30 + 646 + 207 = 1,020 sc. Join.
Round 2: Ch 1. Sc in each sc, with 2 sc in each of the 16 extra corner sc. Sc2tog across the 2 sc at the inside point of each of the 4 bottom notches. Join and fasten off.
Round 2 total: 1,020 + 16 − 4 = 1,032 sc. The top straight edge stays at 137.
Why the math works: The side edge measures about 62.9 in (159.8 cm), and 323 sc over that length is about 5.1 sc per inch. The top edge measures about 26.6 in (67.6 cm), and 137 sc gives the same rate. Both match the 5.25 sc per inch gauge, so the edges lie flat without ruffling or cupping.
Tabs (make 5): Center one tab on each top octagon flat. With RS facing, skip the first 2 of that octagon’s 13 sts and join Color A in the 3rd. Sc in the same st and the next 8 sts. (9 sc, 1.75 in / 4.4 cm wide) Work 32 more rows of 9 sc, for 33 rows or about 6 in (15.2 cm). Fold the tab to the WS and sew the last row to the base of Round 2. Each finished tab loop is 3 in (7.6 cm).
Final Blocking
- Weave in all ends along the seams.
- Lay the panel flat on mats and pin it to 30.8 x 66.8 in (78.2 x 169.7 cm).
- Pin each bottom scallop point and each notch so they are symmetrical.
- Mist the panel thoroughly with water until it is damp, not soaked.
- Gently open the petals and the mesh with your fingers.
- Leave it to dry completely before unpinning.
Final Quality-Control Checklist
- Every octagon has 13 sc per side and every square has 13 per side.
- All cream seams sit flat with even tension.
- Petals face forward on every octagon.
- Border Round 1 has 1,020 sc and Round 2 has 1,032 sc.
- The side edges are straight and the bottom scallops are even.
- The 5 tabs are evenly spaced, 6 in (15.2 cm) apart center to center.
- The panel measures 30.8 x 66.8 in (78.2 x 169.7 cm).
Troubleshooting
- Octagon cups: Round 5 is too tight. Loosen your dc or go up a half hook size.
- Octagon ruffles: Make the ch-6 loops in Round 4 tighter, or use ch 5.
- Square too small for the gap: Go up a half hook size for the squares.
- Seams pucker: Seam more loosely or with a larger hook.
- Side edges wave: Check the triangle row ends. Each dc row end needs exactly 2 sc.
- Panel sags on the rod: Add a sixth tab, or use shorter tabs.
Care
Hand wash in cool water, press out the water gently and dry flat. Avoid hanging the panel to dry while it is wet, because cotton stretches under its own weight.
Final Notes
The measurement chain runs like this:
- Gauge is 21 sc = 4 in (10.2 cm).
- Each octagon and square side is 13 sc = 2.5 in (6.4 cm).
- Each octagon is 6 in (15.2 cm) across the flats.
- A 5 x 11 layout makes a 30 x 66 in (76.2 x 167.6 cm) panel.
- A 0.4 in (1.0 cm) border brings it to 30.8 x 66.8 in (78.2 x 169.7 cm).
If each checkpoint matches, the next stage will fit.
Happy crocheting!