
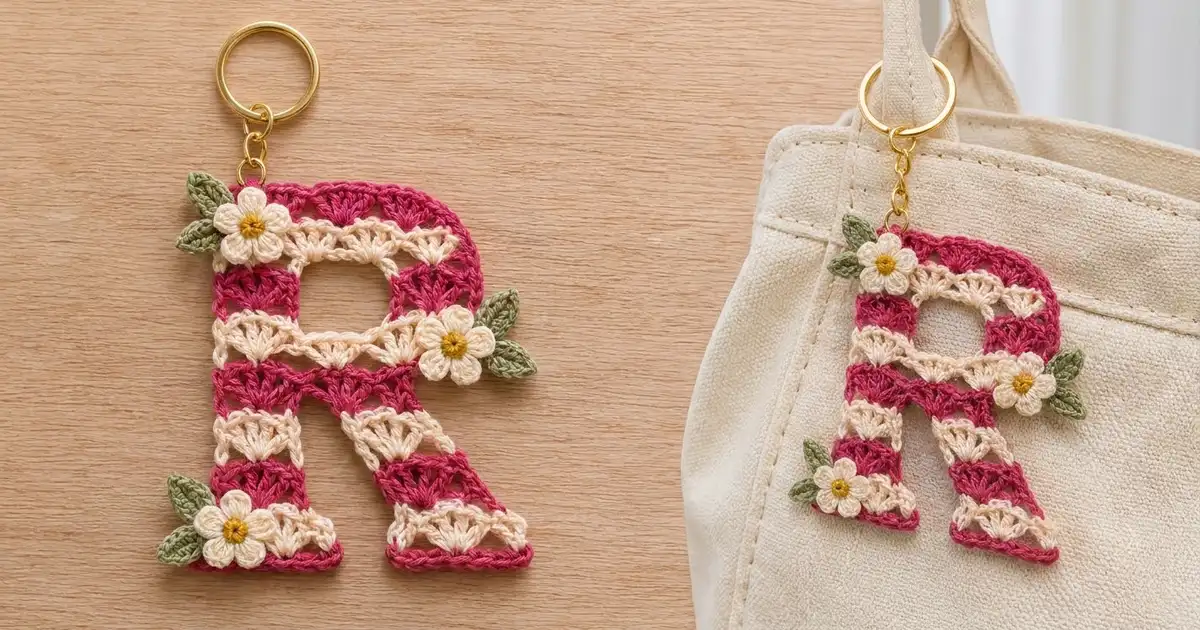
This little keychain is a letter R in bold raspberry and cream shell stripes. Every row is a line of small fans, giving the letter a soft, scalloped texture instead of a flat outline. One round of raspberry single crochet frames the whole shape and keeps the edges crisp.
Three cream daisies with mustard centers and sage green leaves decorate the stem, the bowl, and the left foot. A gold split ring on a short chain hangs from the top-left corner, ready to clip onto a bag, pencil case, or keys.
The pattern uses US crochet terms. The finished letter measures 3 5/8 in (9.2 cm) wide by 4 in (10.2 cm) tall, not counting the ring.
You work the letter from the bottom up in one-row stripes. The two legs are made separately, joined by a bridge row, split around the counter (the hole in the R), and closed with a chained top row. A single crochet border, blocking, and sewn-on flowers finish it.
Finished Size and Construction
- Finished size: 3 5/8 in (9.2 cm) wide x 4 in (10.2 cm) tall
- Skill level: Intermediate (shaping by placement, many color changes)
- Terminology: US
- Yarn weight: Sport (2 Fine) cotton
- Hook: 2.75 mm (C-2)
- Number of pieces: 1 letter, plus 3 flowers and 6 leaves as appliqués
- Layout: Single letter piece; appliqués sewn on top
- Shell width: 9/16 in (1.4 cm); shell row height 7/16 in (1.1 cm)
- Size before border: 3 3/8 in (8.6 cm) x 3 3/4 in (9.5 cm)
- Border depth: 1/8 in (0.3 cm) per side, adding 1/4 in (0.6 cm) each way
Materials
Use a smooth, mercerized cotton. It shows the shell texture clearly and keeps its shape on a keychain that gets handled daily. Any sport-weight cotton at about 3 m per gram works.
- Raspberry: 8 g, about 24 m
- Cream: 6 g, about 18 m
- Mustard: 1 g, about 3 m
- Sage green: 2 g, about 6 m
All quantities include a margin for a gauge test and the many short tails.
Tools
- 2.75 mm (C-2) hook, plus 2.5 mm and 3.0 mm for gauge adjustment
- Tapestry needle and scissors
- Gold split ring, 1 in (2.5 cm), with a short chain
- One 6 mm jump ring and two flat-nose pliers
- Pins, foam mat, and spray bottle
Abbreviations (US Terms)
- ch chain
- sl st slip stitch
- sc single crochet
- hdc half double crochet
- dc double crochet
- st(s) stitch(es)
- sp space
- MR magic ring
- rnd round
Special stitches
- Shell: 5 dc in the same stitch.
- Half shell: 3 dc in the same stitch.
- Edge shell: A full shell worked into the last stitch at an edge. It fans half a shell past the edge and moves that edge outward.
- Standing sc / standing dc: Start with a slip knot on the hook and work the stitch into the stitch shown.
Working direction: Every row is worked with the right side facing, from right to left. Fasten off at the end of each row and rejoin at the right edge. Left-handed crocheters work left to right and mirror every “right” and “left.”
Gauge and Checkpoints
The left leg is your gauge piece. Make it first and measure it before continuing.
- Gauge: 2 shells (9 foundation sc) = 1 1/8 in (2.9 cm) wide. Foundation plus 3 shell rows = 1 9/16 in (4.0 cm) tall.
- Checkpoint 1, both legs: Each is 1 9/16 in (4.0 cm) tall.
- Checkpoint 2, after Row 4: The bridge row is about 3 1/8 in (7.9 cm) wide.
- Checkpoint 3, after Row 5: The letter is 2 7/16 in (6.2 cm) tall.
- Checkpoint 4, after Row 8: 3 3/8 in (8.6 cm) wide x 3 3/4 in (9.5 cm) tall.
If the leg is wider than 1 1/8 in (2.9 cm), switch to a 2.5 mm hook. If it is narrower, switch to 3.0 mm. Change the hook, never the counts, because the letter’s shape depends on exact shell placement.
Leave 4 in (10.2 cm) tails at every join and fasten-off, and weave each into a stripe of the same color.

Left Leg
Foundation (raspberry): Ch 10. Sc in the 2nd ch from hook and in each ch across. (9 sc) Fasten off.
Row 1 (cream): Standing sc in the first sc. Skip 1 st, shell in next st, skip 1 st, sc in next st. Repeat from * once. (2 shells, 3 sc = 13 sts) Fasten off.
Row 2 (raspberry): Standing dc in the first sc, 2 dc in the same sc (half shell made). Sc in center dc of next shell, shell in next sc, sc in center dc of next shell, half shell in last sc. (2 half shells, 1 shell, 2 sc = 13 sts) Fasten off.
Row 3 (cream): Standing sc in the first dc. Shell in next sc, sc in center dc of next shell, shell in next sc, sc in last dc. (2 shells, 3 sc = 13 sts) Fasten off.
Measure: 1 1/8 in (2.9 cm) wide x 1 9/16 in (4.0 cm) tall.
Right Leg
The right leg slants toward the stem. Each row drops half a shell at the right edge and adds an edge shell at the left edge, so the strip shifts half a shell left per row.
Foundation and Row 1: Work as for the left leg. (9 sc; then 13 sts)
Row 2 (raspberry): Standing sc in center dc of the first shell (the last 2 dc and end sc stay unworked). Shell in next sc, sc in center dc of next shell, edge shell in last sc. (2 shells, 2 sc = 12 sts) Fasten off.
Row 3 (cream): Standing sc in center dc of the first shell. Shell in next sc, sc in center dc of the edge shell, edge shell in last dc. (2 shells, 2 sc = 12 sts) Fasten off.
The right leg now matches the left leg’s height, and its top leans toward the stem.
Row 4: Bridge Row (Raspberry)
Lay both legs right side up, right leg on the right. The gap between their tops is about half a shell wide.
Row 4: Standing dc in the first sc of the right leg, 4 dc in the same sc (edge shell). Sc in center dc of next shell, shell in next sc, sc in center dc of next shell, shell in last dc of the right leg. Ch 2 across the gap. Shell in first sc of the left leg, sc in center dc of next shell, shell in next sc, sc in center dc of next shell, half shell in last sc. (5 shells = 25 dc, plus 4 sc, 3 dc half shell, and 2 ch = 34 sts including the ch-2) Fasten off.
The opening edge shell pushes the right edge out by half a shell, forming the bulge where the bowl meets the leg.
Row 5: Bottom of the Bowl (Cream)
Row 5: Standing sc in center dc of the first shell. Shell in next sc, sc in center dc of next shell. Repeat from * once. Shell in the ch-2 sp, sc in center dc of next shell, shell in next sc, sc in center dc of next shell, shell in next sc, sc in last dc. (5 shells, 6 sc = 31 sts) Fasten off.
Row 6: Around the Counter (Raspberry)
This row is worked in two sections, leaving the middle open as the counter.
Right section: Standing dc in the first sc, 4 dc in the same sc (edge shell). Sc in center dc of next shell, shell in next sc, sc in center dc of next shell. (2 shells, 2 sc = 12 sts) Fasten off.
Skip the next 8 sts (the last 2 dc of that shell, 1 sc, and the whole next shell).
Left section: Standing dc in the next sc, 2 dc in the same sc (half shell). Sc in center dc of next shell, shell in next sc, sc in center dc of next shell, half shell in last sc. (2 half shells, 1 shell, 2 sc = 13 sts) Fasten off.
Row 7: Top of the Bowl (Cream)
Row 7: Standing sc in center dc of the first shell. Shell in next sc, sc in center dc of next shell, shell in last sc of the right section. Ch 5 across the counter. Sc in first dc of the left section, shell in next sc, sc in center dc of next shell, shell in next sc, sc in last dc. (4 shells = 20 dc, plus 5 sc and 5 ch = 30 sts including the ch-5) Fasten off.
The counter is now closed at about 7/8 in (2.2 cm) wide x 7/16 in (1.1 cm) tall.
Row 8: Top Row (Raspberry)
Row 8: Skip the first sc and first 2 dc to round the top-right corner. Standing sc in center dc of the first shell, shell in next sc, sc in center dc of next shell. Shell in 1st ch of the ch-5, skip 1 ch, sc in next ch, skip 2 ch. Shell in next sc, sc in center dc of next shell, shell in next sc, sc in center dc of next shell, half shell in last sc. (4 shells = 20 dc, plus 5 sc and 3 dc half shell = 28 sts) Fasten off.
Weave in all tails now so the border can cover the edge ends. The letter should measure 3 3/8 in (8.6 cm) x 3 3/4 in (9.5 cm).
Flowers (Make 3)
Rnd 1 (mustard): MR, 5 sc in ring, sl st to first sc. (5 sc) Fasten off and pull the ring closed.
Rnd 2 (cream): Join with sl st in any sc. (Ch 2, 2 dc, ch 2, sl st) in same sc, sl st in next sc. Repeat from * around, working the last repeat into the joining st. (5 petals) Fasten off, leaving a 6 in (15.2 cm) tail.
Each flower is about 7/8 in (2.2 cm) across.
Leaves (Make 6)
Leaf (sage): Ch 6. Sc in 2nd ch from hook, hdc in next ch, dc in next ch, hdc in next ch, (sc, ch 2, sc) in last ch for the tip. Working along the other side of the chain: hdc in next ch, dc in next ch, hdc in next ch, sc in last ch. Sl st to first sc. (10 sts plus ch-2 tip) Fasten off, leaving a 6 in (15.2 cm) tail.
Each leaf is about 5/8 in (1.6 cm) long.
Border
Border gauge: About 9 sc per 2 in (5.1 cm) along row ends, worked as 2 sc per shell-row end. Along the foundation and top, work 1 sc per stitch.
Work counterclockwise with the right side facing.
Rnd 1 (raspberry):
- Left foot bottom: Join at the bottom-left corner. 3 sc in first ch, 1 sc in each of next 7 ch, 3 sc in last ch. (9 ch worked 1 per st + 4 corner extras = 13 sc)
- Left leg inner edge (going up): 2 sc in each end of Rows 1–3. (6 sc)
- Crotch: 1 sc around the ch-2 of Row 4. (1 sc)
- Right leg inner edge (going down): 2 sc in each end of Rows 3–1. (6 sc)
- Right foot bottom: As for left foot. (13 sc)
- Right leg outer edge (going up): 2 sc in each end of Rows 1–3, working over the unworked step stitches. (6 sc)
- Bowl outer edge: 2 sc in each end of Rows 4–7. (8 sc)
- Top-right corner: 2 sc in the end of Row 8, no corner increase. (2 sc)
- Top: 1 sc in each of the 28 sts of Row 8, with 3 sc in the last st for the top-left corner. (28 sts worked 1 per st + 2 corner extras = 30 sc)
- Stem left edge (going down): 2 sc in each end of Rows 8–1, then 1 sc in the end of the foundation row. (17 sc)
Sl st to first sc. (13 + 6 + 1 + 6 + 13 + 6 + 8 + 2 + 30 + 17 = 102 sc) Fasten off.
Why the math works: A shell row is 7/16 in (1.1 cm) tall, and two sport-weight sc are about the same width, so 2 sc per row end lies flat. Along the foundation and top, the border copies existing stitches 1 to 1 and follows the scallops without stretching them. Three-sc corners turn the square corners, the single crotch sc prevents bunching, and the plain top-right corner keeps the bowl round. Adding 1/8 in (0.3 cm) on every side turns 3 3/8 x 3 3/4 in (8.6 x 9.5 cm) into 3 5/8 x 4 in (9.2 x 10.2 cm).
Final Blocking
- Mist the letter until damp, not soaked.
- Pin it right side up to 3 5/8 in (9.2 cm) x 4 in (10.2 cm).
- Pin both feet along one straight line.
- Shape the counter into a smooth oval with a pin at each end.
- Nudge each top scallop into a rounded fan.
- Let it dry completely, at least 4 hours.
- Unpin. Sew one flower near the top of the stem with 2 leaves pointing left, one on the right edge of the bowl with 2 leaves pointing right, and one on the left foot with 2 leaves pointing left. Stitch through flower centers and leaf bases only so the edges stay lifted.
- Open the jump ring with both pliers, pass it through the top-left corner of the border and the end chain link, and close it fully.
Final Quality-Control Checklist
- Finished size is 3 5/8 in (9.2 cm) x 4 in (10.2 cm).
- Stripes alternate cream and raspberry, with raspberry at the base and top.
- Both feet sit level.
- The right leg slants evenly toward the stem.
- The counter is open, about 7/8 in (2.2 cm) wide.
- The border has 102 sc and lies flat.
- All 3 flowers and 6 leaves are secure.
- The jump ring is fully closed and the ring hangs straight.
Troubleshooting
- Border ruffles on the sides: Work 3 sc per 2 row ends on the long stem edge.
- Corners pull in: Confirm 3 sc in each square corner.
- Right leg looks straight: Check that Rows 2 and 3 start in a shell center and end with an edge shell.
- Counter closed up: Recount the 8 skipped stitches in Row 6.
- Ch-5 sags: Chain more tightly, or use a 2.5 mm hook for that chain only.
- Flowers cup: Steam them flat before sewing.
Care
Hand wash in cool water, roll in a towel, and dry flat, re-pinning to shape if needed. Remove the metal ring first to prevent tarnish.

Final Notes
The measurement chain is simple. Two shells measure 1 1/8 in (2.9 cm), and each leg stands 1 9/16 in (4.0 cm). The bridge row spans about 3 1/8 in (7.9 cm), and Row 5 brings the height to 2 7/16 in (6.2 cm). Row 8 finishes the letter at 3 3/8 x 3 3/4 in (8.6 x 9.5 cm), and the 102-stitch border takes it to 3 5/8 x 4 in (9.2 x 10.2 cm). Confirm gauge on the left leg, and the rest of the letter follows.
Happy crocheting!