

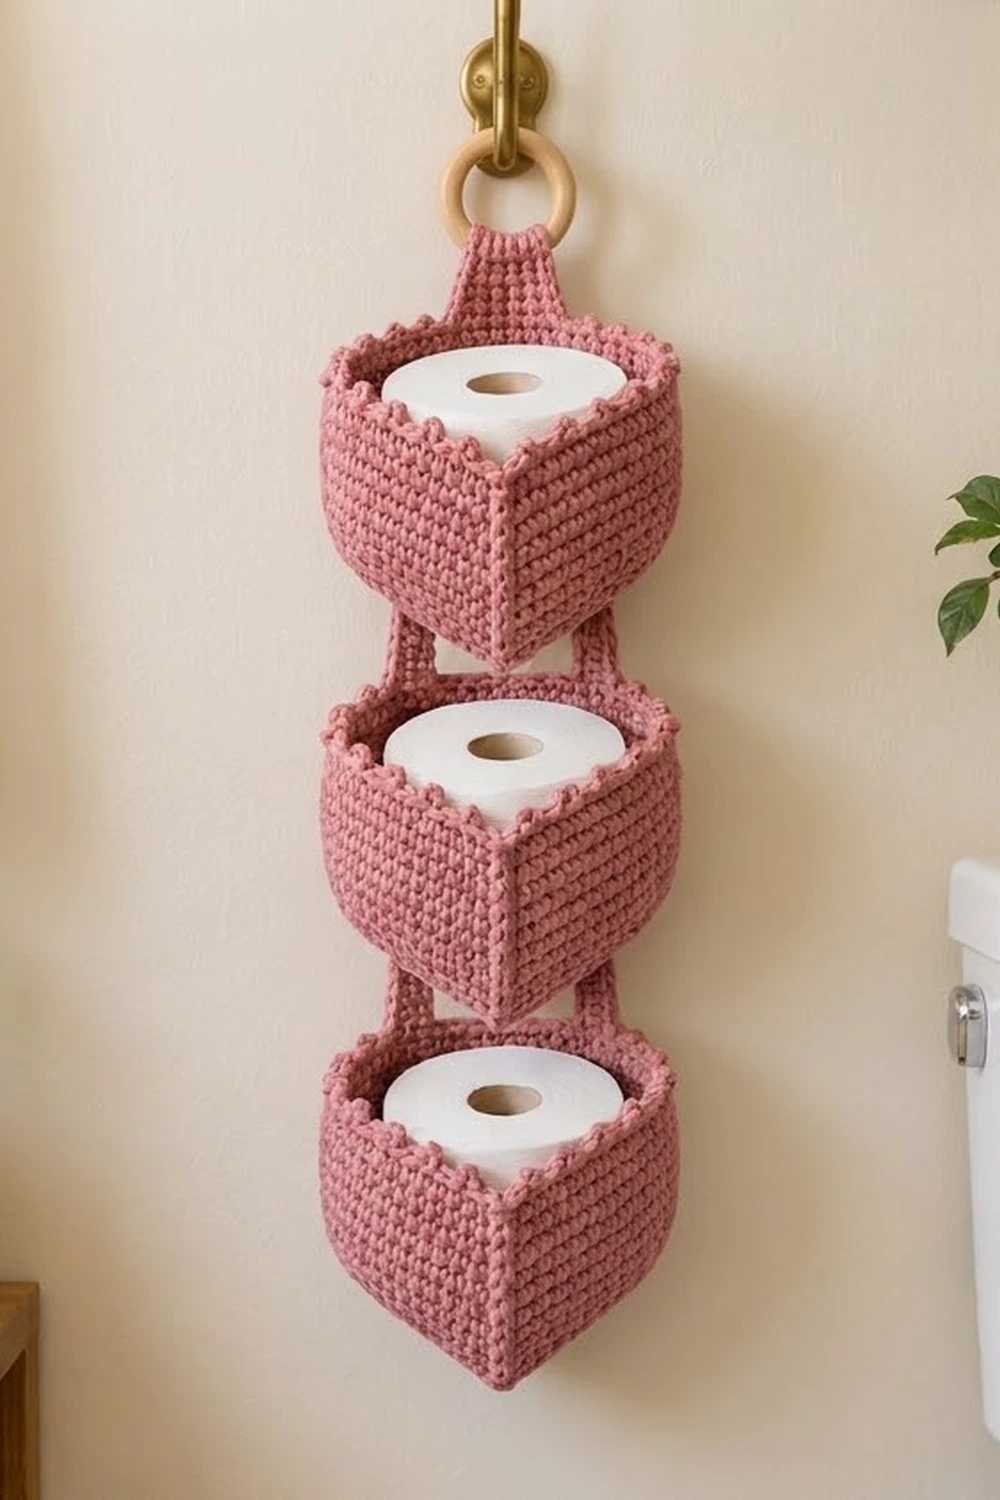
This holder stacks three small heart-shaped baskets in a column. Each basket holds one standard toilet roll. Short paired straps link the baskets, and a tapered tab at the top loops over a wooden ring, so the whole holder hangs from one hook.
The sample uses one color, a soft dusty rose. Dense single crochet keeps the walls firm and upright. A back-loop round makes a neat ridge where the base meets the wall, and a picot round finishes each rim with a row of small bumps.
The pattern uses US crochet terms. The finished holder is about 6 in (15.2 cm) wide, 5.1 in (13.0 cm) deep, and 17.7 in (45.0 cm) tall, measured from the bottom basket to the top of the ring loop.
The construction is simple. You work each heart base flat in rows, from the point up to the two lobes. An edging round sets the stitch count for the walls. The walls are joined rounds with a picot finish. Then you make one hanging tab and four connector straps and sew everything together.
Finished Size and Construction
- Finished size: about 6 in (15.2 cm) wide x 17.7 in (45.0 cm) tall x 5.1 in (13.0 cm) deep
- Skill level: Easy+ (shaping in rows, joined rounds, sewing)
- Terminology: US
- Yarn weight: worsted (#4), cotton or cotton blend
- Hook: 4.0 mm (G-6)
- Number of pieces: 8 (3 baskets, 1 hanging tab, 4 connector straps)
- Layout: 1 column of 3 baskets, hanging vertically
- Basket size: base 6 in (15.2 cm) wide x 5.1 in (13.0 cm) deep; 4 in (10.2 cm) tall including picots
- Base size before edging: 5.75 in (14.6 cm) wide x 4.9 in (12.4 cm) deep
- Rim (border) depth: 1 picot round, about 0.25 in (0.6 cm)
Materials
Yarn: Use a smooth, worsted-weight cotton or cotton blend. Cotton holds its shape and won’t sag under the weight of a roll. Avoid very soft or fuzzy acrylics, because the walls will slump.
- Dusty rose: 170 g, about 323 m (353 yd), based on a yarn with roughly 190 m per 100 g
The quantities include a margin of about 30 g over what the sample used. That covers a gauge swatch and some ripping back.
Tools:
– 4.0 mm (G-6) crochet hook
– Wooden ring, 2.5 in (6.4 cm) outer diameter
– 4 locking stitch markers
– Tapestry needle
– Scissors
– Measuring tape
– Rust-proof pins and a blocking mat or towel
Abbreviations (US Terms)
- ch – chain
- sc – single crochet
- sc2tog – single crochet 2 together
- sl st – slip stitch
- BLO – back loop only
- st(s) – stitch(es)
- RS – right side
Special stitch – Picot: ch 3, sl st in 3rd ch from hook.
Notes: The ch 1 at the start of a row or round doesn’t count as a stitch. Join each round with a sl st to the first sc.
Gauge and Checkpoints
Gauge: 16 sc x 18 rows = 4 in (10.2 cm) in sc worked in rows. That’s 4 sts and 4.5 rows per inch.
Make one complete basket before you start anything else. It’s your real gauge test, and it shows you whether a roll will fit.
Checkpoints:
– After Row 11 of the base: 23 sts, 5.75 in (14.6 cm) wide.
– After Row 17: about 3.8 in (9.7 cm) tall.
– After Row 22: 4.9 in (12.4 cm) from the point to the top of the lobes.
– After Rnd 1 (edging): 68 sts; base 6 in (15.2 cm) wide x 5.1 in (13.0 cm) deep.
– After Rnd 17: walls 3.5 in (8.9 cm) tall; opening about 17 in (43.2 cm) around.
If your piece is too big: Go down 0.5 mm in hook size. Loose walls also lean outward.
If your piece is too small: Go up 0.5 mm. After Rnd 6 of the walls, test with a roll. A standard roll about 4–4.5 in (10.2–11.4 cm) wide should drop in without forcing.

Heart Basket (make 3)
Base
Work the base flat in rows, from the heart point upward.
Row 1: Ch 2, 3 sc in 2nd ch from hook, turn. (3 sts)
Row 2: Ch 1, 2 sc in first st, sc in next st, 2 sc in last st, turn. (5 sts)
Rows 3–11: Ch 1, 2 sc in first st, sc in each st to last st, 2 sc in last st, turn. Each row is 2 sts longer than the row before.
– Row 3: 7 sts
– Row 5: 11 sts
– Row 8: 17 sts
– Row 11: 23 sts
Rows 12–17: Ch 1, sc in each st across, turn. (23 sts per row)
Checkpoint: 17 rows, 23 sts, about 3.8 in (9.7 cm) tall.
First Lobe
Row 18: Ch 1, sc in first 11 sts, turn. Leave the remaining 12 sts unworked. (11 sts)
Row 19: Ch 1, sc2tog, sc in next 7 sts, sc2tog, turn. (9 sts)
Row 20: Ch 1, sc2tog, sc in next 5 sts, sc2tog, turn. (7 sts)
Row 21: Ch 1, sc2tog, sc in next 3 sts, sc2tog, turn. (5 sts)
Row 22: Ch 1, sc2tog, sc in next st, sc2tog. (3 sts) Fasten off.
Second Lobe
Skip the 12th st of Row 17, which is the center st. Join yarn in the 13th st.
Rows 18–22: Work exactly as for the first lobe over the last 11 sts. (11, 9, 7, 5, 3 sts) Fasten off.
The skipped center st becomes the dip of the heart.
Edging Round
Rnd 1: Hold the base with the RS facing you. The RS is the side you want facing down when the basket sits. Join yarn at the point, in the base of Row 1. Work around the whole base in this order:
– At the point: 3 sc in the base of Row 1. (3 sts)
– Up the side and the outer edge of the lobe: 1 sc in each row end, Rows 1 to 22. (22 sts)
– Across the lobe top: 2 sc in first st, sc in next st, 2 sc in last st. (5 sts)
– Down the inner edge of the lobe: 1 sc in each row end, Rows 22 to 18. (5 sts)
– In the skipped center st of Row 17: 1 sc. (1 st)
– Up the inner edge of the other lobe: 1 sc in each row end, Rows 18 to 22. (5 sts)
– Across that lobe top: 2 sc in first st, sc in next st, 2 sc in last st. (5 sts)
– Down the outer edge and the side: 1 sc in each row end, Rows 22 to 1. (22 sts)
Join with a sl st to the first sc. (68 sts)
Check: 3 + 22 + 5 + 5 + 1 + 5 + 5 + 22 = 68.
Stitch numbering for the rest of the pattern:
– Sts 1–3: point (st 2 is the tip)
– Sts 4–25: first side
– Sts 26–30: first lobe top
– Sts 31–35: first inner edge
– St 36: center dip
– Sts 37–41: second inner edge
– Sts 42–46: second lobe top
– Sts 47–68: second side
The tip (st 2) and the dip (st 36) are exactly 34 sts apart, which is half of 68, so the heart is symmetrical. Every wall round starts in st 1, so this numbering holds all the way up.
Walls
Rnd 2: Ch 1, working in BLO, sc in each st around, join. (68 sts) This round makes the ridge between base and wall.
Rnds 3–17: Ch 1, sc through both loops in each st around, join. (68 sts each round)
The join seam sits right next to the point and hides in the front crease. Checkpoint: walls are 3.5 in (8.9 cm) tall. Don’t fasten off yet; the picot rim comes after joining.
Make All Pieces
Make 3 baskets as above. Each uses about 42 g, so 126 g for all three. Leave a working loop on each basket’s last round, or fasten off and rejoin later for the rim.
Hanging Tab (make 1, about 4 g)
Row 1: Ch 12, sc in 2nd ch from hook and in each ch across, turn. (11 sts)
Rows 2–8: Ch 1, sc in each st, turn. (11 sts)
Row 9: Ch 1, sc2tog, sc in next 7 sts, sc2tog, turn. (9 sts)
Row 10: Ch 1, sc in each st, turn. (9 sts)
Row 11: Ch 1, sc2tog, sc in next 5 sts, sc2tog, turn. (7 sts)
Row 12: Ch 1, sc in each st, turn. (7 sts)
Row 13: Ch 1, sc2tog, sc in next 3 sts, sc2tog, turn. (5 sts)
Rows 14–30: Ch 1, sc in each st, turn. (5 sts) Fasten off, leaving a long tail.
The tab is 2.75 in (7.0 cm) wide at the base, 1.25 in (3.2 cm) wide at the strap end, and 6.7 in (17.0 cm) long.
Connector Straps (make 4, about 2 g each)
Row 1: Ch 5, sc in 2nd ch from hook and in each ch across, turn. (4 sts)
Rows 2–20: Ch 1, sc in each st, turn. (4 sts) Fasten off, leaving a long tail.
Each strap is 1 in (2.5 cm) wide and 4.4 in (11.2 cm) long.
Layout grid (back view):
        [ ring ]
        [ tab  ]
  [   Basket 1 (top)    ]
    [strap]     [strap]
  [   Basket 2 (middle) ]
    [strap]     [strap]
  [   Basket 3 (bottom) ]
Joining
Do the joining before you work the picot rim. The top rounds are still plain then, and they’re easy to count.
Method: Whipstitch with the yarn tails, going through both layers at every stitch or row end.
Strap placement (stitch-to-stitch logic): Each strap is 4 sts wide. On the back, center one strap over the first lobe on sts 27–30 and the other over the second lobe on sts 42–45. These positions mirror each other around the center dip (st 36), so the baskets hang level. Mark these sts with locking markers on all three baskets.
Upper ends: Lay Strap Rows 1–7 flat against the outside back of Basket 1, covering wall Rnds 9 down to 3. Strap Row 8 should sit at the base ridge. Sew all four edges.
Lower ends: Lay Strap Rows 14–20 against the outside back of Basket 2, covering Rnds 11 to 17. Strap Row 20 should line up with Rnd 17. Sew. Strap Rows 8–13, about 1.3 in (3.3 cm), stay free and form the gap. Once the picot rim is added, the visible gap is about 1.25 in (3.2 cm).
Repeat to join Basket 2 to Basket 3.
Tab: Center Tab Rows 1–7 over sts 31–41 of Basket 1, covering Rnds 11 to 17. That’s 11 sts, centered on the dip at st 36. Sew it in place. Slide the ring onto the 5-st end, fold Rows 14–30 back over the ring, and whipstitch Row 30 to the back of Row 13.
Tension: Sew firmly, but don’t pull so hard that the wall puckers. The straps carry the weight, so go over each strap’s top and bottom edges twice.
Size checkpoint: Hang the holder empty. The baskets should sit level, and the tab should rise about 3.2 in (8.1 cm) above the top of Basket 1.
Border (Picot Rim)
Border gauge: The rim goes over the same 68 sts at 4 sts per inch, so it neither flares nor pulls in.
Rnd 18: Ch 1, sc in next 4 sts, picot; repeat from * around, join. (68 sc, 17 picots) Fasten off.
The picots follow the stitch numbering. They fall after sts 4, 8, 12, and so on, up to 68.
– First side (sts 4–25): 6 picots, after sts 4, 8, 12, 16, 20, 24.
– Lobes and back (sts 26–46): 5 picots, after sts 28, 32, 36, 40, 44.
– Second side (sts 47–68): 6 picots, after sts 48, 52, 56, 60, 64, 68.
That’s 6 + 5 + 6 = 17 picots.
Why the math works: 68 divides evenly by 4, so the repeat closes with no partial group. The rim count matches the wall count, which matches the edging count, so the rim lies flat. Picots are added on top of the sc and don’t use up any stitches, so the round stays at 68 sc plus 17 picots.
Work the rim on all three baskets. Where the straps and tab end at Rnd 17, work the rim sc through the top loops just above the sewn edge. The picots then hide the seam.
Final Blocking
- Weave in all ends on the inside of the baskets.
- Mist the whole holder lightly with water, or steam it gently if you’re using cotton.
- Put a toilet roll or a rolled towel in each basket.
- Pinch the front point (st 2) into a crisp vertical crease from base to rim.
- Pin each picot upward so the rim reads as an even row of bumps.
- Lay the holder on its back and smooth the straps and tab flat.
- Let it dry completely, then hang it on the hook.
Final Quality-Control Checklist
- Each base has 68 sts in the edging round.
- Every wall round has 68 sts, and the walls are 3.5 in (8.9 cm) tall.
- Each rim has 17 evenly spaced picots.
- The straps sit over sts 27–30 and 42–45 on every basket.
- The tab is centered over the dip.
- The baskets hang level, with gaps of about 1.25 in (3.2 cm).
- The overall height is about 17.7 in (45.0 cm).
- No ends show on the outside.
Troubleshooting
Walls lean outward: Your tension is loose. Go down a hook size, or work just the walls with a 3.5 mm hook.
Base cups or ripples: Check the edging count first. If you have 68 and it still ripples, go down a hook size for the base only.
Roll won’t fit: Go up 0.5 mm in hook size, or add one more even row to Rows 12–17.
Baskets tilt sideways: The straps are off-center. Count again from the dip (st 36) and move them.
Picots flop down: Block them upward, or pull each picot’s sl st snug.
Rim waves: You may have worked an extra sc in one repeat. Recount the groups of 4.
Care
Hand wash in cool water, then lay flat to dry with rolls inside the baskets to hold the shape. Don’t wring or tumble dry.
Final Notes
The measurements build one step at a time. At a gauge of 4 sts per inch, the 23-st base row is 5.75 in (14.6 cm) wide. The edging round turns that into a 68-st heart 6 in (15.2 cm) across. The walls keep all 68 sts for 3.5 in (8.9 cm), and the picot rim splits those 68 sts into 17 even repeats. Three 4-in (10.2-cm) baskets, two 1.25-in (3.2-cm) gaps, and a 3.2-in (8.1-cm) tab give a holder 17.7 in (45.0 cm) tall. If each checkpoint matches, the finished piece will too.
Happy crocheting!