

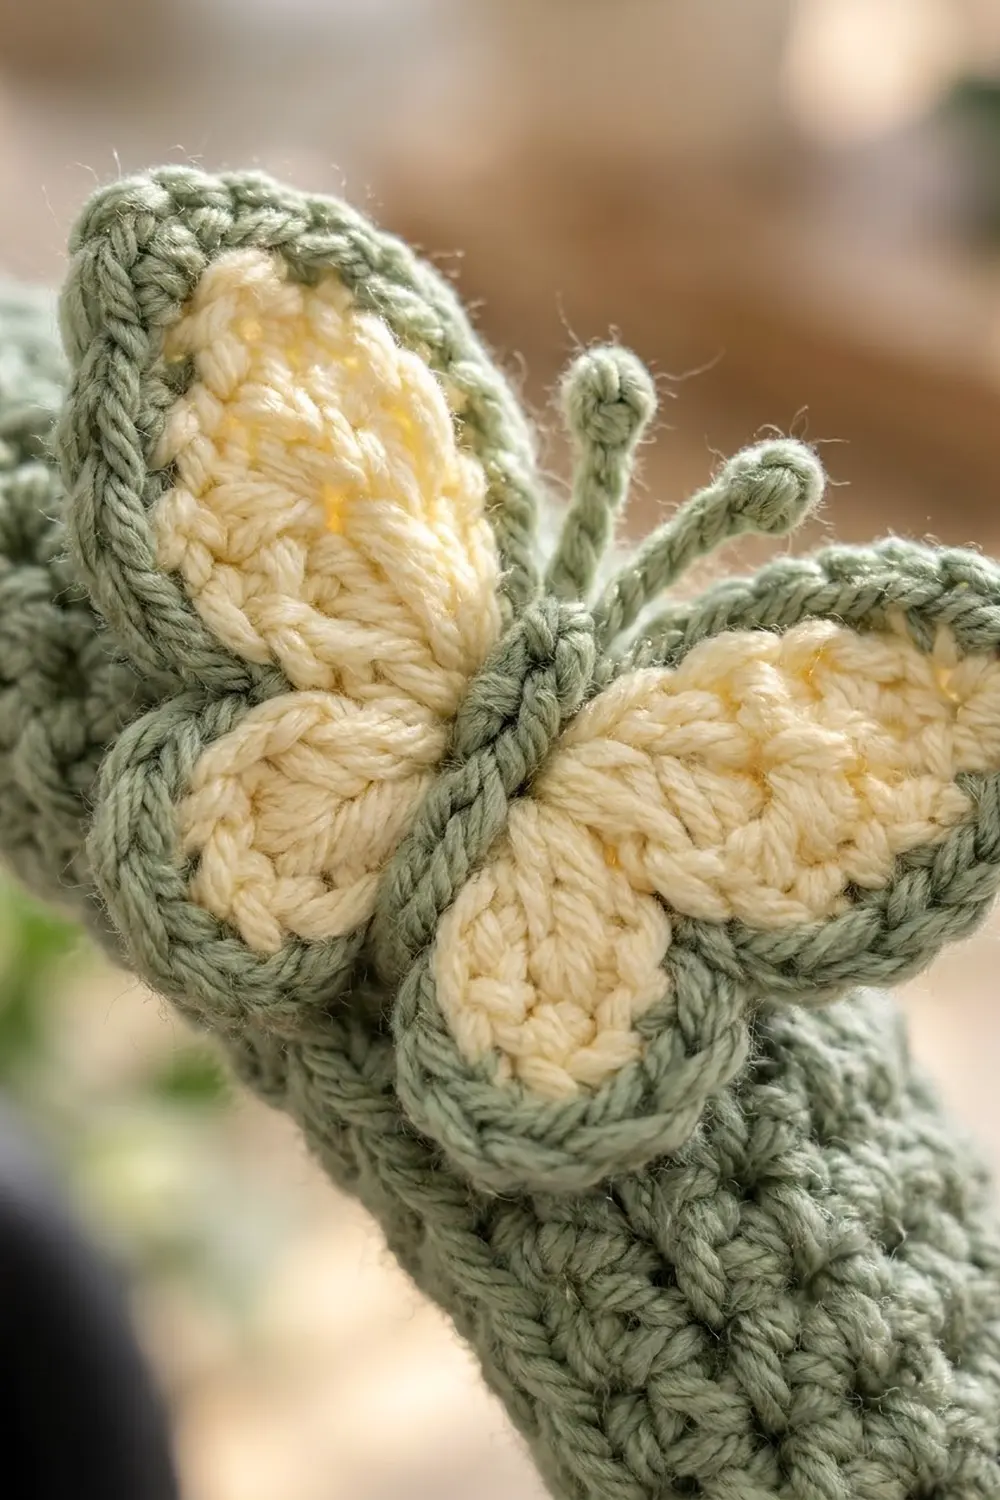
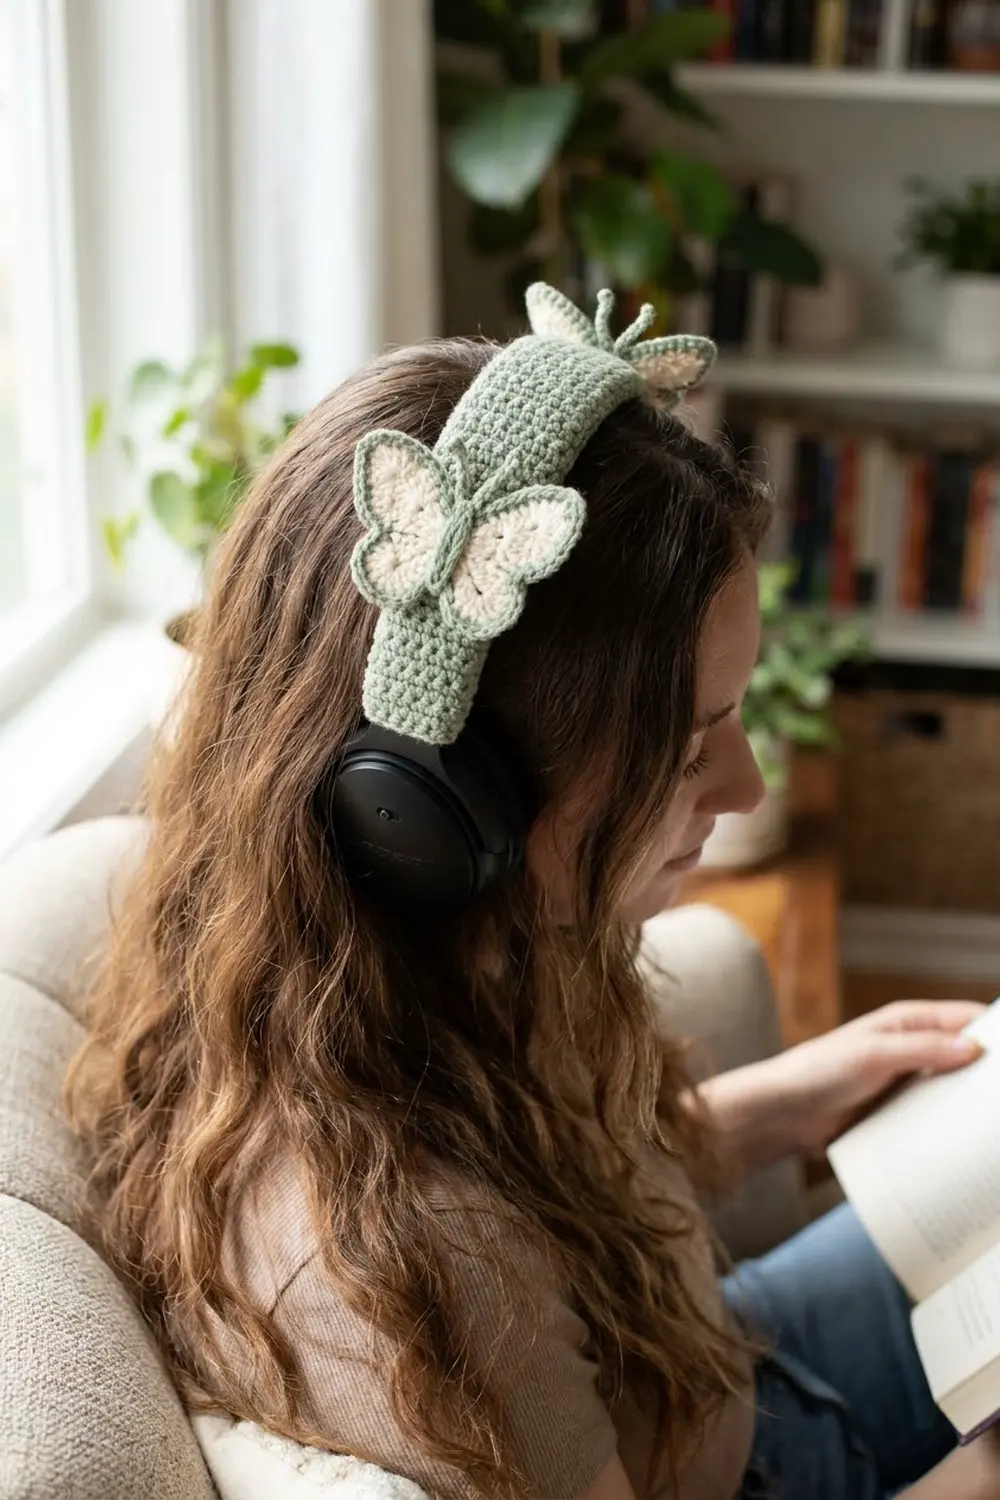
This cover makes a plain pair of black over-ear headphones look soft and spring-like. A sage green single crochet sleeve wraps the headband, and two cream butterflies outlined in sage sit on the upper curve, one on each side.
The pattern uses only two colors. Muted sage green is used for the sleeve, the wing edging and the bodies, and soft cream fills the wing centers. The style is calm and cottage-like, and the cover is easy to wear every day.
This pattern uses US crochet terms. The sleeve measures 3.6 in (9.1 cm) wide x 12.0 in (30.5 cm) long when flat. Each butterfly measures 2.75 in (7.0 cm) wide x 2.25 in (5.7 cm) tall.
Here is the order of work:
– Crochet a flat rectangle in rows and add one border round of single crochet.
– Block the rectangle.
– Wrap it around the headband and whipstitch the long edges together on the underside.
– Work each butterfly in the round from a magic ring, edge it in sage, add a separate body with antennae, and sew it on top of the sleeve.
Finished Size and Construction
- Finished sleeve size: 3.6 in (9.1 cm) x 12.0 in (30.5 cm), measured flat
- Skill level: Easy / advanced beginner
- Terminology: US terms
- Yarn weight: DK (light, #3) cotton or cotton blend
- Hook: 4.0 mm (G-6)
- Number of pieces: 5 (1 sleeve, 2 wing motifs, 2 bodies)
- Layout: Sleeve wrapped around the headband with the seam underneath; 1 butterfly on each side of the arc, on top
- Butterfly size: 2.75 in (7.0 cm) x 2.25 in (5.7 cm)
- Sleeve size before border: 3.1 in (7.9 cm) x 11.6 in (29.5 cm)
- Border depth: about 0.2 in (0.5 cm), 1 round of sc
Materials
Use a smooth DK cotton or cotton blend. Cotton shows the stitches clearly, doesn’t fuzz against your hair, and keeps the wings crisp. Avoid very stretchy acrylic, because it can make the sleeve sag on the headband.
- Color A, sage green: 20 g, about 46 m (sleeve, wing edging, bodies, sewing)
- Color B, cream: 6 g, about 14 m (wing centers)
These amounts include extra yarn for a gauge swatch, sewing tails and small size changes.
Tools:
– 4.0 mm (G-6) crochet hook
– Tapestry needle
– 4 locking stitch markers
– Sewing pins and rust-proof blocking pins
– Blocking mat, scissors, tape measure
Abbreviations (US Terms)
- ch – chain
- sl st – slip stitch
- sc – single crochet
- hdc – half double crochet
- dc – double crochet
- tr – treble crochet
- sp – space
- st(s) – stitch(es)
- RS – right side
- MR – magic ring
Special technique – picot tip: Ch 6, then sl st in the 3rd ch from the hook. This closes a tiny loop that forms the round knob at the end of each antenna.
Gauge and Checkpoints
Gauge: 18 sc and 18 rows = 4 in (10.2 cm), in sc worked in rows.
At this gauge, each stitch is as tall as it is wide. That is why the border can be worked with 1 sc per row end and still lie flat.
Test one piece first: work Rows 1–18 of the sleeve and measure before you continue.
Checkpoints:
– After Row 1: 14 sc = 3.1 in (7.9 cm) wide
– After Row 18: 4.0 in (10.2 cm) long
– After Row 52: 11.6 in (29.5 cm) long
– After the border: 3.6 in (9.1 cm) x 12.0 in (30.5 cm)
– Butterfly after Rnd 1: about 0.6 in (1.5 cm) across
– Butterfly after Rnd 2: about 2.4 in (6.1 cm) x 1.9 in (4.8 cm)
– Butterfly after Rnd 3: 2.75 in (7.0 cm) x 2.25 in (5.7 cm)
If your swatch is too big, go down to a 3.75 mm (F-5) hook. If it is too small, go up to a 4.5 mm (7) hook. Swatch again until both the stitch gauge and the row gauge match.
Fitting your headphones: Measure the headband along the top of the arc from one slider to the other, then measure around its thickness. This sleeve fits a headband about 12 in (30.5 cm) long and 3.3–3.6 in (8.4–9.1 cm) around. To adjust:
– Each 9 rows you add or remove changes the length by 2.0 in (5.1 cm).
– Each 2 sc you add to the foundation adds about 0.4 in (1.0 cm) of width.
Headband Sleeve
With Color A:
Row 1 (RS): Ch 15. Sc in the 2nd ch from the hook and in each ch across. Turn. (14 sc)
Rows 2–52: Ch 1 (doesn’t count as a st). Sc in each st across. Turn. (14 sc)
Checkpoint: the piece should measure 3.1 in (7.9 cm) x 11.6 in (29.5 cm). Don’t fasten off. Go straight on to the Border section.
To keep the edges straight, always work into the first and last stitch of each row. Count your stitches every 10 rows; there should be 14.
Butterfly Wings (make 2)
The wing motif is worked in the round. Rnd 1 gives 8 base stitches, and each wing uses 2 of them:
– Upper Wing A: sts 1–2
– Lower Wing A: sts 3–4
– Lower Wing B: sts 5–6
– Upper Wing B: sts 7–8
With Color B:
Rnd 1: MR, ch 1, 8 sc in the ring. Sl st to the first sc and pull the ring tight. (8 sc)
Rnd 2 (wings):
– Upper Wing A: Work (ch 3, dc, 2 tr) in the same st as the join. Then work (2 tr, dc, ch 3, sl st) in the next st.
– Lower Wing A: Sl st in the next st. Work (ch 2, hdc, 2 dc) in the same st. Then work (2 dc, hdc, ch 2, sl st) in the next st.
– Lower Wing B: Sl st in the next st, then work as Lower Wing A.
– Upper Wing B: Sl st in the next st, then work as Upper Wing A.
Fasten off Color B. (4 wings with 6 sts each = 24 sts, not counting chains and sl sts)
The upper wings use dc and tr, so they come out taller and wider. The lower wings use hdc and dc, so they stay smaller and rounder. Together they make the classic butterfly shape.
Rnd 3 (edging): With the RS facing you, join Color A with a sl st in the first sc of Rnd 1, at the base of Upper Wing A. Then work:
– Upper Wing A: 2 sc in the ch-3 sp, sc in the dc, 2 sc in each of the next 4 tr, sc in the dc, 2 sc in the ch-3 sp. (14 sc)
– Join: Sl st in the Rnd 1 sc between the wings.
– Lower Wing A: 2 sc in the ch-2 sp, sc in the hdc, sc in the next dc, 2 sc in each of the next 2 dc, sc in the next dc, sc in the hdc, 2 sc in the ch-2 sp. (12 sc)
– Join: Sl st in the Rnd 1 sc between the wings.
– Lower Wing B: Work as Lower Wing A. (12 sc)
– Join: Sl st in the Rnd 1 sc between the wings.
– Upper Wing B: Work as Upper Wing A. (14 sc)
– Close: Sl st to the joining sl st.
Fasten off, leaving a 10 in (25.4 cm) tail. (52 sc + 4 sl sts)
Each sl st dips into the center between two wings. This pulls the wings apart, so each one gets its own rounded outline.
Butterfly Body (make 2)
With Color A:
Rnd 1: Ch 8. Sc in the 2nd ch from the hook, sc in the next 5 ch, and 3 sc in the last ch. Turn the piece and work along the other side of the foundation chain: sc in the next 5 ch, then 2 sc in the last ch. Sl st to the first sc. (16 sc)
Antennae: Work a picot tip (ch 6, sl st in the 3rd ch from the hook). Sl st in each of the next 3 ch, then sl st in the same st on the body. Sl st in the next st and repeat once more for the second antenna.
Fasten off, leaving a 12 in (30.5 cm) tail. The body is about 1.6 in (4.1 cm) long, and each antenna is about 0.75 in (1.9 cm) long. The end with the antennae is the head.
Make All Pieces
Color A (sage): 1 sleeve (52 rows + border), 2 wing edgings (Rnd 3), 2 bodies with antennae
Color B (cream): 2 wing centers (Rnds 1–2)
Layout (top view of the flat sleeve, 12.0 in long):
|<-3.5 in->|                  |<-3.5 in->|
+-----------------------------------------+
|          B1                 B2          |  <- center line
+-----------------------------------------+
 slider end                     slider end
B1 and B2 mark the butterfly centers. Each is 3.5 in (8.9 cm) from its short end and sits on the center line, 1.8 in (4.6 cm) from each long edge. The two centers are 5.0 in (12.7 cm) apart.
Joining
Finish the Border and Final Blocking sections before you join anything. The full order is: sleeve, border, blocking, butterflies, joining.
Step 1 – Body to wings: Place the body vertically over the center of the wings, with the head between the upper wings. Using the body’s tail, whipstitch the edge of the body to Rnd 1 of the wings all the way around. Leave the antennae free so they curve outward.
Step 2 – Butterflies to sleeve:
– Lay the sleeve flat with the RS up.
– Pin each butterfly at its layout position, with the head tilted about 20° outward.
– Using the wing tail, sew through Rnd 1 of the wings and under the body.
– Tack each wing tip down with 1–2 small stitches. Leave the outer wing edges slightly raised for a 3D look.
Step 3 – Sleeve around headband: Place the sleeve over the headband with the butterflies on top. Bring the long edges together on the underside, against the pad.
Each long edge has 56 sts, including both corner center sts. Match the edges stitch to stitch, starting with corner center to corner center. Whipstitch through the back loops of both edges for 56 stitch pairs.
Tension: Pull each stitch only snug enough to close the gap. If you pull too tight, the seam gets shorter and the sleeve twists. Every 10 stitches, check that the seam is still running straight down the middle of the underside.
Size checkpoint: The seam should measure 12.0 in (30.5 cm), and the sleeve should sit smoothly with no gaps. Leave the short ends open so the sliders can still move.
Border
The border uses the same gauge as the sleeve: 18 sc = 4 in (10.2 cm), with 1 sc per row end.
Rnd 1: Continue from Row 52 with the RS facing you. Ch 1, then work:
– Short side 1 (top of Row 52): 3 sc in the first st, sc in the next 12 sts, 3 sc in the last st.
– Long side 1: Sc in the end of each row. (52 sc)
– Short side 2 (foundation chain): 3 sc in the first ch, sc in the next 12 ch, 3 sc in the last ch.
– Long side 2: Sc in the end of each row. (52 sc)
Sl st to the first sc. Fasten off, leaving a 30 in (76.2 cm) tail for the seam.
Total count:
– 4 corners x 3 sc = 12
– 2 short sides x 12 sc = 24
– 2 long sides x 52 sc = 104
– Total: 140 sc
Per-side counts: The corner center is the middle sc of each 3-sc corner group.
– Short side, including both corner centers: 1 + 1 + 12 + 1 + 1 = 16 sts
– Long side, including both corner centers: 1 + 1 + 52 + 1 + 1 = 56 sts
– Check: 2 x 16 + 2 x 56 = 144. Subtract the 4 corner centers that were counted twice and you get 140.
Why the math works: At 18 sc and 18 rows per 4 in (10.2 cm), each row end is as tall as one stitch is wide. So 1 sc per row end exactly matches the length of the side. The 3-sc groups turn each corner by 90° without cupping.
The border adds one stitch-depth to every edge:
– Width: 14 + 2 = 16 sts, which is 3.6 in (9.1 cm).
– Length: 52 + 2 = 54 rows, which is 12.0 in (30.5 cm).
Final Blocking
Block all the pieces flat before they go on the headphones. Never wet-block a piece while it is on the headphones.
- Mist each piece with cool water until it is damp, not soaked.
- Pin the sleeve to 3.6 in (9.1 cm) x 12.0 in (30.5 cm), keeping the long edges straight.
- Pin each wing motif to 2.75 in (7.0 cm) x 2.25 in (5.7 cm), with a pin at every wing tip.
- Shape the antennae into gentle outward curves.
- Let everything dry completely, for at least 6 hours.
- Unpin and measure again. A difference of up to 0.1 in (0.3 cm) is fine.
Final Quality-Control Checklist
- [ ] The sleeve has 52 rows, with 14 sc in every row.
- [ ] The border has 140 sc, with 3 sc at each corner.
- [ ] Each long edge has 56 sts, including the corner centers.
- [ ] Each wing edging has 52 sc + 4 sl sts.
- [ ] The upper wings are clearly larger than the lower wings.
- [ ] Each body is centered, with the head between the upper wings.
- [ ] Each butterfly is 3.5 in (8.9 cm) from its end, and the two mirror each other.
- [ ] The seam runs straight along the underside.
- [ ] All tails are woven in for at least 1.5 in (3.8 cm).
- [ ] The sliders move freely at both ends.
Troubleshooting
Sleeve edges ripple: Your rows are taller than your stitches are wide. In the border, skip 1 row end every 10 rows. Skip the same row ends on both long sides so the edges still match for the seam.
Sleeve is loose on the band: Start with ch 13 for 12 sc instead of 14. In the border, work 10 sc between the corner groups on each short side.
Wings curl forward: The edging is too tight. Work Rnd 3 again with a 4.5 mm (7) hook.
Wings look shapeless: Check that the Rnd 3 sl sts go into the Rnd 1 sc between the wings.
Seam twists: Pin the corner centers together first, then the midpoints, and sew between the pins.
Antennae flop: Stiffen them with a little diluted fabric glue.
Care
For everyday cleaning, spot clean the cover while it’s on the headphones and keep water away from the ear cups. For a deep wash, snip the seam to remove the cover, hand wash it in cool water and dry it flat.
Final Notes
The numbers all follow from the gauge. At 18 sc and 18 rows = 4 in (10.2 cm), the 14-stitch, 52-row sleeve measures 3.1 in (7.9 cm) x 11.6 in (29.5 cm). One border round of 140 sc brings it to 3.6 in (9.1 cm) x 12.0 in (30.5 cm), with 56 matching stitches on each long edge for a neat seam. Two 2.75 in (7.0 cm) butterflies, each placed 3.5 in (8.9 cm) from an end, finish the design. Check each stage against these numbers and the cover will fit snugly.
Happy crocheting!