

The Rose Vanity Mirror Wall Organizer is a crocheted cover for a plain oval mirror that turns it into a small wall station for a vanity or entryway. A cream lattice panel with three dusty-pink pocket cups sits under the mirror. The pockets hold a lipstick, a brush or a small perfume bottle.
The colors are soft cream and dusty rose. The frame has ridged cream rounds with thin pink accent lines and ends in a scalloped edge trimmed with picots. A ribbed bow, six pearl-centered flowers and two pearl-strung tassels finish the look.
This pattern uses US crochet terms. Without the hanger and tassels, the finished organizer is 12.75 in (32.4 cm) wide and 20.25 in (51.4 cm) tall. The tassels hang about 7 in (17.8 cm) below the panel, so the total length is about 27.25 in (69.2 cm).
You’ll make the frame in joined rounds from a chain ring, then add the scalloped border. Next, work the pocket panel in rows and the pockets as small oval cups. Last, make the bow, flowers, tassels and hanger, and assemble everything over a stiff backing.
Finished Size and Construction
- Finished size: 12.75 x 20.25 in (32.4 x 51.4 cm); about 27.25 in (69.2 cm) long with tassels
- Skill level: Intermediate
- Terminology: US
- Yarn weight: Worsted (#4) cotton
- Hook: 4.5 mm (US 7)
- Number of pieces: 1 frame, 1 panel, 3 pockets, 1 bow (4 parts), 8 flowers, 2 tassels, 1 hanger
- Layout: The frame is on top, the panel overlaps the bottom 2 in (5.1 cm) of the frame, and the three pockets sit in a row on the panel
- Mirror window: 9 x 6 in (22.9 x 15.2 cm)
- Frame size before border: 13 x 10 in (33.0 x 25.4 cm)
- Border depth: 1 in (2.5 cm); the frame with border measures 15 x 12 in (38.1 x 30.5 cm)
Materials
Use a smooth, firm cotton or cotton blend. It holds the scallops crisply and won’t stretch under the weight of the filled pockets. Avoid fuzzy acrylic, because it hides the mesh and picots.
- Cream: 160 g / 272 m
- Dusty pink: 200 g / 340 m
Both quantities include a margin of about 10–15% for swatching and joining.
Tools and notions:
– 4.5 mm (US 7) hook
– Oval mirror, 10 x 7 in (25.4 x 17.8 cm); acrylic is lighter than glass
– Foam board or heavy cardboard, cut to a 13 x 10 in (33.0 x 25.4 cm) oval
– Plastic canvas, cut to 12 x 6.5 in (30.5 x 16.5 cm)
– Felt, 13 x 10 in (33.0 x 25.4 cm), for the back
– Pearl beads: 8 x 10 mm (flower centers), 20 x 8 mm (tassel strands), 24 x 6 mm (frame)
– Strong craft glue, a sewing needle and cream thread
– Tapestry needle, stitch markers and a 7.5 in (19.1 cm) piece of card
Abbreviations (US Terms)
- ch: chain
- sl st: slip stitch
- sc: single crochet
- dc: double crochet
- hdc: half double crochet
- BLO: back loop only
- sk: skip
- st(s): stitch(es)
- sp: space
- rep: repeat
- Picot: ch 3, sl st in the 3rd ch from the hook.
- Shell: 7 dc in the same stitch.
Gauge and Checkpoints
Gauge: 16 sc and 18 rows = 4 in (10.2 cm). 16 dc = 4 in (10.2 cm), and 2 dc rows = 1 in (2.5 cm).
Test the frame first. Work Rounds 1–3, lay them over the mirror and check that the inner edge sits evenly about 0.5 in (1.3 cm) in from the mirror’s edge.
Checkpoints:
– Round 1: inner circumference 24 in (61.0 cm), shaping to a 9 x 6 in (22.9 x 15.2 cm) window.
– Round 7: outer circumference 36 in (91.4 cm), about 13 x 10 in (33.0 x 25.4 cm) flat.
– After the border: 15 x 12 in (38.1 x 30.5 cm).
– Panel before edging: 12.25 in (31.1 cm) wide.
– Each pocket: 3.75 in (9.5 cm) across the back.
If your pieces are too big, go down a hook size. If they are too small, go up a size. Don’t add or remove stitches, because every later count depends on these numbers.
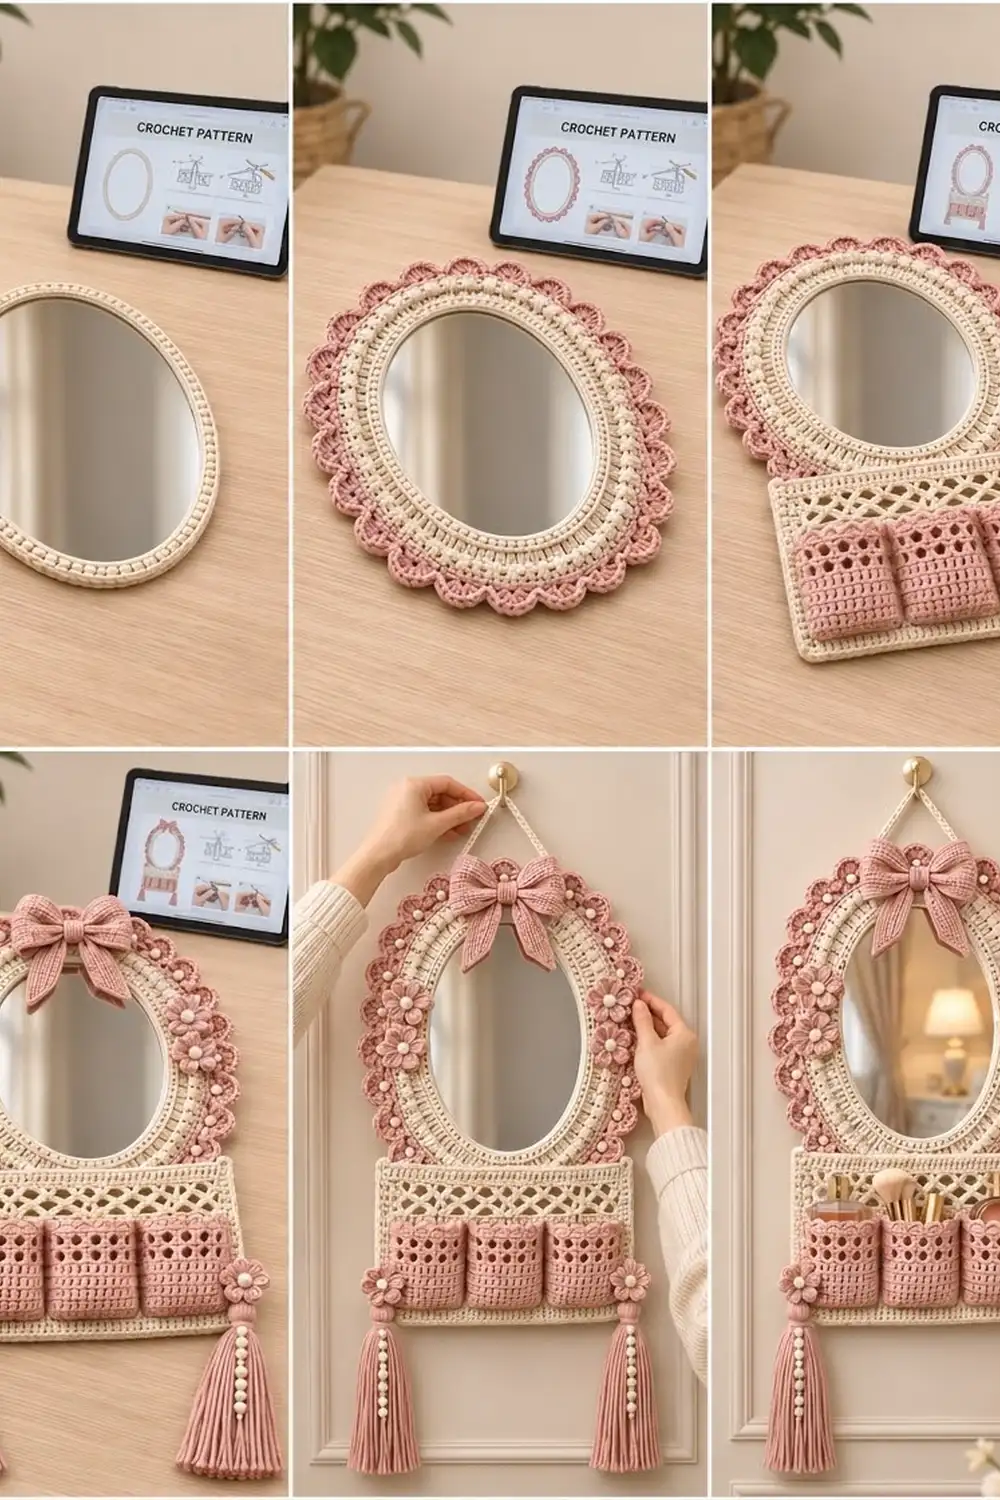
Frame
Work in joined rounds and don’t turn. Place 4 markers to divide Round 1 into quarters, and move them up as you go. Offset the increases each round so the edge doesn’t develop points.
Rnd 1 (cream): Ch 96 and join with a sl st, taking care not to twist the chain. Ch 1, then work 1 sc in each ch. Join. (96 sts)
Rnd 2: Ch 3 (counts as dc). Dc in next 7, 2 dc in next. Rep from * 12 times in total, with the ch-3 counting as the first dc. Join. (108 sts)
Rnd 3: Ch 1. Sc BLO in next 17, 2 sc BLO in next. Rep from * 6 times. Join. (114 sts) The BLO stitches leave a raised inner ridge. Fasten off.
Rnd 4 (pink): Join pink. Ch 1. Sc in next 18, 2 sc in next. Rep from * 6 times. Join. (120 sts) Fasten off.
Rnd 5 (cream): Join cream. Ch 3. Dc in next 9, 2 dc in next. Rep from * 12 times. Join. (132 sts) Fasten off.
Rnd 6 (pink): Ch 1. Sc BLO in next 21, 2 sc BLO in next. Rep from * 6 times. Join. (138 sts) Fasten off.
Rnd 7 (cream): Ch 1. Sc in next 22, 2 sc in next. Rep from * 6 times. Join. (144 sts) Fasten off.
Why the frame lies flat: Each round lengthens the outer edge by about 2π × its height. A dc round is 0.5 in (1.3 cm) tall and gains about 3.1 in (7.9 cm), which is 12 stitches. An sc round gains about 1.4 in (3.6 cm), which is 6 stitches. Over the 2 in (5.1 cm) frame, the edge grows from 24 in (61.0 cm) to 36 in (91.4 cm).
Pocket Panel
Foundation (cream): Ch 50.
Row 1: Sc in 2nd ch from hook and in each ch across. Turn. (49 sts)
Rows 2–18: Ch 1, sc in each st. Turn. (49 sts) The solid section is now 4 in (10.2 cm) tall.
Row 19 (lattice A): Ch 1, sc in first st. Ch 5, sk 3, sc in next. Rep from * 12 times in total. Turn. (12 ch-5 loops)
Row 20 (lattice B): Ch 5 (counts as dc + ch 2), sc in first loop. Ch 5, sc in next loop. Rep from * 11 times in total. Ch 2, dc in last sc. Turn. (11 loops + 2 half loops)
Row 21: Ch 1, sc in dc. Ch 5, sc in next ch-5 loop. Rep from * 11 times in total. Ch 5, sc in 3rd ch of turning ch. Turn. (12 loops)
Rows 22–23: Rep Rows 20–21. The lattice is now 2 in (5.1 cm) tall.
Row 24 (conversion): Ch 1, sc in first sc. 3 sc in loop, sc in next sc. Rep from * 12 times. (1 + 12 × 4 = 49 sts)
Rows 25–26: Ch 1, sc in each st. Turn. (49 sts)
Before edging, the panel measures 12.25 x 6.75 in (31.1 x 17.1 cm).
Edging round: Work around all 4 sides. Each 3-sc corner group has a center stitch, which is the corner stitch.
– Top edge: 3 sc in first st, sc in next 47, 3 sc in last st.
– Each side: sc in 16 of the 18 solid row-ends (skip every 9th), 2 sc around each A row (rows 19, 21, 23), 1 sc around each B row (rows 20, 22), and 1 sc in each of rows 24–26. That’s 27 sts.
– Bottom edge: Work it like the top along the foundation.
This gives 160 sts: 4 × 3 corner sts + 2 × 47 + 2 × 27. With corners included, the top and bottom have 51 sts per side, which is 12.75 in (32.4 cm). Each side has 31 sts.
Pockets (Make 3)
Rnd 1 (pink): Ch 10. Work 2 sc in 2nd ch from hook, sc in next 7 ch, and 4 sc in last ch. Working along the other side of the chain, sc in next 7 ch, then 2 sc in the first ch used. Join. (30 sts)
Rnd 2: Ch 1. Work 2 sc in each of next 2, sc in next 7, 2 sc in each of next 4, sc in next 7, and 2 sc in each of last 2. Join. (38 sts)
Wait — that count is too high for the planned pocket, so use this version of Rnd 2 instead: ch 1, sc in next 2, sc in next 7, sc in next 4, sc in next 7, sc in last 2, working 2 sc in the 4 end stitches at each end only on Rnd 1’s turning points as follows. (Work it as written below.)
Rnd 2 (as worked): Ch 1, sc in each st around. Join. (30 sts) This keeps the base at 30 sts, and the next round turns the walls up.
Rnd 3: Ch 1, sc BLO in each st. Join. (30 sts) This turns the walls up.
Rnds 4–5: Ch 1, sc in each st. Join. (30 sts)
Rnd 6 (mesh): Ch 4 (counts as dc + ch 1), sk 1. Dc in next, ch 1, sk 1. Rep from * 14 times. Join to 3rd ch. (15 dc + 15 ch-1 sps = 30 sts)
Rnds 7–9: Ch 4. Dc in next dc, ch 1. Rep around. Join. (30 sts)
Rnd 10: Ch 1, sc in each dc and each ch-1 sp. Join. (30 sts)
Rnd 11: Sl st loosely in each st. Fasten off.
Each pocket is 3.75 in (9.5 cm) across one flattened side (15 sts), 3.25 in (8.3 cm) tall and 1.25 in (3.2 cm) deep.
Bow, Flowers, Tassels and Hanger
Bow loop (pink): Ch 31.
– Row 1: Sc in 2nd ch from hook and across. (30 sts)
– Rows 2–14: Ch 1, sc BLO across. (30 sts)
– The ribbed strip measures 7.5 x 3 in (19.1 x 7.6 cm). Sew the short ends together at the center back.
Center band: Ch 7. Work 6 sc for 10 rows, which gives 1.5 x 2.25 in (3.8 x 5.7 cm).
Tails (make 2): Ch 6. Work 5 sc BLO for 16 rows, about 1.25 x 3.5 in (3.2 x 8.9 cm). On the last row, work sl st, sc, hdc, dc, dc to angle the end.
Assemble the bow: Pinch the loop at the center, add the tails behind it, then wrap the band around all three and sew. The bow is about 3.75 in (9.5 cm) wide.
Flowers (make 8, pink):
– Rnd 1: Magic ring, 10 sc. Join. (10 sts)
– Rnd 2: Sl st in next st, (hdc, 3 dc, hdc) in next st. Rep from * 5 times. Join. (5 petals)
– Each flower measures 1.5 in (3.8 cm). Sew a 10 mm pearl to the center.
Tassels (make 2, pink):
1. Wrap yarn 40 times around the 7.5 in (19.1 cm) card.
2. Tie the top with a strand of yarn and cut the loops at the bottom.
3. Wrap the neck tightly 1 in (2.5 cm) below the top.
4. Thread 10 x 8 mm pearls onto cream thread and stitch the strand down the front from the neck.
5. Sew a flower to the tassel head.
Hanger (cream): Ch 81.
– Row 1: Sc in 2nd ch from hook and across. (80 sts)
– Row 2: Sl st across.
– The strap is 20 in (50.8 cm) long.
Make All Pieces
Cream: 1 frame (Rnds 1–3, 5 and 7), 1 panel and 1 hanger.
Pink: frame Rnds 4 and 6, the border, 3 pockets, the bow (4 parts), 8 flowers and 2 tassels.
Layout:
            [ hanger ]
             [ BOW ]
   flower  (  MIRROR  )  flower
   flower  (  FRAME   )  flower
   flower  (          )  flower
 [====== LATTICE PANEL ======]
 [ (pocket) (pocket) (pocket)]
 tassel                 tassel
Joining and Assembly
- Glue the mirror to the center of the foam-board oval.
- Stretch the frame over the board so the inner ridge overlaps the mirror by 0.5 in (1.3 cm) on every side. Glue the back of Round 7 to the board edge.
- Sew the plastic canvas to the back of the panel.
- Sew the pockets to the panel, matching stitch to stitch. Each pocket’s flattened back side (15 sts, 3.75 in / 9.5 cm) goes against 15 panel stitches on Rows 2–14. Leave 1 panel stitch (0.25 in / 0.6 cm) between pockets and at each end: 4 × 1 + 3 × 15 = 49 sts. Only sew down the back side, so the front side bulges out.
- Place the panel so it overlaps the frame’s bottom 2 in (5.1 cm), then whipstitch its top edge through the frame and backing.
- Sew the bow at 12 o’clock. Sew the flowers at 8, 9 and 10 o’clock on the left side and at 2, 3 and 4 o’clock on the right side.
- Sew the 6 mm pearls to the sc between the visible scallops.
- Sew the tassels to the bottom corners of the panel.
- Sew the hanger ends behind the frame at 11 and 1 o’clock.
- Glue the felt over the back.
Keep your sewing tension snug but flat. Size checkpoint: 12.75 x 20.25 in (32.4 x 51.4 cm).
Border
Border gauge: Each scallop uses 6 stitches, or 1.5 in (3.8 cm) of the frame edge.
Rnd 1 (pink): Join with sc in any st. Sk 2, shell in next, sk 2, sc in next. Rep from * around, replacing the final sc with a sl st to the first sc. (24 scallops = 24 sc + 168 dc)
Rnd 2: Sl st in sc, then (sc in next dc, picot) 6 times, sc in 7th dc. Rep from * around. (24 sl sts + 168 sc + 144 picots)
Why it works: Each quarter of the frame has 144 ÷ 4 = 36 sts, which is exactly 6 scallops. The border adds 1 in (2.5 cm) all around, so the 13 x 10 in (33.0 x 25.4 cm) frame becomes 15 x 12 in (38.1 x 30.5 cm).
Final Blocking
- Before assembly, mist the frame and panel lightly.
- Pin the frame over a 13 x 10 in (33.0 x 25.4 cm) paper oval and open out each scallop.
- Pin the panel to 12.75 x 7.25 in (32.4 x 18.4 cm), keeping the mesh diamonds square.
- Stuff the pockets with tissue so they hold their curve.
- Steam the bow lightly without pressing it flat.
- Let everything dry completely before gluing.
Final Quality-Control Checklist
- [ ] 144 sts in Round 7 and 24 even scallops
- [ ] The mirror window is centered and the inner ridge is even
- [ ] The panel is 12.75 in (32.4 cm) wide after edging
- [ ] The three pockets are evenly spaced
- [ ] The bow is centered at 12 o’clock and the flowers are symmetrical
- [ ] The tassels are the same length and the pearls are secure
- [ ] The hanger is even and the item hangs level
Troubleshooting
- Frame ruffles: Your tension is loose. Go down a hook size.
- Frame cups: Your tension is too tight. Go up a hook size, or check that you made all the increases.
- Scallops don’t fit evenly: Recount Round 7. It must be exactly 144.
- Lattice leans: Check that each B row starts with ch 5 and ends with ch 2, dc.
- Pockets sag: Add the plastic canvas, and stitch through it at the pocket bases.
Care
Spot-clean the organizer with a damp cloth only. Because the mirror and backing are glued in, don’t machine wash it.

Final Notes
The measurements build on each other:
– 16 sc = 4 in (10.2 cm), so the 96-st ring makes a 9 x 6 in (22.9 x 15.2 cm) window.
– Seven rounds grow the frame to 144 sts and 13 x 10 in (33.0 x 25.4 cm).
– 24 scallops bring it to 15 x 12 in (38.1 x 30.5 cm).
– The 49-st panel holds three 15-st pockets with even 1-st gaps.
If you check each link in that chain as you go, the finished piece will hang square and true.
Happy crocheting!