

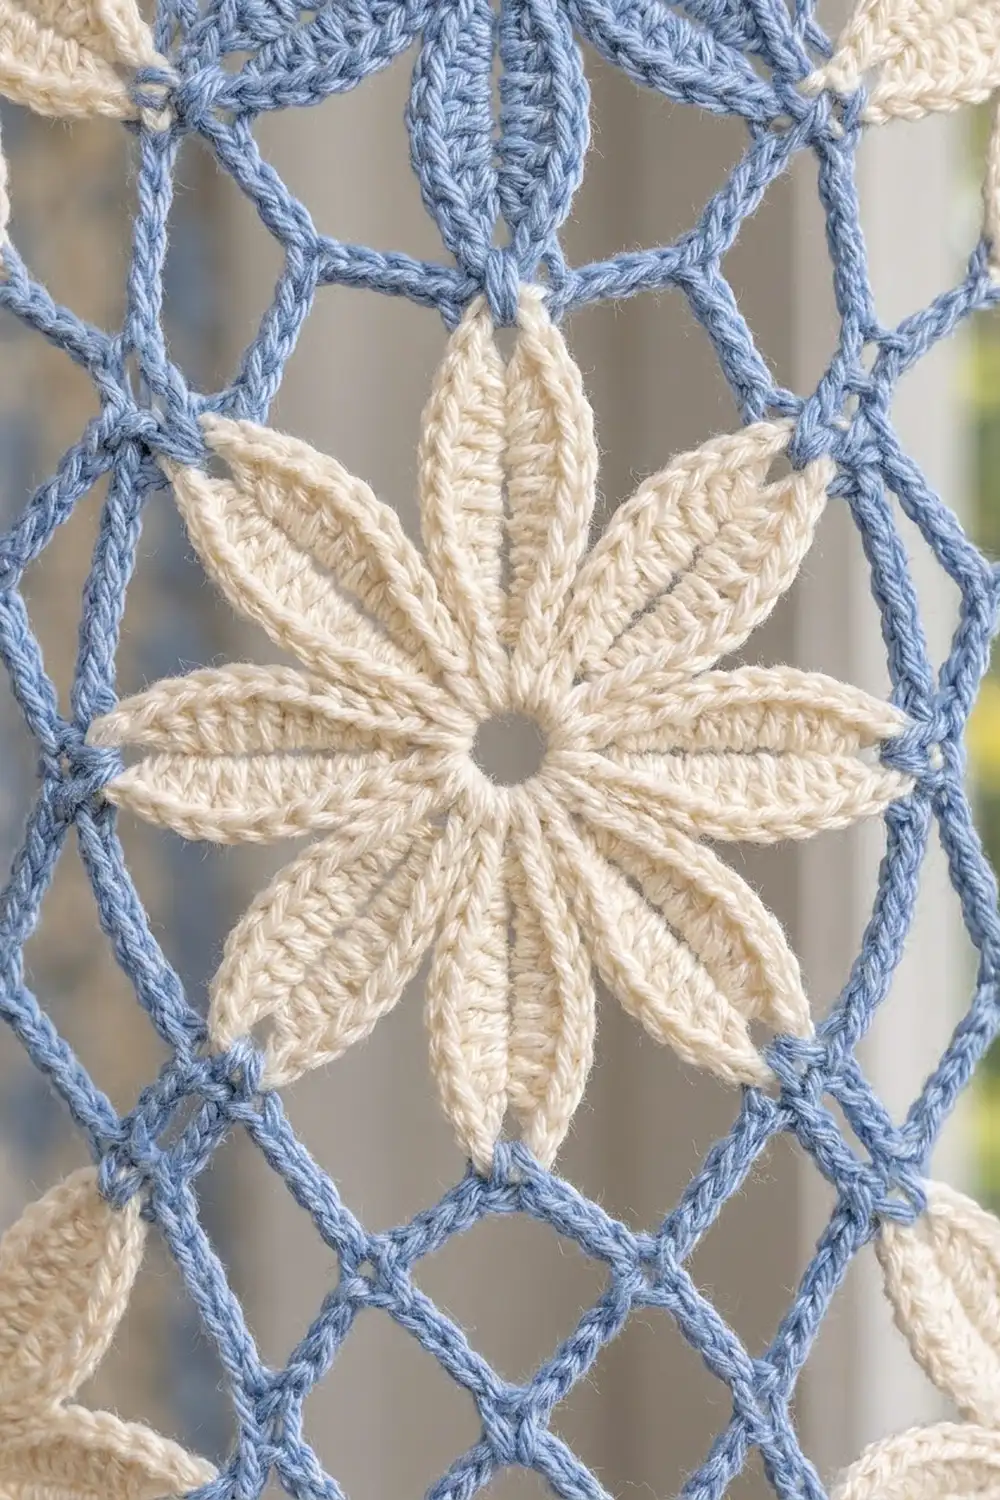
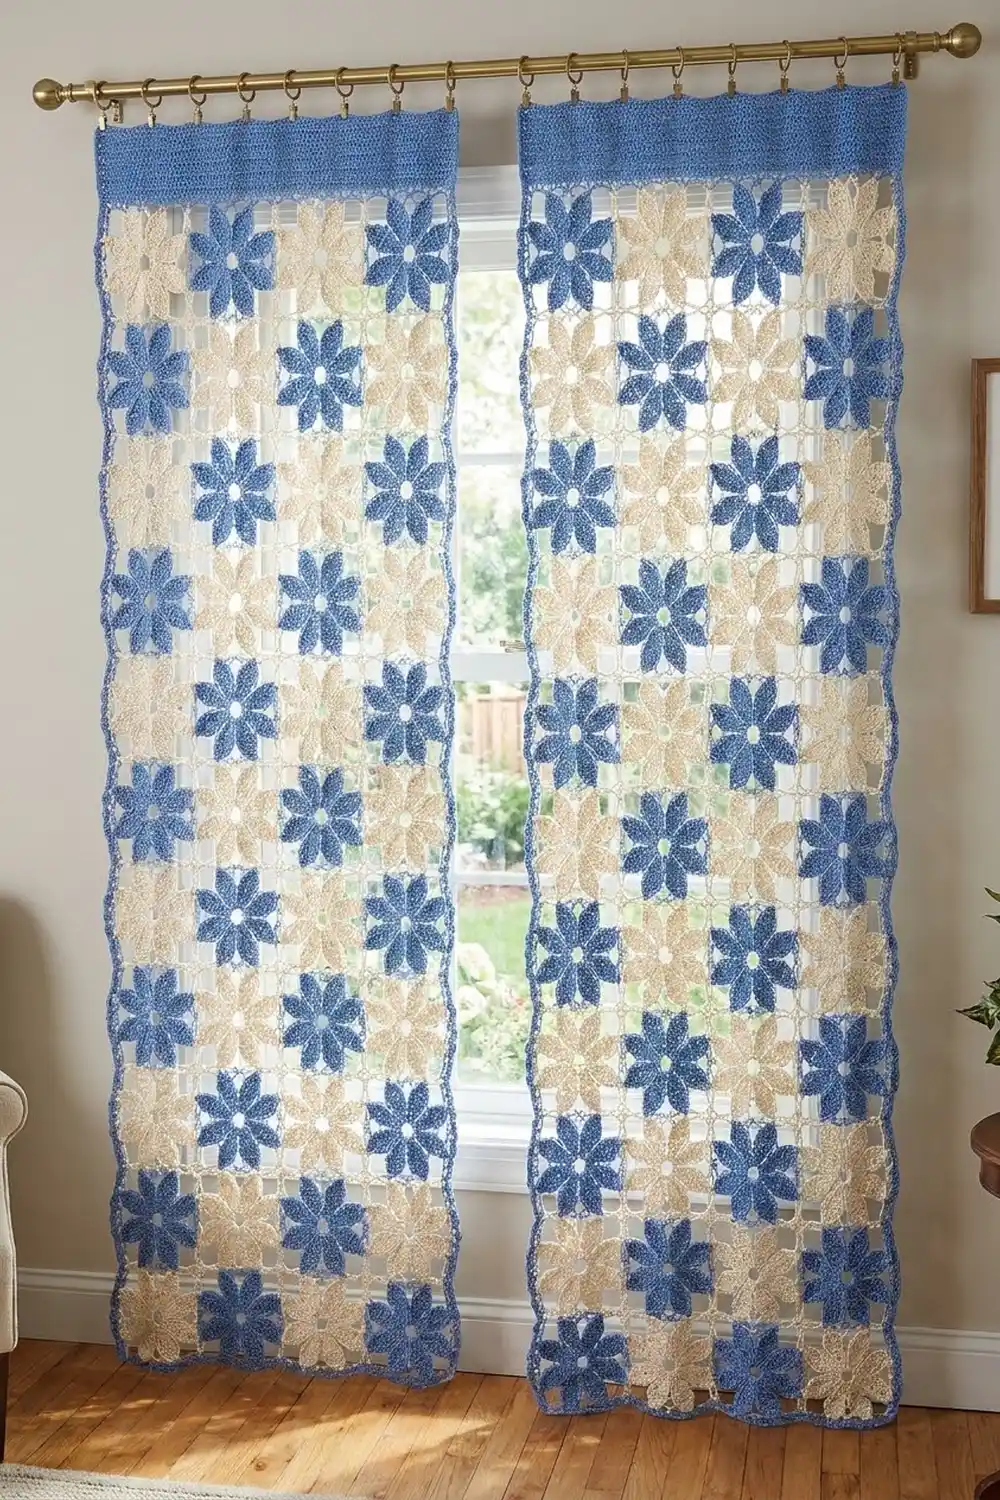
This lace curtain panel is made from six-petal flower motifs in soft cornflower blue and creamy ivory, set out in a checkerboard. Open chain mesh joins the motifs at their petal tips and corners, which leaves diamond-shaped windows between the flowers for daylight to shine through. A solid blue band of double crochet runs across the top. It takes clip rings, so the panel hangs easily from any rod.
The style is cottage and summery, and the panel also works as a window screen or a sheer room divider. Each flower has a small open center ring and long, pointed petals made from graduated stitches, with a short chain point at every tip.
This pattern uses US crochet terms. One finished panel measures 35 in (88.9 cm) wide by 77 in (195.6 cm) long, header included. The photo shows a matching pair of panels, so make two for the same result.
Construction is simple. Complete one motif, then join each new motif to its neighbors in its last round (join-as-you-go). When all 105 motifs are joined, work a 2 in (5.1 cm) header band straight across the top edge.
Finished Size and Construction
- Finished panel size: 35 in x 77 in (88.9 cm x 195.6 cm)
- Skill level: Intermediate
- Terminology: US crochet terms
- Yarn weight: DK (light #3) cotton or cotton blend
- Hook: 4.0 mm (G-6)
- Number of pieces: 105 flower motifs, joined into one panel
- Layout: 7 motifs across x 15 motifs down, checkerboard
- Motif size (blocked): 5 in x 5 in (12.7 cm x 12.7 cm)
- Size before border: 35 in x 75 in (88.9 cm x 190.5 cm)
- Border (header) depth: 2 in (5.1 cm), top edge only
Materials
Use a smooth, mercerized or combed DK cotton. Cotton gives crisp stitch definition and holds its shape in a window. It also stretches less than acrylic, which matters in a long hanging piece. The quantities below assume about 115 m per 50 g.
- Color B (cornflower blue): 400 g / 920 m, for 53 motifs plus the header
- Color C (ivory cream): 300 g / 690 m, for 52 motifs
Each motif uses about 5 g (11.5 m). The quantities include a safety margin of roughly 15-20% for your gauge motif and for weaving in ends. Double everything for a pair of panels. Buy each color from a single dye lot, because small shade differences show clearly when light comes through lace.
Tools:
- 4.0 mm (G-6) crochet hook
- Tapestry needle
- Scissors
- Rustproof blocking pins and foam mats
- Spray bottle
- Tape measure
- 11 curtain clip rings and a curtain rod
Abbreviations (US Terms)
- ch – chain
- sl st – slip stitch
- sc – single crochet
- hdc – half double crochet
- dc – double crochet
- tr – treble crochet (yarn over twice)
- sp(s) – space(s)
- sk – skip
- RS – right side
Special stitches:
- Tip: (sc, ch 3, sc) in the ch-3 tip sp of a petal.
- Corner ring: ch 6, sl st in the 6th ch from hook. This makes a small floating loop.
- Joined tip: in the tip sp, work (sc, ch 1, sl st in the neighbor’s matching tip sp, ch 1, sc).
- Joined corner ring: ch 3, sl st in the neighbor’s corner ring, ch 3, sl st in the 1st of these 6 ch.
Gauge and Checkpoints
Make one complete motif and block it before you start the panel. Every later measurement depends on this motif.
- After Rnd 1: the center disc measures 1 in (2.5 cm) across.
- After Rnd 3: the flower measures 4 in (10.2 cm) from tip to opposite tip.
- After Rnd 4, unblocked: about 4.75 in (12.1 cm) square.
- After Rnd 4, blocked: 5 in x 5 in (12.7 cm x 12.7 cm), measured from corner ring to corner ring.
Measure only after the motif has been wet-blocked and is fully dry, because cotton lace relaxes noticeably. Measure across the middle and along both edges.
If your motif is larger than 5 in (12.7 cm), change to a 3.75 mm hook. If it is smaller, change to a 4.5 mm hook. Being off by just 0.25 in (0.6 cm) per motif adds up to 1.75 in (4.4 cm) across the width and 3.75 in (9.5 cm) down the length, so this check matters.
Flower Motif
Make every motif this way, using one color per motif and following the layout for which color.
Rnd 1 (RS): Make a magic ring. Ch 3 (counts as dc), work 11 dc in the ring, and sl st to the top of the beginning ch-3. Pull the ring snug, but leave a small open center. (12 dc)
Rnd 2: Ch 1, sc in the same st, ch 9, sk next dc. Sc in next dc, ch 9, sk next dc. Repeat from * to * 4 more times. Sl st to the first sc. (6 sc, 6 ch-9 loops)
Rnd 3 (petals): Sl st in the first ch-9 loop. In each ch-9 loop, work (sc, hdc, 2 dc, 2 tr, ch 3, 2 tr, 2 dc, hdc, sc). Sl st to the first sc. (72 sts and 6 ch-3 tip sps; 12 sts per petal)
The graduated stitches pinch each ch-9 loop into a long, pointed petal, and the ch-3 at the top becomes the petal tip. Check: 4 in (10.2 cm) from tip to opposite tip.
Rnd 4 (mesh frame): Turn the flower so one petal points straight to the right. This is Tip 1. Count the other tips counterclockwise as Tips 2 to 6:
- Tips 2 and 3 point up-right and up-left.
- Tip 4 points left.
- Tips 5 and 6 point down-left and down-right.
Sl st across to the ch-3 sp of Tip 1. Ch 1, then work as follows:
- Tip in Tip 1. Ch 10, corner ring, ch 4.
- Tip in Tip 2. Ch 7.
- Tip in Tip 3. Ch 4, corner ring, ch 10.
- Tip in Tip 4. Ch 10, corner ring, ch 4.
- Tip in Tip 5. Ch 7.
- Tip in Tip 6. Ch 4, corner ring, ch 10.
- Sl st to the first sc. Fasten off.
(12 sc, 6 ch-3 tip sps, 4 corner rings, 70 connecting ch)
The two ch-7 spans form the flat top and bottom edges. Each ch-10 span runs from a corner to a side tip. Together, the four corner rings pull the six-pointed flower into a square frame.
Top edge per motif: Reading from one upper corner ring to the other, the top edge is corner ring, ch 4, Tip 2, ch 7, Tip 3, ch 4, corner ring. The header is worked along this edge, which gives 27 sts per motif (see Border).
Make All Pieces
- Color B (blue): 53 motifs
- Color C (cream): 52 motifs
- Total: 105 motifs
Make the first motif in full. For every other motif, work Rnds 1-3, then work Rnd 4 as a joining round (see Joining).
Layout (7 across x 15 down):
Row 1:  B C B C B C B
Row 2:  C B C B C B C
Row 3:  B C B C B C B
Row 4:  C B C B C B C
...continue alternating...
Row 15: B C B C B C B
Odd rows have 4 B and 3 C motifs. Even rows have 3 B and 4 C motifs. With 8 odd rows and 7 even rows, you need (8 x 4) + (7 x 3) = 53 B motifs and (8 x 3) + (7 x 4) = 52 C motifs.
Joining
Join motifs during Rnd 4 with a sl st through the matching tip sp or corner ring. Work the round as written, but use a joined tip or joined corner ring wherever the new motif meets a finished one.
Order of work: Build the panel row by row, starting at the top-left motif and working to the right. Each motif in the first row joins only to the motif on its left. From the second row on, each motif joins to the motif above it, and every motif after the first in its row also joins to the motif on its left.
Side-by-side join (left neighbor): The new motif’s Tip 4 joins the neighbor’s Tip 1. The new motif’s upper-left corner ring joins the neighbor’s upper-right corner ring, and its lower-left corner ring joins the neighbor’s lower-right corner ring.
Top join (neighbor above): The new motif’s Tip 2 joins Tip 6 of the motif above, and its Tip 3 joins Tip 5 of the motif above. The new motif’s upper-left and upper-right corner rings join the lower-left and lower-right corner rings of the motif above.
Four-way corners: Where three motifs already meet at a corner, sl st into the ring that is already joined. All four rings then share one join point, and the corner stays flat.
Stitch logic: Each join replaces the center chain of a ch-3 or ch-6 with a sl st, so the chain length stays the same and the motif keeps its size. The ch-7 and ch-10 spans are never joined. They form the open diamond mesh between the flowers.
Tension: Keep the joining sl sts loose and even. Tight joins pucker the corners and pull the panel narrower. Lay the work flat after each row of motifs to check it.
Checkpoints:
- After the first row of 7 motifs, the strip measures 35 in (88.9 cm) wide after a light press.
- After 4 rows, the panel measures 20 in (50.8 cm) from top to bottom.
- The fully joined panel measures 35 in x 75 in (88.9 cm x 190.5 cm).
Border (Header Band)
Work the header along the top edge only. Leave the sides and bottom as open lace.
Border gauge:
- 27 sc = 5 in (12.7 cm) across
- 1 dc row = 0.375 in (1.0 cm) tall
- 1 sc row = 0.25 in (0.6 cm) tall
Per-motif top count: 27 sts. This includes 1 sc in each of that motif’s own two upper corner rings. At a seam, the two joined rings belong to different motifs, so each ring gets its own sc. No extra seam stitches are added.
Row 1 (RS): With B, join yarn in the upper-right corner ring of the top-right motif and ch 1. Work across each motif as follows:
- 1 sc in the right corner ring
- 4 sc in the ch-4
- Tip 2: sc in sc, 3 sc in the ch-3 sp, sc in sc (5 sc)
- 7 sc in the ch-7
- Tip 3: 5 sc, worked as for Tip 2
- 4 sc in the ch-4
- 1 sc in the left corner ring
(1 + 4 + 5 + 7 + 5 + 4 + 1 = 27 sc per motif; 7 x 27 = 189 sc) Turn.
Rows 2-5: Ch 3 (counts as dc), dc in each st across. Turn. (189 dc in each row)
Row 6: Ch 1, sc in each st across. Fasten off. (189 sc)
Why the math works:
- Width: 189 sts at 27 sts per 5 in (12.7 cm) is 35 in (88.9 cm), the same as the 7-motif width.
- Depth: 0.25 in + (4 x 0.375 in) + 0.25 in = 2 in (5.1 cm), which makes the panel 75 in + 2 in = 77 in (195.6 cm) long.
- Shape: every row has 189 sts, so the header stays straight and does not flare.
Hanging: Clip 11 rings to the header, one at each end and the rest 3.5 in (8.9 cm) apart. That makes 10 gaps x 3.5 in = 35 in (88.9 cm).
Final Blocking
- Weave in all ends along chain spans or the backs of petals, never across the open centers.
- Soak the panel in cool water for 15 minutes, then press the water out gently. Do not wring it.
- Roll the panel in towels to remove more water.
- Lay it flat on the mats, right side up. Block it in sections if you are short of space.
- Pin the header straight to 35 in (88.9 cm).
- Pin the columns of corner rings into straight lines 5 in (12.7 cm) apart.
- Pin each petal tip outward so the flowers sit open and even.
- Let the panel dry completely, then unpin it.
Final Quality-Control Checklist
- Every motif has 6 petals, 6 tips, and 4 corner rings.
- The checkerboard is correct, with no two same-color motifs side by side.
- Every tip and corner join is secure, and none were skipped.
- Every header row has 189 sts.
- The panel measures 35 in x 77 in (88.9 cm x 195.6 cm).
- All ends are woven in and hidden from the right side.
- The header lies straight, with no waves or gathers.
Troubleshooting
Petals look rounded instead of pointed: The ch-9 loops are too loose or the tr stitches are too short. Pull each tr up to full height and keep your chains firm.
Motif is rectangular, not square: The ch-10 side spans are tighter than the ch-7 top span. Chain with even tension, or pin the side tips out further when blocking.
Corners pucker: The joins are too tight. Redo them with looser sl sts.
Gaps at four-way corners: A ring was joined to the wrong loop. Every ring at that corner should share one join point.
Header waves: There are more than 189 sts. Count each motif section, which should have 27.
Header pulls the lace in: Your sc is too tight. Use a 4.5 mm hook for Row 1 only.
Panel stretches after hanging: Cotton can drop a little under its own weight. Re-block the panel and add more clip rings to spread the load.
Blue tints the cream: Wash a scrap of blue before you start. If the color runs, use a color-catcher sheet when you wash the panel.
Care
Hand wash in cool water with a mild detergent and dry flat, pinning the header straight again. Do not tumble dry, because the heat can shrink the cotton and distort the motifs.
Final Notes
Here is the measurement chain:
- One motif blocks to 5 in (12.7 cm) square.
- Seven motifs across make 35 in (88.9 cm), and fifteen motifs down make 75 in (190.5 cm).
- Each motif gives 27 header stitches, for 189 across.
- The 2 in (5.1 cm) header brings the panel to 77 in (195.6 cm).
If your first motif is accurate, every later stage will be too. Make a second panel to complete the pair.
Happy crocheting!