

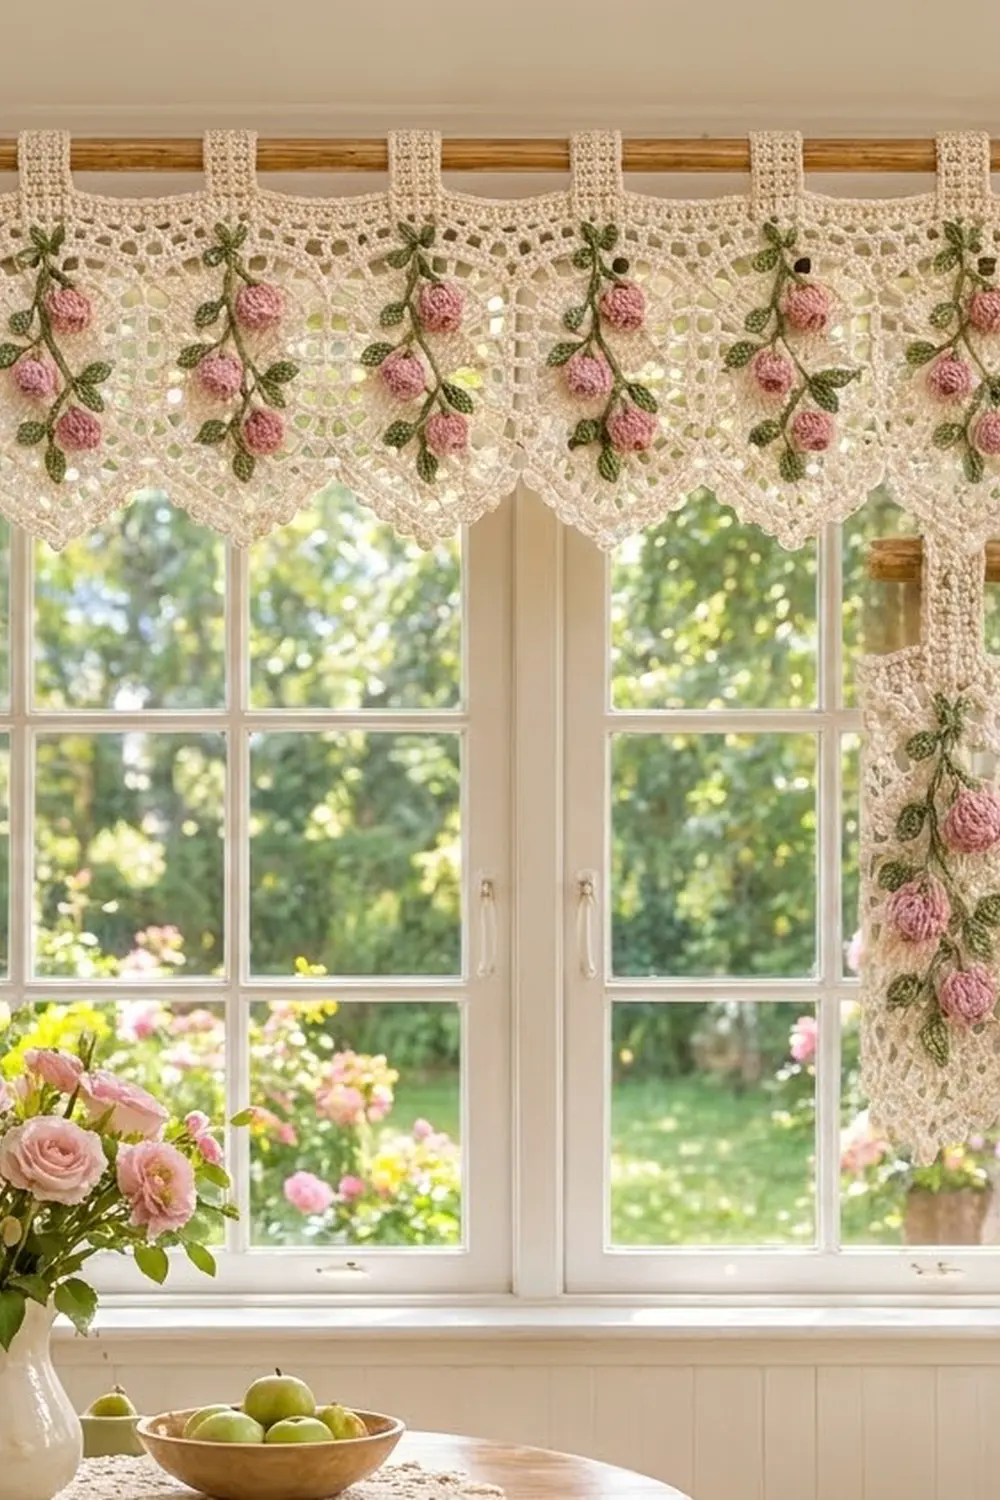
This valance has a cottage look. Nine panels of open cream mesh each end in a soft point, and each one carries a climbing rose vine with pink buds and sage-green leaves. When it hangs in a window, the light comes through the mesh and the roses stand out against it.
The palette is cream, rose pink and sage green. The mesh is plain filet, so the appliqués are the focus and the background stays light. All instructions use US crochet terms.
The finished valance is about 54.5 in (138.4 cm) wide and 9.75 in (24.8 cm) deep from the top of the band to the tips of the points. The tab loops add about 2 in (5.1 cm) above the band.
You’ll work nine panels from the top down, starting with a straight mesh section and decreasing to a point. Next you crochet and sew on the rose vines. Then you seam the panels, add a single-crochet top band with ten tabs, and finish with a shell-and-picot edging along the points.
Finished Size and Construction
- Finished size: 54.5 in × 9.75 in (138.4 cm × 24.8 cm), plus 2 in (5.1 cm) tab loops
- Skill level: Intermediate
- Terminology: US
- Yarn weight: DK (weight 3) cotton
- Hook: 3.5 mm (E-4)
- Number of pieces: 9 panels, 27 rosebuds, 27 sepals, 72 leaves and 9 stems
- Layout: 9 panels in one row
- Panel size: 6 in × 8 in (15.2 cm × 20.3 cm)
- Size before border: 54 in × 8 in (137.2 cm × 20.3 cm)
- Border depth: top band 1 in (2.5 cm); lower edging 0.75 in (1.9 cm) at the tips
Materials
Use a smooth mercerized or combed cotton. It shows the mesh clearly, holds its shape in a sunny window and washes well. Avoid fuzzy yarns, because they blur the lattice.
- Cream (main color): 200 g, about 440 m
- Rose pink: 75 g, about 165 m
- Sage green: 100 g, about 220 m
These quantities include a margin of about 20 percent for swatching and joining.
Tools:
– 3.5 mm (E-4) hook
– Tapestry needle
– Stitch markers
– Rust-proof pins and a blocking mat
– Measuring tape
– Spray bottle
Abbreviations (US Terms)
- ch: chain
- sl st: slip stitch
- sc: single crochet
- hdc: half double crochet
- dc: double crochet
- sc2tog: single crochet 2 together
- sp: space
- RS / WS: right side / wrong side
Special stitches:
- Puff: (yo, insert hook in stitch, pull up a loop) 3 times, yo, pull through all 7 loops.
- Picot: ch 3, sl st in 3rd ch from hook.
- Shell: (hdc, dc, picot, dc, hdc) all in the same stitch.
- Mesh: one dc plus one ch-1 space. A row of N mesh has 2N + 1 stitches.
Gauge and Checkpoints
Gauge in mesh: 10 mesh (21 stitches) = 4 in (10.2 cm) wide, and 8 rows = 4 in (10.2 cm) tall. Each mesh is 0.4 in (1.0 cm) wide and 0.5 in (1.3 cm) tall.
Gauge in sc (band): about 5.2 sc per inch, and 4 rows = 1 in (2.5 cm).
Make one complete panel first and use it as your gauge swatch. Check it at these points:
- After Row 1: the panel is 6 in (15.2 cm) wide.
- After Row 9: the panel is 4.5 in (11.4 cm) tall.
- After Row 16: the panel is 8 in (20.3 cm) tall, and the point is 3.5 in (8.9 cm) deep.
If the panel is too big, go down half a hook size. If it’s too small, go up half a size. Being off by just 1/8 in (0.3 cm) per panel adds up to about 1.1 in (2.9 cm) across nine panels, so fix gauge now.
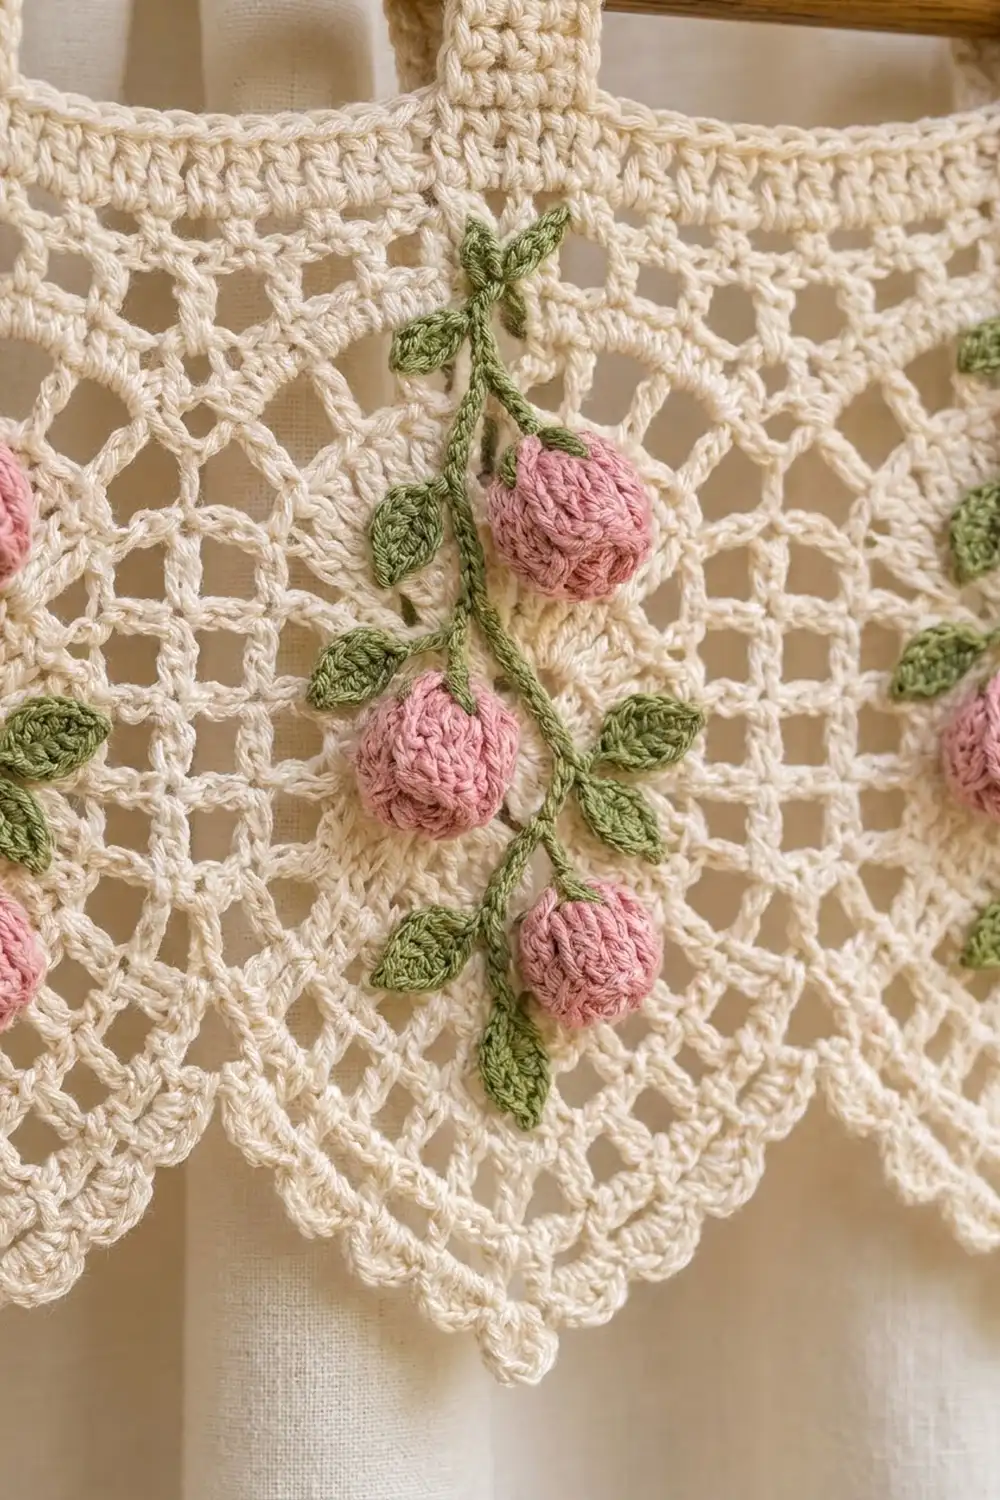
Panel (make 9)
Make the panels in cream. Choose one side as the RS and mark it.
Foundation: Ch 33.
Row 1: Dc in 4th ch from hook and in each ch across. The skipped 3 ch count as the first dc. Turn. (31 sts)
Row 2: Ch 4 (counts as dc + ch 1), skip next dc, dc in next dc. [Ch 1, skip next dc, dc in next dc] 14 times, ending in the top of the turning ch. Turn. (15 mesh, 31 sts)
Rows 3–9: Ch 4 (counts as dc + ch 1), skip ch-1 sp, dc in next dc. [Ch 1, skip ch-1 sp, dc in next dc] 14 times, working the last dc into the 3rd ch of the turning ch-4. Turn. (15 mesh, 31 sts)
Checkpoint: the panel measures 6 in × 4.5 in (15.2 cm × 11.4 cm).
Row 10 (decrease): Sl st in first ch-1 sp, then sl st in next dc. Ch 4 (counts as dc + ch 1), skip ch-1 sp, dc in next dc. [Ch 1, skip ch-1 sp, dc in next dc] 12 times. Leave the last mesh and the turning ch unworked. Turn. (13 mesh, 27 sts)
Rows 11–16: Work as Row 10, so each row is 1 mesh shorter at each end. Each row’s totals are:
- Row 11: 11 mesh, 23 sts
- Row 12: 9 mesh, 19 sts
- Row 13: 7 mesh, 15 sts
- Row 14: 5 mesh, 11 sts
- Row 15: 3 mesh, 7 sts
- Row 16: 1 mesh, 3 sts
Fasten off and weave in the ends.
Checkpoint: the panel is 8 in (20.3 cm) tall. The point rises 3.5 in (8.9 cm) over a half-width of 3 in (7.6 cm), so you get a soft V.
Rose Vine Appliqués
Rosebud (make 27, pink)
Rnd 1: 6 sc in a magic ring. (6 sts)
Rnd 2: 2 sc in each st around. (12 sts)
Rnd 3: [Puff in next st, sc in next st] 6 times. (6 puffs + 6 sc = 12 sts)
Rnd 4: Sc2tog 6 times. (6 sts)
Tuck the yarn tail inside as light stuffing, close the hole and leave a sewing tail. The bud measures about 0.75 in (1.9 cm) across, and the puffs give it a knobby, rounded look.
Sepal (make 27, green)
In a magic ring, work [ch 3, sl st in 2nd ch from hook, sc in next ch, sl st in ring] 3 times. (3 points) Close the ring and leave a tail.
Leaf (make 72, green)
Ch 7.
- Working into the chain from the 2nd ch from the hook: sc, hdc, dc, dc, hdc, then 3 sc in the last ch.
- Working back along the other side of the chain: hdc, dc, dc, hdc, sc.
- Sl st to the first sc. (13 sts)
The leaf is about 1 in (2.5 cm) long.
Stem (make 9, green)
Ch 26. Sl st in the back bump of each ch from the 2nd ch from the hook. (25 sl sts) The stem is about 5 in (12.7 cm) long.
Placement
Lay the panel RS up.
- Sew the stem down the center of the panel. Start 0.5 in (1.3 cm) below Row 1 and end about 2.5 in (6.4 cm) above the tip.
- Sew a sepal under each bud. Then sew the buds next to the stem: one upper right, one middle left and one lower right.
- Sew eight leaves in alternating pairs along the stem. Put two leaves at the top of the stem to make a small sprig.
Use matching yarn and small stitches through the dc posts so nothing shows through the mesh.
Make All Pieces
Totals:
- Cream: 9 panels
- Pink: 27 rosebuds
- Green: 27 sepals, 72 leaves and 9 stems
Sew the appliqués to every panel before you join them. Flat, separate panels are much easier to handle.
Layout (one row, tabs marked T):
T      T      T      T      T      T      T      T      T      T
[P1]   [P2]   [P3]   [P4]   [P5]   [P6]   [P7]   [P8]   [P9]
 \/     \/     \/     \/     \/     \/     \/     \/     \/
Joining
Method: sc seam, worked on the WS.
- Hold two panels with their RS together, with the Row 1 edges aligned at the top.
- Join cream at the top corner. Working through both layers along the straight edges only (Rows 1–9), work 2 sc into each dc row-end. That gives 9 row-ends × 2 sc = 18 sc per seam.
- Stop at the end of Row 9 and fasten off. The decrease rows stay free and form the V-shaped valleys between the points.
Join the panels in order from P1 to P9, which makes 8 seams.
Every row-end gets exactly 2 sc on both panels, so the rows line up across the seam. Keep the seam stitches the same height as your mesh rows. If the seam is pulled tight, the straight edge puckers. If it’s too loose, the seam flares.
Checkpoint: measured across Row 1, the joined piece is 9 × 6 in = 54 in (137.2 cm).
Border
The border has three parts: the top band, the tabs and the lower edging.
Border gauge: about 5.2 sc per inch and 4 sc rows per inch. This matches the mesh width (31 sts = 6 in), so the band neither gathers nor stretches the panels.
Top Band
Row 1 (RS): Join cream at the top right corner. Work 1 sc into the base of each Row 1 stitch along the foundation edge: 31 sc per panel. Don’t add any stitches at the seams. Turn. (9 × 31 = 279 sc)
Rows 2–4: Ch 1, sc in each st across. Turn. (279 sc)
Fasten off. The band measures 54 in × 1 in (137.2 cm × 2.5 cm).
Tabs (make 10)
Number the Row 4 stitches 1 to 279. Each tab is 8 sts wide, about 1.5 in (3.8 cm). Work the tabs over these stitches:
- End tabs: sts 1–8 and sts 272–279.
- Seam tabs: for seam k (k = 1 to 8), sts 31k − 3 through 31k + 4, so 4 sts on each side of the seam. For example, seam 1 uses sts 28–35 and seam 8 uses sts 245–252.
For each tab:
- Join cream in the first st of the tab and work 1 sc in each of the 8 sts. Turn.
- Ch 1, sc in each st across. Turn. Repeat until the tab has 16 rows in total. (8 sc per row; 16 rows = 4 in / 10.2 cm)
- Fasten off with a long tail.
- Fold the tab to the WS and sew the last row to the base of the tab.
Each finished loop stands 2 in (5.1 cm) tall and fits a rod up to 1.25 in (3.2 cm) in diameter. The gaps between tabs are 19 sts at the ends and 23 sts between seam tabs, so the tabs are spaced symmetrically.
Lower Edging
Row 1 (RS): Join cream at the top left corner of the band.
- Left end: work 1 sc into each of the 4 band row-ends, then 2 sc into each of P1’s 9 straight row-ends. (4 + 18 = 22 sc)
- Each panel, P1 to P9: work 3 sc into each row-end of Rows 10–16 (21 sc), 1 sc in each of the 3 sts of Row 16 at the tip (3 sc), then 3 sc into each row-end of Rows 16–10 (21 sc). (45 sc per panel)
- Each valley: between panels, work 1 sc into the last seam sc. (1 sc per valley; 8 valleys)
- Right end: work 2 sc into each of P9’s 9 straight row-ends and 1 sc into each of the 4 band row-ends. (22 sc)
Fasten off. Row 1 has 22 + (9 × 45) + 8 + 22 = 457 sc.
Row 2 (RS): With the RS facing, rejoin cream at the same top left corner.
- Left end: sc in each of the first 22 sc.
- Each panel: [sc in next st, shell in next st, skip next st] 15 times.
- Each valley: sc in the valley sc.
- Right end: sc in each of the last 22 sc.
Fasten off. Row 2 has 187 sc and 135 shells.
Why the math works:
- Top band: 279 = 9 panels × 31 sts. The panel top is defined as 31 sts, and nothing extra is added at the seams.
- Points: each panel’s 45 sts divide evenly into 15 three-stitch repeats. The 8th repeat places its shell on the 23rd stitch, which is the center sc of the tip, and the shells mirror each other on either side of it.
- Valleys: each valley sc gives the edging a neat inward dip between points.
- Ends: the outer sides stay as plain sc, so the valance hangs straight.
Final Blocking
- Weave in all the ends, burying them in solid stitches or along the stem.
- Soak the valance in cool water for 10 minutes. Press the water out in a towel; don’t wring it.
- Lay it flat RS up and pin the band straight at 54.5 in (138.4 cm).
- Pin each point to 8.75 in (22.2 cm) below the band edge. Check that every point is the same depth.
- Pin each picot open and shape the leaves flat. Puff the rosebuds with your fingers.
- Straighten the mesh so its columns run vertically.
- Let the valance dry completely before you unpin it.
Final Quality-Control Checklist
- Every panel has 15 mesh in Rows 2–9 and a single mesh at Row 16.
- The band has 279 sc in every row.
- All 10 tabs are 8 sts wide and 16 rows long, and their loops are even.
- Every point has its center shell exactly at the tip.
- Each vine has 3 buds, 3 sepals and 8 leaves, all sewn securely.
- The width is 54.5 in (138.4 cm) and the depth is 9.75 in (24.8 cm).
Troubleshooting
- Points lean to one side: you skipped the sl st step on one end. Each decrease row must lose exactly 1 mesh at both ends.
- Band ruffles: you have more than 279 sts. Recount and make sure you didn’t add a stitch at a seam.
- Band pulls the panels in: work the band with a hook half a size larger.
- Edging cups at the points: you worked fewer than 3 sc per row-end. If it waves, you worked more.
- Appliqués show stitches on the back: sew through the dc posts only, using matching yarn.
- Tabs twist: fold each one square before you sew it down.
Care
Hand wash in cool water with mild soap, press the water out in a towel and dry flat. Reshape the points and buds while the valance is still damp.
Final Notes
Here is the full measurement chain:
- Gauge: each mesh is 0.4 in (1.0 cm) wide.
- Panel: 15 mesh = 6 in (15.2 cm) wide and 8 in (20.3 cm) tall.
- Joined panels: nine panels make 54 in (137.2 cm).
- Band: 279 sc add 1 in (2.5 cm) of depth.
- Edging: adds about 0.75 in (1.9 cm) at the tips.
- Finished valance: 54.5 in × 9.75 in (138.4 cm × 24.8 cm).
If your first panel matches gauge, the rest will follow. Happy crocheting!