

This hanging toilet paper holder keeps two spare rolls in reach and makes a bathroom wall look more finished. It has a tall cream backing panel with a scalloped border, two deep lace pockets, and a dusty-rose fan medallion on the front of each pocket.
The palette is soft: warm cream for the body and a muted dusty rose for the fans and the outer edge of the border. The style is classic cottage. The lace keeps it light, and the solid single crochet panel keeps it from sagging when both pockets are full.
The pattern uses US crochet terms. The finished holder is about 7.75 in (19.7 cm) wide and 19.1 in (48.5 cm) tall, not counting the tab. With the tab and ring it hangs about 22 in (55.9 cm) long.
Here is the construction. You crochet the panel in rows and add a three-round border. Then you make two pockets from the base up, two half-circle fan medallions, and a tab, and sew everything together.
Finished Size and Construction
- Finished size: 7.75 in x 19.1 in (19.7 cm x 48.5 cm), plus tab and ring
- Skill level: Intermediate
- Terminology: US
- Yarn weight: Worsted (#4) cotton
- Hook: 4.5 mm (US 7)
- Number of pieces: 6 (1 panel, 2 pockets, 2 fan medallions, 1 tab), plus 1 wooden ring
- Layout: Two pockets stacked vertically on one panel
- Panel size before border: 5.75 in x 17.1 in (14.6 cm x 43.4 cm)
- Border depth: about 1 in (2.5 cm) per side
- Pocket: base 5.25 in x 4.7 in (13.3 cm x 11.9 cm); walls 3.75 in (9.5 cm) tall
- Fan medallion: about 4.6 in (11.7 cm) wide x 2.3 in (5.8 cm) tall
Materials
Use a smooth worsted-weight cotton or cotton blend. Cotton holds its shape on the wall, stands up to bathroom humidity, and shows the lace clearly. A yarn of about 190 m per 100 g works well. Avoid fuzzy or splitty yarns, because the arches need clean definition.
- Color A, Cream: 250 g (about 475 m)
- Color B, Dusty Rose: 50 g (about 95 m)
These amounts include a margin of about 20 percent.
Tools:
– 4.5 mm (US 7) crochet hook
– 2.5 in (6.4 cm) wooden ring
– Tapestry needle
– Locking stitch markers
– Rustproof pins
– Measuring tape
– Spray bottle and blocking mat
Abbreviations (US Terms)
- ch: chain
- sl st: slip stitch
- sc: single crochet
- hdc: half double crochet
- dc: double crochet
- sk: skip
- sp: space
- st(s): stitch(es)
- BLO: back loop only
- rnd: round
Special stitch, Scallop: 5 dc in the same stitch.
Gauge and Checkpoints
Gauge: 16 sc x 18 rows = 4 in x 4 in (10.2 cm x 10.2 cm).
Make one pocket base before anything else. It is a 21 x 21 sc piece that you will use anyway, so it doubles as your gauge swatch. It should measure 5.25 in x 4.7 in (13.3 cm x 11.9 cm). A standard roll is about 4.5 in (11.4 cm) across, so this base gives it a little room.
Checkpoints:
– Pocket base: 5.25 in x 4.7 in (13.3 cm x 11.9 cm)
– Pocket wall after Rnd 6: about 2 in (5.1 cm) tall
– Fan medallion: about 4.6 in (11.7 cm) wide
– Panel after Row 18: 5.75 in x 4 in (14.6 cm x 10.2 cm)
– Panel after Row 77: 5.75 in x 17.1 in (14.6 cm x 43.4 cm)
– Bordered panel: 7.75 in x 19.1 in (19.7 cm x 48.5 cm)
If your work is too big, go down 0.5 mm in hook size. If it is too small, go up 0.5 mm. Fix gauge at the swatch stage. Each pocket base has to fit inside the panel’s 23 stitches with 1 stitch to spare on each side.
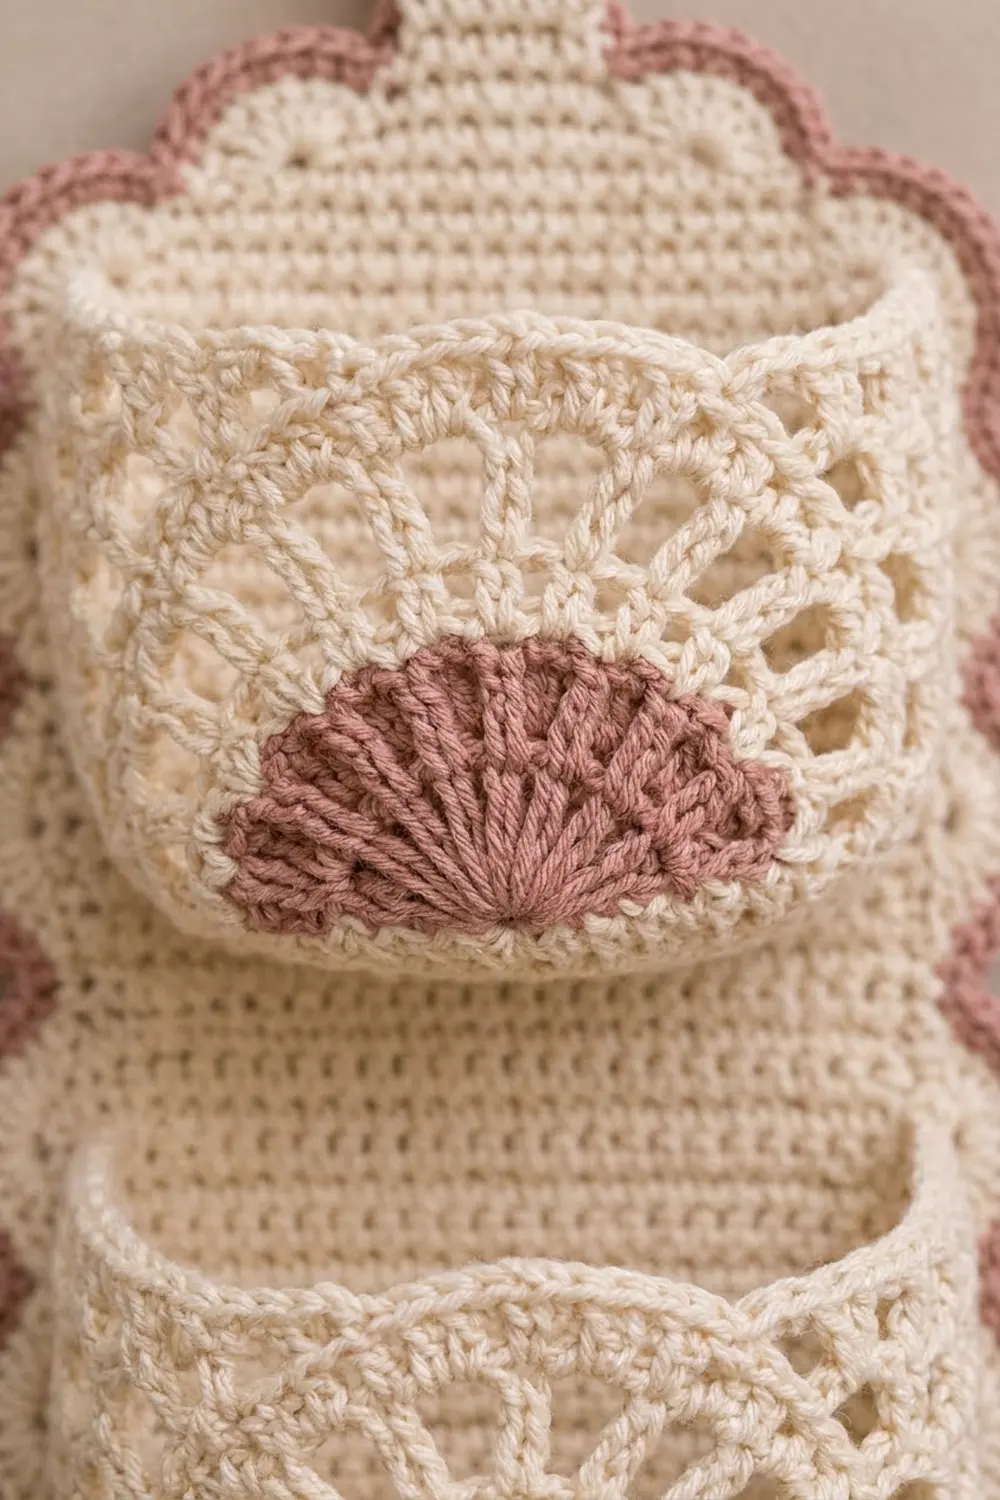
Backing Panel
Use Color A.
Foundation: Ch 24.
Row 1: Sc in 2nd ch from hook and in each ch across, turn. (23 sc)
Rows 2–77: Ch 1, sc in each st across, turn. (23 sc)
Measure after Row 18 and again after Row 77. Count the stitches every 10 rows or so, because one dropped edge stitch will throw off the border. Do not fasten off; the border starts from here.
Pocket (Make 2)
Use Color A for the whole pocket.
Base
Foundation: Ch 22.
Row 1: Sc in 2nd ch from hook and in each ch across, turn. (21 sc)
Rows 2–21: Ch 1, sc in each st across, turn. (21 sc)
The base is 21 sts by 21 rows, about 5.25 in x 4.7 in (13.3 cm x 11.9 cm). Do not turn after Row 21.
Walls
Rnd 1 (base edging): Ch 1. Work 21 sc evenly down the row ends, 21 sc across the foundation chain, 21 sc up the other row ends, and 21 sc across the top of Row 21. Join with a sl st to the first sc. (84 sc, 21 per side)
Do not add corner stitches. This keeps the pocket box-shaped.
Rnd 2: Ch 1, sc in BLO of each st around, join. (84 sc)
The unused front loops form a ridge, and the walls fold up along it.
Rnd 3: Ch 1, sc in first st, ch 5, sk 3, sc in next st; repeat from * 19 more times, ch 5, sk 3, join to first sc. (21 sc, 21 ch-5 loops)
Rnd 4: Sl st in first 2 ch, ch 1, sc in same loop, ch 5, sc in next loop; repeat from * around, ch 5, join to first sc. (21 loops)
Rnd 5: Sl st into first loop, ch 3 (counts as dc), 2 dc in same loop, ch 1, (3 dc, ch 1) in next loop; repeat from * around, join to top of ch 3. (63 dc + 21 ch-1 sps = 84 sts)
Rnd 6: Ch 1, sc in each dc and each ch-1 sp around, join. (84 sc)
Rnds 7–10: Repeat Rnds 3–6. (84 sc)
Fasten off, leaving a 24 in (61.0 cm) tail for sewing. The walls should be 3.75 in (9.5 cm) tall. The last round is a plain sc rim that keeps the pocket opening firm.
Fan Medallion (Make 2)
Work this half-circle in rows, starting from the center of its straight edge.
Row 1 (Color B): Ch 4, 10 dc in 4th ch from hook, turn. (11 dc; the skipped ch counts as 1 dc)
Row 2 (Color B): Ch 3 (counts as dc), dc in same st, 2 dc in each st across, turn. (22 dc)
Fasten off Color B. The solid rose fan is about 2.5 in (6.4 cm) wide.
Row 3 (Color A): Join in first dc, ch 4 (counts as dc + ch 1), dc in next st, ch 1; repeat from * 19 more times, dc in last st, turn. (22 dc + 21 ch-1 sps = 43 sts)
Row 4 (Color A): Ch 1, sc in first dc, ch 4, sk first ch-1 sp, sc in next ch-1 sp, ch 4, sk next ch-1 sp, sc in next ch-1 sp; repeat from * 8 more times, ch 4, sc in last dc, turn. (12 sc, 11 ch-4 arches)
Row 5 (Color A): Ch 1, (sc, hdc, dc, hdc, sc) in next arch; repeat from * across. (55 sts)
Fasten off, leaving a 16 in (40.6 cm) tail. The medallion is about 4.6 in (11.7 cm) wide and 2.3 in (5.8 cm) tall.
Hanging Tab
Foundation (Color A): Ch 10.
Row 1: Sc in 2nd ch from hook and in each ch across, turn. (9 sc)
Rows 2–36: Ch 1, sc in each st across, turn. (9 sc)
The tab is 2.25 in x 8 in (5.7 cm x 20.3 cm). Fasten off, leaving a 16 in (40.6 cm) tail.
Make All Pieces
Color A: 1 panel and border Rnds 1–2, 2 pockets, 1 tab, and Rows 3–5 of both medallions.
Color B: Rows 1–2 of both medallions, and border Rnd 3.
Layout (front view, panel rows counted from the bottom):
        [ ring ]
        [ tab  ]
+-----------------------+  Row 77
|                       |
|   [ Top pocket      ] |  Rows 44-61
|   [  fan medallion  ] |
|                       |
|   [ Bottom pocket   ] |  Rows 6-23
|   [  fan medallion  ] |
+-----------------------+  Row 1
Border
Border gauge: Rnd 1 works 1 sc per stitch on the short sides and 1 sc per row end on the long sides. Each scallop repeat covers 6 stitches. That is about 1.5 in (3.8 cm) on the short sides and 1.3 in (3.3 cm) on the long sides.
Rnd 1 (Color A): With the right side facing, ch 1 and sc in each of the 23 sts of Row 77. Ch 2 for the corner. Work 77 sc down the row ends (1 per row), ch 2, 23 sc across the foundation chain, ch 2, 77 sc up the row ends, ch 2, and join. (200 sc: 23 + 77 + 23 + 77, plus 4 corner ch-2 sps)
The corner ch-2 spaces are not included in the side counts.
Rnd 2 (Color A): Sl st into a corner ch-2 sp. Ch 3 (counts as dc) and work 6 dc in the same sp, for 7 dc at the corner. Then work each side as follows: sk 2, sc in next, [sk 2, Scallop in next, sk 2, sc in next] to the last 2 sts of the side, sk 2, 7 dc in the next corner ch-2 sp. Work all 4 sides this way. Skip the final corner group, since you already worked it at the start, and join.
- Short sides: 2 + 1 + (3 x 6) + 2 = 23 sts used, for 3 Scallops and 4 sc
- Long sides: 2 + 1 + (12 x 6) + 2 = 77 sts used, for 12 Scallops and 13 sc
- Total: 28 corner dc + 150 Scallop dc + 34 sc = 212 sts (34 scallop groups)
Rnd 3 (Color B): Join in the first dc of any corner group. Sc in each dc of every group, with 2 sc in the 4th (center) dc of each corner group. Sl st in each sc between groups. Join.
- Each side Scallop: 5 sc
- Each corner group: 8 sc
- Total: 150 + 32 sc + 34 sl sts = 216 sts
Why the math works: The scallop repeat is 6 stitches, and each side also uses 5 stitches around its ends: the opening sk 2 and sc, plus the closing sk 2. The panel was sized so each side is a multiple of 6 plus 5: 23 = 6 x 3 + 5 and 77 = 6 x 12 + 5. No side needs a fudged stitch. The border adds about 1 in (2.5 cm) per side. The width goes from 5.75 in to 7.75 in (14.6 cm to 19.7 cm), and the length goes from 17.1 in to 19.1 in (43.4 cm to 48.5 cm).
Joining
Do all sewing with Color A and a tapestry needle, using whipstitch, after the border is finished.
Medallions to pockets: Lay a medallion on the front wall of a pocket, centered, with its straight edge on the Rnd 2 ridge. Whipstitch the straight edge down. Then tack the center dc of each of the 11 Row 5 arches to the wall behind it. Keep the stitches loose so the lace lies flat.
Pockets to panel: Pin the bottom pocket so the back edge of its base lies along panel Row 6. Match the 21 back stitches of the base to panel stitches 2 through 22, one to one. That leaves 1 panel stitch free on each side. Whipstitch this edge. Next, sew both back corners of the walls straight up the panel. Then sew the 21 back stitches of Rnd 10 across panel Row 23. Attach the top pocket the same way, from Row 44 to Row 61.
Tension: Pull each stitch just snug enough to close the gap. Pulling harder makes the panel pucker behind the pocket.
Tab: Fold the tab through the ring so the two ends meet. Sew both layers to the back of the panel, overlapping the top 1.5 in (3.8 cm). About 1 in (2.5 cm) of tab should show above the border.
Size checkpoint: After sewing, the holder should still measure 7.75 in x 19.1 in (19.7 cm x 48.5 cm).
Final Blocking
- Mist the whole holder evenly until damp, not dripping.
- Lay it face up on a blocking mat.
- Pin the panel to 7.75 in x 19.1 in (19.7 cm x 48.5 cm).
- Pin out the center dc of each scallop so the curves are even.
- Open each medallion arch with your fingertips.
- Fill each pocket with a dry roll or a rolled towel so it dries in shape.
- Let it dry completely before hanging.
Final Quality-Control Checklist
- Panel is 23 sts by 77 rows
- Border Rnd 2 has 34 scallop groups; Rnd 3 has 216 sts
- Each pocket wall has 84 sts and is 3.75 in (9.5 cm) tall
- Medallions are centered, with straight edges on the pocket ridge
- Pockets are level, with 1 panel stitch free on each side
- Tab is stitched firmly and the ring hangs straight
- All tails are woven in on the back
Troubleshooting
Scallops ruffle: Rnd 1 probably gained stitches. Recount each side to 23 or 77.
Pocket walls flare: The ch-5 loops are too loose. Use ch 4 instead, or a smaller hook for Rnds 3–10.
Medallion cups: Row 2 is too tight. Rework it with looser tension.
Panel sags when filled: Add a second line of stitching along each pocket base.
Roll doesn’t fit: Check your base gauge. The base must be at least 4.7 in (11.9 cm) deep.
Care
Hand wash in cool water with mild soap. Press the water out in a towel, then dry flat in shape. Do not tumble dry, because heat can shrink the cotton and pull the pockets out of line.
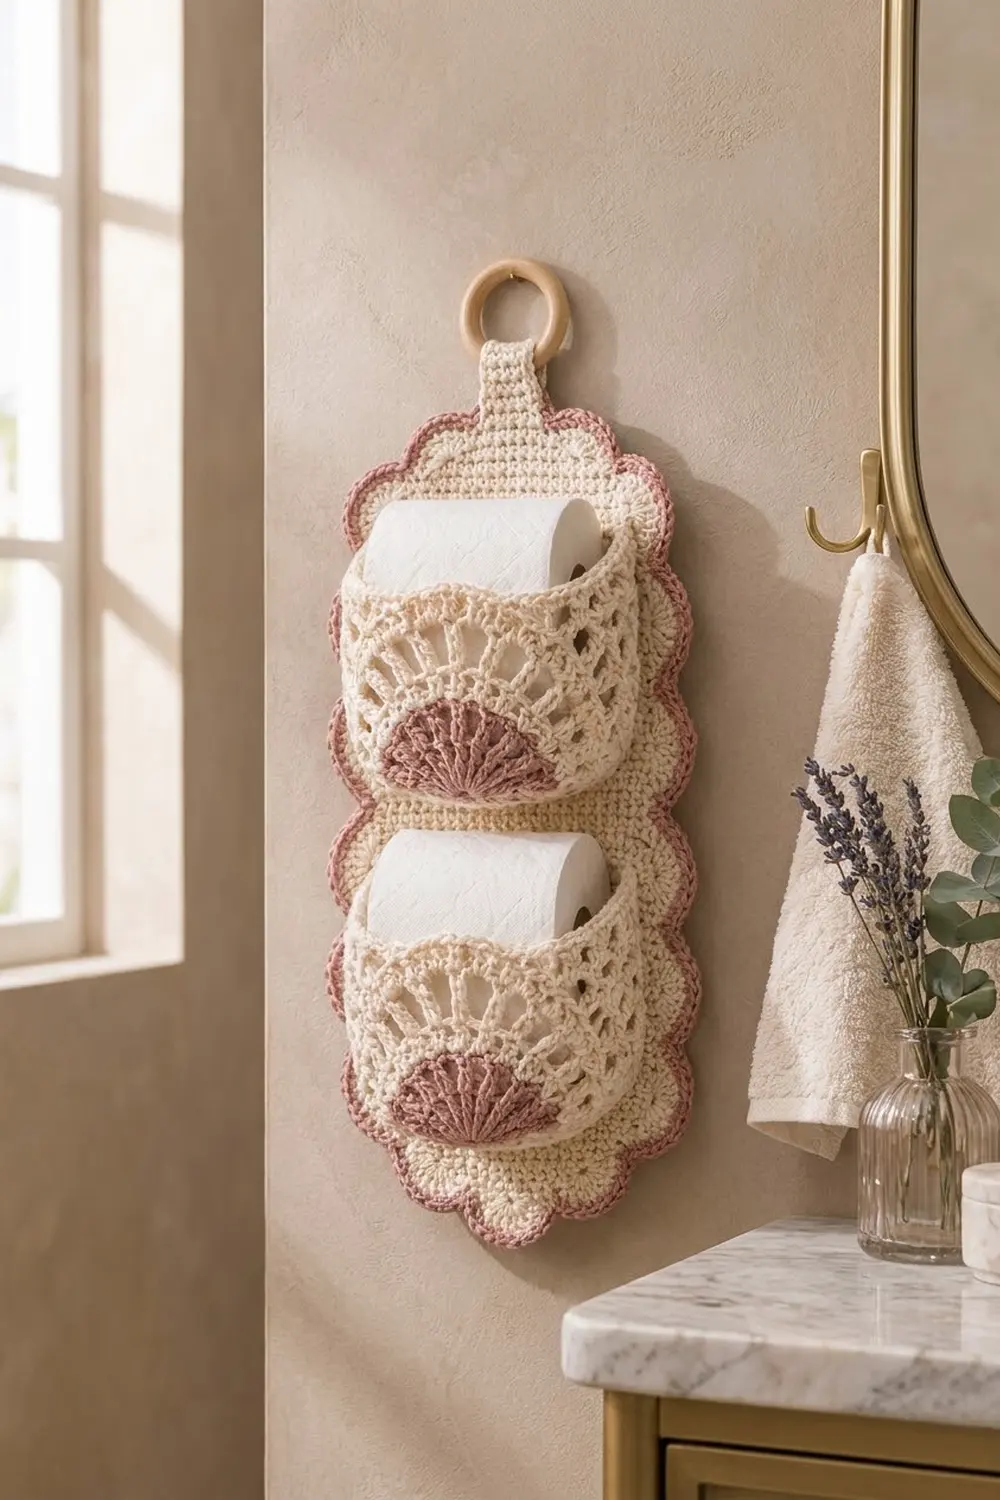
Final Notes
Each measurement builds on the one before it. A gauge of 16 sc x 18 rows gives a 21 x 21 pocket base of 5.25 in x 4.7 in (13.3 cm x 11.9 cm). That base fits inside a 23-stitch panel measuring 5.75 in x 17.1 in (14.6 cm x 43.4 cm). The 6-stitch scallop repeat fits the 23-stitch and 77-stitch sides exactly, and the finished holder is 7.75 in x 19.1 in (19.7 cm x 48.5 cm). Check each stage and the holder will hang straight with two full rolls.
Happy crocheting!