
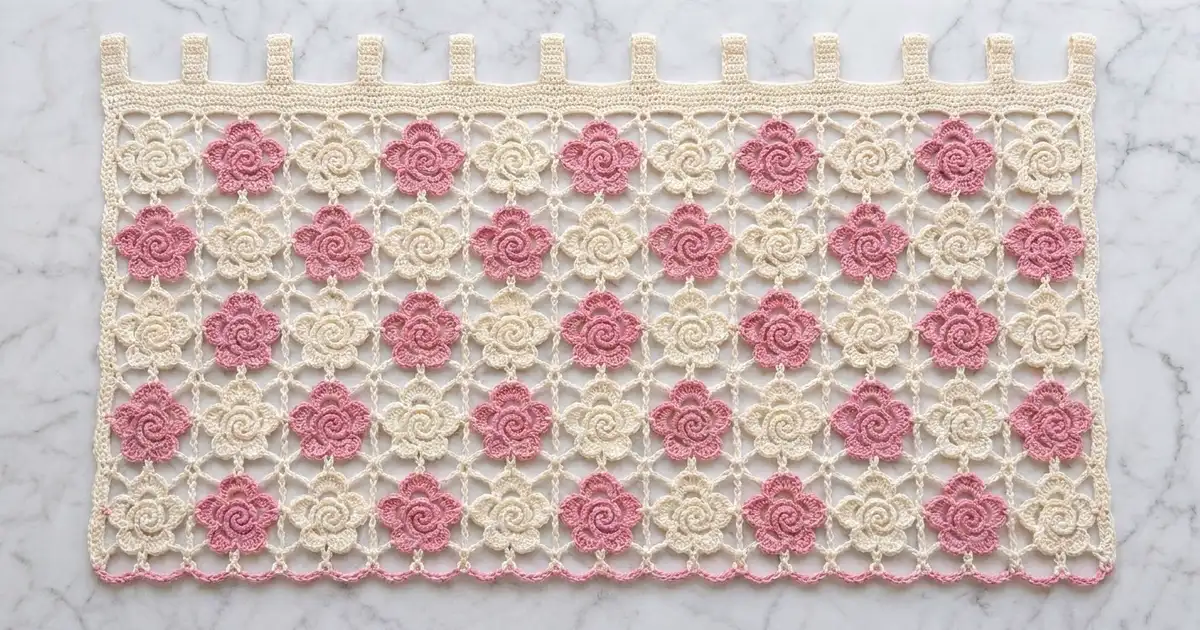
The Rosewater Lace Curtain is a tab-top window panel made from square lace motifs. Each motif has a raised spiral rose with five rounded petals, set in an open cream chain mesh. Pink and cream roses alternate in a checkerboard. From across the room the panel looks soft and romantic, and up close you can see the detail.
The palette uses just two colors, dusty rose pink and warm cream. The mesh, side borders and hanging tabs are cream. A row of pink chain scallops along the bottom edge picks up the color of the pink roses.
This pattern uses US crochet terms. Without the tabs, the finished panel measures 44.75 in (113.7 cm) wide by 76.75 in (194.9 cm) long.
You make 84 motifs and join them as you go on their last round, 7 across and 12 down. Then you add a narrow sc border, a pink scalloped bottom edge and 8 cream tabs across the top.
Finished Size and Construction
- Finished size: 44.75 in x 76.75 in (113.7 cm x 194.9 cm), excluding tabs
- Skill level: Intermediate
- Terminology: US
- Yarn weight: Worsted (#4), cotton or cotton blend
- Hook: 5 mm (H-8)
- Number of pieces: 84 square motifs (42 pink-rose, 42 cream-rose)
- Layout: 7 motifs wide x 12 motifs tall, checkerboard
- Motif size: 6.25 in (15.9 cm) square, blocked
- Size before border: 43.75 in x 75 in (111.1 cm x 190.5 cm)
- Border depth: about 0.5 in (1.3 cm) on the sides and top; the bottom scallops add another 0.75 in (1.9 cm)
- Tabs: 8 tabs, each 1.25 in (3.2 cm) wide, folded into 2 in (5.1 cm) loops
Materials
Choose a smooth worsted cotton. Cotton keeps the lace open, hangs straight and does not fuzz in sunlight. Avoid splitty yarn, because the spiral ridge needs clean front loops. The quantities below assume about 170 m per 100 g.
- Color A (rose pink): 350 g, about 595 m (42 roses plus the bottom scallops)
- Color B (cream): 1050 g, about 1785 m (42 roses, all 84 meshes, the border and the tabs)
These quantities include a margin of about 10 percent for gauge differences and swatching.
Tools:
– 5 mm (H-8) crochet hook
– Tapestry needle
– Stitch markers
– Rust-proof pins and a blocking mat
– Spray bottle
– Measuring tape
– Curtain rod up to 1 in (2.5 cm) in diameter
Abbreviations (US Terms)
- ch: chain
- sl st: slip stitch
- sc: single crochet
- hdc: half double crochet
- dc: double crochet
- tr: treble crochet
- sp: space
- st(s): stitch(es)
- BLO: back loop only
- MR: magic ring
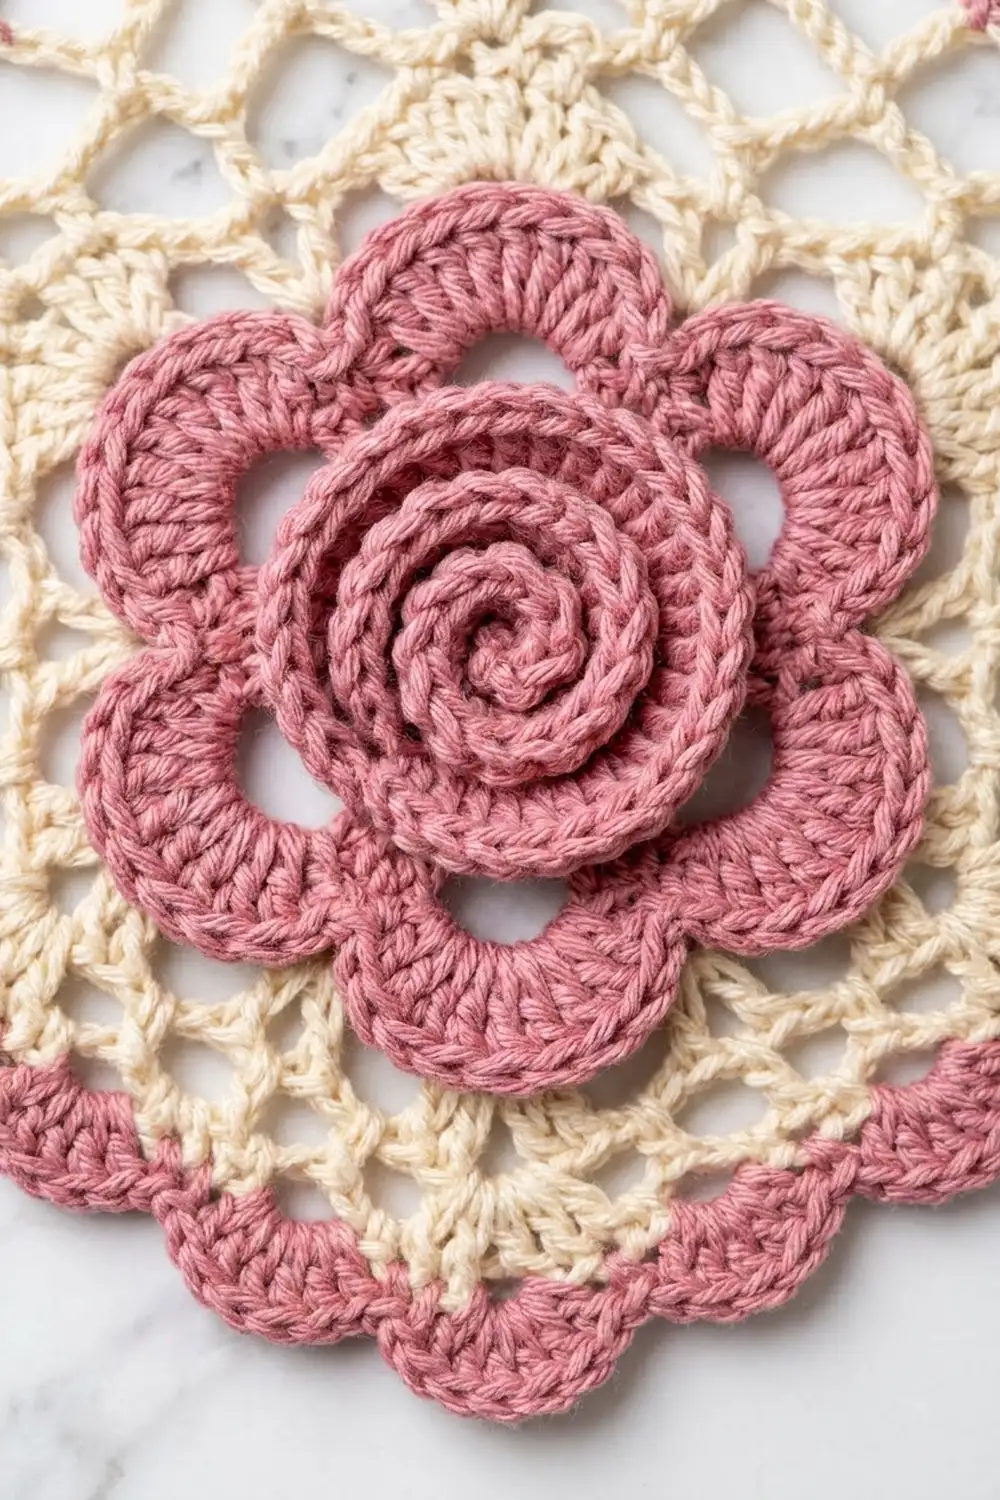
Spiral ridge: Starting at the center and working outward, sc in each free front loop left behind by the BLO rounds. The center is worked in a continuous spiral, so this ridge coils outward as one raised line and gives the rolled-rose look.
Joining loop (JL): Ch 2, sl st into the matching sp of the neighboring motif, ch 2. A JL replaces a ch-5 and counts as 5 sts.
Gauge and Checkpoints
Gauge: 16 sc and 18 rows = 4 in (10.2 cm) with a 5 mm hook.
Make one complete motif and block it before you go any further. With 84 motifs, small errors add up quickly.
Checkpoints:
– After Round 4 (spiral center): 2.25 in (5.7 cm) across
– After Round 6 (petals): 4.5 in (11.4 cm) from petal tip to petal tip
– After Round 8: about 5.5 in (14.0 cm) across, slightly rounded
– After Round 9, blocked: 6.25 in (15.9 cm) square
Too big? Go down to a 4.5 mm hook. Too small? Go up to a 5.5 mm hook. In mesh, the chains are usually the cause, so check them first. A relaxed ch-5 should lie about 1.25 in (3.2 cm) long.
Motif Pattern
Work the rose in Color A for pink-rose motifs or in Color B for cream-rose motifs. The mesh (Rounds 7–9) is always Color B.
Rose Center (continuous spiral)
Do not join Rounds 1–4. Place a marker in the first st of each round and move it up as you go.
Round 1: MR, 10 sc in ring. Pull the ring closed. (10 sts)
Round 2: Working in BLO, 2 sc in each st around. (20 sts)
Round 3: Working in BLO, sc in next st, 2 sc in next st; repeat from * 9 more times. (30 sts)
Round 4: Working in BLO, sc in next 2 sts, 2 sc in next st; repeat from * 9 more times. (40 sts)
Sl st in the BLO of the next st to smooth the step. The front loops of Rounds 1–4 stay free for the spiral ridge.
Petals
Round 5: Ch 1. Working in BLO of Round 4, sc in same st, ch 6, skip next 7 sts, sc in next st, ch 6, skip next 7 sts; repeat from * 3 more times. Join with sl st to first sc. (5 sc and 5 ch-6 sps; 5 x 8 = 40 sts of Round 4 used)
The skipped sts leave a small open window under each petal, so the petals look layered over the center.
Round 6: In each ch-6 sp, work (sc, hdc, 2 dc, 3 tr, 2 dc, hdc, sc), then sl st in next sc. (5 petals of 11 sts + 5 sl sts = 60 sts)
The middle st of each petal is the 2nd of the 3 tr.
Spiral Ridge
Use the rose’s color. With the front facing you, join the yarn in the first free front loop of Round 1. Sc in each free front loop, following the spiral outward through Round 4. (100 sc: 10 + 20 + 30 + 40) Fasten off and weave in the ends.
The ridge should stand up and coil. If it pulls the center into a cup, the ridge sts are too tight, so redo them a little looser.
Mesh
For a pink rose, join Color B as written below. For a cream rose, you can carry on with the same yarn.
Round 7: Join Color B with sc in the middle tr of any petal. Ch 5, skip next 4 sts, sc in next st; repeat from * 10 more times. Ch 5, skip last 4 sts, join with sl st to first sc. (12 sc and 12 ch-5 sps; 12 x 5 = 60 sts used)
Round 8: Sl st into first ch-5 sp. Ch 1, (sc, ch 7, sc) in same sp for the first corner. [Ch 5, sc in next ch-5 sp] twice, ch 5, (sc, ch 7, sc) in next ch-5 sp; repeat from * 2 more times. [Ch 5, sc in next ch-5 sp] twice, ch 5, join with sl st to first sc. (4 ch-7 corner sps and 12 ch-5 sps; 104 sts)
This round turns the circle into a square, because every third loop of Round 7 becomes a corner.
Round 9 (first motif only): Sl st into ch-7 corner sp. Ch 1, (sc, ch 3, sc) in same sp. [Ch 5, sc in next ch-5 sp] 3 times, ch 5, (sc, ch 3, sc) in next ch-7 corner sp; repeat from * 2 more times. [Ch 5, sc in next ch-5 sp] 3 times, ch 5, join with sl st to first sc. Fasten off.
Round 9 count per side: 1 corner sc + 4 ch-5 (20 ch) + 3 sc + 1 corner sc = 25 sts. The ch-3 corner sps sit between the sides. Total: 4 x 25 + 4 x 3 = 112 sts.
Every other motif is joined to its neighbors during Round 9 (see Joining).
Make All Pieces
- Pink-rose motifs: 42 (rose in Color A, mesh in Color B)
- Cream-rose motifs: 42 (all in Color B)
Layout grid (P = pink rose, C = cream rose), 7 across:
Row 1:  P C P C P C P
Row 2:  C P C P C P C
Row 3:  P C P C P C P
Row 4:  C P C P C P C
...repeat Rows 1–2 through Row 12
Row 12: C P C P C P C
Odd rows have 4 P and 3 C, and even rows have 3 P and 4 C. With six rows of each, that comes to 42 P and 42 C.
Work Rounds 1–8 of all 84 motifs first. Then work Round 9 on each one, joining them row by row.
Joining (Join-As-You-Go)
You join the motifs on Round 9 with JLs. The chains of neighboring motifs cross at each JL and form small X shapes, so the mesh looks continuous.
Joining one side: Work Round 9 as written until you reach the side to be joined. At the first corner of that side, work sc, ch 1, sl st into the neighbor’s ch-3 corner sp, ch 1, sc. Along that side, replace each ch-5 with a JL into the matching ch-5 sp of the neighbor, and work the middle sc as usual. At the far corner, work sc, ch 1, sl st into the neighbor’s corner sp, ch 1, sc.
Stitch-to-stitch logic: Both sides have 4 ch-5 sps, so the join goes loop to loop with nothing left over. A JL counts as 5 sts and a joined corner (ch 1, sl st, ch 1) counts as 3. That means every joined motif still has 25 sts per side and 112 sts in total.
Four-way corners: Where four motifs meet, sl st into the sl st that already joins the first corners. This keeps all the corners stacked at one point.
Tension: Make the ch-2 halves of each JL the same size as your normal chains. Tight joins pucker, and loose joins sag when the curtain hangs.
Size checkpoint: A joined row of 7 motifs should lie flat at 43.75 in (111.1 cm). After all 12 rows, the pinned panel should measure 43.75 in x 75 in (111.1 cm x 190.5 cm).
Border
Border gauge: 4 sc per 1 in (2.5 cm), the same as the motif gauge. A ch-5 sp is 1.25 in (3.2 cm) long, so 5 sc in it lie flat.
Border Round 1 (Color B): Join with sc in any sc along a side. Work sc in each sc and 5 sc in each ch-5 sp. At the seams between motifs, skip the joined corner sps and work no sts in them. At each of the 4 outer corners, work 3 sc in the ch-3 sp. Join with sl st to first sc.
- Per motif side: 1 + 20 + 3 + 1 = 25 sc
- Top and bottom: 7 x 25 = 175 sc each
- Left and right: 12 x 25 = 300 sc each
- Corners: 4 x 3 = 12 sc
- Total: 962 sts. Counted between the corner center sts, that is 177 on the top and bottom and 302 on each side, plus 4 corner sts.
Border Round 2 (Color B): Ch 1, sc in each st, working 3 sc in each corner center st. Join and fasten off. (179 sts on the top and bottom, 304 on each side, plus 4 corner sts; total 970 sts)
Bottom Scallops (Color A): With the right side facing, join A with sc in the bottom-right corner center st. Ch 5, skip next 3 sts, sc in next st; repeat from * 44 more times, ending in the bottom-left corner center st. Fasten off. (45 scallops)
Why it works: Counting both corner sts, the bottom edge has 179 + 2 = 181 sts. Each scallop uses 4 sts, and 45 x 4 = 180, plus the starting sc = 181. Each scallop spans 1 in (2.5 cm).
Tabs (Color B): Counting both corner sts, the top edge also has 181 sts. Mark 8 tabs of 6 sts each, with 19-st gaps between them: sts 1–6, 26–31, 51–56, 76–81, 101–106, 126–131, 151–156 and 176–181. To check: 8 x 6 + 7 x 19 = 48 + 133 = 181. The tab centers fall every 25 sts, so there is one tab over each outer edge and one over each motif seam.
For each tab: Join B in the first marked st, ch 1, sc in same st and next 5 sts, turn. (6 sts) Rows 2–18: Ch 1, sc in each st, turn. (6 sts) Fasten off, leaving a 12 in (30.5 cm) tail. Each tab is 4 in (10.2 cm) long. Fold it to the back and whipstitch the last row to the back of Border Round 1 to make a 2 in (5.1 cm) loop.
Final Blocking
- Weave in all ends, splitting the yarn as you go so they cannot work loose.
- Spray the panel until it is evenly damp.
- Lay it flat on a mat, right side up.
- Pin the outer corners first, to 44.75 in (113.7 cm) wide by 76 in (193.0 cm) long, measured to the base of the scallops.
- Pin along every seam line so each motif sits at 6.25 in (15.9 cm) square.
- Open each mesh loop, and pin each pink scallop tip 0.75 in (1.9 cm) below the border.
- Lift each spiral ridge with your fingertips so it stands up.
- Let the panel dry completely, then unpin it.
Final Quality-Control Checklist
- 84 motifs in a checkerboard, starting with pink at the top left
- Every rose has 5 petals and a raised spiral ridge of 100 sc
- Each motif side has 4 ch-5 sps and measures 6.25 in (15.9 cm)
- The corners stack cleanly at every four-way join
- Border Round 1 has 175 sts on the top and bottom and 300 on each side
- 45 pink scallops along the bottom
- 8 tabs, centered over the seams and outer edges
- All ends woven in and trimmed
Troubleshooting
The center cups: The spiral ridge or the BLO rounds are too tight. Loosen the ridge first.
The petals curl forward: The Round 5 chains are too short. Keep each ch-6 relaxed.
The motif is round, not square: Make sure every third Round 7 loop got a (sc, ch 7, sc) corner in Round 8, then block firmly.
The motifs don’t line up: A corner was probably joined to a side loop. Count 4 ch-5 sps per side before you join.
The bottom edge flares: Go down 0.5 mm in hook size for the border only.
Care
Hand wash in cool water, or machine wash cold on a gentle cycle in a mesh bag. Lay it flat to dry and re-pin if needed, and never hang the curtain while it is wet.

Final Notes
The measurement chain is short and easy to check. A 2.25 in (5.7 cm) center grows into 4.5 in (11.4 cm) petals and then a 6.25 in (15.9 cm) motif with 25 sts per side. Seven motifs across make 43.75 in (111.1 cm), and twelve motifs down make 75 in (190.5 cm). The two border rounds bring the panel to 44.75 in (113.7 cm) by 76 in (193.0 cm), and the pink scallops finish it at 76.75 in (194.9 cm). If your first motif measures correctly, the rest of the curtain will too.
Happy crocheting!