

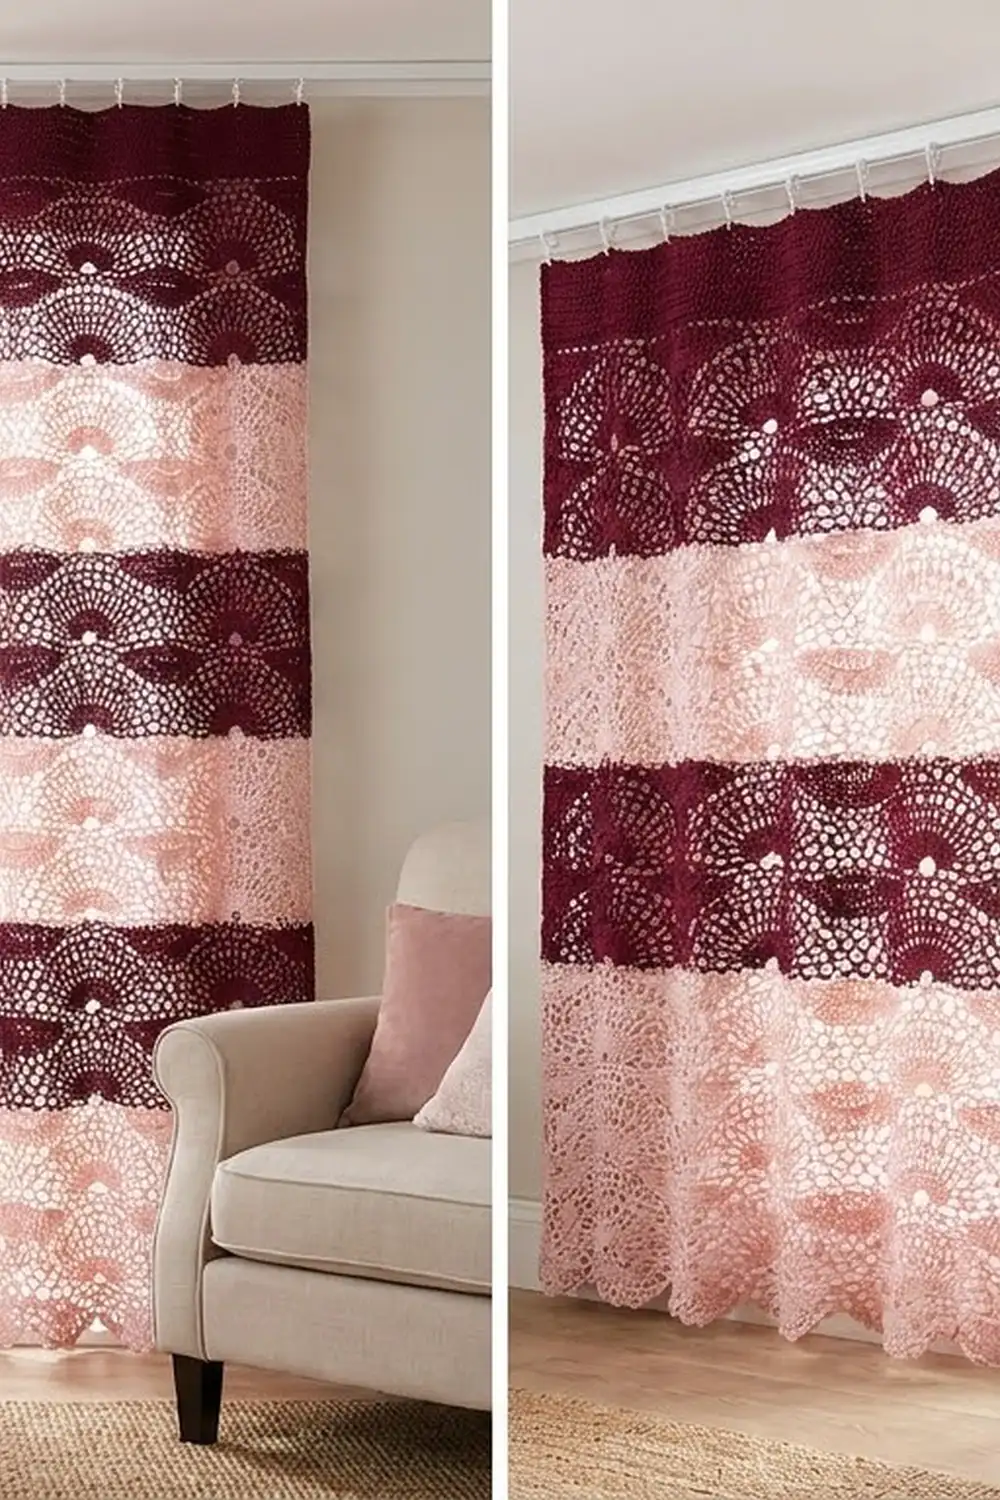
The Rosewood Fan Lace Curtain Panel is a tall, airy curtain made of stacked fans. Each fan opens from a narrow V into a wide, rounded crown of treble-crochet spokes. Open chain lace fills the spaces between fans, so daylight comes through without the room feeling exposed.
The panel uses two colors: a deep burgundy and a soft blush pink. They swap every band, so you get bold stripes of fans with the same curve repeated all the way down. The pink hem ends in small lacy scallops, and a dense burgundy heading at the top holds the drapery hooks.
All instructions use US crochet terms. One finished panel measures 41.7 in wide × 74.25 in long (105.9 cm × 188.6 cm) after blocking. The photo shows a matching pair; to make the pair, work two identical panels.
Construction is simple. You work a foundation chain and one row of sc, then 24 four-row “tiers” of fans, alternating pink and burgundy. A two-row scalloped hem is added along the foundation chain. Finally, a three-row sc border runs up one side, across the top, and down the other side.
Finished Size and Construction
- Finished size: 41.7 in × 74.25 in (105.9 cm × 188.6 cm) per panel
- Skill level: Intermediate
- Terminology: US
- Yarn weight: DK (#3) cotton
- Hook: 4.0 mm (US G-6)
- Number of pieces: 1 per panel (make 2 for a pair, as shown); no joining
- Layout: 8 fans across × 24 tiers up (12 pink, 12 burgundy)
- Pattern repeat: 24 sts = 5 in (12.7 cm) wide; 1 tier = 3 in (7.6 cm) tall
- Size before border: 40.2 in × 72.25 in (102.1 cm × 183.5 cm)
- Border depth: hem 1.25 in (3.2 cm); side and top border 0.75 in (1.9 cm)
Materials
Use a smooth, mercerized DK cotton or a cotton blend with about 120 m (131 yd) per 50 g. Cotton drapes well, shows the fan spokes clearly, and doesn’t fuzz in sunlight. Avoid very stretchy yarns; a long lace panel lengthens under its own weight.
Per panel:
– Color A – Burgundy: 550 g, about 1320 m (12 tiers + top and side border)
– Color B – Blush Pink: 525 g, about 1260 m (12 tiers + hem)
For the pair: double these amounts (1100 g / 2640 m burgundy; 1050 g / 2520 m pink).
These quantities include a margin of roughly 10% for gauge differences and swatching.
Tools:
– 4.0 mm (G-6) crochet hook
– Tapestry needle
– Stitch markers (at least 9)
– Measuring tape
– Rust-proof pins and blocking mats or a clean sheet on the floor
– Spray bottle
– Drapery hooks (17 per panel) for a ceiling track or rod rings
Abbreviations (US Terms)
- ch – chain
- sl st – slip stitch
- sc – single crochet
- dc – double crochet
- tr – treble crochet (yo twice)
- dtr – double treble crochet (yo 3 times, then [yo, pull through 2] 4 times)
- sp – space
- st(s) – stitch(es)
- yo – yarn over
- RS / WS – right side / wrong side
Special stitch – V-st: (tr, ch 3, tr) all in the same stitch. This is the narrow base of every fan.
Turning chains: ch 3 counts as a dc, ch 4 counts as a tr, and ch 5 counts as a dtr. Ch 1 never counts as a stitch.
Gauge and Checkpoints
Gauge: 24 sc = 5 in (12.7 cm) in Row 1, and one tier (4 rows) = 3 in (7.6 cm) tall, both measured after blocking.
Test swatch first. Ch 50. Work Row 1 (49 sc), then work 2 tiers using 2 repeats instead of 8. Block the swatch.
- Row 1 should measure 10.2 in (25.9 cm).
- The full swatch should be 6.25 in (15.9 cm) tall.
If your swatch is too big, go down a hook size (3.75 mm). If it’s too small, go up to 4.5 mm. Check the width first; small height differences can be corrected when you block.
Checkpoints on the panel (measure gently stretched, as when blocked):
– After Row 1: 193 sc = 40.2 in (102.1 cm)
– After Tier 1: 3.25 in (8.3 cm) tall
– After Tier 4: 12.25 in (31.1 cm)
– After Tier 12: 36.25 in (92.1 cm)
– After Tier 24: 72.25 in (183.5 cm)
To change the size: each 24-st repeat adds or removes 5 in (12.7 cm) of width. Each pair of tiers adds or removes 6 in (15.2 cm) of length. Always end with a burgundy tier.
Foundation
With Color B (pink), ch 194.
Row 1 (WS): sc in 2nd ch from hook and in each ch across, turn. (193 sc)
Place a marker in every 24th st (sts 1, 25, 49 … 193) to mark the 9 valley points. These markers make Row A easy to check.
Fan Tier (4 Rows)
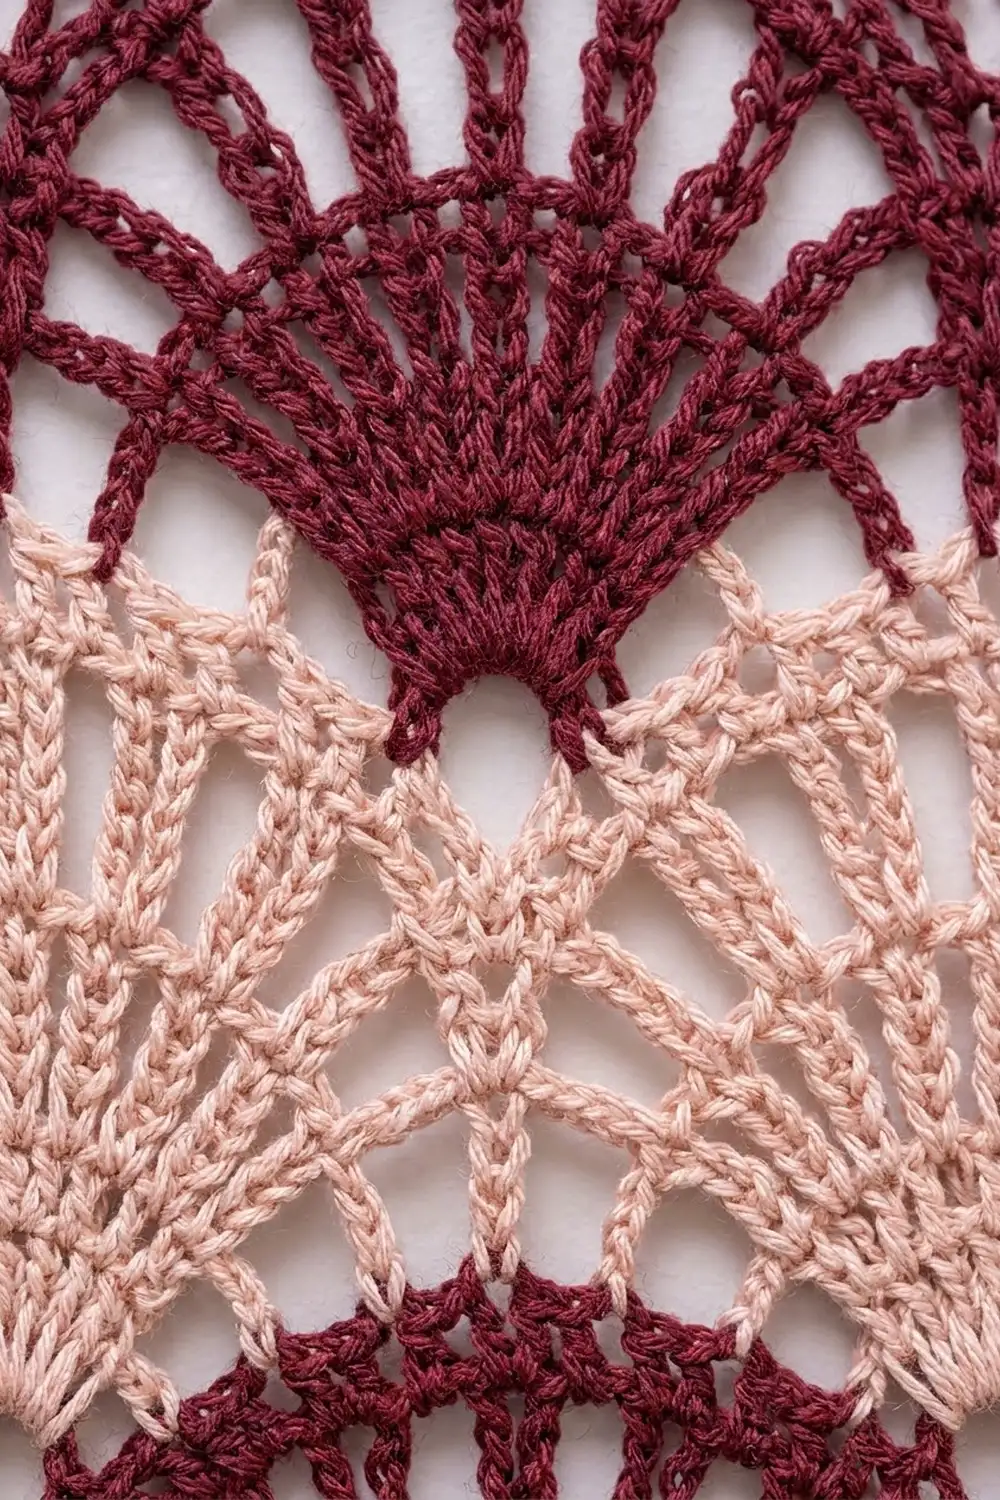
Each tier is 4 rows in one color. The fan forms in the middle of each 24-st repeat, and the “valley” stitch at each end of the repeat forms the lacy column between fans. Row D brings the count back to 193 so the next tier stacks directly on top.
Row A (RS) – V row: ch 1, sc in first st, ch 7, skip 11 sts, V-st in next st, ch 7, skip 11 sts, sc in next st; repeat from * 7 more times (8 repeats), turn.
(161 sts: 9 sc, 8 V-sts, 16 ch-7 sps)*
The V-st lands on the 12th st after each valley, which is exactly the center of the fan below.
Row B (WS) – fan row: ch 3 (counts as dc), ch 4, skip ch-7 sp and next tr, 9 tr in ch-3 sp of V-st, ch 4, skip next tr and ch-7 sp, dc in next sc; repeat from * 7 more times, turn.
(145 sts: 72 tr, 9 dc, 16 ch-4 sps)*
Row C (RS) – spoke row: ch 4 (counts as tr), ch 3, skip ch-4 sp, tr in next tr, [ch 1, tr in next tr] 8 times, ch 3, skip ch-4 sp, tr in next dc; repeat from * 7 more times, working the last tr in top of turning ch-3, turn.
(193 sts: 81 tr, 64 ch-1 sps, 16 ch-3 sps)*
The ch-1 gaps spread the 9 spokes into the open fan you see in the photo.
Row D (WS) – crown row: ch 5 (counts as dtr), 3 sc in ch-3 sp, sc in next tr, [sc in ch-1 sp, sc in next tr] 8 times, 3 sc in ch-3 sp, dtr in next tr; repeat from * 7 more times, working the last dtr in 4th ch of turning ch-4, turn.
(193 sts: 184 sc + 9 dtr)*
The sc across the spokes close each fan into its rounded crown. The tall dtr fills the valley so the next tier starts on a level row.
Why the heights balance: at the valley you stack sc + dc + tr + dtr. Over the fan you stack tr + tr + tr + sc. Both total about the same height, so the tier stays level.
Working the Panel
Tiers 1–24: work Rows A–D 24 times, alternating colors:
– Odd tiers (1, 3, 5 … 23): Color B, pink
– Even tiers (2, 4, 6 … 24): Color A, burgundy
Color changes: change color on the last yo of the final dtr of each Row D. Every tier has an even number of rows, so every color change happens at the same side edge. Carry the unused color loosely up that edge instead of cutting it. The side border will hide it.
Check your measurements at each checkpoint. At Tier 24 the body should be 40.2 in × 72.25 in (102.1 cm × 183.5 cm). Fasten off.
Border
The border has two parts. A pink scalloped hem goes along the foundation chain. A three-row burgundy sc band goes up one side, across the top, and down the other side.
Border gauge: 24 sc = 5 in (12.7 cm), the same as Row 1. Along the sides, work 14 sc per 3 in (7.6 cm) tier, about 4.7 sc per inch. This is slightly fewer than 4.8 so the open lace edge stays flat instead of rippling.
Scalloped Hem (Color B)
Hem Row 1 (RS): With RS facing, join pink with a sl st in the first unused loop of the foundation chain. Ch 1, sc in same loop, skip 5 loops, (dc, [ch 1, dc] 6 times) in next loop, skip 5 loops, sc in next loop; repeat from * 15 more times, turn.
(16 shells; 225 sts: 112 dc, 96 ch-1 sps, 17 sc)*
That is 2 shells under each fan. You work into all 193 loops (16 × 12 + 1 = 193), so the hem comes out exactly as wide as the body.
Hem Row 2 (WS): ch 1, sc in first sc, ch 2, [sc in next ch-1 sp, ch 3] 5 times, sc in next ch-1 sp, ch 2, sc in next sc; repeat from * 15 more times. Fasten off.
(16 scallops, each edged with 5 ch-3 loops)*
Side and Top Band (Color A)
Border Row 1 (RS): With RS facing, join burgundy at the bottom of the right side edge, in the Row 1 row-end.
– Right side: sc in Row 1 row-end (1 sc), then for each of the 24 tiers work 2 sc in Row A’s row-end, 3 sc in Row B’s, 4 sc in Row C’s, and 5 sc in Row D’s. That’s 14 per tier, for 337 sc.
– Top corner and top edge: 3 sc in first st of Tier 24 Row D, sc in each of next 191 sts, 3 sc in last st.
– Left side: work down the left side to match the right side (337 sc). Turn.
(871 sts) Counting each side from corner center to corner center: right side 339, top 195, left side 339. The 2 corner centers are shared, so 339 + 195 + 339 − 2 = 871.
Border Row 2 (WS): ch 1, sc in each sc, working 3 sc in each corner center sc, turn.
(875 sts: sides 340, top 197)
Border Row 3 (RS): ch 1, sc in each sc, working 3 sc in each corner center sc. Fasten off.
(879 sts: sides 341, top 199)
Why the math works: The top band starts with 1 sc in each of the 193 top sts, so the top stays exactly 40.2 in (102.1 cm) wide. The only extras are 2 corner sc per row: 193 + 2 = 195, then 197, then 199. The sides use 337 sc over 72.25 in (183.5 cm), which matches the lace gauge.
Three sc rows add 0.75 in (1.9 cm) on each side and at the top:
– Width: 40.2 + 0.75 + 0.75 = 41.7 in (105.9 cm)
– Length: 72.25 + 1.25 (hem) + 0.75 = 74.25 in (188.6 cm)
Final Blocking
- Weave in all ends along the side borders and through solid sc rows, never across open chain lace.
- Soak the panel in cool water with a little wool wash for 15 minutes. Press out the water; don’t wring.
- Roll it in towels to remove excess moisture.
- Lay it flat on mats or a clean sheet. If floor space is short, block one half at a time.
- Pin the top and sides to a rectangle of 41.7 in × 74.25 in (105.9 cm × 188.6 cm).
- Pin out each fan crown so it curves evenly, and open each Row C spoke gap.
- Pin the point of each hem scallop, 16 pins evenly spaced across the bottom.
- Leave to dry completely, 24–48 hours, before removing the pins.
Final Quality-Control Checklist
- [ ] Row 1 and every Row C and Row D has 193 sts.
- [ ] Each fan has 9 tr spokes, and every V-st sits above the center of the fan below.
- [ ] Colors alternate pink/burgundy, starting with pink at the bottom and ending with burgundy at the top.
- [ ] There are 16 hem scallops, evenly spaced.
- [ ] Each side border has 337 sc in Row 1, and the top has 199 sts after Row 3.
- [ ] The blocked size is 41.7 in × 74.25 in (105.9 cm × 188.6 cm).
- [ ] Carried yarn is hidden under the side border.
- [ ] Ends are secure, and the panel hangs straight with no wavy edges.
Troubleshooting
The panel is getting wider tier by tier. Your Row D sc are too loose. Make sure you work exactly 3 sc in each ch-3 sp and don’t add extra sc over the spokes.
The fans are drifting sideways. Row A is skipping the wrong number of sts. Count 11 sts from each valley marker; the V-st goes in the 12th.
There are dips at the valleys. Make your dtr taller, or pull up the first loop a little longer. The valley column needs its full height.
The side edges ripple. Rework Border Row 1 with 13 sc per tier (2-3-4-4). The side edges pull in: use 15 per tier (2-3-4-6).
The fan crowns cup or ruffle. Your Row C chains are too long or too short. Every ch-1 and ch-3 needs to match your normal chain tension.
The panel stretches after hanging. This is normal for cotton. Re-block it, and space the hooks evenly so the weight is shared.
Care
Hand wash in cool water and dry flat, then reshape. Don’t tumble dry. Long-term direct sun may fade the burgundy, so consider a sheer liner on very sunny windows.
Final Notes
Everything in this panel follows from one measurement chain:
– 24 sts = 5 in (12.7 cm), so 8 repeats + 1 = 193 sts = 40.2 in (102.1 cm).
– 1 tier = 3 in (7.6 cm), so 24 tiers + Row 1 = 72.25 in (183.5 cm).
– The 1.25 in (3.2 cm) hem and 0.75 in (1.9 cm) border bring the panel to 41.7 in × 74.25 in (105.9 cm × 188.6 cm).
Check your swatch, check each milestone, and the panel will finish at the right size. To hang it, place drapery hooks through Border Rows 2–3 above each valley and each fan center. That is 17 hooks, about 2.5 in (6.4 cm) apart. Make a second panel the same way for the pair.
Happy crocheting!