

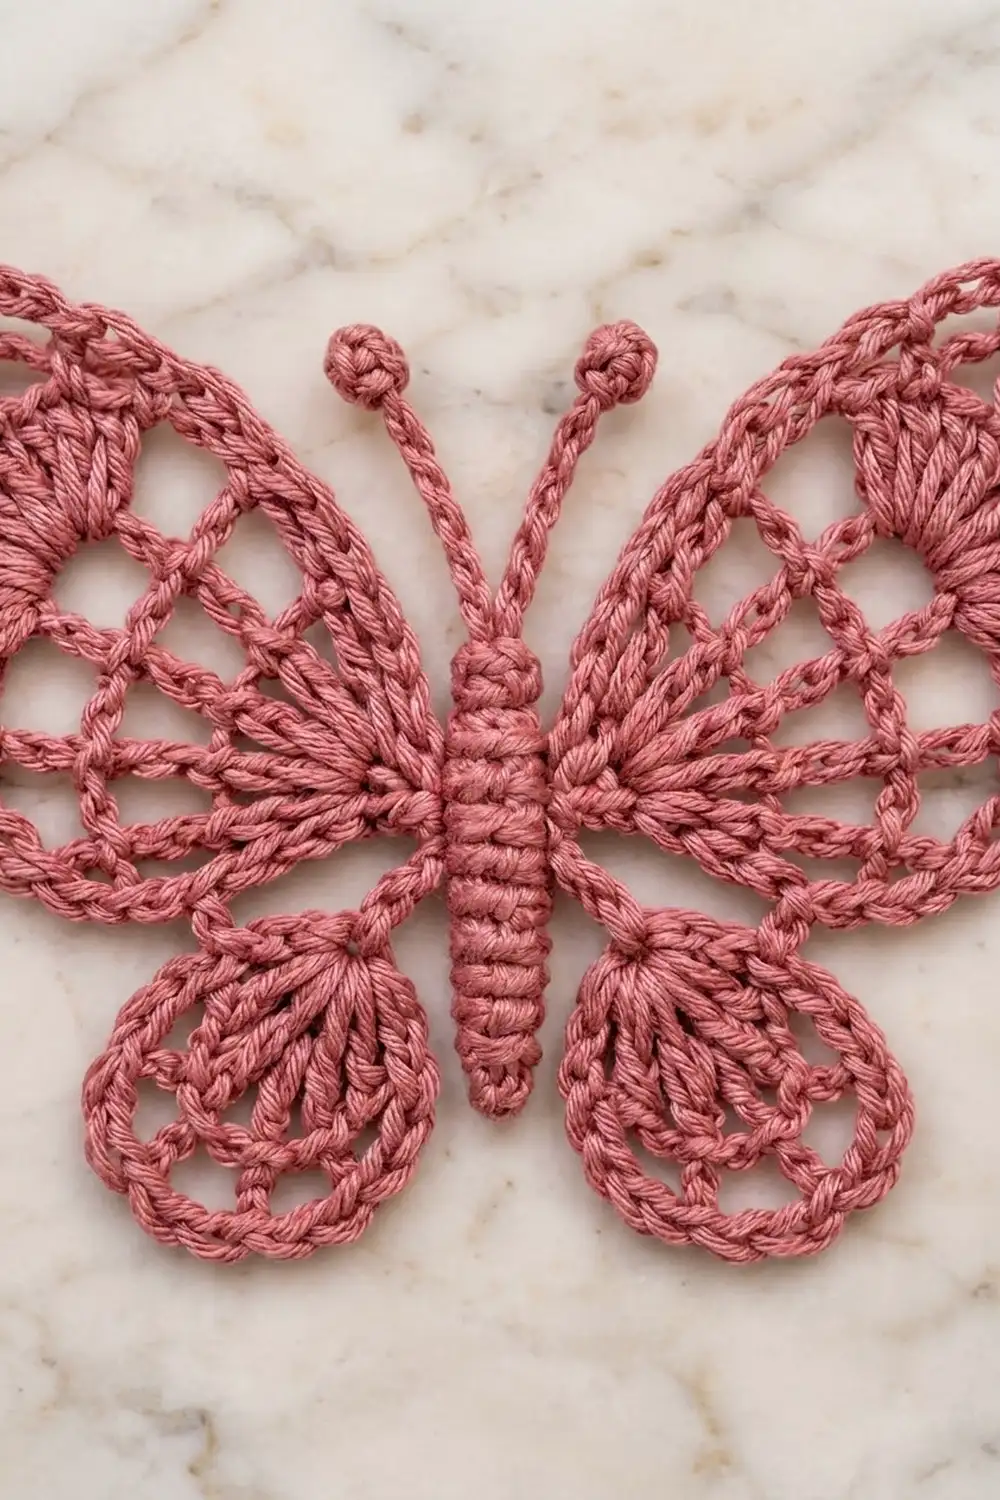
This lace butterfly is a single crochet motif in one soft dusty rose. Its open, airy wings sit on either side of a raised, ridged body topped with two antennae with round knobs at the tips. The large upper wings mix open mesh windows with a solid fan of double crochet. The smaller lower wings are teardrop shapes with a dense fan near the body.
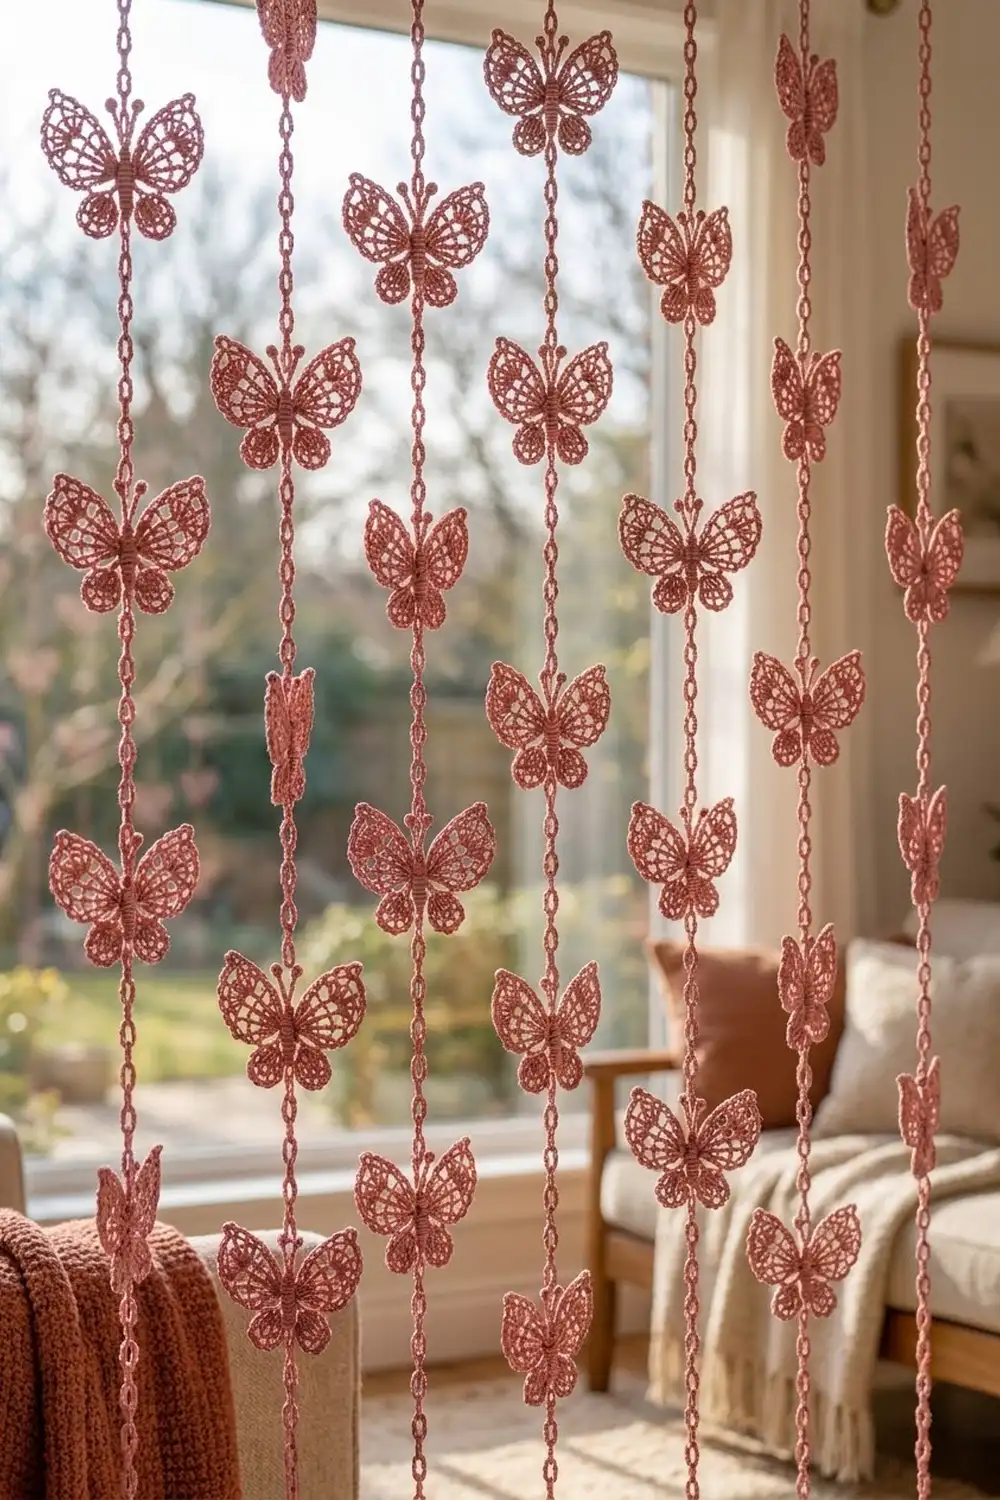
The look is vintage and delicate, but the motif is sturdy enough to handle. It works well as an appliqué, a gift tag, or a hanging ornament. Use mercerized cotton for crisp stitch definition and a slight sheen.
This pattern uses US crochet terms. The finished motif measures 6 in (15.2 cm) wide and 4.75 in (12.1 cm) tall from wing tip to wing tip, not counting the antennae.
The construction is simple. You work a ring of treble crochet rays, then build four wings in short rows off that ring. One continuous outline round of single crochet and chain-3 loops edges the whole wing panel. Last, you make a small ridged body with antennae and sew it down the center.
Finished Size and Construction
- Finished size: 6 in (15.2 cm) wide x 4.75 in (12.1 cm) tall, not counting the antennae
- Skill level: Intermediate
- Terminology: US crochet terms
- Yarn weight: Fine (weight 2 / sport) mercerized cotton
- Hook: 3.25 mm (US D/3)
- Number of pieces: 1 motif (a wing panel with a body sewn onto it)
- Layout: One butterfly, with two upper wings and two lower wings around a central body
- Body size: 3 in (7.6 cm) long x 0.5 in (1.3 cm) wide
- Size before border: 5.5 in (14.0 cm) x 4.25 in (10.8 cm)
- Border depth: 0.25 in (0.6 cm) on every outer edge
Materials
Use a smooth, tightly plied mercerized cotton. Fuzzy or loosely spun yarn will blur the mesh windows and the ridged body. Choose a muted, old-rose pink.
- Dusty rose: 15 g, about 51 m (56 yd)
This amount includes a margin of about 50% for a gauge swatch, the border round, and the sewing tail. One motif uses about 10 g.
Tools:
- 3.25 mm (US D/3) crochet hook
- Tapestry needle
- Scissors
- Stitch markers (4)
- A small amount of matching scrap yarn or fiberfill for the body
- Blocking mat, rust-proof pins, and a spray bottle
Abbreviations (US Terms)
- ch = chain
- sl st = slip stitch
- sc = single crochet
- dc = double crochet
- tr = treble crochet
- sc2tog = single crochet 2 together
- BLO = back loop only
- sp(s) = space(s)
- tch = turning chain
- RS = right side
Special stitch: Knob. Ch 3, then sl st in the 3rd ch from the hook to form a tiny ring. Work 5 sc into the ring, then sl st to the first sc.
Gauge and Checkpoints
Gauge: 20 sc and 24 rows = 4 in (10.2 cm), in sc worked in rows.
Make one complete motif first and check it before you make more. Lace can grow or shrink quickly, so the checkpoints below matter more than the swatch.
- After Rnd 1: the tr ring measures 1.5 in (3.8 cm) across.
- After Upper Wing Row 3: the wing reaches 2 in (5.1 cm) from the center of the ring.
- After Lower Wing Row 3: the wing reaches 1.75 in (4.4 cm) from the center of the ring.
- Before the border: the wing panel measures 5.5 in (14.0 cm) x 4.25 in (10.8 cm).
- After the border: the motif measures 6 in (15.2 cm) x 4.75 in (12.1 cm).
Too big? Go down to a 3.0 mm hook, or work your chains more snugly so they match your stitch height.
Too small? Go up to a 3.5 mm (US E/4) hook. Tight chains are the usual cause, so loosen them first.
Wing Panel
Center Ring
Rnd 1 (RS): Make a magic ring. Ch 5 (counts as tr + ch 1), tr in ring, ch 1; rep from * 14 more times. Join with a sl st in the 4th ch of the beginning ch-5. Pull the ring closed. (16 tr, 16 ch-1 sps)*
Fasten off. Use markers to divide the 16 ch-1 sps. Going clockwise from the top:
- 1 sp at the top = head sp
- 4 sps = right upper wing
- 1 sp = right side gap
- 2 sps = right lower wing
- 1 sp at the bottom = tail sp
- 2 sps = left lower wing
- 1 sp = left side gap
- 4 sps = left upper wing
That makes 1 + 4 + 1 + 2 + 1 + 2 + 1 + 4 = 16 sps. The head, tail, and gap sps stay empty until the border.
Upper Wings (Make 2)
Work each upper wing in rows over its 4 sps.
Row 1: With the RS facing, join the yarn in the upper-wing sp next to the side gap. Ch 3 (counts as dc), dc in the same sp, 2 dc in each of the next 3 sps. Turn. (8 dc)
Row 2: Ch 4 (counts as dc + ch 1), dc in the next dc, ch 1; rep from * 5 more times, dc in the top of the tch. Turn. (8 dc, 7 ch-1 sps)*
Row 3: Ch 5 (counts as dc + ch 2), dc in the next dc, ch 2; rep from * 5 more times, dc in the 3rd ch of the tch. Turn. (8 dc, 7 ch-2 sps)*
These rows make the long open rays that fan out from the body.
Row 4: You are now at the head side. Ch 1, sc in the first dc, skip the next ch-2 sp, 9 dc in the next dc (shell made), skip the next ch-2 sp, sc in the next dc, ch 5, skip the next ch-2 sp, sc in the next dc; rep from * 4 more times. Put the last sc in the 3rd ch of the tch. (7 sc, 1 shell of 9 dc, 5 ch-5 loops)*
The shell becomes the solid fan at the top outer corner of the wing. The ch-5 loops become the mesh along the outer side. Fasten off.
Lower Wings (Make 2)
Work each lower wing in rows over its 2 sps.
Row 1: With the RS facing, join the yarn in the lower-wing sp next to the side gap. Ch 3 (counts as dc), 4 dc in the same sp, 5 dc in the next sp. Turn. (10 dc)
Row 2: Ch 3 (counts as dc), dc in the same st, 2 dc in each of the next 8 dc, dc in the top of the tch. Turn. (19 dc)
This row makes the dense fan near the body.
Row 3: Ch 1, sc in the first dc, ch 4, skip the next dc, sc in the next dc; rep from * 8 more times. The last sc goes in the top of the tch. (10 sc, 9 ch-4 loops)*
Fasten off. Weave in the wing ends on the wrong side, hiding them inside the solid fans.
Body and Antennae
Work in continuous rounds without joining. Use a marker to keep track of the rounds.
Rnd 1: 6 sc in a magic ring. (6)
Rnd 2: (Sc in the next st, 2 sc in the next st) 3 times. (9)
Rnd 3: Sc in each st around. (9)
Rnd 4 (neck): (Sc in the next st, sc2tog) 3 times. (6)
Rnd 5: (Sc in the next st, 2 sc in the next st) 3 times. (9)
Rnds 6–16: Sc in BLO of each st around. (9)
The unworked front loops form ridges that give the body its segmented, coiled look. Stuff the body lightly with scrap yarn as you go.
Rnd 17: (Sc in the next st, sc2tog) 3 times. (6)
Rnd 18: Sc2tog 3 times. (3)
Fasten off, leaving a 12 in (30.5 cm) tail for sewing. The body measures 3 in (7.6 cm) long and 0.5 in (1.3 cm) wide.
Antennae (make 2): Join the yarn at the top of the head, between Rnd 1 and Rnd 2. Ch 8 for the stem, then work a Knob. Sl st in each of the 8 stem chains back to the head. Fasten off. Place the second antenna 2 sts away from the first. Each antenna is about 1.25 in (3.2 cm) long.
Border (Outline Round)
Border gauge: Each sc-and-ch-3 unit along the edge measures about 0.25 in (0.6 cm), and the border extends 0.25 in (0.6 cm) past the wing edge.
Work one continuous round around the whole wing panel. Join the yarn with a sl st in the head sp.
Right upper wing (head side first): Sc in the end of Row 1, ch 3, sc in the end of Row 2, ch 3, sc in the end of Row 3, ch 3, sc in the first sc of Row 4. Sc in the first dc of the shell, (ch 3, sc in the next dc) 8 times. Sc in the next sc. (2 sc, ch 3, 2 sc) in the next ch-5 loop, sc in the next sc; rep from * 4 more times. Ch 3, sc in the end of Row 3, ch 3, sc in the end of Row 2, ch 3, sc in the end of Row 1. (42 sc, 19 ch-3 loops)*
Sl st in the right side gap sp.
Right lower wing: Sc in the end of Row 1, ch 3, sc in the end of Row 2, ch 3, sc in the first sc of Row 3. (2 sc, ch 3, 2 sc) in the next ch-4 loop, sc in the next sc; rep from * 8 more times. Ch 3, sc in the end of Row 2, ch 3, sc in the end of Row 1. (50 sc, 13 ch-3 loops)*
Sl st in the tail sp.
Left lower wing: Work as for the right lower wing. (50 sc, 13 ch-3 loops)
Sl st in the left side gap sp.
Left upper wing (gap side first): Sc in the end of Row 1, ch 3, sc in the end of Row 2, ch 3, sc in the end of Row 3, ch 3, sc in the last sc of Row 4. (2 sc, ch 3, 2 sc) in the next ch-5 loop, sc in the next sc; rep from * 4 more times. Sc in the first dc of the shell, (ch 3, sc in the next dc) 8 times. Sc in the next sc. Ch 3, sc in the end of Row 3, ch 3, sc in the end of Row 2, ch 3, sc in the end of Row 1. (42 sc, 19 ch-3 loops)*
Join with a sl st in the first sl st. Fasten off.
Round total: 42 + 50 + 50 + 42 = 184 sc; 19 + 13 + 13 + 19 = 64 ch-3 loops; 4 sl sts into Rnd 1.
Why the math works:
- Upper wing (42 sc): 6 row-end sc + 7 sc (one in each of the 7 sc of Row 4) + 9 sc on the shell + 20 sc inside the 5 ch-5 loops (5 x 4).
- Upper wing loops (19): 6 along the side edges + 8 on the shell + 5 inside the ch-5 loops.
- Lower wing (50 sc): 4 row-end sc + 10 sc (one in each of the 10 sc of Row 3) + 36 sc inside the 9 ch-4 loops (9 x 4).
- Lower wing loops (13): 4 along the side edges + 9 inside the ch-4 loops.
Each chain loop gets 4 sc, which fits its length, so the edge lies flat without cupping or ruffling. The two upper wings have the same counts in mirror order, and so do the two lower wings, so the butterfly stays symmetrical.
Attach the Body
Lay the body down the center of the RS, with the head over the head sp and the tail over the tail sp. Pin it so it covers the whole tr ring. Using the tail and the tapestry needle, whipstitch the underside of the body to the tr posts and ch-1 sps below it, working down both sides. Keep the stitches in the grooves between the ridges so they don’t show.
Final Blocking
- Wet the motif in cool water and press out the extra water in a towel. Do not wring it.
- Lay it RS up on the blocking mat.
- Pin the center first, then the wing tips, to 6 in (15.2 cm) wide x 4.75 in (12.1 cm) tall.
- Pin out each mesh loop and each ch-3 loop of the border so it opens up.
- Spread the shell fans evenly and straighten the antennae.
- Mist lightly and let the motif dry completely before you unpin it.
Final Quality-Control Checklist
- Rnd 1 has 16 tr and 16 ch-1 sps, divided 1-4-1-2-1-2-1-4.
- Each upper wing has a 9-dc shell and 5 ch-5 loops.
- Each lower wing has 19 dc in Row 2 and 9 ch-4 loops in Row 3.
- The border has 184 sc and 64 ch-3 loops.
- The motif measures 6 in (15.2 cm) x 4.75 in (12.1 cm).
- The body is centered and covers the ring completely.
- Both antennae are the same length and both knobs are round.
- All ends are woven in and hidden in solid areas.
Troubleshooting
The center ring cups. Your tr are too short for 16 stitches. Loosen the ch-1 sps, or go up half a hook size for Rnd 1 only.
The wings ruffle. Your chains are too loose. Tighten your ch-2 and ch-5 loops until they lie flat.
The shell doesn’t fan out. Check that you skipped a ch-2 sp on both sides of the shell.
The border pulls the edge in. Work the row-end sc around the dc post, not into the edge strand alone.
The wings don’t match. Count each wing before the border and compare with the totals in “Why the math works.”
The body leans. Pin it at the head and tail before sewing, and sew both sides evenly.
Care
Hand wash in cool water with mild soap, then reshape and dry flat. Re-pin the loops if they lose their crispness.
Final Notes
The measurements are easy to check as you go. Rnd 1 measures 1.5 in (3.8 cm) across. After Row 3, the upper wings reach 2 in (5.1 cm) from the center and the lower wings reach 1.75 in (4.4 cm). Before the border, the panel measures 5.5 in (14.0 cm) x 4.25 in (10.8 cm). The 0.25 in (0.6 cm) border brings the butterfly to its final 6 in (15.2 cm) x 4.75 in (12.1 cm). If you check each stage, your butterfly will come out symmetrical and lacy.
Happy crocheting!