

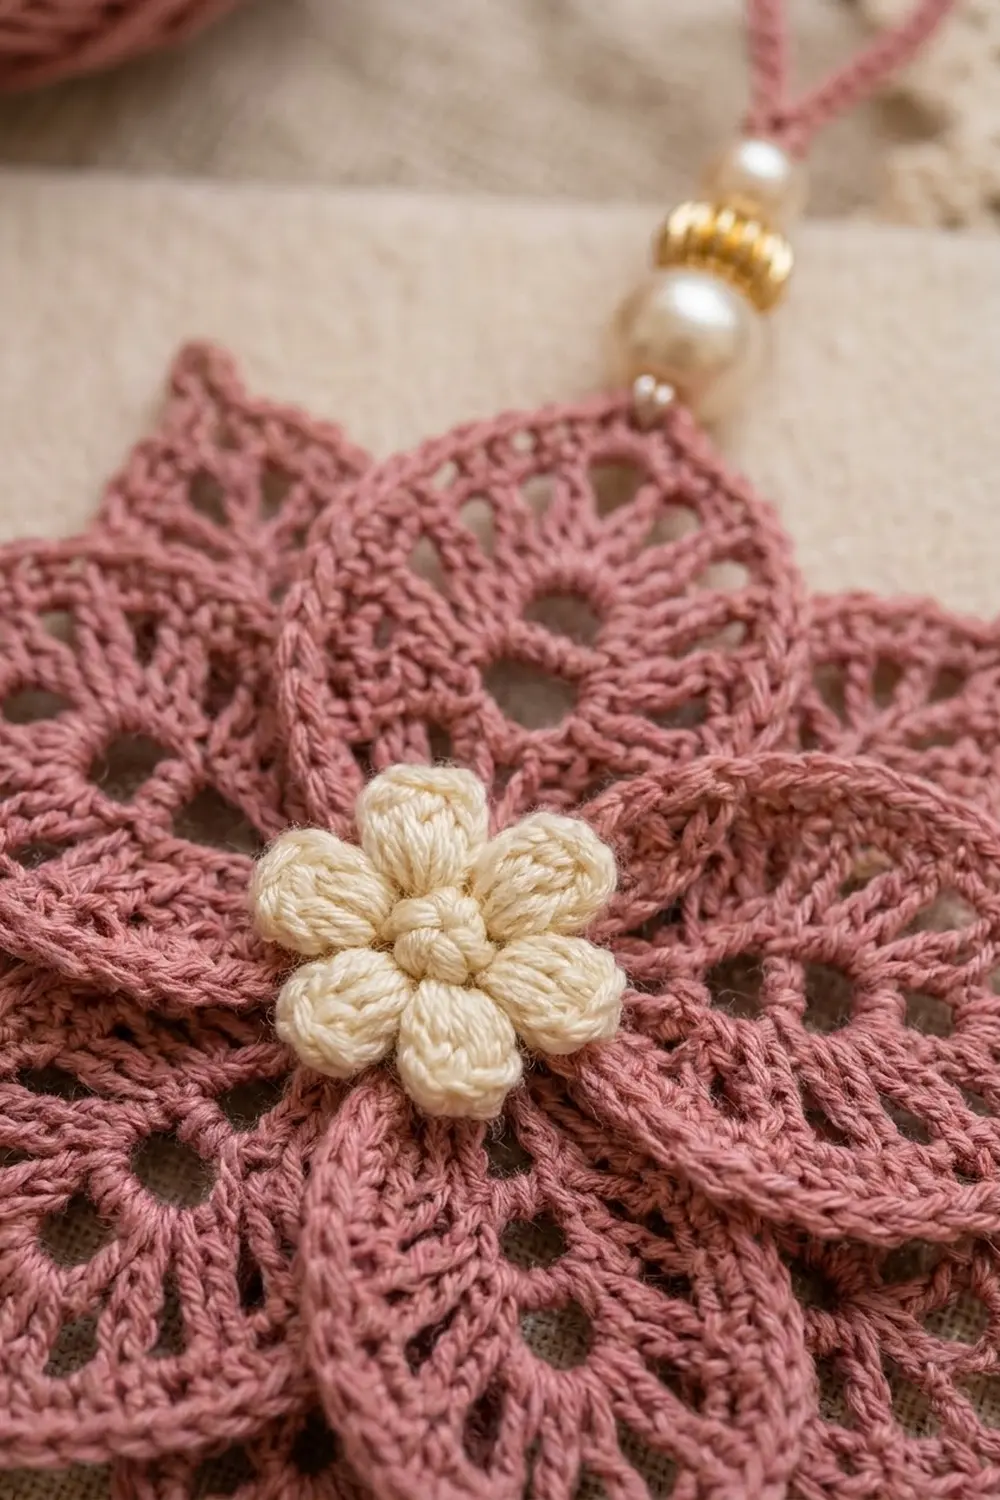
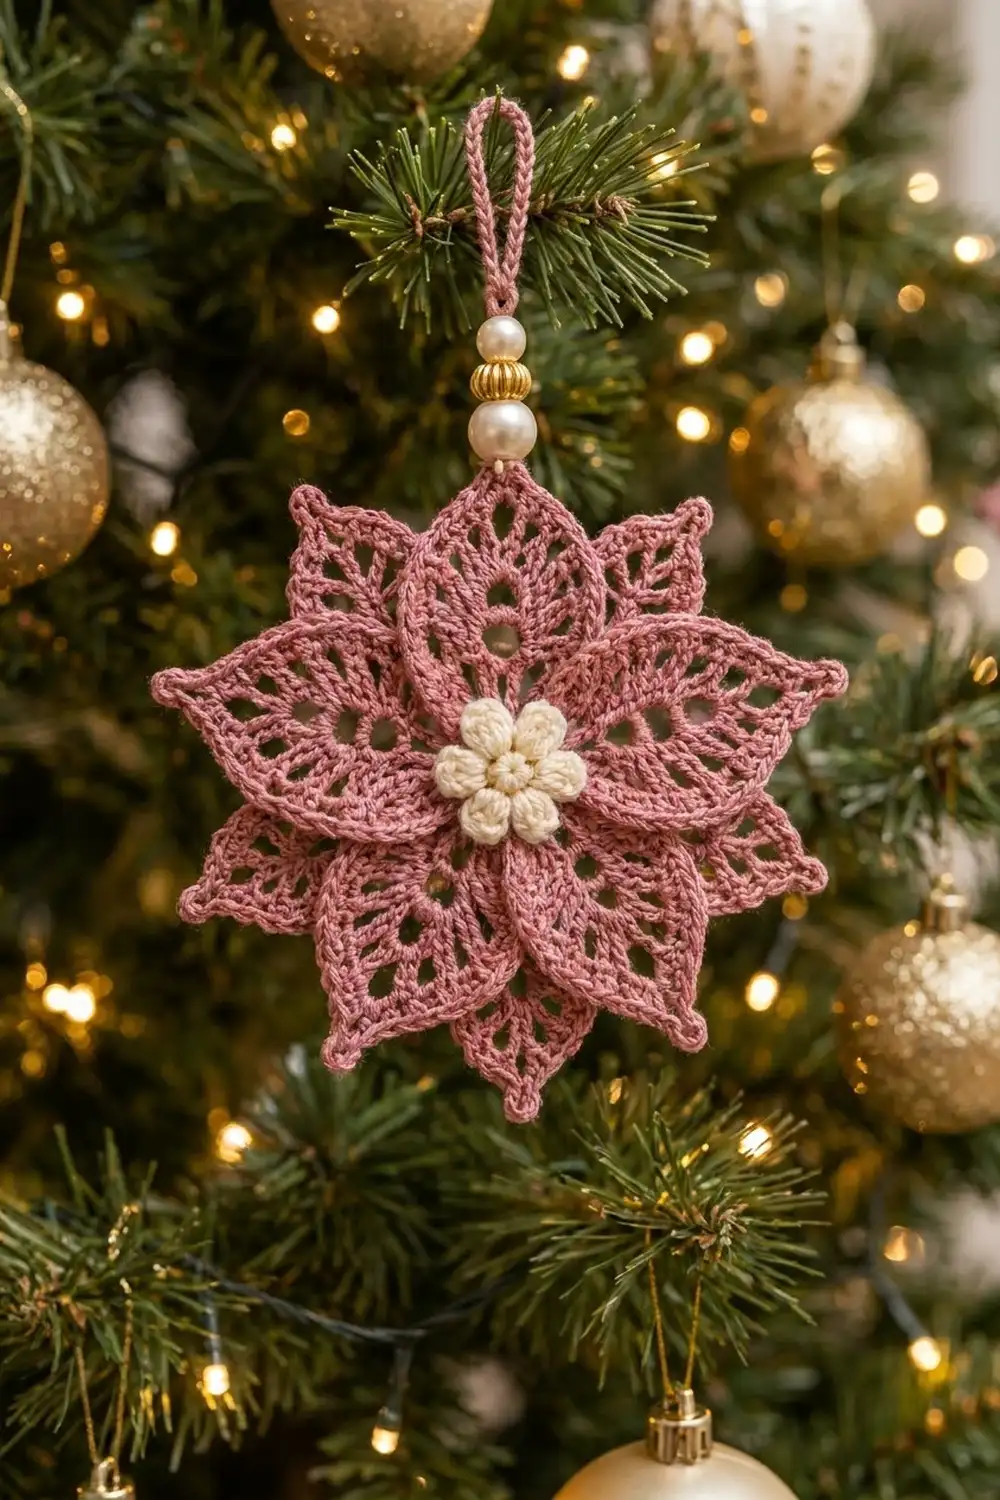
This lacy poinsettia ornament is a small star flower in dusty rose. It has two stacked layers of eight pointed, openwork petals and a plump cream flower in the center. A chain hanging loop with a short pearl-and-gold bead stack finishes it, so it’s ready to go on the tree.
There are two colors. Dusty rose (Color A) is used for both petal layers and the loop, and cream (Color B) is used for the center flower. The style is vintage lace with a crisp outline. Each petal has a solid stitch vein down the middle, a row of open eyelets on each side and a sharp chain point at the tip.
This pattern uses US crochet terms. The finished ornament measures 5.25 in (13.3 cm) from one petal tip to the opposite tip. It hangs 7.75 in (19.7 cm) tall including the bead stack and loop.
You’ll make three small pieces: a large back layer, a smaller front layer and the center flower. You then stack them with the front petals offset between the back petals and sew them together. The beaded hanging loop goes on last. Every petal is worked off a chain spine directly from the center rounds, so you never have to sew on individual petals.
Finished Size and Construction
- Finished size: 5.25 in (13.3 cm) across, tip to tip
- Hanging height: 7.75 in (19.7 cm) including the loop
- Skill level: Intermediate (working both sides of a chain, tall stitches, puff stitch)
- Terminology: US crochet terms
- Yarn weight: Sport / fine (#2) cotton
- Hook: 2.75 mm (C-2)
- Number of pieces: One ornament, built from 3 crocheted pieces plus a chain loop
- Layout: Back layer (8 petals), then the front layer (8 petals) turned half a petal, then the cream flower on top
- Piece sizes: Back layer 5.25 in (13.3 cm); front layer 4.5 in (11.4 cm); flower 1.25 in (3.2 cm)
- Size before rim: Back layer 5 in (12.7 cm); front layer 4.25 in (10.8 cm)
- Rim depth: About 1/8 in (0.3 cm) at each side of a layer
Materials
Choose a smooth, tightly plied mercerized or combed cotton in sport weight. The petals rely on tall stitches and crisp points, and cotton keeps both sharp after blocking. Acrylic will work, but the eyelets tend to close up and the tips curl more.
- Color A, dusty rose: 15 g, about 45 m (49 yd)
- Color B, cream: 3 g, about 9 m (10 yd)
These amounts include a margin of about 20% for a test piece and sewing tails.
Tools:
- 2.75 mm (C-2) crochet hook
- Tapestry needle thin enough to pass through the beads
- 2 pearl beads, one 8 mm and one 6 mm, with holes of at least 2 mm
- 1 gold spacer bead, 6 mm, with a hole of at least 2 mm
- Rustproof pins and a foam blocking board
- Spray starch, or a 1:1 mix of white craft glue and water (optional)
- Scissors and a ruler
Abbreviations (US Terms)
- ch – chain
- sl st – slip stitch
- sc – single crochet
- hdc – half double crochet
- dc – double crochet
- tr – treble crochet
- sk – skip
- sp – space
- st(s) – stitch(es)
Puff stitch (puff): Yarn over, insert the hook in the stitch, yarn over and pull up a loop about 3/8 in (1.0 cm) tall. Do this 3 times in the same stitch, then yarn over and pull through all 7 loops on the hook.
Chain positions: On each petal spine, the chains are numbered starting from the tip. Position 0 is the chain closest to the hook (the skipped tip chain). Position 1 is the 2nd chain from the hook. The highest-numbered chain sits next to the center.
Gauge and Checkpoints
Exact gauge isn’t critical for an ornament, but it controls how well the layers stack. Make the front layer first and measure it before you start the back layer.
- Checkpoint 1: Rounds 1–2 of either layer measure 1.25 in (3.2 cm) across, from the outer edge of one ch-3 loop to the opposite loop.
- Checkpoint 2: One finished front petal measures 1.625 in (4.1 cm) from the edge of Round 2 to the tip, and about 1 in (2.5 cm) across at its widest point.
- Checkpoint 3: The front layer is 4.5 in (11.4 cm) tip to tip. The back layer is 5.25 in (13.3 cm), with each back petal 2 in (5.1 cm) long.
- Checkpoint 4: The cream flower is 1.25 in (3.2 cm) across.
If it’s too big: Change to a 2.5 mm hook or work the spine chains tighter. Loose spines are the most common cause of long, floppy petals.
If it’s too small or stiff: Change to a 3 mm hook. If the trebles look cramped, pull the first loop of each tr up a little taller.
The back layer should be 0.75 in (1.9 cm) wider than the front layer, so each back point extends 0.375 in (1.0 cm) past the front points.
Front Layer (Color A)
Rnd 1: Make a magic ring, ch 1, work 16 sc into the ring and sl st to the first sc. Pull the ring tight. (16 sc)
Rnd 2: Ch 1, sc in the same st, ch 3, sk 1, [sc in the next st, ch 3, sk 1] 7 times, then sl st to the first sc. (8 sc, 8 ch-3 sps)
The piece should now measure 1.25 in (3.2 cm) across (Checkpoint 1).
Rnd 3 (petals): Sl st into the first ch-3 sp. Work the following petal sequence 8 times, once in each ch-3 sp.
Side 1 (tip to center): Ch 14. Working into the back bumps of the chain, sc in position 1, hdc in position 2, dc in position 3, [ch 1, sk 1, tr in the next ch] 3 times (tr in positions 5, 7 and 9), ch 1, sk 1, dc in position 11, ch 1, sk 1, hdc in position 13. Sl st in the same ch-3 sp. (8 sts, 5 ch-1 sps)
Side 2 (center to tip): Rotate the spine so the free loops face up. Working into those loops, hdc in position 13, ch 1, sk 1, dc in position 11, [ch 1, sk 1, tr in the next ch] 3 times (positions 9, 7 and 5), ch 1, sk 1, dc in position 3, hdc in position 2, sc in position 1. (8 sts, 5 ch-1 sps)
Point: Work (sc, ch 3, sc) into the tip chain at position 0.
Rim: Work back down Side 1 with 1 sc in each stitch and each ch-1 sp until you reach the center. Sl st in the same ch-3 sp. (13 sc)
Move: Sl st in the next sc of Rnd 2, then sl st into the next ch-3 sp.
After the 8th petal’s rim, sl st in the same ch-3 sp and then in the next sc. Fasten off, leaving a 12 in (30.5 cm) tail for sewing.
Per petal: 8 + 8 + 2 + 13 = 31 stitches, plus 10 ch-1 eyelets and one ch-3 point. Layer total: 8 petals, 248 stitches.
The skipped chains make 5 eyelets on each side of the spine, and the solid spine between them reads as the center vein. The trebles widen the middle of the petal and the shorter stitches taper both ends, so you get a pointed leaf shape without any shaping rows. The rim gives a firm edge along Side 1, and the tops of the Side 2 stitches form the opposite edge.
Back Layer (Color A)
Rnds 1–2: Work these the same as for the front layer. (8 sc, 8 ch-3 sps; 1.25 in / 3.2 cm across)
Rnd 3 (petals): Sl st into the first ch-3 sp. Work the following petal sequence 8 times, once in each ch-3 sp.
Side 1: Ch 16. Working into the back bumps, sc in position 1, hdc in position 2, dc in position 3, [ch 1, sk 1, tr in the next ch] 4 times (positions 5, 7, 9 and 11), ch 1, sk 1, dc in position 13, ch 1, sk 1, hdc in position 15. Sl st in the same ch-3 sp. (9 sts, 6 ch-1 sps)
Side 2: Working into the free loops, hdc in position 15, ch 1, sk 1, dc in position 13, [ch 1, sk 1, tr in the next ch] 4 times (positions 11, 9, 7 and 5), ch 1, sk 1, dc in position 3, hdc in position 2, sc in position 1. (9 sts, 6 ch-1 sps)
Point: Work (sc, ch 3, sc) into position 0.
Rim: Work 1 sc in each stitch and each ch-1 sp down Side 1. Sl st in the same ch-3 sp. (15 sc)
Move: Sl st in the next sc, then sl st into the next ch-3 sp.
Finish the same way as the front layer, leaving a 12 in (30.5 cm) tail.
Per petal: 9 + 9 + 2 + 15 = 35 stitches, plus 12 ch-1 eyelets and one ch-3 point. Layer total: 8 petals, 280 stitches.
Each back petal is 2 chains longer than a front petal and has one more treble on each side. That adds 0.375 in (1.0 cm) to every petal, which gives the 0.75 in (1.9 cm) difference across the layer.
Center Flower (Color B)
Rnd 1: Make a magic ring, ch 1, work 10 sc into the ring and sl st to the first sc. (10 sc)
Rnd 2: Work (ch 2, puff, ch 1, puff, ch 2) all in the next sc, then sl st in the next sc. Repeat from * 4 more times. The last sl st lands in the first sc of Rnd 1. (5 petals, 10 puffs)*
Fasten off, leaving a 10 in (25.4 cm) tail. Thread the beginning tail onto the needle and make 3 small French knots in the center ring to create the bobbled middle. Secure that tail on the back.
Each petal is made of two puffs side by side. The ch-2 at each end rounds the petal off, and the sl st between petals pinches the flower into five plump lobes.
Assembly: Stacking the Layers
- Lay the back layer face up.
- Place the front layer on top with the centers matched. Turn it until each front petal sits exactly between two back petals. All 8 back points should show evenly.
- Using the front layer’s tail, whipstitch through the sc of Rnd 2 on both layers. Sew only the centers so the petals stay free and lift slightly.
- Place the cream flower over the joined centers. Sew around its Rnd 1 with the Color B tail, then add one tacking stitch at the base of each puff petal.
- Weave in all the ends on the back, hiding them inside the center rounds.
Hanging Loop and Beads
- Using Color A, leave a 6 in (15.2 cm) tail, ch 26 and fasten off, leaving another 6 in (15.2 cm) tail. The chain should be about 3.5 in (8.9 cm) long.
- Fold the chain in half and thread both tails together onto the needle.
- Thread on the 6 mm pearl, the gold spacer and then the 8 mm pearl, and slide them up to the fold. The loop above the beads should be 1.75 in (4.4 cm), and the bead stack should be 0.75 in (1.9 cm).
- Choose one front petal to be the top. Sew both tails into its point and through the back layer underneath. Knot them securely and weave the tails into the rim.
Border: Petal Rim and Points
There is no separate border round on this ornament. Each petal’s rim and point are worked as part of Round 3, so the edge is finished when that round ends. The edge stitch counts still need to match the petal counts, and here is how they work out.
Rim gauge: 1 sc per stitch or ch-1 space, which comes to about 8 sc per 1 in (2.5 cm) of edge.
Front petal edge:
- Side 2 edge: 8 sts + 5 ch-1 sps = 13 positions
- Point: (sc, ch 3, sc)
- Rim down Side 1: 13 sc
Back petal edge:
- Side 2 edge: 9 sts + 6 ch-1 sps = 15 positions
- Point: (sc, ch 3, sc)
- Rim down Side 1: 15 sc
Why the math works: The number of rim sc always equals the stitches plus spaces on Side 1. That total also equals the number of spine positions used (13 or 15). Working 1 sc per position makes the rim exactly as long as the edge it covers, so it won’t ruffle or pull. The point goes into position 0, which neither side used, so no stitch gets worked twice.
The rim adds 1/8 in (0.3 cm) on each side of a layer. That brings the front layer from 4.25 in (10.8 cm) to 4.5 in (11.4 cm), and the back layer from 5 in (12.7 cm) to 5.25 in (13.3 cm).
Final Blocking
- Mist the assembled ornament with water until it’s damp but not dripping.
- Pin the back layer first. Put one pin through each ch-3 point and pull the points out evenly to a 5.25 in (13.3 cm) circle.
- Pin each front point between two back points, on a 4.5 in (11.4 cm) circle.
- Use a fingertip to open each eyelet so the holes line up along the vein.
- Spray with starch, or brush on the glue mix for a stiffer ornament. Keep it off the cream flower so the puffs stay soft.
- Let it dry completely (at least 12 hours) before removing the pins.
Final Quality-Control Checklist
- Both layers have 8 petals, and every petal has a sharp ch-3 point.
- Front petals have 5 eyelets per side, and back petals have 6.
- Each back point extends 0.375 in (1.0 cm) past the front points.
- The flower has 5 even petals, with 2 puffs in each.
- The ornament measures 5.25 in (13.3 cm) across and 7.75 in (19.7 cm) tall with the loop.
- The bead stack sits snugly against the petal tip.
- No tails show on the front.
Troubleshooting
Petals twist: Side 2 is going into the wrong loops. Work Side 1 into the back bumps and Side 2 into the two loops that are left.
Eyelets disappear: Check that you skip a chain for every ch 1. On the first petal, count the positions out loud as you go.
Center cups: Rnd 1 is too tight. Leave the ring slightly looser, or loosen the ch-3 loops.
Petals ruffle: The spine chain is too loose. Work the chain with a smaller hook, then switch back.
Back points are hidden: The back layer is too small. Recheck Checkpoint 3, or work the back layer with a hook 0.25 mm larger.
Ornament tilts when hung: The loop isn’t centered on a petal tip. Re-sew it exactly at the point.
Care
Spot clean with cool water and mild soap, then reshape it and pin it out to dry. Store it flat in tissue paper so the points don’t get crushed.
Final Notes
The measurements build on each other in a short chain:
- Center rounds: 1.25 in (3.2 cm)
- Front petals: 1.625 in (4.1 cm) long, making a 4.5 in (11.4 cm) front layer
- Back petals: 2 in (5.1 cm) long, making a 5.25 in (13.3 cm) back layer
- Cream flower: 1.25 in (3.2 cm), sewn on top
- Loop and bead stack: 2.5 in (6.4 cm) together, for a 7.75 in (19.7 cm) hanging ornament
If every checkpoint matches, the layers will stack cleanly and the points will block crisp.
Happy crocheting!