

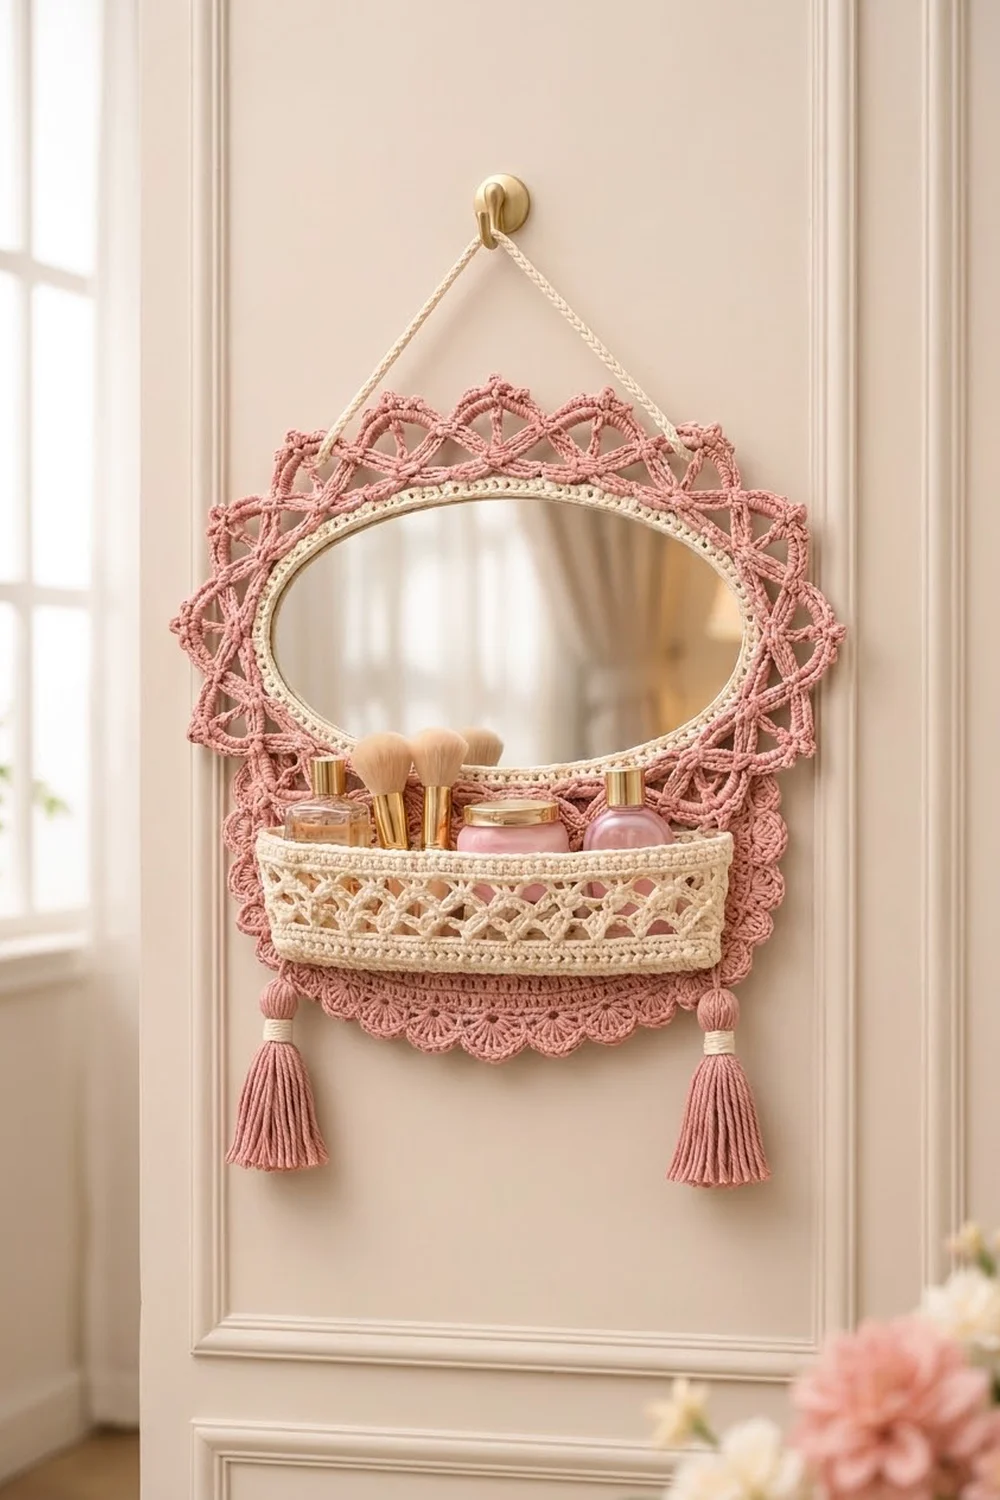
This oval wall mirror has a deep, lacy frame of dusty rose chain-loop trellis with tiny picot points all around. A narrow cream bezel with small ladder windows hugs the glass. Below the mirror, a cream lattice pocket holds brushes, perfume and small jars.
The palette uses two colors. Dusty rose is for the frame, lower panel and tassels. Warm cream is for the bezel, pocket, hanging cord and tassel wraps. The style is soft and vintage, with a boho touch from the chunky tassels.
The pattern uses US crochet terms. The finished organizer measures about 17 1/2 in wide x 17 1/2 in tall (44.5 x 44.5 cm), not counting the cord and tassels.
You work the cream bezel and rose frame as one set of joined rounds. Next you add a small rose panel worked in rows, then make a pocket in rounds on an oval base. Finally you assemble everything around a 10 x 7 in (25.4 x 17.8 cm) oval mirror.
Finished Size and Construction
- Finished size: about 17 1/2 x 17 1/2 in (44.5 x 44.5 cm), excluding cord and tassels
- Skill level: Intermediate
- Terminology: US
- Yarn weight: Worsted (#4) cotton
- Hook: 4.0 mm (G-6)
- Number of pieces: 1 finished item made from 6 components (frame, lower panel, pocket, 2 tassels, hanging cord)
- Layout: mirror in the oval frame; panel behind the lower frame; pocket centered in front
- Frame size: 17 1/2 x 14 3/4 in (44.5 x 37.5 cm)
- Frame before border: 16 x 13 1/4 in (40.6 x 33.7 cm)
- Border depth: 3/4 in (1.9 cm) on the frame and on the panel
Materials
Choose a smooth, firm 100% cotton worsted. Cotton holds the lattice shape and won’t stretch when the pocket is full. Acrylic lets the loops sag.
- Dusty rose: 150 g / 255 m (279 yd)
- Cream: 80 g / 136 m (149 yd)
These quantities include a margin of about 15%.
Tools and supplies:
- 4.0 mm (G-6) hook
- Tapestry needle and scissors
- Stitch markers (at least 4)
- Oval acrylic mirror, 10 x 7 in (25.4 x 17.8 cm), 1/8 in (0.3 cm) thick
- Foam board or heavy card, cut to an 11 x 8 1/4 in (27.9 x 21.0 cm) oval
- Felt, cut to a 12 x 9 1/4 in (30.5 x 23.5 cm) oval
- Clear craft glue suitable for acrylic
- Cardboard strip 5 1/2 in (14.0 cm) long, for tassels
- Rustproof pins and a blocking board
Abbreviations (US Terms)
- ch: chain
- sl st: slip stitch
- sc: single crochet
- hdc: half double crochet
- dc: double crochet
- sc2tog: single crochet 2 together
- BLO: back loop only
- sk: skip
- sp: space
- st(s): stitch(es)
- MR: magic ring
- Fsc: foundation single crochet
Fsc: Ch 2, insert hook in 2nd ch from hook, yo, pull up a loop, yo, draw through 1 loop (the “chain”), yo, draw through 2 loops. For each following Fsc, insert hook into the “chain” of the previous stitch and repeat.
Picot: Ch 3, sl st in 3rd ch from hook.
Gauge and Checkpoints
- sc: 16 sts and 16 rows = 4 in (10.2 cm)
- dc: 16 sts and 8 rows = 4 in (10.2 cm)
Test with the frame itself. Work cream Rnds 1–3, then measure before starting the rose rounds.
Checkpoint 1 (after Rnd 1): The 96-st ring measures about 24 in (61.0 cm) around. Shaped as an oval, the opening is about 9 x 6 1/4 in (22.9 x 15.9 cm). It overlaps the mirror by about 1/2 in (1.3 cm) on the long sides and 3/8 in (1.0 cm) on the short sides.
Checkpoint 2 (after Rnd 3): The bezel is about 1 in (2.5 cm) wide, and its outer edge matches the 11 x 8 1/4 in (27.9 x 21.0 cm) board.
Checkpoint 3 (after Rnd 7): The frame lies flat at about 16 x 13 1/4 in (40.6 x 33.7 cm).
If your ring is longer than 24 in (61.0 cm), go down a hook size. If it’s shorter, go up a hook size. Small differences in the loop rounds are fine, but the opening must overlap the mirror.
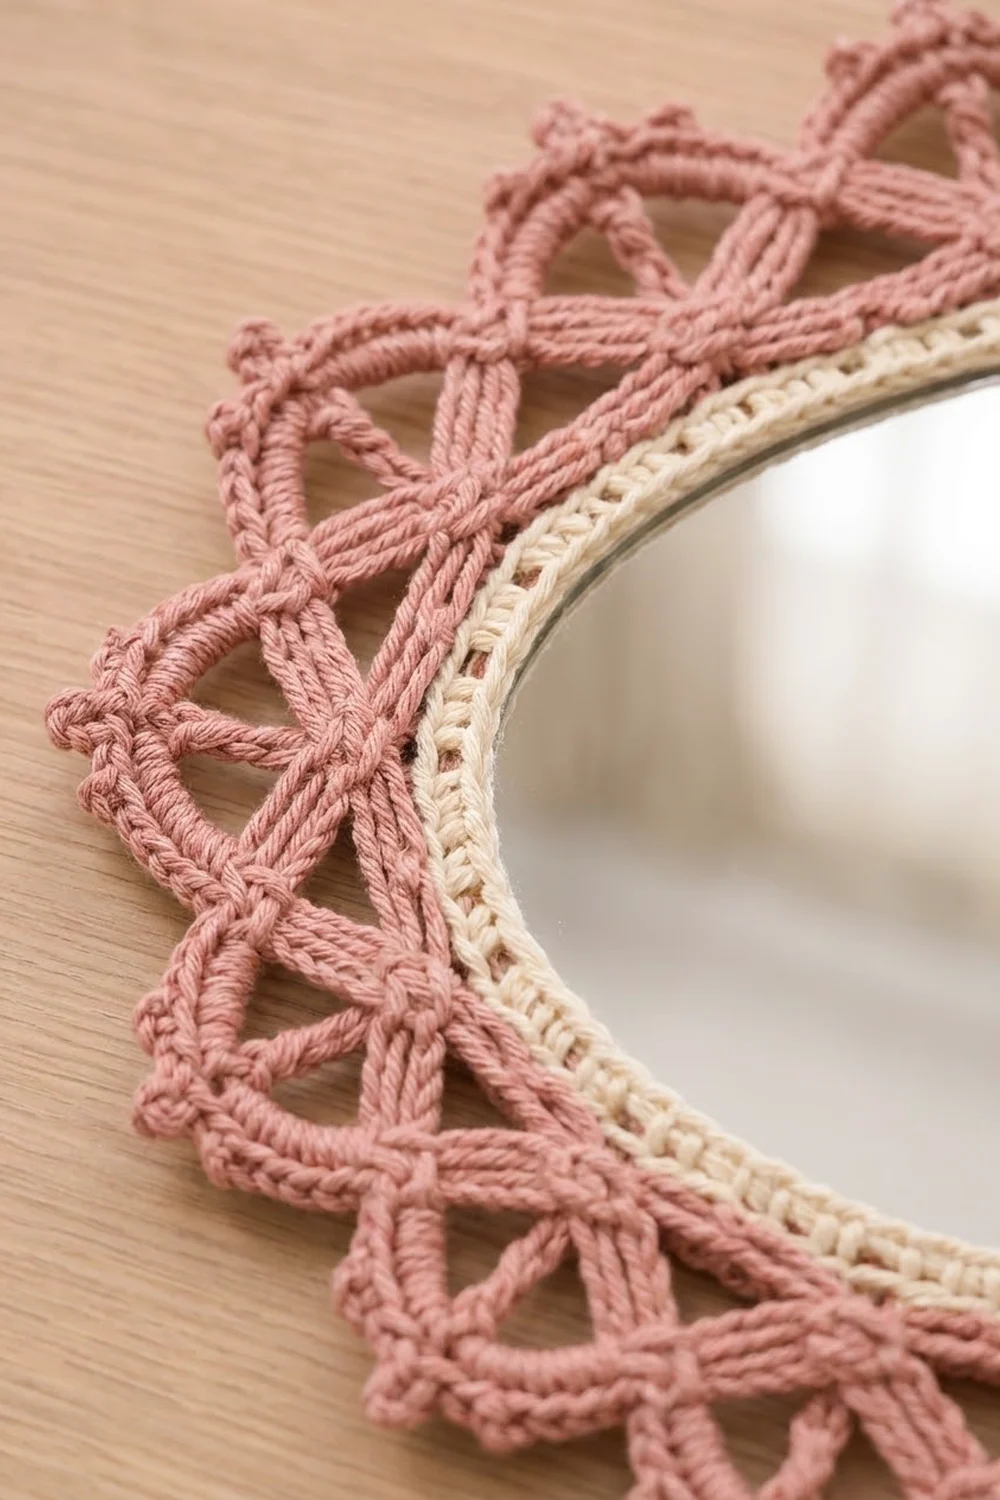
Frame (Bezel and Lattice)
Rnd 1 (cream): Fsc 96, join with sl st to first st without twisting. (96 sts)
Rnd 2: Ch 1, [sc in next 7 sts, 2 sc in next st] 12 times, join. (108 sts)
Rnd 3 (ladder windows): Ch 4 (counts as dc + ch 1), sk next st, [dc in next st, ch 1, sk next st] 3 times, *(dc, ch 1) in next st, [dc in next st, ch 1, sk next st] 4 times; repeat from * 10 more times, (dc, ch 1) in last st, join to 3rd ch of beginning ch-4. Fasten off cream. (60 dc + 60 ch-1 sps = 120 sts)
Check the math. The round has 48 plain units (2 sts used, 2 made) and 12 increase units (1 st used, 2 made). That uses 96 + 12 = 108 sts and makes 96 + 24 = 120.
Rnd 4 (join rose): Join rose in any dc. Ch 1, sc in each dc and each ch-1 sp around, join. (120 sts)
Rnd 5: Ch 1, sc in first st, *ch 6, sk 2, sc in next st; repeat from * around, ending ch 6, sk 2, join to first sc. (40 ch-6 loops)
Rnd 6: Sl st in next 3 ch, ch 1, sc in same loop, *ch 7, sc in next ch-6 loop; repeat from * around, ending ch 7, join to first sc. (40 ch-7 loops)
Rnd 7: Sl st in next 4 ch, ch 1, sc in same loop, *ch 8, sc in next ch-7 loop; repeat from * around, ending ch 8, join to first sc. (40 ch-8 loops)
Each round anchors in the center of the loops below. This offsets and crosses the loops into the interlaced diamond lattice. Don’t fasten off, because the border continues from here.
Lower Panel
Worked in rose, in rows from the bottom edge up.
Row 1: Ch 51, dc in 4th ch from hook and each ch across, turn. (49 dc; the skipped ch count as 1 dc)
Rows 2–5: Ch 3 (counts as dc), dc in first st, dc in each st to last st, 2 dc in last st, turn. (51, 53, 55, 57 dc)
Rows 6–8: Ch 3, dc in each st across, turn. (57 dc)
Fasten off. The panel measures about 14 1/4 in (36.2 cm) across the top, 12 1/4 in (31.1 cm) across the bottom and 4 in (10.2 cm) tall.
Worked in cream, in joined rounds on an oval base.
Rnd 1: Ch 42, sc in 2nd ch from hook, sc in next 39 ch, 3 sc in last ch. Working along the other side of the chain, sc in next 39 ch, 2 sc in last ch (the same ch as the first sc), join. (84 sts)
Rnd 2: Ch 1, 2 sc in first st, sc in next 39 sts, 2 sc in each of next 3 sts, sc in next 39 sts, 2 sc in each of last 2 sts, join. (90 sts)
Rnd 3: Ch 1, sc in BLO of each st, join. (90 sts) This turns the wall up and leaves a ridge of free front loops.
Rnd 4: Ch 1, sc in each st, join. (90 sts)
Rnd 5: Ch 1, sc in first st, *ch 5, sk 4, sc in next st; repeat from * around, ending ch 5, sk 4, join. (18 ch-5 loops)
Rnds 6–8: Sl st in next 3 ch, ch 1, sc in same loop, *ch 5, sc in next loop; repeat from * around, ending ch 5, join. (18 ch-5 loops each round)
Rnd 9: Ch 1, 5 sc in each ch-5 loop, join. (90 sts)
Rnds 10–11: Ch 1, sc in each st, join. (90 sts) Fasten off.
The pocket measures about 11 1/4 in (28.6 cm) wide, 3 1/2 in (8.9 cm) tall and 1 1/4 in (3.2 cm) deep. Each flattened half (front and back) has 45 sts.
Make All Pieces
- Rose: frame Rnds 4–7 and border, lower panel, 2 tassels with caps
- Cream: frame Rnds 1–3, pocket, hanging cord, tassel wraps
Tassel cap (make 2, rose): Rnd 1: 6 sc in MR. (6) Rnd 2: 2 sc in each st. (12) Rnds 3–4: sc in each st. (12) Rnd 5: sc2tog 6 times. (6) Fasten off.
Tassel (make 2, rose): Wrap rose 30 times around the 5 1/2 in (14.0 cm) card. Tie the top with a 12 in (30.5 cm) strand and cut the bottom loops. Thread both tie ends up through a cap so it sits on the tassel head. Wrap cream 6 times about 1/2 in (1.3 cm) below the cap and knot. Trim the tassel to 5 in (12.7 cm).
Hanging cord (cream): Ch 100, sl st in back bump of each ch. The cord is about 25 in (63.5 cm) long.
Layout grid:
          [ cord ]
   [  FRAME + MIRROR  ]
   [  FRAME + MIRROR  ]
 [PANEL][ POCKET ][PANEL]
 [ PANEL + SCALLOP EDGE ]
  [tassel]      [tassel]
Joining
- Mirror: Glue the mirror to the center of the board. Lay the frame face down. Place the board, mirror side down, into the opening so the bezel overlaps the glass all around.
- Backing: Lay the felt over the board. Whipstitch the felt edge to the back bars of Rnd 4, one whipstitch per stitch (120 total). This holds the board between the bezel and the felt.
- Panel: Place the panel behind the frame with the right side facing out, so its top edge is 2 in (5.1 cm) above the frame’s bottom edge. Whipstitch Row 8 to the felt and to Rnd 5 wherever they meet. The lower 2 in (5.1 cm) of the panel and its 3/4 in (1.9 cm) border show below the frame.
- Pocket: Find the 45 free front loops along the back half of pocket Rnd 2. Whipstitch them one-to-one to the 45 center sts of panel Row 4, sewing through the lattice where the frame overlaps. Leave 5 panel sts free at each end (5 + 45 + 5 = 55). Tack the back half of Rnd 11 at 5 evenly spaced points, at the lower edge of the cream bezel.
- Cord: Count 4 loops left and right from the top-center Rnd 7 loop. Tie one cord end around each of those anchor sc, about 8 in (20.3 cm) apart, and weave in.
- Tassels: Tie one tassel to each bottom corner of the panel border so it hangs about 1 in (2.5 cm) below the scallops.
Keep whipstitches snug but not tight, because pulled stitches pucker the lattice. After joining, check that the piece measures about 17 1/2 x 17 1/2 in (44.5 x 44.5 cm).
Border
Work the border at sc gauge: one border stitch per chain or stitch, so the edges stay flat.
Frame Picot Edge
Rnd 8 (rose): Sl st into the first ch-8 loop. Ch 1, then work (2 sc, hdc, dc, picot, dc, hdc, 2 sc) in each ch-8 loop, join, fasten off.
Counts: 40 fans, each with 8 sts + 1 picot (320 sts + 40 picots). Top half: 20 fans. Bottom half: 20 fans. Each quarter: 10 fans.
Why it works: Rnd 4 has 120 sts, and 120 ÷ 3 = 40 loops. Rnds 5–7 keep exactly 40. Eight stitches in an 8-ch loop is one stitch per chain, so the edge doesn’t ruffle or cup. The border adds 3/4 in (1.9 cm) per side, taking the frame from 16 x 13 1/4 in (40.6 x 33.7 cm) to 17 1/2 x 14 3/4 in (44.5 x 37.5 cm).
Panel Scallop Edge
Row 1 (rose): With the right side facing, join at the top-left corner. Work 2 sc in each row end down the left side (16 sc). Then work across the 49 sts at the base of Row 1: sc in first st, *sk 2, 5 dc in next st, sk 2, sc in next st; repeat from * 7 more times. Work 2 sc in each row end up the right side (16 sc), turn.
Counts: right side 16 sc; bottom 8 scallops (9 sc + 40 dc = 49 sts); left side 16 sc. Total 81 sts.
Row 2: Sl st in each of the 16 side sc and in the corner sc. *Sc in next 2 dc, (sc, picot, sc) in next dc, sc in next 2 dc, sl st in next sc; repeat from * 7 more times. Sl st in each of the 16 sc on the other side. Fasten off.
Why it works: The bottom edge has 49 sts. One sc plus 8 repeats of 6 sts (1 + 48 = 49) ends with a sc in the last stitch, so both corners match. Two sc per dc row end matches the 1/2 in (1.3 cm) row height at 4 sc per inch.
Final Blocking
- Weave in all ends.
- Lay the assembled piece flat, face up, on a blocking board.
- Pin the 40 picot points evenly around the frame. Check that the frame is 17 1/2 in (44.5 cm) wide and 14 3/4 in (37.5 cm) tall.
- Pin each of the 8 panel scallops at its picot.
- Mist the yarn lightly, keeping water away from the board and felt.
- Shape the pocket lattice so the diamonds open evenly.
- Let it dry completely, at least 12 hours, before hanging.
Final Quality-Control Checklist
- Bezel overlaps the mirror evenly all around
- 120 sts in Rnd 4; 40 loops in each of Rnds 5–7
- 40 picot fans, evenly spaced
- Panel has 57 sts at the top, 49 at the bottom and 8 scallops
- Pocket has 90 sts, 18 loops in Rnds 5–8 and 45 sts per half
- Pocket is centered with 5 panel sts free at each end
- Cord ends are 4 loops from top center on each side
- Tassels are both 5 in (12.7 cm)
- Piece hangs level and lies flat against the wall
Troubleshooting
- Frame ruffles: Recount Rnd 4 to 120. If the count is right, the loops are loose, so drop a hook size for Rnds 5–7.
- Frame cups: The chains are tight. Go up a hook size for the loop rounds only.
- Mirror slips through: The opening is too large. Rework Rnd 1 with a smaller hook.
- Pocket tips forward: Add more tacking points along Rnd 11.
- Piece tilts: Check that both cord ends are the same number of loops from center.
- Tassel cap slides: Tighten the tie and add a small stitch through the cap.
Care
Dust with a soft brush or a hair dryer on the cool setting. Spot clean with a damp cloth. Don’t soak it, because the board is inside.
Final Notes
Here is the measurement chain:
- A 96-st ring of about 24 in (61.0 cm) sets the opening.
- Three cream rounds build the bezel to fit the 11 x 8 1/4 in (27.9 x 21.0 cm) board.
- The 120-st rose round divides into 40 loops. These carry through to 40 picot fans and a 17 1/2 x 14 3/4 in (44.5 x 37.5 cm) frame.
- The 49-st panel edge gives 8 even scallops.
- The 90-st pocket splits into two 45-st halves that sit centered on the panel’s 55-st row.
Check each count as you go, and every part will fit without guesswork.
Happy crocheting!