

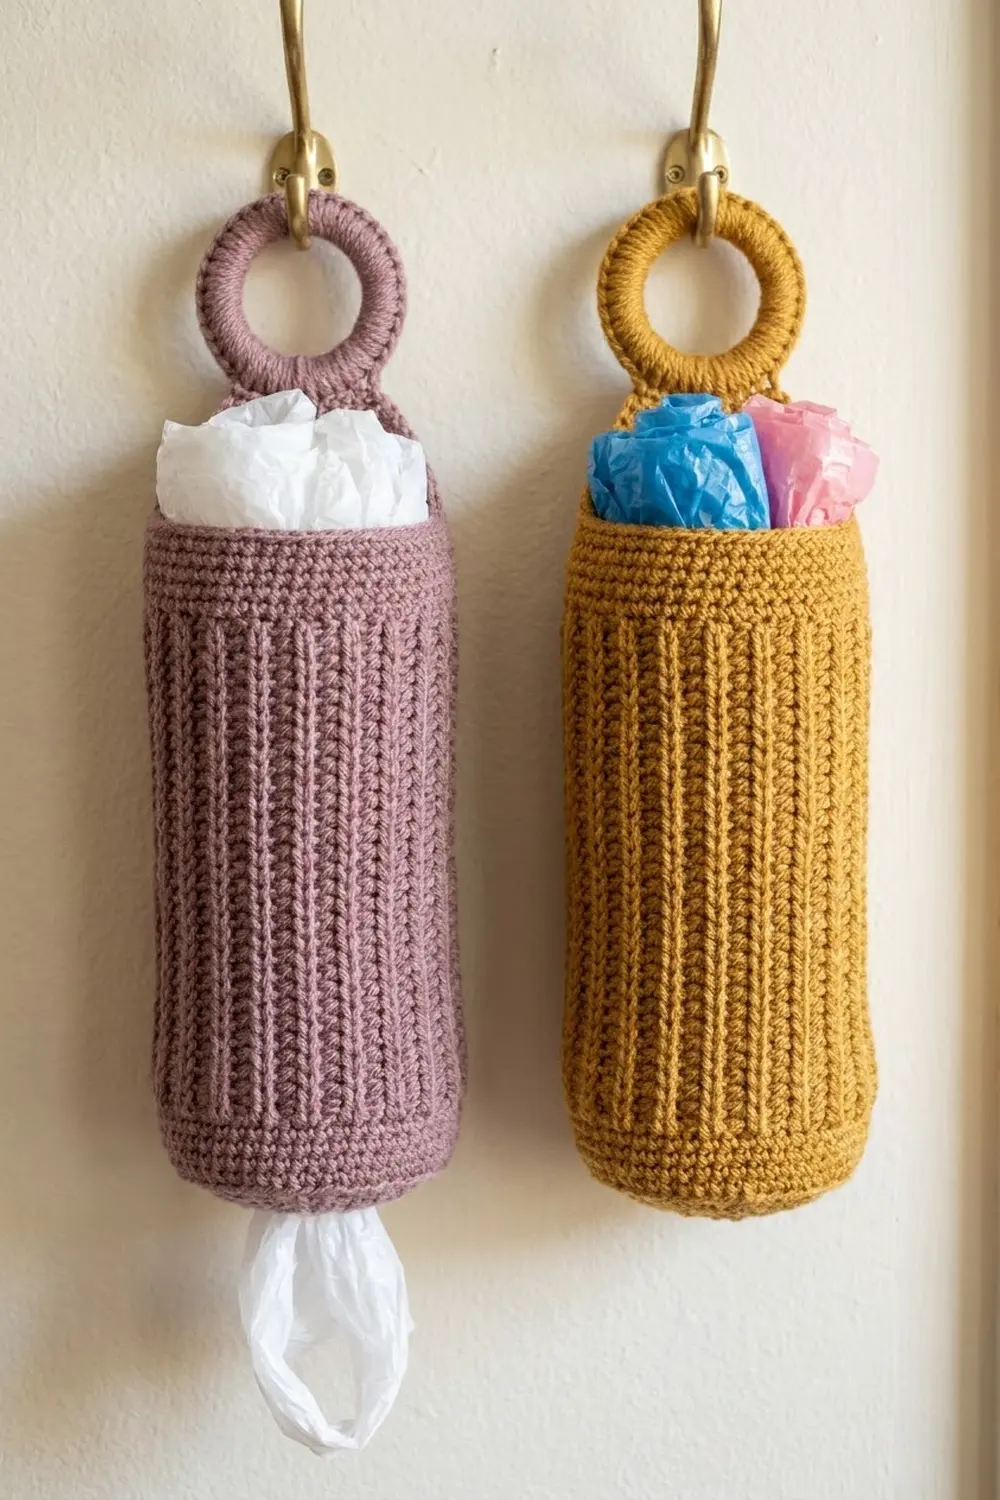
The Rosewood Rib Bag Holder is a tidy, knit-look tube that hangs on a hook and keeps plastic bags in one place. You push bags in at the top and pull them out one at a time through the narrower opening at the bottom. A yarn-wrapped ring at the top back lets it hang straight on any wall hook or cabinet knob.
The sample is worked in a soft dusty mauve, and a second holder in mustard gold shows how well the design works in warm, solid colours. The texture comes from waistcoat stitch, a single crochet worked through the middle of the stitch below. It makes firm vertical columns of V’s that look like knit stockinette. This pattern uses US crochet terms throughout.
The finished holder is 16 in (40.6 cm) tall and 5 in (12.7 cm) wide when laid flat, which is a 10 in (25.4 cm) circumference. The bottom opening is 8 in (20.3 cm) around, about 4 in (10.2 cm) flat. The covered ring adds about 2.5 in (6.4 cm) above the top edge.
The construction is simple. You cover the ring first. Then you work the tube from the bottom up in one continuous spiral: a single crochet bottom band, one increase round, a long waistcoat stitch body and a single crochet top rim. A short tab at the back of the rim wraps around the ring and is sewn down inside.
Finished Size and Construction
- Finished size: 16 in (40.6 cm) tall x 5 in (12.7 cm) wide flat, not counting the ring
- Skill level: Easy
- Terminology: US crochet terms
- Yarn weight: Bulky (#5)
- Hook: 6 mm (J-10)
- Number of pieces: 1 tube plus 1 covered ring, joined into a single holder
- Layout: Vertical tube, ring centred at the top back
- Piece size: 30 stitches around the body, 52 rounds tall
- Size before border (after Rnd 49): about 15 in (38.1 cm) tall, 5 in (12.7 cm) flat
- Border depth: 3 rounds of sc at the top, about 1 in (2.5 cm), plus a slip stitch edge at the bottom
Materials
Yarn: Choose a smooth bulky (#5) yarn in cotton, a cotton blend or acrylic. Smooth, round plies make the waistcoat stitch columns crisp. Fuzzy or brushed yarn hides the texture and makes it hard to see where to put your hook.
- Main colour (dusty mauve): 100 g, about 150 m (164 yd)
- Optional second holder (mustard gold): 100 g, about 150 m (164 yd)
One holder, including the ring cover and tab, uses about 80 m (87 yd). The amounts above include a generous margin for your gauge swatch and any adjustments.
Tools:
- 6 mm (J-10) crochet hook
- 1 wooden or metal ring, 2 in (5.1 cm) outer diameter
- 1 stitch marker
- Tapestry needle
- Scissors
- Tape measure
- A rolled towel or a 3 in (7.6 cm) cardboard tube for blocking
Abbreviations (US Terms)
- ch – chain
- sc – single crochet
- sl st – slip stitch
- st(s) – stitch(es)
- rnd(s) – round(s)
- 2 sc in next – increase: work 2 sc in the same stitch
- wst – waistcoat stitch (see below)
Special stitch: waistcoat stitch (wst). Look at a single crochet from the front and you will see a V. Insert your hook through the centre of that V, between its two legs and under the horizontal bars at the back, then yarn over, pull up a loop and finish as a normal sc. Each new stitch sits right on top of the one below, which is what builds the vertical columns.
Gauge and Checkpoints
Gauge: 12 sts and 13 rnds = 4 in (10.2 cm) in both sc and waistcoat stitch worked in the round.
Waistcoat stitch is dense, so loosen your grip a little. If your stitches are too tight to get your hook into the V, go up half a hook size before you go any further.
Test first: Work Rnds 1–13 below as your swatch. They are the start of the holder, so you lose nothing if your gauge is right. Lay the tube flat and measure it.
Checkpoints:
- After Rnd 3: 24 sts, 8 in (20.3 cm) around, 4 in (10.2 cm) flat
- After Rnd 4: 30 sts, 10 in (25.4 cm) around, 5 in (12.7 cm) flat
- After Rnd 13: 4 in (10.2 cm) tall
- After Rnd 26: 8 in (20.3 cm) tall
- After Rnd 39: 12 in (30.5 cm) tall
- After Rnd 49: about 15 in (38.1 cm) tall
- After Rnd 52: 16 in (40.6 cm) tall
Too big? If the tube is more than 5.5 in (14.0 cm) flat, start again with a hook one size smaller. Too small? If it is under 4.5 in (11.4 cm) flat, go up one hook size. Height is easy to change: add or remove body rounds between Rnd 5 and Rnd 49. Each round is about ⅓ in (0.8 cm).
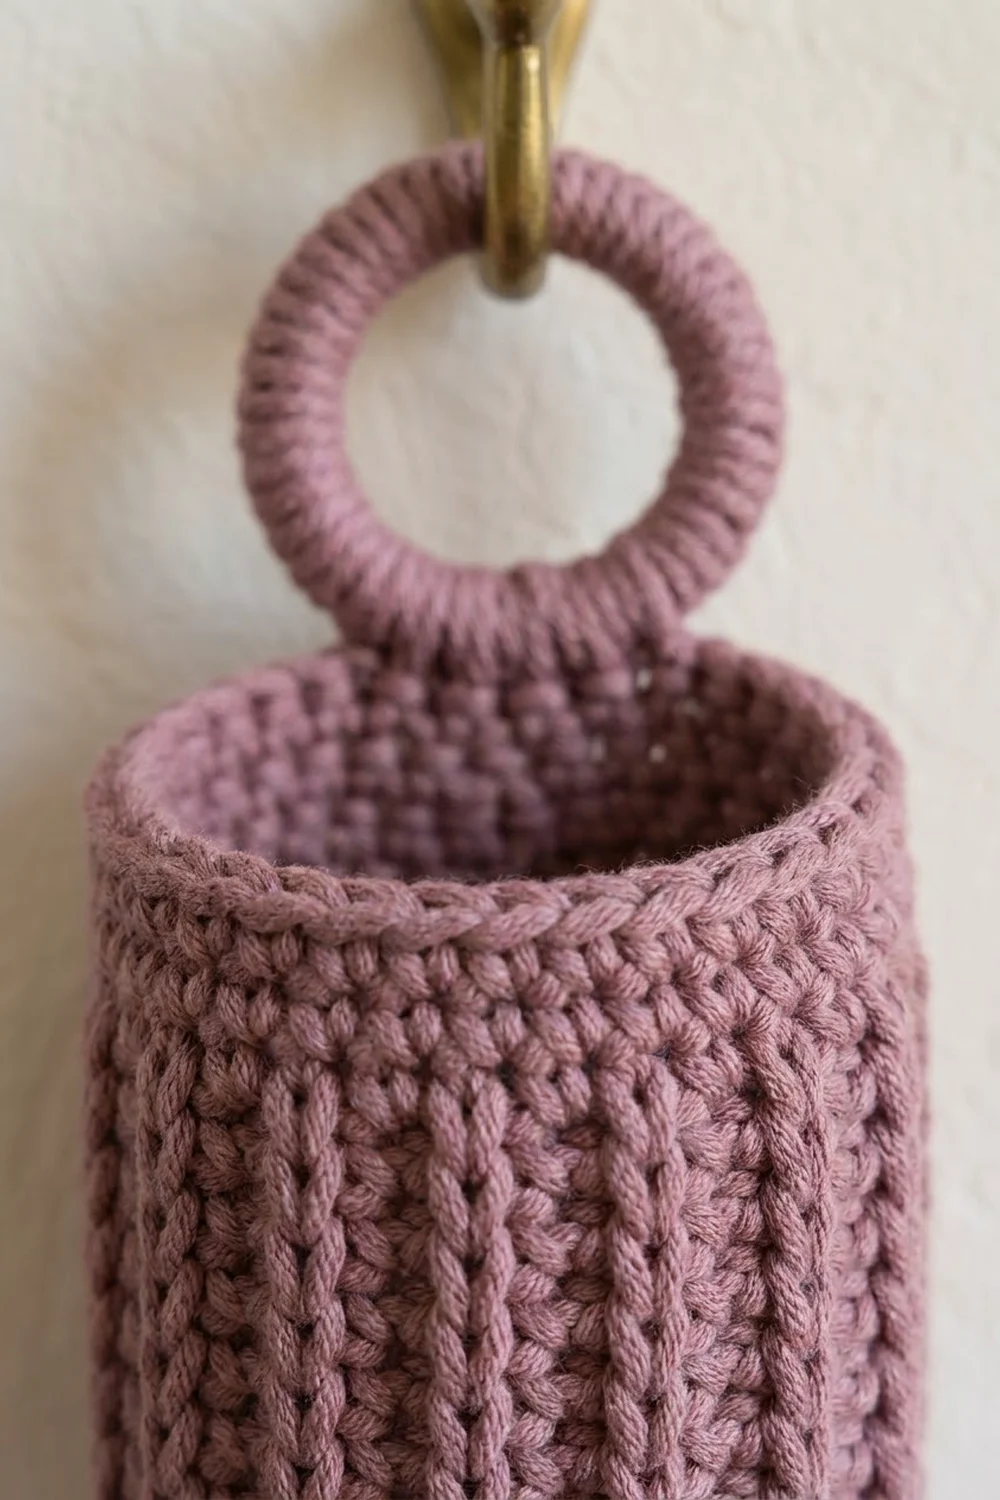
Ring Cover
Make this first so it is ready when the tube is finished.
- Make a slip knot and place it on your hook.
- Holding the ring in your left hand, insert your hook through the centre of the ring. Yarn over and pull up a loop, then yarn over above the ring and pull through both loops on the hook. This is your first sc around the ring.
- Work 31 more sc around the ring, for a total of 32 sc. Push the stitches together as you go so none of the ring shows.
- Sl st to the first sc. Fasten off and weave in the ends.
Count: 32 sc. If your ring still shows, add sc in pairs (34 or 36) until it is fully covered. The count here does not change any other part of the pattern.
Tube
The tube is worked from the bottom up in a continuous spiral, so you do not join or chain at the start of each round. Place a marker in the first stitch of each round and move it up as you go. The start of each round is the centre back of the holder.
Bottom Band
Foundation: Ch 24 and sl st to the first ch to make a ring. Do not twist the chain.
Rnd 1: Ch 1, sc in each ch around. Do not join; place a marker in the first sc. (24 sts)
Rnd 2: Sc in each st around. (24 sts)
Rnd 3: Sc in each st around. (24 sts)
Checkpoint: The band is 8 in (20.3 cm) around and about 0.9 in (2.3 cm) tall. This firm, narrower band is the bottom opening that holds the bags in until you pull them out.
Increase Round
Rnd 4 (conversion round): Wst in next 3 sts, 2 wst in next st; repeat from * 6 times.
Count: 24 sts worked once + 6 extra sts = 30 sts.*
This round switches from plain sc to waistcoat stitch and widens the tube to its full size. For the 2 wst increase, put both stitches into the centre of the same V.
Body
Rnds 5–49: Wst in each st around. (30 sts every round; 45 rounds)
Keep the work turned the same way (right side facing out) the whole time. The V’s will stack into 30 straight columns. If the columns start to lean, you are probably putting your hook slightly to one side of the V. Aim for the exact centre.
Checkpoints: The tube is 4 in (10.2 cm) tall after Rnd 13, 8 in (20.3 cm) after Rnd 26, 12 in (30.5 cm) after Rnd 39 and about 15 in (38.1 cm) after Rnd 49. It stays 5 in (12.7 cm) wide flat the whole way up.
Do not fasten off. Go straight into the top rim.
Border
The holder has two borders: a 3-round sc rim at the top and a sl st edge at the bottom.
Border gauge: Plain sc at the same 12 sts = 4 in (10.2 cm) as the body. This means the rim lies the same width as the body and does not flare or pull in.
For counting, think of the tube as two “sides” when laid flat: the front and the back, each half of the round.
Top Rim
Rnd 50: Sc in each st around. Insert your hook under both top loops, as for a normal sc, not into the V. (30 sts: 15 front + 15 back)
Rnd 51: Sc in each st around. (30 sts: 15 front + 15 back)
Rnd 52: Sc in each st around. (30 sts: 15 front + 15 back) Sl st in the next st to smooth out the step at the end of the spiral. This sl st is not counted as a stitch.
Why the math works: The body has 30 sts, 15 on each flat side. The rim keeps that same 30 with no increases or decreases. Because sc and waistcoat stitch match in gauge, 15 sts still measure 5 in (12.7 cm) across each side. The change to plain sc makes a smooth, firm band that holds the top open.
Hanging Tab
The tab is worked in rows over the 4 sts at the centre back of the rim, where your marker shows the start of the round.
Row 1: Ch 1, turn so the inside of the tube faces you. Sc in the last 2 sts of Rnd 52 and the first 2 sts of Rnd 52, centred on the marker. (4 sts)
Rows 2–6: Ch 1, turn, sc in each st across. (4 sts)
Fasten off and leave a 12 in (30.5 cm) tail.
The tab is 4 sts wide, about 1.3 in (3.4 cm), and 6 rows tall, about 1.75 in (4.4 cm).
Attach the ring: Pass the tab from front to back through the covered ring. Fold it down over the inside of the rim so the ring sits snugly at the top edge. Using the tail and a tapestry needle, sew the last row of the tab to the inside of Rnd 50 with small whip stitches. Go across all 4 sts twice for strength. Weave in the end.
Bottom Edge
Edge round: Hold the tube upside down. Join yarn with a sl st in any remaining loop of the foundation chain at the centre back. Sl st in each foundation ch around. (24 sl sts: 12 front + 12 back) Join to the first sl st and fasten off.
Why the math works: The foundation has 24 chains, and the edge places one sl st in each, so the bottom stays at 8 in (20.3 cm) around and 4 in (10.2 cm) flat. The sl st round adds almost no height and makes a neat, rolled edge that stops the opening from stretching out as bags are pulled through.
Weave in all remaining ends on the inside of the tube.
Final Blocking
- Lightly mist the whole holder with water until it is damp but not soaked.
- Slide a rolled towel or a 3 in (7.6 cm) cardboard tube inside so the holder is round and evenly filled.
- Lay it flat on a towel. Pat it to 16 in (40.6 cm) tall and 5 in (12.7 cm) wide.
- Gently straighten the stitch columns with your fingers so they run straight up and down.
- Shape the top rim into an even circle and the bottom edge into a slightly smaller circle.
- Make sure the ring sits flat and centred above the back of the rim.
- Leave it to dry completely, then take out the form.
Final Quality-Control Checklist
- Height is 16 in (40.6 cm), not counting the ring
- Flat width is 5 in (12.7 cm) across the body and top rim
- Bottom opening is 4 in (10.2 cm) flat, 8 in (20.3 cm) around
- All 30 stitch columns run straight with no twisting
- Rnd 4 has exactly 30 sts, with the 6 increases evenly spaced
- No part of the ring shows through the cover
- Tab is centred at the back and sewn down securely on the inside
- Bottom sl st edge is smooth and even, with no loose loops
- All ends are woven in on the inside
Troubleshooting
The columns spiral around the tube. This is a normal drift in spiral rounds and is usually mild. Make sure every wst goes into the exact centre of the V below. Steaming and blocking on a form will straighten a slight lean.
I can’t get my hook into the V. Your tension is too tight. Hold the working yarn looser, or go up half a hook size.
The tube is getting narrower. You have probably missed stitches. Count to 30 at the marker every few rounds.
The tube is getting wider. You may be working twice into the same V. Count again and take out the extra stitches.
The top rim flares. Your sc is looser than your waistcoat stitch. Work Rnds 50–52 with a hook half a size smaller.
Bags fall out of the bottom. Work a second sl st round on the bottom edge, or redo the foundation with 22 chains and work Rnd 4 as (wst 2, 2 wst in next) x 6, then wst 4, for 30 sts. This is 22 + 8 = 30, so the increases are not perfectly even, but the difference does not show.
The ring tilts forward. Sew the tab down further inside the tube, or shorten it to 5 rows.
Care
Hand wash in cool water and lay flat to dry on a form to keep its shape. Do not tumble dry, because the dense waistcoat stitch can shrink and stiffen.
Final Notes
The measurements all follow from one gauge: 12 sts and 13 rnds = 4 in (10.2 cm). A 24-chain foundation gives the 8 in (20.3 cm) bottom opening. The increase round takes it to 30 sts, 10 in (25.4 cm) around and 5 in (12.7 cm) flat. Forty-nine rounds bring the tube to about 15 in (38.1 cm), and the 3-round sc rim finishes it at 16 in (40.6 cm). The covered 2 in (5.1 cm) ring adds about 2.5 in (6.4 cm) above the rim for hanging. If your gauge matches, every checkpoint will line up. Once the first holder is done, a second one in mustard gold or any other colour is quick to make.
Happy crocheting!