

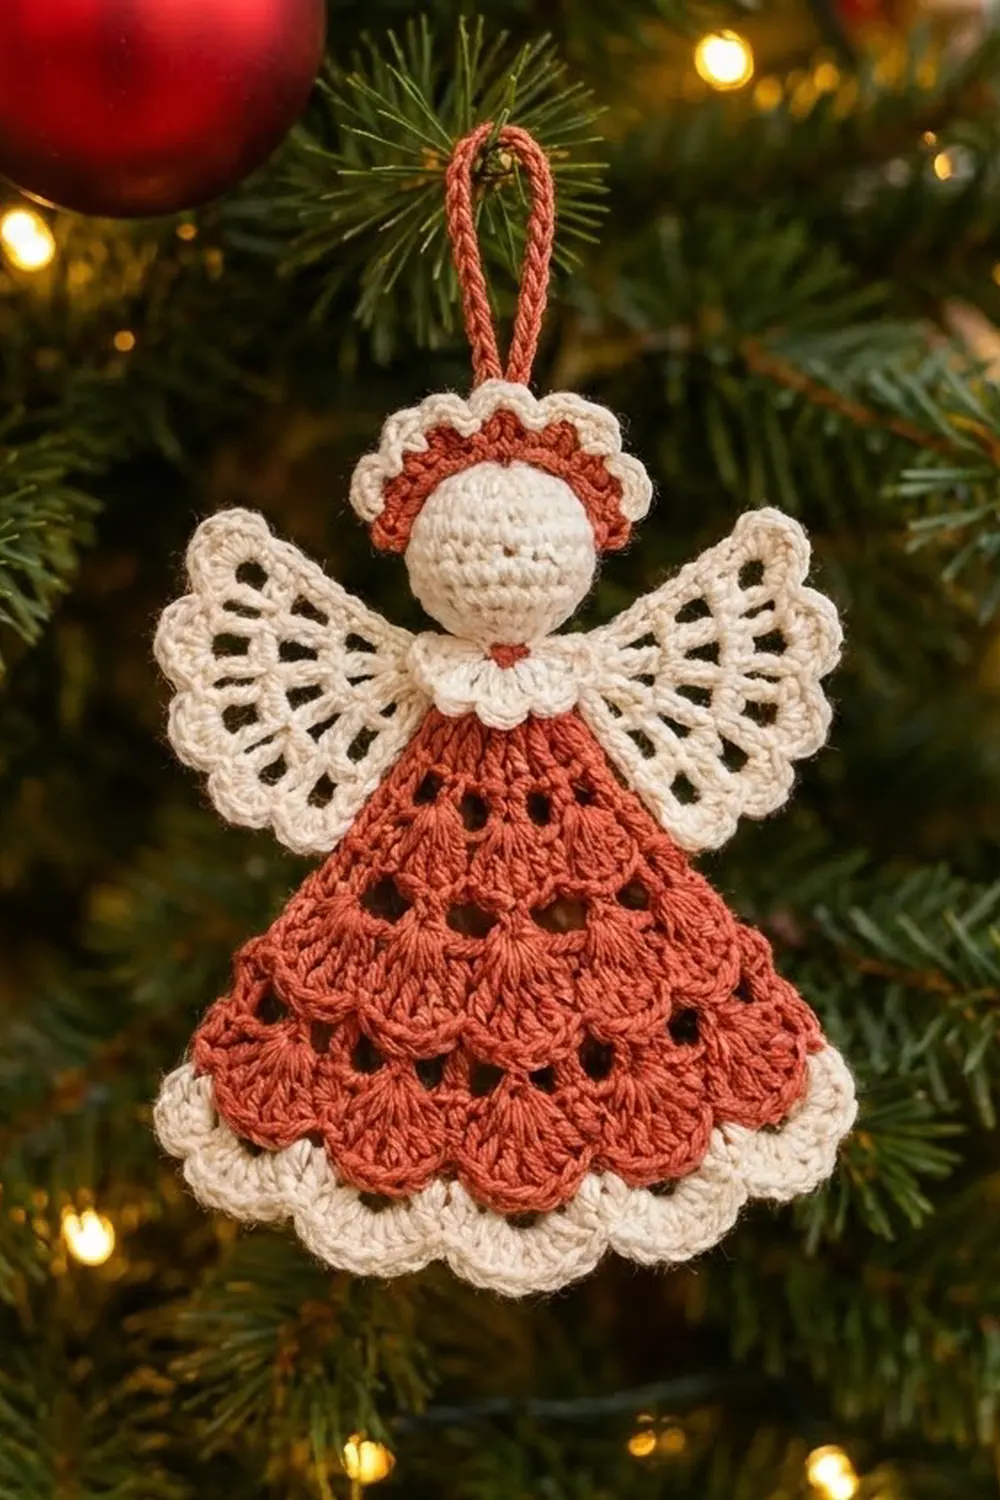
The Rosewood Shell Angel is a small, flat Christmas ornament. It has a rust-red lacy dress, cream openwork wings, a round cream head, and a two-tone halo. A rust chain loop at the top makes it ready to hang on the tree as soon as you weave in the last end.
The dress is built from three tiers of shell stitches separated by airy rows of treble V-stitches, so it looks like a tiered lace skirt. A cream scalloped hem, a tiny ruffled collar, and fan-edged wings give it a soft vintage contrast that stands out against green branches.
This pattern uses US crochet terms. The finished angel measures about 4.5 in (11.4 cm) across the wings and 4.2 in (10.7 cm) from the top of the halo to the hem. The hanging loop adds 1.3 in (3.3 cm), for about 5.5 in (14.0 cm) overall.
The construction is simple. You work the dress top-down in turned rows from a magic ring, then add a cream border along the hem. The wings are one piece worked outward from a center ring. The head is a small stuffed ball, and the collar and halo are short strips. Everything is sewn together into one ornament.
Finished Size and Construction
- Finished size: 4.5 in (11.4 cm) wide at the wings x 4.2 in (10.7 cm) tall, plus a 1.3 in (3.3 cm) loop
- Skill level: Easy-intermediate
- Terminology: US crochet terms
- Yarn weight: Size 3 mercerized cotton crochet thread (super fine)
- Hook: 2.25 mm (US B/1)
- Number of pieces: One finished ornament, made from 5 parts (dress, wings, head, collar, halo) plus a chain loop
- Layout: Single ornament. The wings sit behind the dress, the head above the dress, the collar at the neck, and the halo arches over the head.
- Dress size: 3.0 in (7.6 cm) tall x 3.75 in (9.5 cm) wide at the hem
- Dress size before border: 2.6 in (6.6 cm) tall x 3.5 in (8.9 cm) wide
- Border depth: 0.4 in (1.0 cm), 2 rows
Materials
Choose a smooth, mercerized cotton thread in size 3. It shows shell and lace texture clearly, holds its shape after blocking, and won’t shed on the tree. Fuzzy yarns blur the eyelets and soften the scallops.
- Rust red: 10 g, about 55 m (dress, halo fans, hanging loop)
- Cream: 8 g, about 44 m (hem border, wings, head, collar, halo base)
These amounts include about 20 percent extra for your gauge check and yarn tails.
Tools:
- 2.25 mm (US B/1) crochet hook
- Tapestry needle
- Small pinch of polyester fiberfill
- 2 stitch markers
- Scissors
- Blocking mat, rustproof pins, and a spray bottle
- Optional: fabric stiffener or light starch
Abbreviations (US Terms)
- ch – chain
- sl st – slip stitch
- sc – single crochet
- hdc – half double crochet
- dc – double crochet
- tr – treble crochet
- inc – 2 sc in the same stitch
- dec – sc2tog (invisible decrease recommended)
- MR – magic ring
- sp(s) – space(s)
- st(s) – stitch(es)
- RS / WS – right side / wrong side
Special stitches:
- V-st: (tr, ch 2, tr) in the same stitch. The ch-2 in the middle is the “V-st sp.”
- Beginning V-st: Ch 6 (counts as tr + ch 2), tr in the same stitch.
- Spacer: Ch 2 worked between two V-sts. This makes a “spacer sp.”
- Shell: 5 dc in the same space. The 3rd dc is the shell’s center.
Gauge and Checkpoints
Gauge matters most for how the parts fit together. Make the dress first as your test piece and check it before you start the wings.
- Shell gauge: One shell-plus-sc repeat (6 sts) = 0.5 in (1.3 cm) wide
- Row gauge: One V-st row plus one shell row = 0.7 in (1.8 cm) tall
- Row 1 checkpoint: The tr fan measures 0.5 in (1.3 cm) from ring to edge
- Row 3 checkpoint: 1.2 in (3.0 cm) tall
- Row 5 checkpoint: 1.9 in (4.8 cm) tall
- Row 7 checkpoint: 2.6 in (6.6 cm) tall x 3.5 in (8.9 cm) wide
- After border: 3.0 in (7.6 cm) tall x 3.75 in (9.5 cm) wide
If your dress is more than 0.2 in (0.5 cm) too big at Row 3, start again with a 2.0 mm hook. If it is too small, start again with a 2.5 mm hook. Use the same hook for every part so the wings and head stay in proportion.
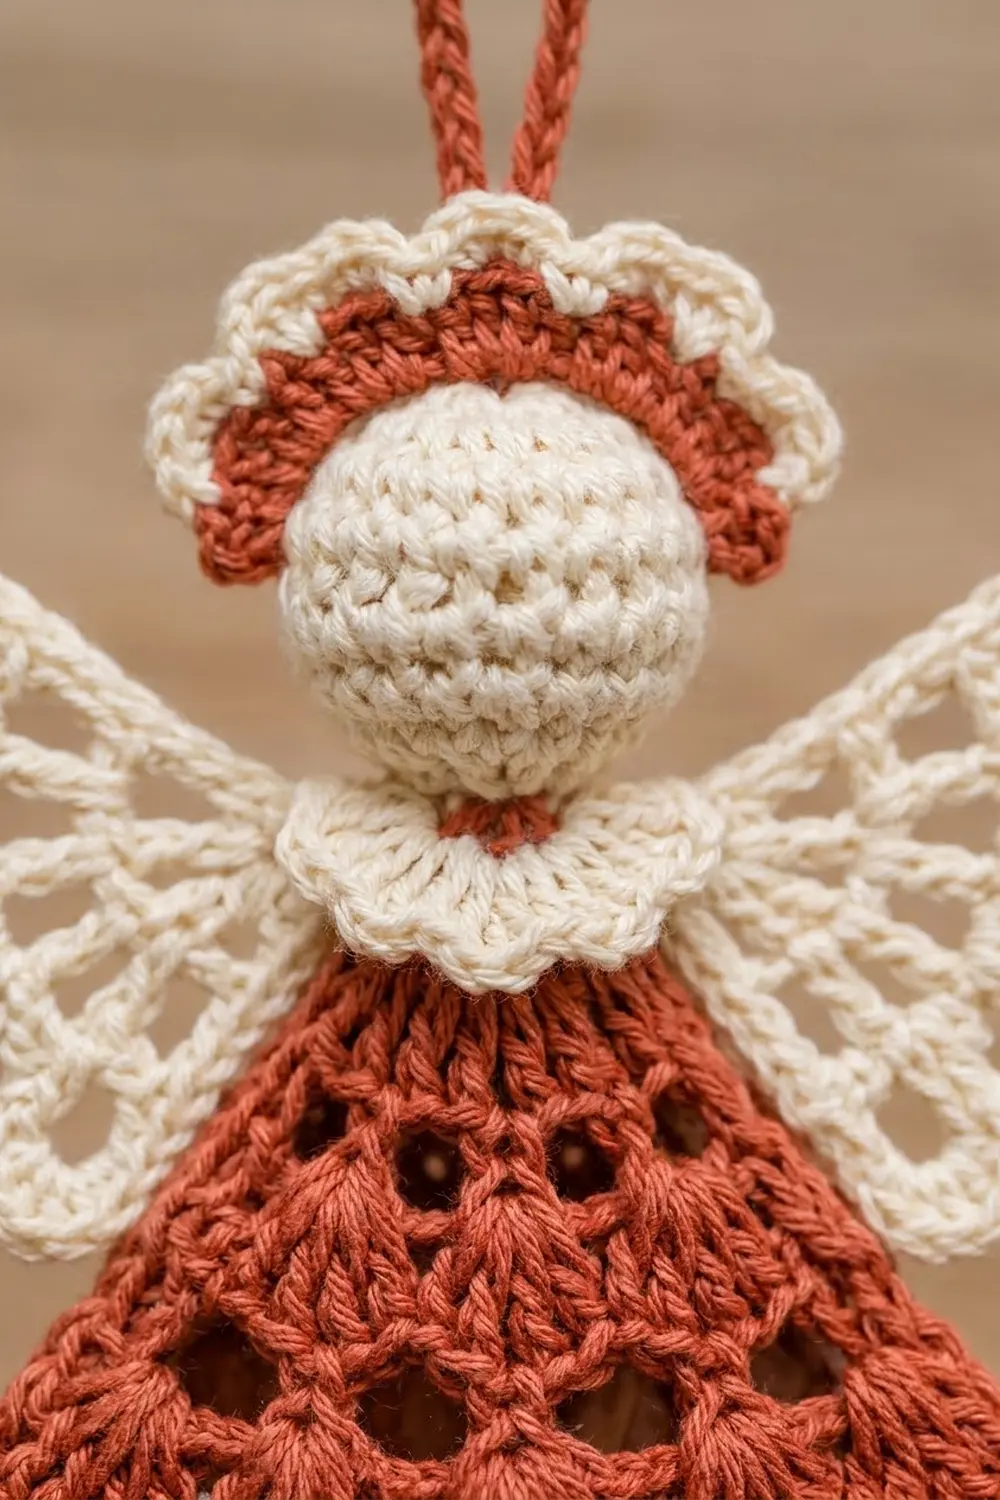
Dress (Rust Red)
Work the dress top-down in turned rows. Odd rows are RS. Each V-st row adds 2 V-sts at the edges, so each shell tier has 2 more shells than the tier above it.
Row 1 (RS): With rust, make a MR. Ch 4 (counts as tr), 8 tr in ring. Pull the ring closed but keep the fan flat. Turn. (9 tr)
Row 2 (WS): Beginning V-st in first st, [ch 2, skip 3 tr, V-st in next tr] 2 times, working the last V-st in the top of the turning ch-4. Turn. (3 V-sts, 2 spacer sps)
The V-sts sit in sts 1, 5, and 9, so the row spreads evenly across all 9 sts.
Row 3 (RS, Shell Tier 1): Ch 1, sc in first tr, [5 dc in next V-st sp, sc in next spacer sp] 2 times, 5 dc in last V-st sp, sc in 4th ch of beginning ch-6. Turn. (3 shells + 4 sc = 19 sts)
Row 4 (WS): Beginning V-st in first sc, [ch 2, V-st in center dc of next shell] 3 times, ch 2, V-st in last sc. Turn. (5 V-sts, 4 spacer sps)
The two V-sts worked in the edge sc are the new repeats that widen the skirt.
Row 5 (RS, Shell Tier 2): Ch 1, sc in first tr, [5 dc in next V-st sp, sc in next spacer sp] 4 times, 5 dc in last V-st sp, sc in 4th ch of beginning ch-6. Turn. (5 shells + 6 sc = 31 sts)
Row 6 (WS): Beginning V-st in first sc, [ch 2, V-st in center dc of next shell] 5 times, ch 2, V-st in last sc. Turn. (7 V-sts, 6 spacer sps)
Row 7 (RS, Shell Tier 3): Ch 1, sc in first tr, [5 dc in next V-st sp, sc in next spacer sp] 6 times, 5 dc in last V-st sp, sc in 4th ch of beginning ch-6. Fasten off rust. (7 shells + 8 sc = 43 sts)
Check the Row 7 measurements now: 2.6 in (6.6 cm) tall and 3.5 in (8.9 cm) wide across the hem. The cream hem border is worked on these 43 sts (see Border below). You can add it now or after assembly.
Wings (Cream, One Piece)
The wings are a single piece. Each wing fans out from opposite halves of a shared center ring.
Center ring: Ch 6, sl st in first ch to form a ring.
Wing A, Row 1: Ch 3 (counts as dc), [ch 2, dc in ring] 3 times, keeping all sts on one half of the ring. Turn. (4 dc, 3 ch-2 sps)
Row 2: Ch 5 (counts as dc + ch 2), dc in first dc, [ch 2, (dc, ch 2, dc) in next dc] 3 times, working the last group in the top of the turning ch-3. Turn. (8 dc, 7 ch-2 sps)
Row 3: Ch 1, sc in first dc, [ch 4, sc in next ch-2 sp] 7 times, ch 4, sc in 3rd ch of beginning ch-5. Turn. (8 ch-4 loops, 9 sc)
Row 4: Ch 1, (sc, hdc, 3 dc, hdc, sc) in each ch-4 loop across. Fasten off. (8 scallops, 56 sts)
Wing B: With RS facing, join cream in the empty half of the center ring. Repeat Rows 1–4 of Wing A.
Each wing measures about 2.0 in (5.1 cm) from the ring to the scalloped edge. The full piece spans 4.5 in (11.4 cm).
Head (Cream)
Work in continuous rounds. Mark the first st of each round.
Rnd 1: MR, 6 sc in ring. (6)
Rnd 2: Inc in each st around. (12)
Rnd 3: [Sc, inc] 6 times. (18)
Rnd 4: [2 sc, inc] 6 times. (24)
Rnds 5–7: Sc in each st around. (24)
Rnd 8: [2 sc, dec] 6 times. (18)
Rnd 9: [Sc, dec] 6 times. (12)
Stuff firmly with a small pinch of fiberfill.
Rnd 10: Dec 6 times. (6)
Fasten off, leaving a 10 in (25.4 cm) tail, and close the hole. The head is about 0.9 in (2.3 cm) across.
Collar (Cream)
Row 1: Ch 11, sc in 2nd ch from hook and in each ch across. Turn. (10 sc)
Row 2: Ch 3 (counts as dc), dc in first st, 2 dc in each remaining sc across. (20 dc)
Fasten off, leaving an 8 in (20.3 cm) tail. Row 2 doubles the stitch count, so the strip ruffles on its own. It measures about 1.2 in (3.0 cm) long.
Halo (Cream Base, Rust Fans)
Row 1 (cream): Ch 14, sc in 2nd ch from hook and in each ch across. Fasten off cream. Turn. (13 sc)
Row 2 (rust): Join rust in first sc. Ch 1, sc in first sc, [3 dc in next sc, sc in next sc] 6 times. Fasten off. (6 fans; 1 + 6 x 4 = 25 sts)
The outer edge now has nearly twice as many sts as the inner edge, so the strip curves into a crescent about 1.4 in (3.6 cm) across.
Hanging loop: Join rust in the center sc of Row 2 (the sc between the 3rd and 4th fans). Ch 36, sl st in the same sc. Fasten off. The loop stands about 1.3 in (3.3 cm) tall.
Assembly
- Wings: Lay the dress RS up. Center the wings behind it so the center ring sits behind Row 2. Whipstitch the ring to the back of Rows 1–2 with cream.
- Head: Sew the head directly above Row 1 of the dress, catching the magic ring and the top of the wing ring.
- Collar: Wrap the collar around the front of the neck with the ruffle facing down. Sew Row 1 along the seam between head and dress, tucking the ends behind the head.
- Halo: Arch the halo over the top of the head with the cream edge against the head. Sew the cream row to the back of the head so the rust fans frame the face.
- Weave in all ends on the back.
Border (Cream Hem)
The border is worked along the bottom edge of the dress only, across the 43 sts of Row 7.
Border gauge: Border Row 1 should lie flat across 3.5 in (8.9 cm). The finished scallops flare the hem to 3.75 in (9.5 cm).
Border Row 1 (WS): With WS facing, join cream in the first sc of Row 7. Ch 1, sc in each st across. Turn. (43 sts worked 1-per-stitch + 0 added = 43 sc)
Border Row 2 (RS): Ch 1, sc in first sc, [skip 2 sc, 7 dc in next sc, skip 2 sc, sc in next sc] 7 times. Fasten off. (8 sc + 7 scallops of 7 dc = 57 sts)
Why the math works: Row 7 has 7 shell repeats of 6 sts plus 1 edge sc: 7 x 6 + 1 = 43. Border Row 1 keeps that count exactly. Border Row 2 uses the same 6-st repeat, so each 7-dc scallop lands above the center dc of a shell, and the 8 sc sit above the 8 sc of Row 7. The hem scallops line up with the shells.
Final Blocking
- Soak the ornament in cool water and press out the extra water in a towel.
- Pin the dress flat as a triangle, 3.0 in (7.6 cm) tall and 3.75 in (9.5 cm) wide at the hem.
- Pin out each wing scallop evenly so the wingspan measures 4.5 in (11.4 cm).
- Pin each of the 7 hem scallops into a rounded curve.
- Shape the halo into a smooth crescent and the collar into even folds.
- Optional: spray lightly with stiffener or starch.
- Let it dry completely, at least 12 hours, before you remove the pins.
Final Quality-Control Checklist
- The dress has 3 shell tiers of 3, 5, and 7 shells
- The hem has 7 cream scallops lined up under the 7 bottom shells
- Each wing has 8 scallops, and both wings match
- The head is round and firm, with no fiberfill showing
- The collar covers the neck seam
- The halo sits evenly, with rust fans facing out
- The loop is centered so the angel hangs straight
- The overall size is 4.5 in (11.4 cm) wide x 4.2 in (10.7 cm) tall, plus loop
- All ends are woven in on the back
Troubleshooting
Dress cups or curls: Your V-st rows are tight. Loosen the spacer chains slightly, or go up one hook size for the V-st rows only.
Dress ruffles at the edges: Your shell rows are loose. Tighten each sc as you work it into its spacer sp.
Scallops don’t line up with shells: Recount Row 7. You need exactly 43 sts before the border.
Wings flop forward: Stiffen them, or tack the wing tips lightly to the back of the dress.
Head looks lumpy: Use a little less fiberfill and roll the head between your palms before closing.
Angel hangs crooked: Check that the loop is joined at the exact center sc of the halo.
Care
Hand wash in cool water, lay flat to dry, and block again if needed. Store flat in tissue paper between seasons to protect the wings and halo.
Final Notes
Here is how the measurements build up. Row 1 is 0.5 in (1.3 cm) deep, and each shell tier adds 0.7 in (1.8 cm). That brings the dress to 2.6 in (6.6 cm) tall and 3.5 in (8.9 cm) wide at Row 7. The cream border adds 0.4 in (1.0 cm) and flares the hem to 3.75 in (9.5 cm). Add the 0.9 in (2.3 cm) head and the halo, and the angel stands 4.2 in (10.7 cm) tall, with 4.5 in (11.4 cm) wings. Check each number as you go, and every angel you make will match the last.
Happy crocheting!