

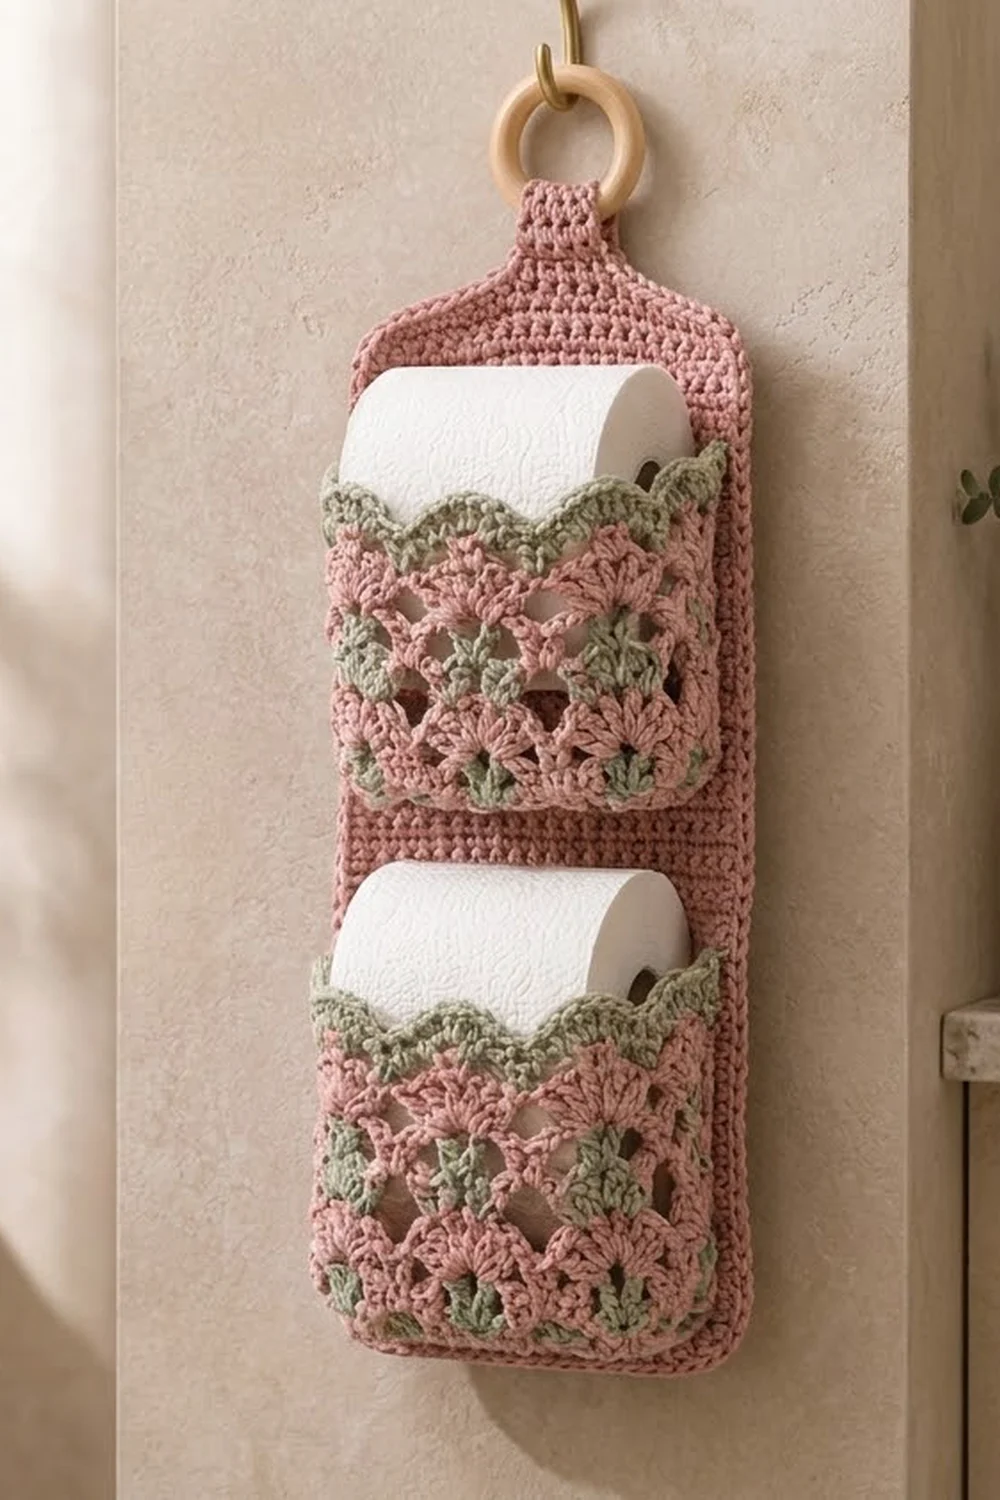
This hanging toilet paper holder is a tall, solid backing panel with two lacy pockets stacked on the front. Each pocket holds one standard roll. The holder hangs from a natural wooden ring, so you can put it on a towel hook, a door hook or a small nail.
The backing panel is worked in dusty rose half double crochet, which makes a firm fabric that stays flat. The pockets combine rose shells with small sage-green V-stitches, which creates open diamonds with green accents. Each pocket ends with a wavy sage edge that follows the shells below it. A rose single crochet and slip stitch border goes around the whole panel.
This pattern uses US crochet terms. The finished panel is 6.5 in (16.5 cm) wide. It hangs about 20 in (50.8 cm) from the bottom edge to the top of the tab fold, or about 22 in (55.9 cm) including the ring.
You’ll make three pieces: one backing panel worked in rows from the bottom up, and two identical pockets. Each pocket starts with a flat single crochet base. You then work the lace wall around three sides of the base, which gives the pocket real depth. To finish, you’ll border the panel, sew on the pockets, fold the tab over the ring and block.
Finished Size and Construction
- Finished size: 6.5 in (16.5 cm) wide x about 20 in (50.8 cm) hanging length, not counting the ring
- Skill level: Intermediate (easy lace, color changes, seaming)
- Terminology: US crochet terms
- Yarn weight: Worsted (#4), cotton or cotton blend
- Hook: 5.0 mm (H-8)
- Number of pieces: 3 (1 backing panel, 2 pockets)
- Layout: Vertical, with one pocket near the bottom and one at mid-height
- Panel size before border: 6 in (15.2 cm) wide x 21.6 in (54.9 cm) long laid flat, including shoulders and tab
- Pocket size: base 5.4 in x 3 in (13.7 cm x 7.6 cm); wall 3.5 in (8.9 cm) tall
- Border depth: 0.25 in (0.6 cm)
Materials
Choose a smooth worsted cotton or cotton-acrylic blend. Cotton keeps its shape in a humid bathroom and washes well. Smooth yarn shows the shells most clearly, so avoid fuzzy or splitty yarn.
- Dusty rose (Color A): about 130 g / 220 m
- Sage green (Color B): about 30 g / 50 m
These amounts assume about 170 m per 100 g and include a margin of about 15%.
Tools:
- 5.0 mm (H-8) crochet hook
- Wooden ring, 2.5 in (6.4 cm) outer diameter
- Tapestry needle
- 4–6 locking stitch markers
- Rust-proof pins
- Scissors and tape measure
- Blocking mat or folded towel
Abbreviations (US Terms)
- ch: chain
- sl st: slip stitch
- sc: single crochet
- hdc: half double crochet
- dc: double crochet
- sk: skip
- sp: space
- st(s): stitch(es)
- hdc3tog: (yarn over, insert hook in next st, pull up a loop) 3 times, yarn over, pull through all 7 loops on hook
- Shell: 5 dc in the same st or sp
- V-st: (dc, ch 1, dc) in the same st or sp
Gauge and Checkpoints
Gauge matters most for the pockets, because a roll won’t fit in a pocket that’s too small. Make one pocket first and test it with a real roll before you start the panel.
- Hdc (panel): 14 sts x 10 rows = 4 in (10.2 cm)
- Sc (pocket base and border): 14 sts x 16 rows = 4 in (10.2 cm)
- Lace (pocket wall): 2 shell repeats (12 sts) = 3.5 in (8.9 cm) wide; 5 lace rows = 3 in (7.6 cm) tall
Checkpoints:
- Pocket base after Row 12: 5.4 in x 3 in (13.7 cm x 7.6 cm)
- Pocket wall after Row 6: about 3.25 in (8.3 cm) tall
- Panel after Row 10: 6 in (15.2 cm) wide and 4 in (10.2 cm) tall
- Panel after Row 40: 16 in (40.6 cm) tall
If your pieces are too big, go down one hook size. If they’re too small, go up one hook size. Then make the test pocket again. Check width first, because the lace and border math depends on it.

Pocket (Make 2)
Base
Use Color A.
Row 1: Ch 20, sc in 2nd ch from hook and in each ch across, turn. (19 sc)
Rows 2–12: Ch 1, sc in each st across, turn. (19 sc)
Don’t fasten off. The base should measure 5.4 in x 3 in (13.7 cm x 7.6 cm). The foundation chain is the front edge. Row 12 is the back edge, and you’ll sew it to the panel later.
Wall
The wall is worked back and forth in rows around the two short sides and the front of the base. The back edge stays free.
Row 1 (Color A): Ch 1. Work 12 sc down the row-ends of the side (1 sc per row-end), 19 sc along the foundation chain, then 12 sc up the row-ends of the other side, turn. (43 sc)
Don’t add extra stitches at the corners, because the corners fold up to form the walls. The shell pattern needs a multiple of 6 + 1 stitches, and 43 fits.
Row 2 (Color A): Ch 1, sc in first st, *ch 2, sk 2 sts, shell in next st, ch 2, sk 2 sts, sc in next st; repeat from * 6 more times. Change to Color B in the last st, turn. (7 shells, 8 sc)
Row 3 (Color B): Ch 4 (counts as dc and ch 1), dc in first sc (beginning V-st), *ch 2, sc in center dc of next shell, ch 2, V-st in next sc; repeat from * 6 more times. Change to Color A, turn. (8 V-sts, 7 sc)
Row 4 (Color A): Ch 3 (counts as dc), 2 dc in ch-1 sp of first V-st (half shell), *ch 2, sc in next sc, ch 2, shell in ch-1 sp of next V-st; repeat from * 5 more times, ch 2, sc in next sc, ch 2, 3 dc in ch-1 sp of last V-st (half shell). Change to Color B, turn. (6 shells, 2 half shells, 7 sc)
Row 5 (Color B): Ch 1, sc in first dc, *ch 2, V-st in next sc, ch 2, sc in center dc of next shell; repeat from * 5 more times, ch 2, V-st in next sc, ch 2, sc in top of turning ch. Change to Color A, turn. (7 V-sts, 8 sc)
Row 6 (Color A): Ch 1, sc in first sc, *ch 2, shell in ch-1 sp of next V-st, ch 2, sc in next sc; repeat from * 6 more times. Change to Color B, turn. (7 shells, 8 sc)
The Row 6 shells line up above the Row 2 shells. The sage V-stitches form the small green fans at the base of each open diamond. Carry the yarn you’re not using loosely up the side edges. Those edges get sewn to the panel, so the carried strands won’t show.
Row 7 (Color B, scallop edge): Ch 1, sc in first sc, *2 sc in ch-2 sp, sc in next 2 dc, 3 sc in center dc, sc in next 2 dc, 2 sc in next ch-2 sp, sc in next sc; repeat from * 6 more times. (85 sc)
Check: 1 + (7 x 12) = 85. The 3-sc groups make the peaks and the sc between the shells make the valleys. Fasten off and leave a 12 in (30.5 cm) Color B tail.
Laid flat, the wall measures about 3.5 in (8.9 cm) tall and 12.25 in (31.1 cm) long. Weave in the Color A ends.
Backing Panel
Use Color A.
Row 1: Ch 23, hdc in 3rd ch from hook and in each ch across, turn. (21 hdc; the skipped chains don’t count as a stitch)
Rows 2–40: Ch 2 (doesn’t count as a st), hdc in each st across, turn. (21 hdc)
Checkpoint: 6 in (15.2 cm) wide and 16 in (40.6 cm) tall.
Shoulders
Row 41: Ch 2, hdc3tog, hdc in next 15 sts, hdc3tog, turn. (17 hdc)
Row 42: Ch 2, hdc3tog, hdc in next 11 sts, hdc3tog, turn. (13 hdc)
Row 43: Ch 2, hdc3tog, hdc in next 7 sts, hdc3tog, turn. (9 hdc)
Row 44: Ch 2, hdc3tog, hdc in next 3 sts, hdc3tog, turn. (5 hdc)
The shoulders add 1.6 in (4.1 cm) of height.
Hanging Tab
Rows 45–54: Ch 2, hdc in each st across, turn. (5 hdc)
The tab measures 1.4 in (3.6 cm) wide and 4 in (10.2 cm) long. Don’t fasten off. Go straight into the border.
Make All Pieces
- Backing panel: 1, Color A only
- Pockets: 2. Use Color A for the base and Rows 1, 2, 4 and 6. Use Color B for Rows 3, 5 and 7.
Layout, top to bottom:
        ( wooden ring )
           [ tab ]
       /  shoulders  \
  |                       |
  |   [ upper pocket ]    |  base on Row 22
  |                       |
  |   [ lower pocket ]    |  base on Row 2
  |_______________________|
Border
Work the border before you attach the pockets and the ring. The outline stays straight that way, and the stitches are easier to count.
Border gauge: 7 sc = 2 in (5.1 cm), which matches the panel’s 3.5 sts per inch.
Round 1 (Color A): Ch 1, turn. Work sc around the panel in this order:
- Tab top: 3 sc in first st, sc in next 3 sts, 3 sc in last st (9 sc, including both corner groups)
- Tab side: 14 sc over 10 row-ends (over every 5 row-ends, work 2, 1, 2, 1, 1)
- Shoulder: 10 sc over 4 row-ends (2, 3, 2, 3)
- Long side: 56 sc over 40 row-ends (the same 7-per-5 rhythm, 8 times)
- Bottom: 3 sc in first ch, sc in next 19 ch, 3 sc in last ch (25 sc, including both corner groups)
- Other long side: 56 sc
- Other shoulder: 10 sc
- Other tab side: 14 sc
Join with a sl st to the first sc. (194 sc)
Check: 9 + 14 + 10 + 56 + 25 + 56 + 10 + 14 = 194.
Round 2 (Color A): Sl st loosely in each sc around. (194 sl sts: 194 worked 1 per existing st + 0 added) Fasten off.
Why the math works: 40 hdc rows measure 16 in (40.6 cm). At 3.5 sc per inch, 16 in needs 56 sc, which is exactly 7 sc for every 5 rows. The bottom edge has 21 stitches plus 2 extra at each corner, so the corners turn flat. Each shoulder slope is about 2.8 in (7.1 cm) long, so 10 sc covers it without pulling. The border adds 0.25 in (0.6 cm) per side, so the 6 in (15.2 cm) panel becomes 6.5 in (16.5 cm) wide.
Joining
Sew with Color A and a tapestry needle, with the right side of the panel facing you.
1. Lower pocket base. Place markers in hdc 2 and hdc 20 of Row 2. Line up the 19 back-edge stitches of the base (Row 12) with hdc 2 through hdc 20, matching them one to one. Whipstitch the base to the panel just above Row 2.
2. Wall ends. Stand the wall up. Each end of the wall has 7 row-ends and is about 3.5 in (8.9 cm) tall. Sew each end straight up the panel, in line with the base corner, through panel Rows 3–11. That’s 9 hdc rows, or about 3.6 in (9.1 cm). Use the Color B tail to tack down the scallop end.
3. Upper pocket. Repeat steps 1 and 2, lining the base up with Row 22 and sewing the wall ends through Rows 23–31.
Tension: Pull each stitch just snug enough to close the seam. If it’s too tight, the panel puckers. If it’s too loose, the pocket sags forward.
Size checkpoint: Measure from the panel bottom. The lower pocket rim should be about 4.4 in (11.2 cm) up. The upper pocket base should be about 8.8 in (22.4 cm) up, with its rim at about 12.4 in (31.5 cm). Test each pocket with a roll before you weave in the ends.
4. Ring. Pass the tab through the wooden ring from front to back. Fold the tab down so its top edge lies on the back of the panel at Row 44, and whipstitch it in place. About 2 in (5.1 cm) of tab shows above the shoulders.
Final Blocking
- Soak the holder in cool water for 10 minutes.
- Press out the water without wringing, then roll the holder in a towel.
- Pin the panel flat to 6.5 in (16.5 cm) wide, keeping the long edges straight.
- Lift each scallop peak into shape and pin it if needed.
- Slide a roll wrapped in plastic into each pocket to shape the walls.
- Let the holder dry completely, then take out the pins and the rolls.
Final Quality-Control Checklist
- Panel is 6.5 in (16.5 cm) wide with straight long edges
- Both border rounds have 194 sts, and the corners lie flat
- Rows 2 and 6 of each pocket have 7 shells
- Each pocket has 7 even sage scallop peaks
- Pocket bases are centered over hdc 2–20
- Rolls slide in and out without stretching the lace
- Tab is centered and the ring hangs straight
- All ends are woven in on the wrong side
Troubleshooting
Roll doesn’t fit: Your gauge is tight. Remake the pocket one hook size larger.
Wavy panel edges: You have extra border stitches. Recount to 56 sc per long side.
Edges pull in: You have too few border stitches, or Round 2 is too tight. Work the slip stitches more loosely.
Shells lean: Make sure you skip exactly 2 stitches on each side of every shell in Row 2.
Flat scallop edge: Make sure you work 3 sc in every center dc.
Holder tilts: Re-sew the tab so it’s centered on the panel.
Care
Hand wash in cool water with mild soap. Lay flat to dry, and reshape the pockets around a roll while they’re still damp.
Final Notes
Every measurement in this holder builds on the one before it. A gauge of 14 hdc gives a 21-stitch panel 6 in (15.2 cm) wide, and 40 rows give 16 in (40.6 cm) of height. The 7-per-5 border rhythm puts 56 sc along that height, and the border brings the width to 6.5 in (16.5 cm). On each pocket, the 19-stitch base matches 19 panel stitches, and the 43-stitch wall fits 7 shell repeats. If you hit each checkpoint, everything will line up.
Happy crocheting!