

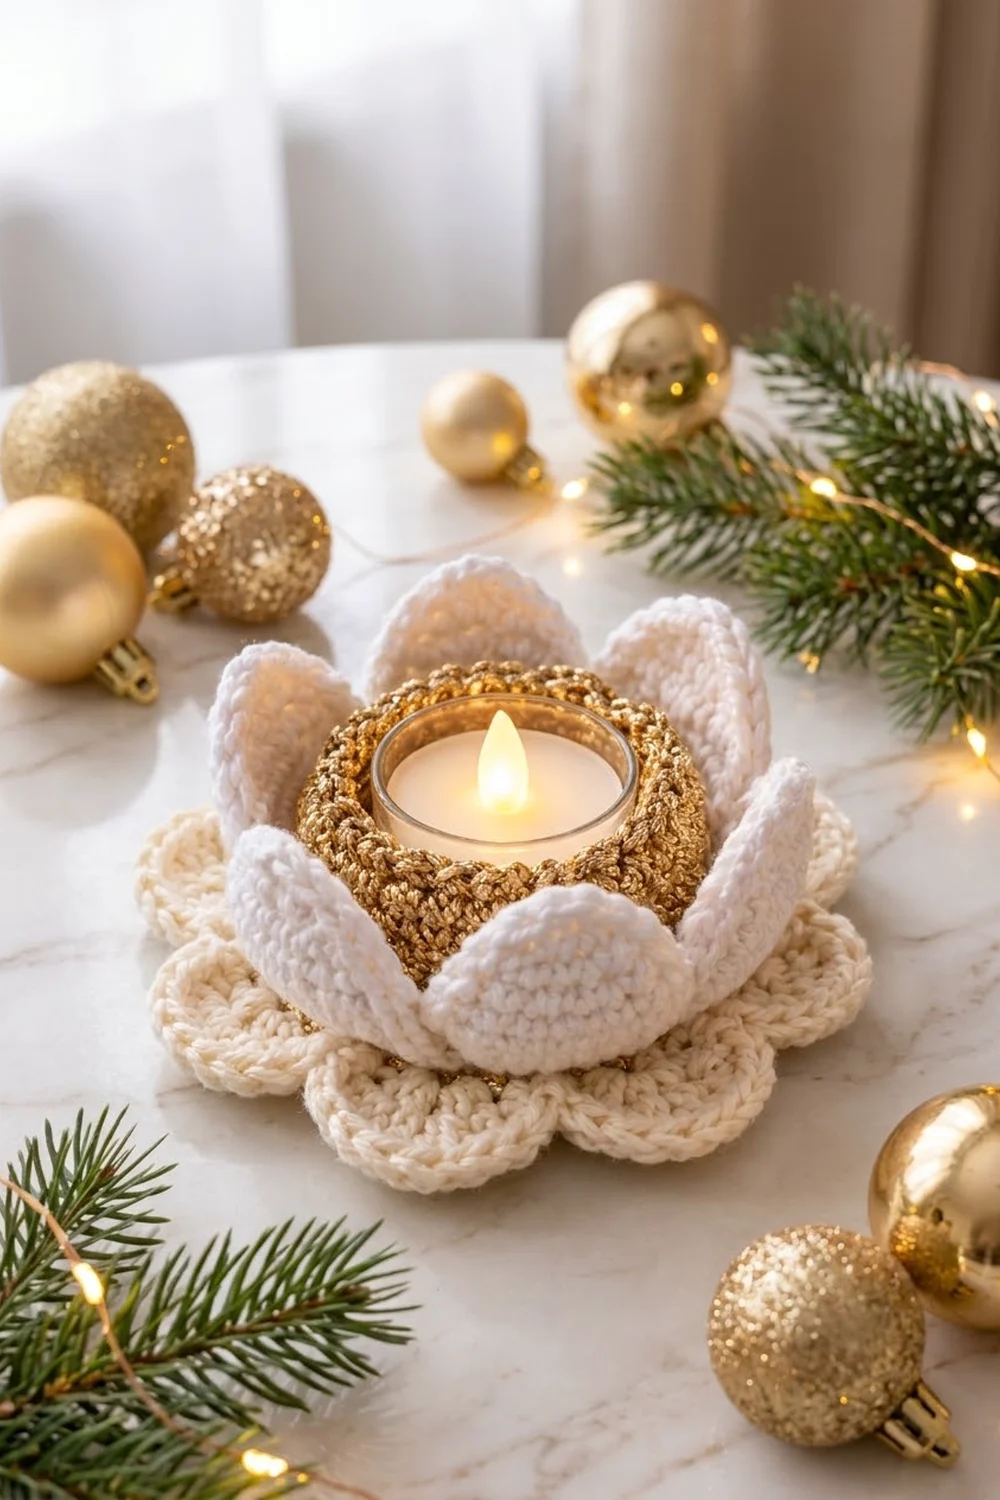
This lotus tealight holder has eight soft white petals around a shimmering gold cup, all sitting on a cream base with a scalloped edge. With an LED tealight glowing in the center, it makes a calm, elegant decoration for a holiday table, mantel or side table.
The colors are simple: ivory cream for the base, bright white for the petals and metallic gold for the cup. The texture comes from dense single crochet in the petals and base. A crunch-stitch wall makes the gold cup sparkle.
This pattern uses US crochet terms. The finished holder is about 6.75 in (17.1 cm) across and about 3 in (7.6 cm) tall. It is sized for a short glass tealight cup about 2.25 in (5.7 cm) wide. Use LED tealights only.
You will crochet a flat base, a gold cup and eight petals. Then you sew the cup and petals into free loops that were left on purpose in the base, so every seam matches stitch for stitch.
Finished Size and Construction
- Finished size: 6.75 in (17.1 cm) across, about 3 in (7.6 cm) tall
- Skill level: Easy to Intermediate
- Terminology: US
- Yarn weight: Worsted (#4)
- Hook: 4.0 mm (G-6)
- Number of pieces: 10 (1 base, 1 cup, 8 petals)
- Layout: cup in the center of the base, with 8 petals in one ring around it
- Petal size: 2 in (5.1 cm) wide × 3.25 in (8.3 cm) long
- Cup size: 2.75 in (7.0 cm) outer diameter, 1.25 in (3.2 cm) tall
- Base size before border: 5.25 in (13.3 cm)
- Border depth: 0.75 in (1.9 cm)
Materials
Use a smooth worsted-weight cotton or cotton blend for the base and petals. Cotton holds its shape and gives clear stitch definition. For the cup, choose a worsted-weight metallic blend. If you only have a thinner gold yarn, you can hold two strands together.
- Cream (base): 25 g, about 46 m (50 yd)
- White (petals): 30 g, about 55 m (60 yd)
- Metallic gold (cup): 12 g, about 22 m (24 yd)
The quantities include a small safety margin.
Tools:
– 4.0 mm (G-6) crochet hook
– Tapestry needle
– Stitch marker
– Scissors
– Glass tealight cup, about 2.25 in (5.7 cm) wide and 1.5 in (3.8 cm) tall
– LED tealight
– Rustproof pins and a spray bottle for blocking
Abbreviations (US Terms)
- ch – chain
- sl st – slip stitch
- sc – single crochet
- hdc – half double crochet
- dc – double crochet
- inc – 2 sc in the same stitch
- sk – skip
- st(s) – stitch(es)
- sp – space
- BLO / FLO – back loop only / front loop only
- RS – right side
Special stitch – crunch pattern: (sl st in next st, hdc in next st) repeated. On later rounds, always sl st into an hdc and hdc into a sl st. Keep the slip stitches loose so you can find them on the next round.
Gauge and Checkpoints
Gauge: 16 sc × 18 rounds = 4 in (10.2 cm). Each sc round adds about 0.22 in (0.6 cm) to the radius of the circle.
Crochet the base first, because it is your gauge swatch. Measure it at these points:
- After Round 4: 1.75 in (4.4 cm) across
- After Round 6: 2.75 in (7.0 cm) across. The cup bottom must match this.
- After Round 8: 3.5 in (8.9 cm) across. This is the petal ring.
- After Round 12: 5.25 in (13.3 cm) across
If your base is too big, go down half a hook size. If it is too small, go up half a size. If the circle ruffles, your tension is too tight for the increases, so use a larger hook. If it cups upward, use a smaller hook. Correct the size at Round 6, because the cup has to fit there.

Base (Cream)
Work in continuous joined rounds: join each round with a sl st to the first sc, then ch 1 to start the next round. The ch 1 does not count as a stitch. Keep the RS facing you throughout.
Round 1: Make a magic ring, then ch 1 and work 6 sc in the ring. Join. (6 sts)
Round 2: Work inc in each st around. (12 sts)
Round 3: (Sc 1, inc) × 6. (18 sts)
Round 4: (Sc 2, inc) × 6. (24 sts)
Round 5: (Sc 3, inc) × 6. (30 sts)
Round 6: (Sc 4, inc) × 6. (36 sts)
Round 7 (FLO): Work in FLO only: (sc 5, inc) × 6. (42 sts)
This leaves the 36 back loops of Round 6 free as a ring on the RS. You will sew the cup to these loops.
Round 8: Work in both loops: (sc 6, inc) × 6. (48 sts)
Round 9 (FLO): Work in FLO only: (sc 7, inc) × 6. (54 sts)
This leaves the 48 back loops of Round 8 free. You will sew the petals to these loops.
Round 10: (Sc 8, inc) × 6. (60 sts)
Round 11: (Sc 9, inc) × 6. (66 sts)
Round 12: (Sc 10, inc) × 6. (72 sts)
Check that the base measures 5.25 in (13.3 cm) across. Do not fasten off; the border comes next. If the circle starts to look like a hexagon, move the increase to a different place within each repeat on alternate rounds. The stitch counts stay the same.
Gold Cup
Rounds 1–6: Work exactly like Base Rounds 1–6, using both loops throughout. (36 sts)
The cup bottom should measure 2.75 in (7.0 cm) across, the same as Base Round 6.
Round 7 (BLO): Work 1 sc in BLO of each st around. (36 sts)
This turns the wall upward and leaves the 36 front loops of Round 6 free around the bottom edge.
Round 8: Ch 1, then (sl st in next st, hdc in next st) × 18. Join. (36 sts)
Rounds 9–11: Ch 1, then (sl st in next hdc, hdc in next sl st) × 18. Join. (36 sts each round)
Round 12: Ch 1, then sc in each st around. Join. (36 sts)
Fasten off and weave in the end. The cup should be about 1.25 in (3.2 cm) tall. Test-fit the glass now: it should slide in easily without stretching the wall.
Petals (White) – Make 8
Foundation: Ch 11.
Round 1: Work into the chain as follows. Count the first chain you work into (the 2nd from the hook) as ch 1, so the last chain is ch 10.
– Along the first side: sc in ch 1, hdc in ch 2, dc in each of ch 3 through ch 8 (6 dc), hdc in ch 9.
– At the tip: (sc, ch 2, sc) all in ch 10.
– Rotate the piece and work into the free loops along the other side: hdc in ch 9, dc in each of ch 8 through ch 3 (6 dc), hdc in ch 2, sc in ch 1.
– Join with a sl st to the first sc.
(20 sts + ch-2 tip sp)
Checkpoint: about 2.75 in (7.0 cm) long × 1 in (2.5 cm) wide.
Round 2: Ch 1. Work 2 sc in the first sc, then sc in the next 9 sts. Work (sc, ch 2, sc) in the ch-2 sp. Sc in the next 9 sts, then 2 sc in the last sc. Join. (24 sts + ch-2 sp)
Round 3: Ch 1. Work 2 sc in the first st, then sc in the next 11 sts. Work (sc, ch 2, sc) in the ch-2 sp. Sc in the next 11 sts, then 2 sc in the last st. Join. (28 sts + ch-2 sp)
Fasten off, leaving a 12 in (30.5 cm) tail for sewing. Each petal measures 2 in (5.1 cm) × 3.25 in (8.3 cm).
The rounded end where you started is the petal base. Its 6 sewing stitches are the last 3 sts of Round 3 plus the first 3 sts of Round 3. They sit centered at the bottom, directly opposite the ch-2 point.
Make All Pieces
- Cream: 1 base. Leave it unfinished after Round 12, then work the border.
- Gold: 1 cup
- White: 8 petals
Layout of the free back loops of Base Round 8 (48 loops, with 6 per petal):
Petal:   P1    P2    P3     P4     P5     P6     P7     P8
Loops:  1–6   7–12  13–18  19–24  25–30  31–36  37–42  43–48
The cup sits inside this ring on the 36 free loops of Round 6. The petals do not need to line up with the scallops.
Joining
Cup to base: Center the cup on the base. Use a 20 in (50.8 cm) length of cream yarn and whipstitch each free front loop of Cup Round 6 to the matching free back loop of Base Round 6. That is 36 loops joined to 36 loops, one to one, with no skipped or doubled stitches. Pull each stitch snug but not tight, so the base stays flat and the cup does not pucker.
Petals to base: Place Petal 1 RS out, with its 6 base stitches over base loops 1–6. Whipstitch each petal stitch to one free loop. Continue around until all 8 petals are attached: 8 × 6 = 48 loops, so the ring is fully used with no gaps.
Shaping: Tilt each petal up and slightly inward. Overlap each petal’s left edge about 0.25 in (0.6 cm) over the next petal. Tack the overlap with 2 small stitches about 1 in (2.5 cm) above the base.
Size checkpoint: The petal ring should measure about 3.5 in (8.9 cm) across at the bottom and flare to about 5 in (12.7 cm) at the tips.
Border (Scalloped Edge)
Work the border on Base Round 12 (72 sts) before you join any pieces. The border needs 6 base stitches per scallop: 72 ÷ 6 = 12 scallops, with no partial repeat.
Border gauge: each scallop covers about 1.4 in (3.6 cm) of the Round 12 edge and rises 0.75 in (1.9 cm).
Round 13: Ch 1. Sc in next st, sk 2 sts, 7 dc in next st, sk 2 sts. Repeat from * to * 11 more times. Join to the first sc.
– Per scallop: 1 sc + 7 dc = 8 sts, using 6 base stitches.
– Total: 12 sc + 84 dc = 96 sts.
Round 14: Sl st in the sc. Then sc in the next 3 dc, 3 sc in the center dc, and sc in the next 3 dc. Repeat from * to * 11 more times. Join.
– Per scallop: 1 sl st + 9 sc = 10 sts.
– Count: 96 sts worked 1-per-stitch + 24 added (2 extra at each of 12 scallop centers) = 120 sts.
Fasten off and weave in the end.
Why the math works: Each scallop spans exactly 6 base stitches, so 12 scallops use all 72 stitches evenly. The 7-dc shell gives the curve enough length to round out without ruffling. The 3 sc in the center adds just enough to keep the top of each scallop smooth. The finished diameter is 5.25 in (13.3 cm) + 2 × 0.75 in (1.9 cm) = 6.75 in (17.1 cm).
Final Blocking
- Before joining, mist the base and all 8 petals until they are damp, not soaking.
- Pin the base flat in a 6.75 in (17.1 cm) circle and open each scallop into an even curve.
- Pin each petal flat to 2 in × 3.25 in (5.1 cm × 8.3 cm), with the tip pointed and centered.
- Let everything dry completely.
- Join the pieces as described above.
- After joining, mist the petals lightly. Cup them by hand around the glass and let them dry in place.
- Lightly steam the gold cup only if the yarn label allows it.
Final Quality-Control Checklist
- The base lies flat and measures 6.75 in (17.1 cm) across.
- There are 12 even scallops, each with 10 stitches.
- The cup is centered and all 36 loops are sewn, with no gaps.
- All 8 petals are attached, using all 48 loops.
- The petals overlap evenly and lean inward at the same angle.
- The glass slides in easily and sits level.
- All tails are woven in and none show from the RS.
- An LED tealight is in place. Never use a real flame.
Troubleshooting
- Base ruffles: Use a smaller hook, or check that you haven’t added extra increases. Count 72 after Round 12.
- Base cups upward: Use a larger hook. Recount each round.
- Cup too tight for the glass: Remake it with a hook half a size larger. The bottom must still match Base Round 6.
- Hard to find the crunch stitches: Loosen your slip stitches, and use a marker at the start of each round.
- Petals flop outward: Tack the overlaps higher, about 1.5 in (3.8 cm) above the base, or block them again around the glass.
- Petal tip is blunt: Make sure the ch-2 is in the tip space on both Rounds 2 and 3.
- Scallops are uneven: Check that you skip exactly 2 sts on each side of every shell.
Care
Spot clean or hand wash in cool water. Reshape the petals while damp and dry flat, and remove the glass and LED tealight before washing.
Final Notes
Everything in this pattern depends on getting the measurements right at each stage:
- Gauge: 16 sc = 4 in (10.2 cm).
- Round 6: the base and cup bottom both measure 2.75 in (7.0 cm), so they join 36 to 36.
- Round 8: the ring is 3.5 in (8.9 cm) across and holds 8 petals × 6 sts = 48.
- Round 12: the base is 5.25 in (13.3 cm) across, and its 72 sts make 12 scallops.
- Border: adds 0.75 in (1.9 cm) per side, for a finished size of 6.75 in (17.1 cm).
If you check each measurement as you go, your lotus will come out even and ready to glow. Happy crocheting!