

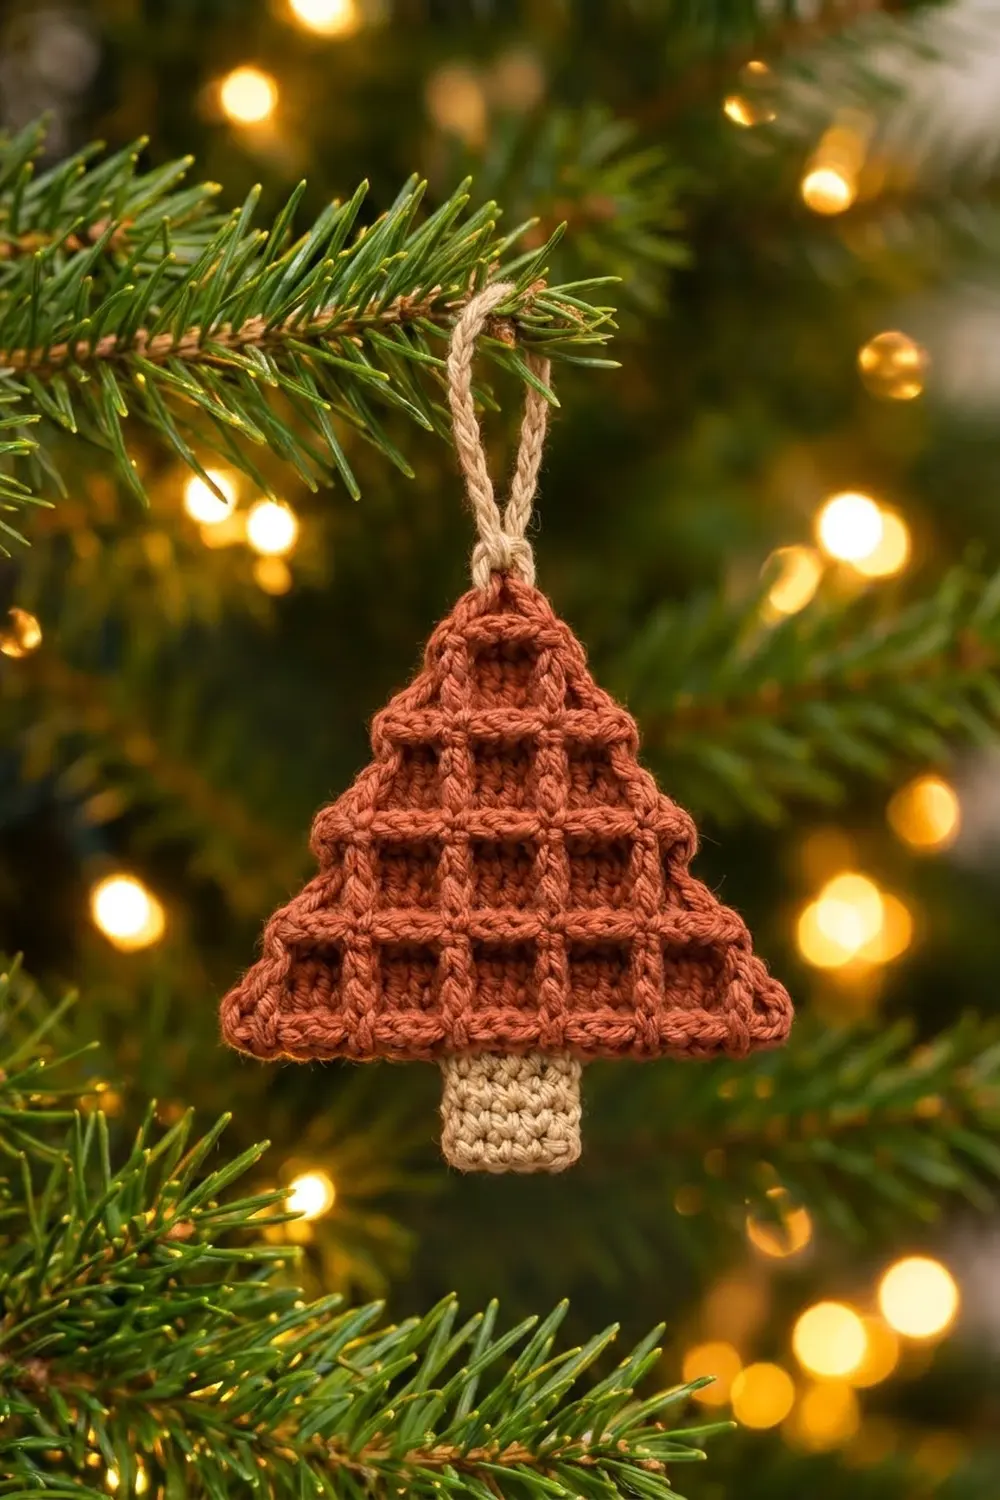
This Rustic Waffle Pine ornament is a small, flat Christmas tree with a lot of texture. Raised bars cross over each other to make a grid of deep square pockets, a bit like a waffle. The tiers step in toward a flat top, and a rounded corded rim finishes the outline.
The design uses two colors. Warm rust (terracotta) is for the tree and a soft beige is for the trunk and hanging loop. Together they look natural and cozy, so the ornament suits a rustic tree, a gift tag, or a kraft-paper parcel.
The pattern uses US crochet terms throughout. The finished ornament is about 5.5 in (14.0 cm) wide and about 5.2 in (13.2 cm) tall from the bottom of the trunk to the top of the rim, plus a hanging loop of about 2.5 in (6.4 cm).
Construction is all in one piece. You crochet the beige trunk first. Next you work the rust tree in rows straight off the top of the trunk, from the widest tier up to the tip. Then a two-row edging in single crochet and reverse single crochet goes around the tree, and you finish with a chain loop at the top.
Finished Size and Construction
- Finished size: about 5.5 in (14.0 cm) wide x 5.2 in (13.2 cm) tall, not counting the loop
- Skill level: Easy-intermediate (front post stitches, decreases, reverse sc)
- Terminology: US crochet terms
- Yarn weight: DK (#3, light)
- Hook: 3.5 mm (E-4)
- Number of pieces: 1 (trunk, tree, and loop all worked together)
- Layout: single tree; no joining
- Tree body before edging: 5 in (12.7 cm) wide at the base x 3.8 in (9.7 cm) tall
- Trunk: 1.4 in (3.6 cm) wide x 1.1 in (2.8 cm) tall
- Edging depth: about 0.25 in (0.6 cm) on every edged side
Materials
Pick a smooth, firmly plied DK yarn in cotton, a cotton blend, or acrylic. Waffle texture shows up best in a plied yarn with good stitch definition. Avoid fuzzy or brushed yarns, because they fill in the pockets.
- Rust / terracotta (Color A): about 10 g, about 23 m (25 yd)
- Beige / light tan (Color B): about 4 g, about 9 m (10 yd)
- 3.5 mm (E-4) crochet hook
- Tapestry needle
- Scissors
- 2 stitch markers
- Ruler or tape measure
- Pins and a blocking mat or folded towel
- Spray bottle with water
These amounts include a small safety margin, so one ball of each color will make several ornaments.
Abbreviations (US Terms)
- ch – chain
- sl st – slip stitch
- sc – single crochet
- dc – double crochet
- fsc – foundation single crochet
- sc3tog – single crochet 3 together
- FPdc – front post double crochet
- BLO – back loop only
- rev sc – reverse single crochet (crab stitch)
- st(s) – stitch(es)
- RS / WS – right side / wrong side
Special Stitches
Foundation single crochet extension (fsc): Insert the hook into the base (the “chain” part) of the stitch you just made. Yarn over and pull up a loop, yarn over and pull through 1 loop (this makes the new base), then yarn over and pull through 2 loops. That’s 1 new stitch added to the end of the row.
sc3tog: Pull up a loop in each of the next 3 sts (4 loops on hook), yarn over, and pull through all 4 loops. You work into 3 sts and get 1 st.
FPdc: Yarn over and insert the hook from front to back to front around the post of the indicated stitch. Pull up a loop, then [yarn over, pull through 2] twice. The stitch sits up on the RS and forms a vertical bar.
Reverse sc (rev sc): Work single crochet from left to right (right to left if you are left-handed) without turning. It makes a twisted, rope-like edge.
Gauge and Checkpoints
Base gauge: 20 sc and 22 rows = 4 in (10.2 cm) in sc with a 3.5 mm hook. That works out to 5 sts per inch.
Tier gauge: one tier (1 dc row + 1 sc row) = 0.6 in (1.5 cm) tall. The dc row is about 0.4 in (1.0 cm) and the sc row about 0.2 in (0.5 cm).
You only need one ornament, so the ornament can be your swatch. Measure at these checkpoints:
- Trunk: 1.4 in (3.6 cm) wide after Row 1.
- Tree Row 1: 25 sts = 5 in (12.7 cm).
- After Row 3: about 0.8 in (2.0 cm) tall measured from the bottom of Row 1.
- After Row 7: about 2 in (5.1 cm) tall.
- After Row 13: 3.8 in (9.7 cm) tall and 1 in (2.5 cm) wide across the top.
If your Row 1 is wider than 5 in (12.7 cm), go down to a 3.25 mm hook. If it is narrower, try a 3.75 mm hook. If the width is right but the tiers are too tall, work the dc a little more snugly; don’t change the stitch counts. A tighter gauge gives deeper, crisper pockets, so lean small rather than large.
Trunk
With Color B (beige):
Row 1: Ch 8, sc in 2nd ch from hook and in each ch across, turn. (7 sc)
Rows 2–6: Ch 1, sc in each st across, turn. (7 sc)
The trunk is now 1.4 in (3.6 cm) wide x 1.1 in (2.8 cm) tall. Fasten off and weave in the tail at the bottom corner only. Leave the top edge free, since the tree is worked into it.
Tree
The tree is worked in rows with Color A (rust). Each tier is 2 rows:
- Pocket row (RS): 3-dc pockets are separated by FPdc bars.
- Bar row (WS): a sc row that becomes the horizontal bar. It also steps the tier in by 2 sts at each end.
Each pocket is 3 sts plus 1 bar st, so a row with n pockets has 4n + 1 sts. Taking 2 sts off each end removes exactly one pocket, which is why the tiers stay centered.
Row 1 (WS): With Color A, ch 10. Sc in 2nd ch from hook and in next 8 ch (9 sc). Hold the trunk so its top edge continues the row and its first top st is next to your last sc. Sc in each of the 7 trunk sts (7 sc). Then make 9 fsc off the end of the row (9 sc). Turn. (25 sts: 9 + 7 + 9)
Check that the trunk sits exactly in the middle, with 9 sts on each side. Place a marker in the 1st and last st of the row; they mark the bottom corners for the edging later.
Row 2 (RS, 6 pockets): Ch 3 (counts as dc here and on every pocket row), dc in BLO of next 3 sts, FPdc around next st; repeat from * 4 more times, dc in BLO of next 3 sts, dc in last st (both loops), turn. (25 sts: 2 edge dc + 18 pocket dc + 5 FPdc)
Row 3 (WS): Ch 1, sc3tog over first 3 sts, sc in each of next 19 sts, sc3tog over last 3 sts, turn. (21 sts: 1 + 19 + 1)
Row 4 (RS, 5 pockets): Ch 3, dc in BLO of next 3 sts, FPdc around next st; repeat from * 3 more times, dc in BLO of next 3 sts, dc in last st, turn. (21 sts: 2 + 15 + 4)
Row 5 (WS): Ch 1, sc3tog, sc in each of next 15 sts, sc3tog, turn. (17 sts)
Row 6 (RS, 4 pockets): Ch 3, dc in BLO of next 3 sts, FPdc around next st; repeat from * 2 more times, dc in BLO of next 3 sts, dc in last st, turn. (17 sts: 2 + 12 + 3)
Row 7 (WS): Ch 1, sc3tog, sc in each of next 11 sts, sc3tog, turn. (13 sts)
Row 8 (RS, 3 pockets): Ch 3, dc in BLO of next 3 sts, FPdc around next st; repeat from * once more, dc in BLO of next 3 sts, dc in last st, turn. (13 sts: 2 + 9 + 2)
Row 9 (WS): Ch 1, sc3tog, sc in each of next 7 sts, sc3tog, turn. (9 sts)
Row 10 (RS, 2 pockets): Ch 3, dc in BLO of next 3 sts, FPdc around next st, dc in BLO of next 3 sts, dc in last st, turn. (9 sts: 2 + 6 + 1)
Row 11 (WS): Ch 1, sc3tog, sc in each of next 3 sts, sc3tog, turn. (5 sts)
Row 12 (RS, 1 pocket): Ch 3, dc in BLO of next 3 sts, dc in last st, turn. (5 sts)
Row 13 (WS): Ch 1, sc in each st across. (5 sts) Fasten off and weave in.
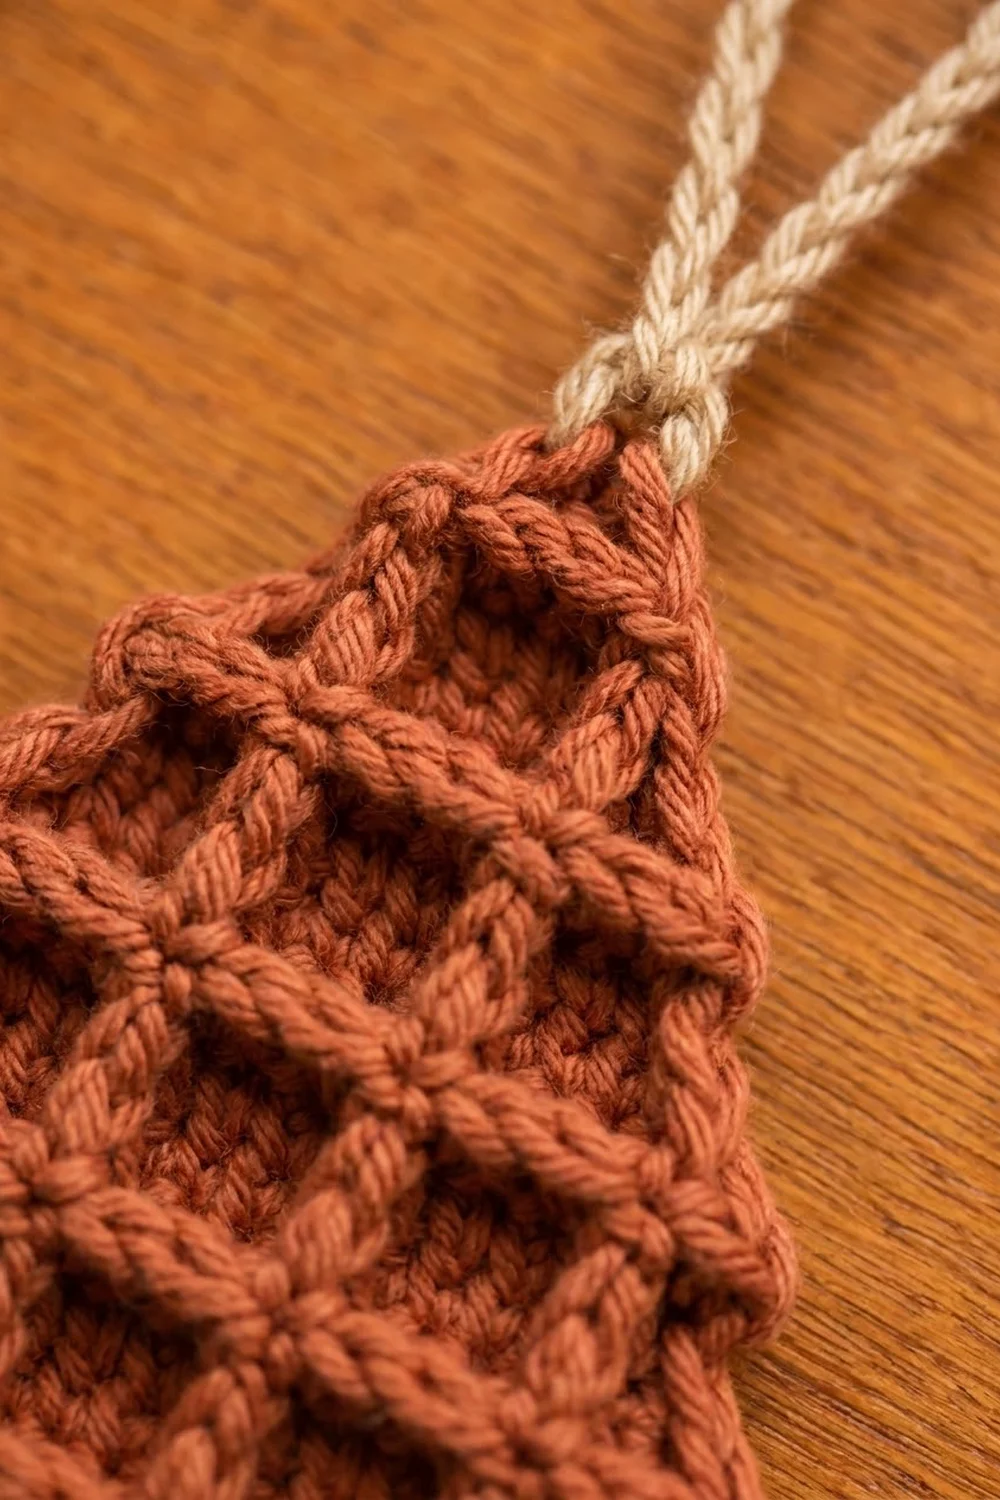
How the texture forms: When you work the pocket dc in the back loop only, the front loops of each sc row are left behind as a raised horizontal line on the RS. The FPdc bars stand up vertically between the pockets. Bars and lines together make the grid, and the plain dc sit lower as the recessed pockets.
Width checkpoints (5 sts per inch): 25 sts = 5 in (12.7 cm); 21 sts = 4.2 in (10.7 cm); 17 sts = 3.4 in (8.6 cm); 13 sts = 2.6 in (6.6 cm); 9 sts = 1.8 in (4.6 cm); 5 sts = 1 in (2.5 cm).
Edging
The edging is worked as two rows with the RS facing. It starts and ends at the trunk, so the beige trunk is never covered.
Edging gauge: along the diagonal sides, use 2 sc per dc row-end and 2 sc per stepped sc row-end. Each tier steps in 0.4 in (1.0 cm) and rises 0.6 in (1.5 cm), so its diagonal edge is about 0.72 in (1.8 cm) long. Four sc over that length is close to the 5 sts per inch gauge, with a little ease that the reverse sc takes up.
Edging Row 1 (RS): With the RS facing and the trunk pointing down, join Color A with sc in the base of the first fsc to the right of the trunk. Work all sts as sc:
- Bottom right: sc in base of next 7 fsc, 3 sc in base of the marked corner st. (11 sts, including the join sc)
- Right diagonal: Row 1 end: 1 sc. Tiers 1–5: 2 sc around each dc row-end and 2 sc in each sc row-end. Tier 6: 2 sc around the Row 12 end and 1 sc in the Row 13 end. (1 + 20 + 3 = 24 sts)
- Top: 3 sc in first st of Row 13, sc in next 3 sts, 3 sc in last st. (9 sts)
- Left diagonal: mirror the right side: 1 sc in the Row 13 end, 2 sc around the Row 12 end, then 2 sc in each sc row-end and 2 sc around each dc row-end for Tiers 5–1, and 1 sc in the Row 1 end. (3 + 20 + 1 = 24 sts)
- Bottom left: 3 sc in free loop of the marked corner ch, sc in free loops of next 8 ch, ending next to the trunk. (11 sts)
Total: 11 + 24 + 9 + 24 + 11 = 79 sts. Don’t turn.
Edging Row 2 (RS): Ch 1, rev sc in each st back to the start. (79 rev sc) Fasten off and weave in.
Why the math works: The 9 tree sts on each side of the trunk give 9 edging sts on each bottom section, plus 2 more from the 3-sc corner, which makes 11. The 5 top sts become 9 because the two corners each add 2. Each diagonal has exactly 1 + (5 x 4) + 3 = 24 sts, so the sides match and the tree stays symmetrical. The edging adds about 0.25 in (0.6 cm) on every edged side. That brings the width from 5 in (12.7 cm) to 5.5 in (14.0 cm), and the tree height from 3.8 in (9.7 cm) to 4.3 in (10.9 cm).
Hanging Loop
With Color B, join with sl st in the center st of the top edge (the 5th of the 9 top edging sts). Ch 30 and sl st in the same st to close the loop. Fasten off and weave the tails into the back of the top edging. The loop hangs about 2.5 in (6.4 cm) above the tree.
Final Blocking
- Weave in all tails along the back of the edging or the trunk, never through the pockets.
- Lay the ornament RS up on a blocking mat or towel.
- Spray it lightly until it is damp, not soaked.
- Pin the two bottom corners 5.5 in (14.0 cm) apart, then pin the top corners 1.5 in (3.8 cm) apart and centered, so the diagonals are straight.
- Check the total height, 5.2 in (13.2 cm) from trunk bottom to top rim, and that the trunk is square and centered.
- With a fingertip, press each pocket down gently and pinch each FPdc bar up a little.
- Let it dry completely, then unpin.
Final Quality-Control Checklist
- Row 1 has 25 sts with 9 on each side of the 7 trunk sts.
- Each pocket row has 4n + 1 sts: 25, 21, 17, 13, 9, 5.
- Each bar row (except Row 13) starts and ends with sc3tog.
- The FPdc bars stand out on the RS.
- Edging Row 1 has 79 sts and both diagonal sides have 24.
- The reverse sc edge is smooth, with no flared corners.
- Finished size: about 5.5 in (14.0 cm) x 5.2 in (13.2 cm).
- The loop is centered and secure.
Troubleshooting
Pockets look flat: Make sure the pocket dc go into the BLO, and try working the dc a little tighter.
FPdc bars lean or wobble: Count back to the post you need. The bars change position each tier, because each new tier sits half a pocket inward.
Wrong count after a bar row: Remember sc3tog uses 3 sts and gives 1. Count again: 2 decreases plus the plain sc in between.
Diagonal edges ripple: Go to 1 sc in each sc row-end. Do the same on both sides so they still match.
Diagonal edges pull in: Add 1 sc in the same spot on both sides.
Trunk is off-center: Rip back Row 1 and count again: 9 on the chain side, 7 on the trunk, 9 fsc.
Corners curl: Re-block, pinning the corners firmly, and let the ornament dry fully before unpinning.
Care
Hand wash in cool water with mild soap, press out the water in a towel, and dry flat, reshaping the pockets. Store flat, or hang it by the loop away from heat.
Final Notes
The measurement chain is simple. At 5 sts per inch, the 7-st trunk is 1.4 in (3.6 cm) wide and Row 1’s 25 sts make a 5 in (12.7 cm) base. Six tiers at 0.6 in (1.5 cm) each, plus Row 1, make the tree body 3.8 in (9.7 cm) tall. Each tier loses exactly 4 sts, so it ends one pocket narrower. The 0.25 in (0.6 cm) edging then brings the tree to 5.5 in (14.0 cm) wide, and the whole ornament to about 5.2 in (13.2 cm) tall. If your checkpoints match at every stage, your tree will match too.
Happy crocheting!