

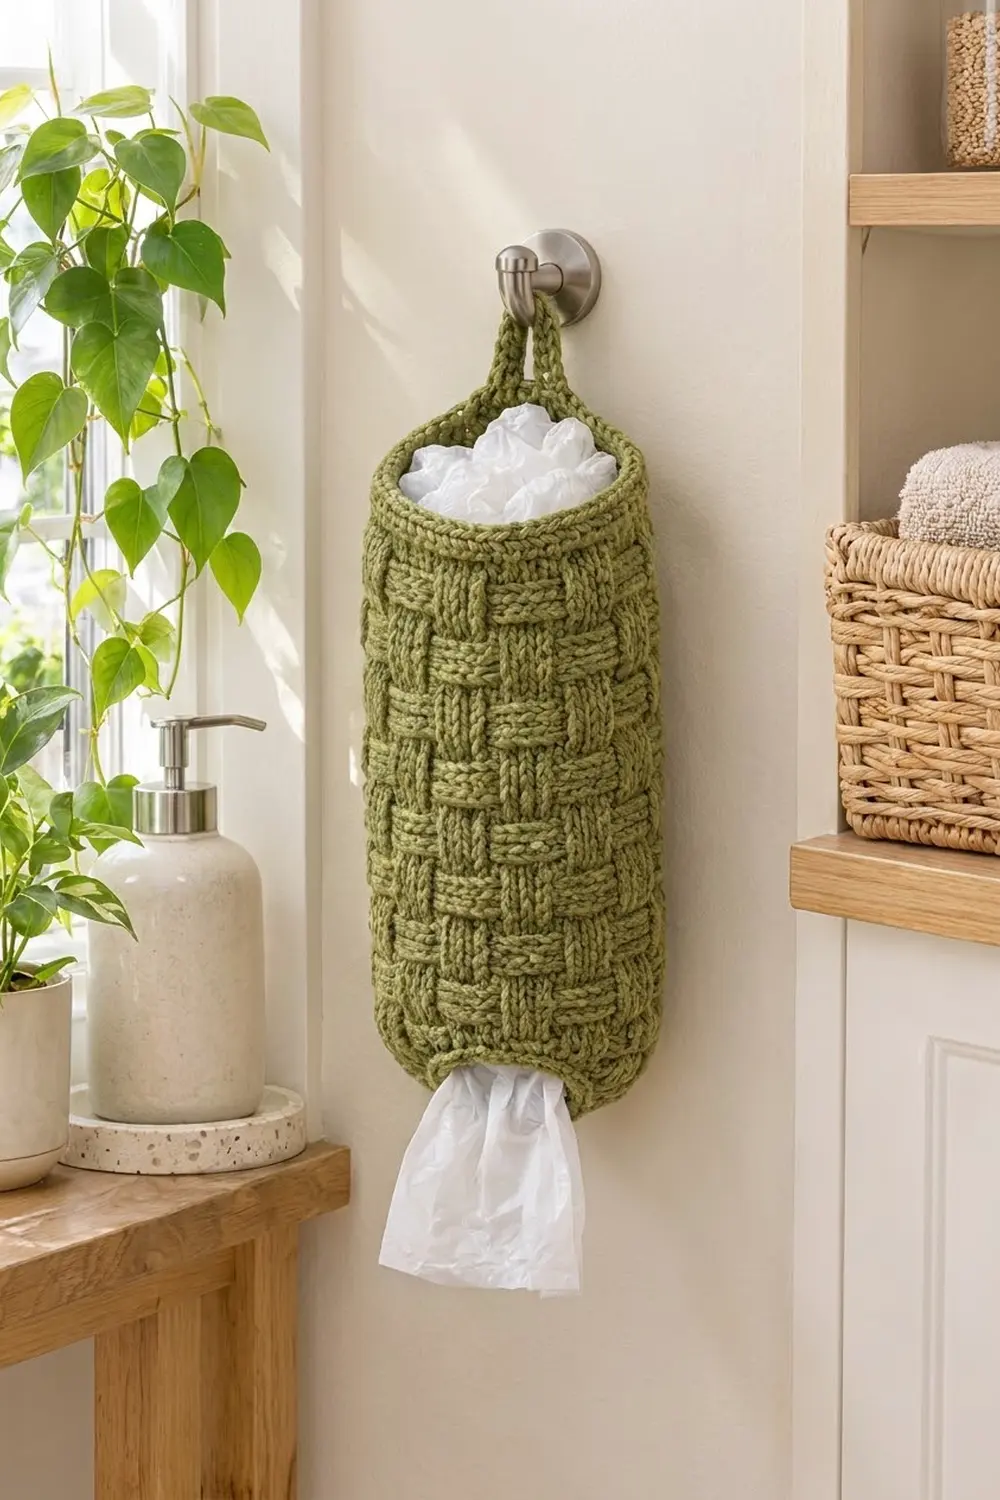
This holder turns a messy pile of grocery bags into something worth looking at. It is a tall basketweave tube in soft sage green. You stuff bags in at the top and pull them out one at a time through a small opening at the bottom. A slim loop at the back hangs it on any wall hook or door knob.
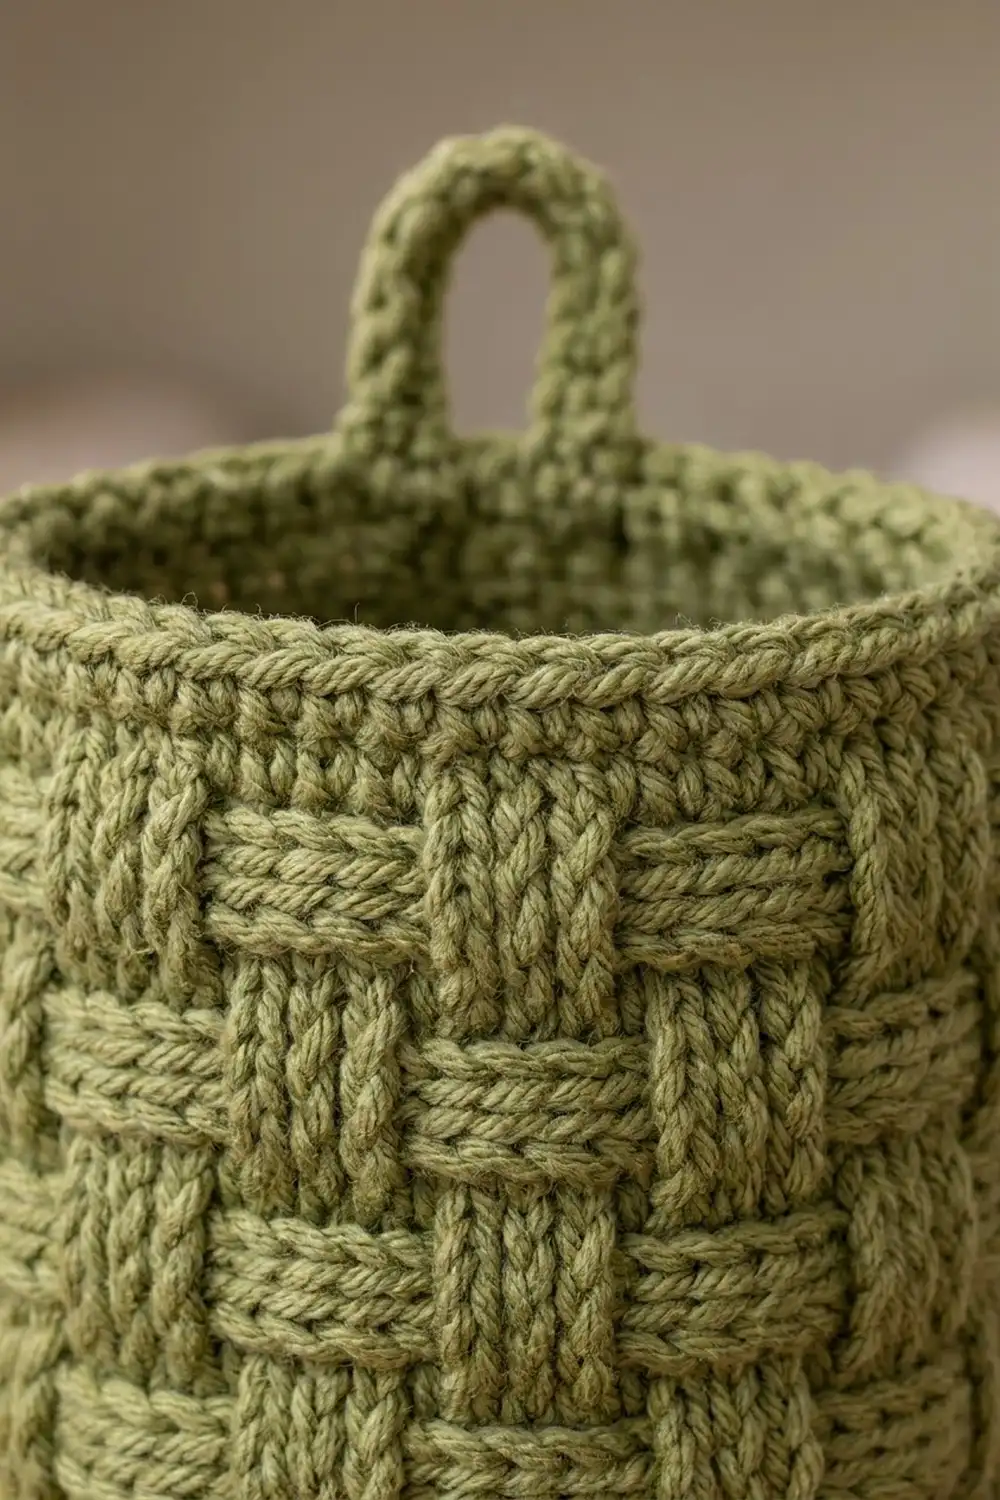
The texture comes from front post and back post double crochet arranged in blocks. The blocks swap every three rounds, so the fabric looks woven, like a wicker basket. It is also firm, so the tube keeps its shape even when it’s only half full.
This pattern uses US crochet terms. The finished holder is 18 in (45.7 cm) around, about 5.7 in (14.5 cm) across, and 14.4 in (36.6 cm) tall. The loop adds about 3 in (7.6 cm) on top.
You work it from the bottom up, in joined rounds, without turning. A short single crochet base grows from a small opening to full width. Thirty rounds of basketweave form the body. A single crochet rim finishes the top, and the hanging strap is worked straight off that rim, so you only sew one short seam.
Finished Size and Construction
- Finished size: 18 in (45.7 cm) around; about 9 in (22.9 cm) wide laid flat; 14.4 in (36.6 cm) tall
- Loop height: about 3 in (7.6 cm) above the rim
- Skill level: Intermediate (post stitches, working in the round)
- Terminology: US
- Yarn weight: Worsted (#4)
- Hook: 5.0 mm (H-8)
- Number of pieces: 1 (the strap is worked onto the body)
- Layout: one vertical tube, open at both ends
- Piece size before rim: 18 in (45.7 cm) around × 13.4 in (34.0 cm) tall
- Rim (border) depth: 1 in (2.5 cm)
- Bottom opening: 8 in (20.3 cm) around, 4 in (10.2 cm) wide laid flat
Materials
Yarn: Use a smooth worsted weight yarn with good stitch definition. A cotton-acrylic blend works best, because it holds the basketweave crisply and doesn’t sag when filled. Avoid fuzzy or very splitty yarns, which blur the post stitches.
- Sage/olive green: 200 g, about 400 m (437 yd)
This amount includes a margin of about 15%. Post stitches use more yarn than plain double crochet, so don’t cut it close.
Tools:
- 5.0 mm (H-8) crochet hook
- 1 stitch marker
- Yarn needle
- Scissors
- Measuring tape
- Spray bottle and pins for blocking
Abbreviations (US Terms)
- ch – chain
- sl st – slip stitch
- sc – single crochet
- dc – double crochet
- FPdc – front post double crochet
- BPdc – back post double crochet
- st(s) – stitch(es)
- Rnd – round
Special stitches:
- FPdc: Yarn over. Insert the hook from front to back around the post of the stitch below, then back to the front. Yarn over and pull up a loop. Finish like a normal dc. The stitch sits raised on the right side.
- BPdc: Yarn over. Insert the hook from back to front around the post of the stitch below, then back to the back. Finish like a normal dc. The stitch sinks back and pushes the top loops forward, which creates the horizontal bar look.
Round notes: Join every round with a sl st to the first stitch. The ch 1 or ch 2 at the start of a round does not count as a stitch. The join line forms the center back of the holder.
Gauge and Checkpoints
Basketweave gauge: 16 sts and 10 rounds = 4 in (10.2 cm)
Single crochet gauge: 16 sts and 16 rounds = 4 in (10.2 cm)
Test the piece first. Post stitches worked in the round behave differently from a flat swatch. So treat Rounds 1–11 of the real piece as your gauge test. Measure there before you commit to the full body.
Checkpoints (measured relaxed, not stretched):
- After Rnd 4: the top edge measures 18 in (45.7 cm) around. Total height is 1 in (2.5 cm).
- After Rnd 5: total height is 1.4 in (3.6 cm).
- After Rnd 11: total height is 3.8 in (9.7 cm). Circumference is still 18 in (45.7 cm).
- After Rnd 17: total height is 6.2 in (15.7 cm).
- After Rnd 35: total height is 13.4 in (34.0 cm).
- After Rnd 39: total height is 14.4 in (36.6 cm).
If your piece is too big: Rip back and go down to a 4.5 mm hook. Post stitches loosen easily, so check that you aren’t pulling up long loops.
If your piece is too small: Go up to a 5.5 mm hook.
Height only off? Round height varies more than stitch width. If the width matches but each 3-round band is shorter or taller than 1.2 in (3.0 cm), keep the round counts as written. The holder will simply be a little shorter or taller, and the stitch math still works.
Pattern
Base (Rounds 1–5)
The base starts at the bottom opening and grows quickly to full width. This gives the holder its rounded, tapered bottom.
Rnd 1: Ch 32 and join with a sl st to the first ch to form a ring. Don’t twist the chain. Ch 1, sc in each ch around, then join. (32 sts)
Rnd 2 (growth): Ch 1, sc in next st, 2 sc in next st; repeat from * 16 times. Join. (48 sts)
Rnd 3 (growth): Ch 1, sc in next 3 sts, 2 sc in next st; repeat from * 12 times. Join. (60 sts)
Rnd 4 (growth): Ch 1, sc in next 4 sts, 2 sc in next st; repeat from * 12 times. Join. (72 sts)
Checkpoint: the edge measures 18 in (45.7 cm) around. The base flares out like a shallow cup.
Rnd 5 (set-up): Ch 2, dc in each st around. Join. (72 sts)
This plain dc round gives the post stitches a tall stitch to wrap around. Without it, the first basketweave band would pucker.
Basketweave Body (Rounds 6–35)
Each block is 6 stitches wide and 3 rounds tall, which is 1.5 in (3.8 cm) wide and 1.2 in (3.0 cm) tall. There are 12 blocks around, so the checkerboard lines up perfectly across the join.
Band A rounds: Ch 2, FPdc in next 6 sts, BPdc in next 6 sts; repeat from * 6 times. Join. (72 sts: 36 FPdc + 36 BPdc)
Band B rounds: Ch 2, BPdc in next 6 sts, FPdc in next 6 sts; repeat from * 6 times. Join. (72 sts: 36 BPdc + 36 FPdc)
Work the bands in this order:
- Rnds 6–8: Band A
- Rnds 9–11: Band B
- Rnds 12–14: Band A
- Rnds 15–17: Band B
- Rnds 18–20: Band A
- Rnds 21–23: Band B
- Rnds 24–26: Band A
- Rnds 27–29: Band B
- Rnds 30–32: Band A
- Rnds 33–35: Band B
That is 30 rounds, or 10 bands, with 72 sts in every round.
Why the blocks stay aligned: In a Band A round, the FPdc stitches land on FPdc stitches from the round below, so the vertical ridges stack. When you switch to Band B, the FPdc stitches now land on BPdc stitches. That flip is what makes the “over and under” weave.
Tip: Put a stitch marker in the first stitch of each round. When you work the last post stitch, check that you’re wrapping the post just before the marker, not the ch 2. This is the most common place to lose a stitch.
Checkpoint after Rnd 35: total height is 13.4 in (34.0 cm), and circumference is 18 in (45.7 cm).
Border
The border has three parts: a single crochet rim at the top, the hanging strap, and a slip stitch edging around the bottom opening.
Border gauge: 16 sc and 16 rounds = 4 in (10.2 cm), so 4 rounds = 1 in (2.5 cm).
Top Rim (Rounds 36–39)
Rnd 36 (conversion): Ch 1, sc in the top of each st around. Join. (72 + 0 = 72 sts)
This round converts the post-stitch fabric to plain sc. It is worked 1 per existing stitch with no stitches added, so the rim stays the same width as the body.
Rnds 37–39: Ch 1, sc in each st around. Join. (72 sts)
When you flatten the holder, that’s 36 sts per side.
Don’t fasten off. Go straight on to the strap.
Why the math works: The body is 72 sts at 4 sts per inch, which is 18 in (45.7 cm). The rim is also 72 sts at 4 sts per inch. Same count and same stitch width means the rim lies smooth, without flaring or pulling in. Four sc rounds give the 1 in (2.5 cm) border depth, so the height adds up to 13.4 + 1 = 14.4 in (36.6 cm).
Hanging Strap
The strap is worked straight off the rim, centered at the back above the join line.
Row 1: Ch 1, sc in each of the first 3 sts of Rnd 39, turn. (3 sts)
Rows 2–28: Ch 1, sc in each st across, turn. (3 sts)
The strap is now 3 sts wide, which is 0.75 in (1.9 cm), and 28 rows long, which is 7 in (17.8 cm).
Fasten off and leave a 12 in (30.5 cm) tail.
To form the loop: Arch the strap up and back down without twisting it. Lay Row 28 over Rnd 39 stitches 7–9. That leaves a 3-stitch gap between the two legs. Whipstitch the end to the inside of the rim, going through both layers, with one stitch per sc. You now have an arched loop about 3 in (7.6 cm) high.
Bottom Edging
Turn the holder upside down. Join yarn with a sl st in any remaining loop of the Rnd 1 foundation chain.
Edging round: Sl st loosely in each foundation loop around. Join. (32 sts, or 16 per side when flattened)
This firms up the opening and gives it a neat, ribbed edge, without making it any smaller. The edging is worked 1 per foundation chain, so the opening stays 8 in (20.3 cm) around. That’s wide enough for bags to slide out, but snug enough to hold them in.
Fasten off and weave in all ends on the inside. Run each tail along the post-stitch ridges so it won’t show through.
Final Blocking
- Turn the holder right side out and check that the join line runs straight up the back.
- Roll up a towel to about 5.7 in (14.5 cm) across. A cardboard tube wrapped in a towel also works. Slide it inside the holder.
- Mist the outside evenly until damp, not soaked.
- Gently smooth the blocks so the vertical and horizontal bars look even. Press the rim so it sits straight.
- Check that the body measures 18 in (45.7 cm) around and 14.4 in (36.6 cm) tall.
- Pin the strap flat so the loop stands up in an arch.
- Let it dry completely, at least 24 hours, before removing the form.
Final Quality-Control Checklist
- Every round has 72 sts from Rnd 4 through Rnd 39.
- There are 10 bands of 3 rounds each, alternating A and B.
- The blocks line up vertically with no shifted columns.
- The join line runs straight up the center back.
- The rim measures 18 in (45.7 cm) around and lies flat.
- The strap is 3 sts wide and 28 rows long, with no twist.
- The loop is sewn firmly through both layers.
- The bottom opening measures 8 in (20.3 cm) around, and the edging is even.
- All ends are woven in on the inside.
- Total height is 14.4 in (36.6 cm) without the loop.
Troubleshooting
The blocks drift diagonally. You probably added or lost a stitch at the join. Count to 72 and recheck where you start each round.
The basketweave looks flat. Your post stitches are too loose. Go down a hook size, or pull each yarn over snug before finishing the stitch.
The fabric leans or spirals. Some lean is normal in joined rounds. Block it firmly on the towel form. If it’s severe, try to keep your hook angle the same for FPdc and BPdc.
The rim flares. You likely worked into both posts and tops, or added stitches. Rnd 36 must be exactly 72 sc.
The bottom opening is too loose. Work a second sl st round. Or go down a hook size for the edging round only.
The strap stretches. Use a hook one size smaller, such as 4.5 mm, for the strap only.
Care
Hand wash in cool water. Squeeze it gently, then reshape it over a rolled towel and let it air dry. Don’t wring it, and don’t hang it wet by the loop.
Final Notes
Each stage of this holder builds on the one before it. The base grows from 32 to 72 stitches, which gives 18 in (45.7 cm) of circumference. The set-up round and 30 basketweave rounds hold that same 72-stitch count while the piece grows to 13.4 in (34.0 cm) tall. The four-round sc rim adds 1 in (2.5 cm), for a total of 14.4 in (36.6 cm). The strap adds a sturdy 3 in (7.6 cm) loop.
If you check your measurements at Rnd 4, Rnd 11, and Rnd 35, the finished piece will come out right. Fill it with bags, hang it up, and enjoy a tidier kitchen.
Happy crocheting!