
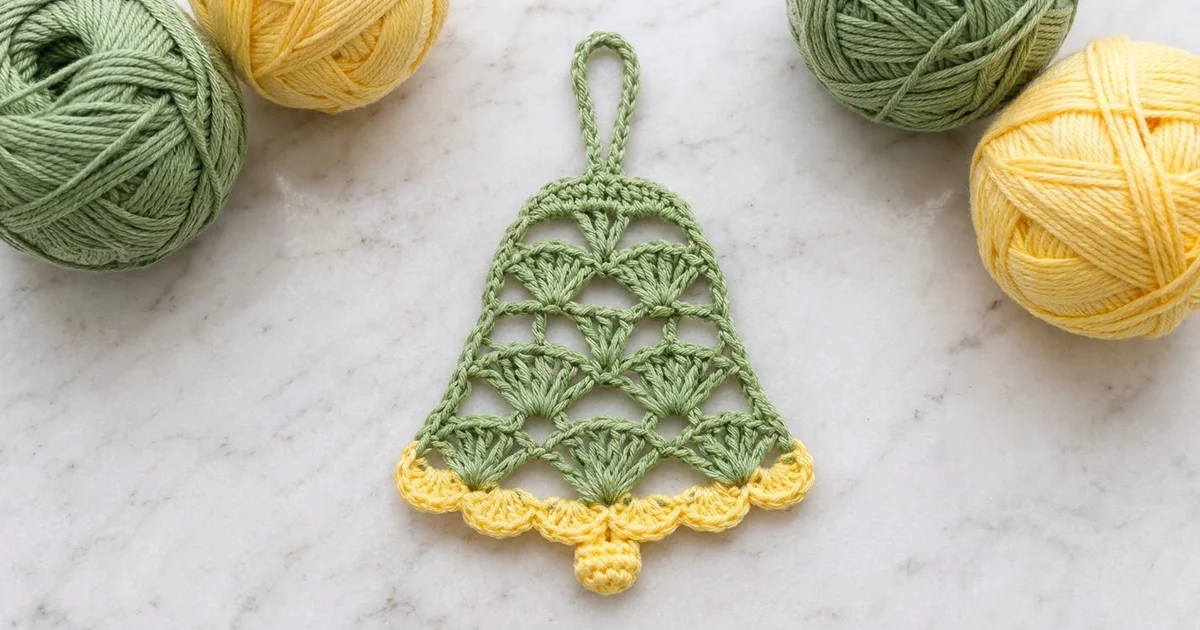
This little bell is a flat, lacy ornament with a soft vintage feel. Rows of open fan shells in sage green stack up and widen into a classic bell shape. A butter yellow scalloped hem finishes the lower edge. A tiny yellow ball clapper hangs from the center, and a green chain loop at the top is for hanging.
The pattern uses US crochet terms. The finished bell body measures about 4.4 inches (11.2 cm) wide by 3.9 inches (9.9 cm) tall. With the hanging loop and clapper, the whole ornament is about 5.9 inches (15.0 cm) from top to bottom.
Construction is simple. You work the bell from the top down in turned rows, starting with a short band of single crochet. Shell rows and arch rows alternate. Each shell row gains one fan, so the bell widens on its own without separate increases. The yellow scalloped border goes across the bottom edge, and then you add the clapper and the loop.
It’s a quick make, about an hour once you know the repeat, and a good way to use up leftover cotton. Because it’s flat, it also works well as a gift tag, a card topper, or a window decoration. Make one to learn the repeat, then make a whole set for the tree.
Finished Size and Construction
- Finished size (body): 4.4 in (11.2 cm) wide x 3.9 in (9.9 cm) tall
- Total length with loop and clapper: 5.9 in (15.0 cm)
- Skill level: Easy+ (basic stitches and counting shells)
- Terminology: US crochet terms
- Yarn weight: Super fine / fingering (#1) cotton
- Hook: 2.5 mm
- Number of pieces: 1 bell body, plus 1 small clapper ball sewn on
- Layout: Single motif, no joining
- Piece size before border: 4.2 in (10.7 cm) wide x 3.3 in (8.4 cm) tall
- Border depth: 0.6 in (1.5 cm), bottom edge only
Materials
Use a smooth, mercerized fingering-weight cotton. It shows the fan stitches clearly and holds its shape after blocking. A blend with a little acrylic also works. Avoid fuzzy or very stretchy yarns, because they blur the lace.
Yarn
- Color A, sage green: 6 g (20 m)
- Color B, butter yellow: 3 g (10 m)
These amounts include about 25 percent extra for your gauge swatch and for weaving in ends.
Tools
- 2.5 mm crochet hook
- Tapestry needle
- Scissors
- Small pinch of fiberfill (or yarn scraps) for the clapper
- Stitch marker
- Blocking mat and rustproof pins
- Spray bottle, or a little fabric stiffener (optional)
Abbreviations (US Terms)
- ch – chain
- sl st – slip stitch
- sc – single crochet
- dc – double crochet
- sc2tog – single crochet 2 together
- sk – skip
- st(s) – stitch(es)
- sp – space
- MR – magic ring
- RS / WS – right side / wrong side
Special stitches
- Shell: 5 dc in the same stitch.
- Half-shell: 3 dc in the same stitch. At the start of a row, the ch 3 counts as the first dc, so work ch 3 and then 2 dc in the first stitch.
- Scallop (border): 5 dc in the same stitch.
The beginning ch 3 of a shell row counts as a dc. The ch 1 at the start of sc rows and arch rows does not count as a stitch.
Gauge and Checkpoints
Gauge isn’t critical for an ornament, but it sets the final size. Make one bell first and check it at each stage before you make a set.
Base gauge: 15 sc = 2 in (5.1 cm). Two rows of sc = 0.3 in (0.8 cm).
Row heights: Each shell row is about 0.45 in (1.1 cm) tall. Each arch row is about 0.4 in (1.0 cm) tall.
Checkpoints:
- After Row 2: 1.75 in (4.4 cm) wide, 0.3 in (0.8 cm) tall
- After Row 5: about 2.6 in (6.6 cm) wide at the lower edge, 1.6 in (4.1 cm) tall
- After Row 7: about 3.4 in (8.6 cm) wide, 2.45 in (6.2 cm) tall
- After Row 9: 4.2 in (10.7 cm) wide, 3.3 in (8.4 cm) tall
- After the border: 4.4 in (11.2 cm) wide, 3.9 in (9.9 cm) tall
Too big? Go down to a 2.25 mm hook, or work your chain arches a little tighter.
Too small? Go up to a 2.75 mm hook. Don’t add chains to the arches, because that changes the shape.
Bell Body
Work in turned rows with Color A (sage green). Every row after Row 1 begins with a turn.
Row 1 (RS): Ch 14. Sc in the 2nd ch from the hook and in each ch across. (13 sc)
Row 2: Ch 1, turn. Sc in each st across. (13 sc)
This is the solid top band. Check: 1.75 in (4.4 cm) wide.
Shell Row 1
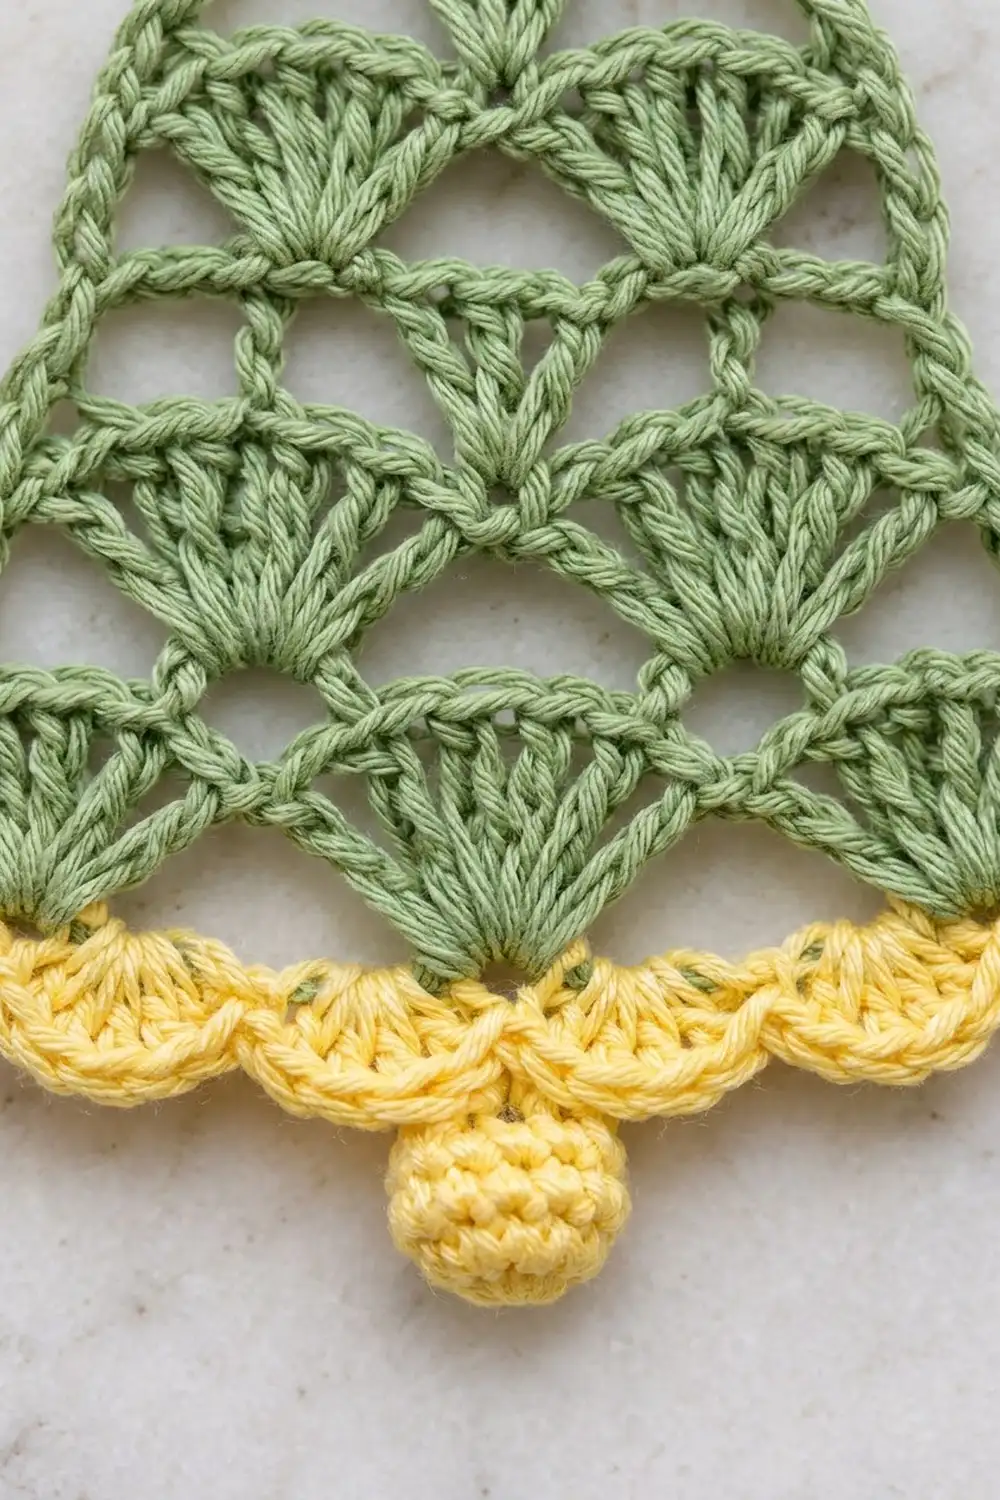
Row 3: Ch 3 (counts as dc), turn. 2 dc in the first sc (half-shell made). Sk 2 sc, sc in the next sc, sk 2 sc, 5 dc in the next sc (shell made), sk 2 sc, sc in the next sc, sk 2 sc, 3 dc in the last sc (half-shell made).
Count: 13 sts (2 half-shells of 3 dc, 1 shell of 5 dc, 2 sc). Math: 3 + 1 + 5 + 1 + 3 = 13.
Arch Row Pattern
Row 4: Ch 1, turn. Sc in the first dc. Ch 3, dc in the next sc, ch 3, sc in the 3rd (center) dc of the next shell. Repeat from * across until only 1 sc remains before the last half-shell. Then ch 3, dc in that last sc, ch 3, and sc in the top of the turning ch.
Count: 3 sc, 2 dc, 4 ch-3 sps.
The arch row puts a dc above every sc of the shell row and a sc above every shell center. Those dc’s are where the next row’s shells go, which is what staggers the fans. Keep your ch-3s at an even, relaxed tension so the open spaces match across the row.
Shell Row Pattern
Row 5: Ch 3 (counts as dc), turn. 2 dc in the first sc. Sc in the next ch-3 sp. 5 dc in the next dc, sc in the next center sc. Repeat from * 1 time. 5 dc in the next dc, sc in the next ch-3 sp, 3 dc in the last sc. Skip all other ch-3 sps.
Count: 19 sts (2 half-shells, 2 shells, 3 sc). Math: 6 + 10 + 3 = 19.
Check: about 2.6 in (6.6 cm) wide, 1.6 in (4.1 cm) tall.
Row 6: Work as Row 4.
Count: 4 sc, 3 dc, 6 ch-3 sps.
Row 7: Work as Row 5, but repeat from * 2 times.
Count: 25 sts (2 half-shells, 3 shells, 4 sc). Math: 6 + 15 + 4 = 25.
Check: about 3.4 in (8.6 cm) wide, 2.45 in (6.2 cm) tall.
Row 8: Work as Row 4.
Count: 5 sc, 4 dc, 8 ch-3 sps.
Row 9: Work as Row 5, but repeat from * 3 times.
Count: 31 sts (2 half-shells, 4 shells, 5 sc). Math: 6 + 20 + 5 = 31.
Check: 4.2 in (10.7 cm) wide, 3.3 in (8.4 cm) tall. Fasten off Color A.
How the rows grow: Every shell row has 6 sts in its two half-shells and 5 sts in each full shell. It also has one more sc than it has full shells. The shell rows have 1, 2, 3, and then 4 full shells, so their totals are 13, 19, 25, and 31 sts.
Border
The border goes across the bottom edge only, in Color B (butter yellow).
Border gauge: 33 sc = 4.4 in (11.2 cm), the same 15 sc = 2 in (5.1 cm) as the base gauge. The sc row is 0.2 in (0.5 cm) deep and the scallop row adds about 0.4 in (1.0 cm), for 0.6 in (1.5 cm) in total.
Row 10 (conversion row): With RS facing, join Color B in the first st at the right-hand end of Row 9. Ch 1. 2 sc in the first st, sc in each of the next 29 sts, 2 sc in the last st.
Count: 31 + 2 = 33 sc (31 sc worked one per existing stitch, plus 2 extra sc at the corners).
Row 11 (scallop row): Ch 1, turn. Sc in the first sc. Sk 1 sc, 5 dc in the next sc, sk 1 sc, sc in the next sc. Repeat from * 7 more times. Fasten off, leaving a 6 in (15.2 cm) tail.
Count: 8 scallops and 9 sc.
Why the math works: Each scallop repeat uses 4 sts (sk 1, scallop, sk 1, sc). The row needs 1 starting sc plus a multiple of 4, so 1 + (8 x 4) = 33. Row 9 has 31 sts, which doesn’t fit the repeat, so the 2 corner increases in Row 10 bring it to 33. They also let the hem flare a little past the edge of the bell. The 5th sc of Row 11 (st 17 of 33) sits exactly in the center, between scallops 4 and 5. That’s where the clapper goes.
Clapper
With Color B:
Rnd 1: 6 sc in MR. (6 sc)
Rnd 2: 2 sc in each st. (12 sc)
Rnds 3–4: Sc in each st. (12 sc)
Rnd 5: Sc2tog 6 times. (6 sc)
Stuff firmly with a small pinch of fiberfill. Fasten off, leaving an 8 in (20.3 cm) tail. Weave the tail through the front loops of the last 6 sts and pull tight. The ball is about 0.5 in (1.3 cm) across.
Use the tail to sew the ball to the center sc of Row 11, so it hangs just below the scalloped hem.
Hanging Loop
With RS facing, join Color A in the center st of Row 1. This is the 7th st, worked into the foundation chain side. Ch 30, then sl st in the same st to form the loop. Sl st in each ch around the loop for a firmer cord, then sl st in the starting st and fasten off. The folded loop measures about 1.5 in (3.8 cm).
Final Blocking
- Weave in all ends along solid stitches, never through the open arches.
- Wet the bell in cool water, or spray it until it’s damp. For a crisp ornament, dip it in diluted fabric stiffener.
- Roll it in a towel to press out the extra water. Don’t wring it.
- Lay it RS up on the blocking mat. Pin the top band to 1.75 in (4.4 cm) wide.
- Pin the bottom corners so the hem is 4.4 in (11.2 cm) wide and the body is 3.9 in (9.9 cm) tall.
- Pin the tip of each of the 8 scallops so the hem makes a smooth curve.
- Use your fingers to open each fan so the spokes spread evenly and the arches stay open.
- Lay the hanging loop straight above the top. Leave the clapper unpinned so it keeps its round shape.
- Let it dry completely before you take out the pins.
Final Quality-Control Checklist
- The top band has 13 sc and measures 1.75 in (4.4 cm).
- The shell rows have 13, 19, 25, and 31 sts.
- The fans are staggered: each shell sits above an sc, not above another shell.
- The side edges are straight lines of dc and sc, with no extra stitches.
- Row 10 has 33 sc, and Row 11 has 8 even scallops.
- The clapper is centered under the hem, between scallops 4 and 5.
- The hanging loop is centered on the top band.
- The body measures 4.4 in x 3.9 in (11.2 cm x 9.9 cm).
- All ends are hidden and trimmed.
Troubleshooting
The fans line up instead of staggering. You probably worked the shells into the center sc’s. Shells always go into the dc’s of the arch row.
Row 11 ends with leftover stitches. Recount Row 10. It must be exactly 33 sc, with the 2 increases at the very ends.
The bell curls or cups. Your arches are too tight. Loosen your tension on the ch-3s, or go up one hook size for the arch rows only.
The sides look wavy. Check that every shell row starts with ch 3 plus 2 dc and ends with 3 dc in the last sc.
The clapper is lumpy. Use less stuffing and pull the closing tail evenly.
The loop twists. Make sure the chain isn’t twisted before you join it, and pin it straight while blocking.
Care
Hand wash in cool water with mild soap and lay flat to dry. If you used stiffener, block it again after washing.

Final Notes
Here’s how the measurements build up:
- The 13-sc top band is 1.75 in (4.4 cm) wide.
- The four shell rows grow to 13, 19, 25, and 31 sts, reaching 4.2 in x 3.3 in (10.7 cm x 8.4 cm).
- The 33-sc border row and 8 scallops bring the bell to 4.4 in x 3.9 in (11.2 cm x 9.9 cm).
- With the 1.5 in (3.8 cm) loop and the 0.5 in (1.3 cm) clapper, the full ornament is 5.9 in (15.0 cm) long.
If your checkpoints match, every bell in a set will come out the same size. Happy crocheting!