

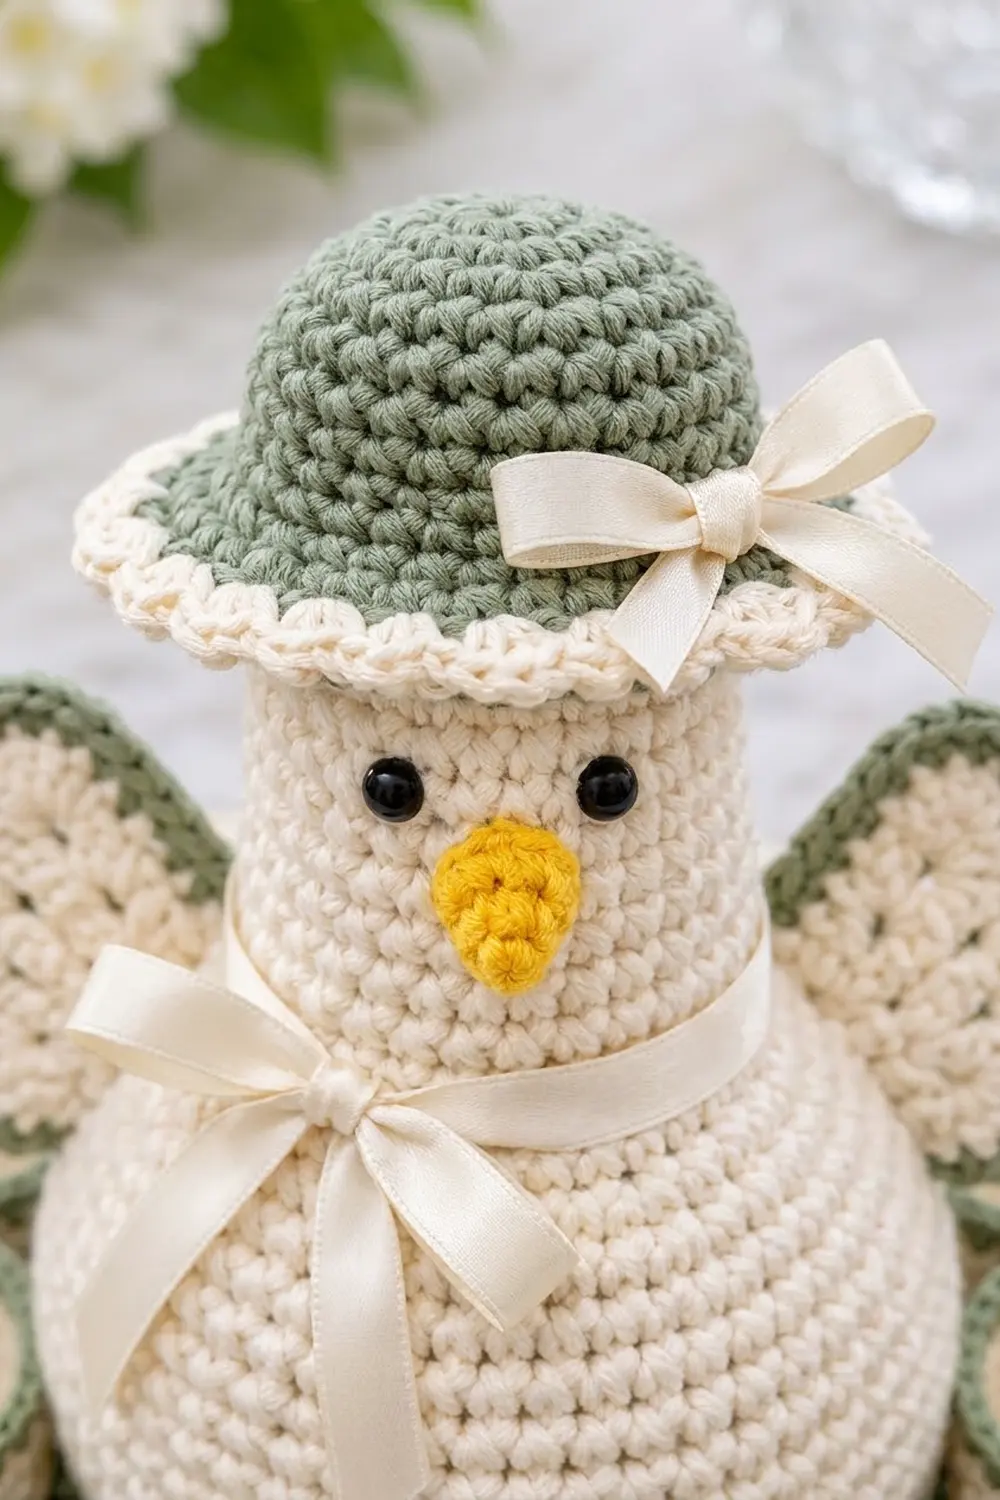
This spring centerpiece is a cream hen sitting on a round sage-green base, surrounded by ten small egg cups. She has a gourd-shaped body, heart-shaped wings with a green outline, a yellow beak, black eyes and a little green hat with a scalloped cream brim. Cream satin bows trim the hat and her neck.
The colors are calm and fresh: sage green, warm cream, a touch of sunny yellow and black for the eyes. The egg cups have green bottoms and rims, with cream puff-stitch sides. The base ends in a cream scalloped border with tiny picots. The style is pretty farmhouse, and it looks lovely on an Easter brunch table.
The pattern uses US crochet terms. The finished base measures about 11.5 in (29.2 cm) across, and the hen stands about 6 in (15.2 cm) tall without her hat.
You crochet each piece separately. The base is worked in flat joined rounds, the hen body in a continuous spiral, the wings as heart motifs, the hat from the top down, and each egg cup from the bottom up. Then you sew the hen and cups onto the base and add the scalloped border.
Finished Size and Construction
- Finished size: base 11.5 in (29.2 cm) across; hen 6 in (15.2 cm) tall and 4.3 in (10.9 cm) wide
- Skill level: Intermediate
- Terminology: US
- Yarn weight: Worsted (#4 medium) cotton
- Hook: 4.0 mm (US G-6)
- Number of pieces: 16 crocheted pieces (1 base, 1 body, 2 wings, 1 beak, 1 hat, 10 egg cups)
- Layout: hen in the center, 10 cups in a ring around her
- Piece size (egg cup): 1.9 in (4.8 cm) across, 1.75 in (4.4 cm) tall
- Base size before border: 9.5 in (24.1 cm) across
- Border depth: 1 in (2.5 cm) all around
Materials
Use a smooth worsted cotton. Cotton holds the cup shape well, wipes clean and shows the puff texture clearly. Use the same brand for every color so the stitches come out the same size.
- Sage green: about 75 g / 115 m (126 yd)
- Cream: about 110 g / 170 m (186 yd)
- Yellow: about 2 g / 3 m (3 yd)
These amounts include about 25% extra for a gauge test and for differences in tension.
Tools and notions:
- 4.0 mm (US G-6) crochet hook
- 2 black safety eyes, 8 mm
- Polyester fiberfill
- 1 circle of stiff cardboard or plastic canvas, 2.8 in (7.1 cm) across, for the bottom of the body
- 1 yd (91.4 cm) cream satin ribbon, 3/8 in (1.0 cm) wide
- Stitch markers, tapestry needle, scissors, pins
Abbreviations (US Terms)
- ch – chain
- sl st – slip stitch
- sc – single crochet
- hdc – half double crochet
- dc – double crochet
- tr – treble crochet
- inc – 2 sc in the same stitch
- sc2tog – single crochet 2 together
- MR – magic ring
- BLO / FLO – back loop only / front loop only
- sp – space
- st(s) – stitch(es)
Special stitch – puff: (Yarn over, insert the hook in the stitch or space, and pull up a loop about 0.25 in / 0.6 cm tall) 3 times. Yarn over and pull through all 7 loops on the hook. A puff counts as 1 stitch.
Gauge and Checkpoints
Gauge: 16 sc and 17 rounds = 4 in (10.2 cm), in sc worked in rounds.
Make one egg cup first as your gauge test. It’s small and quick, and it uses every main stitch in the pattern. After Round 4, the cup bottom should measure 1.9 in (4.8 cm) across. If it’s bigger, go down one hook size. If it’s smaller, go up one hook size.
Measurement checkpoints:
- Egg cup, Round 4: 1.9 in (4.8 cm)
- Base, Round 6: 2.8 in (7.1 cm)
- Base, Round 12: 5.6 in (14.2 cm)
- Base, Round 20: 9.5 in (24.1 cm)
- Hen body, Round 9: 4.3 in (10.9 cm) wide
If the base ruffles, go up one hook size. If it cups upward, go down one hook size. Fix it early, at these checkpoints, before you’ve worked many rounds.
Base
Work in joined rounds with sage green. The ch 1 at the start of each round does not count as a stitch. Join each round with a sl st to the first sc.
- Rnd 1: MR, 6 sc in ring, join. (6)
- Rnd 2: inc in each st around. (12)
- Rnd 3: (sc 1, inc) 6 times. (18)
- Rnd 4: (sc 2, inc) 6 times. (24)
- Rnd 5: (sc 3, inc) 6 times. (30)
- Rnd 6: (sc 4, inc) 6 times. (36)
- Rnds 7–20: Keep adding 6 sts evenly in each round, with 1 more sc before each inc than in the round before. Round 7 has 42 sts, Round 12 has 72 sts, Round 15 has 90 sts and Round 20 has 120 sts.
To keep the circle round instead of six-sided, shift where the increases fall. On even rounds, work half of the first set of plain sc, then repeat as usual, and finish with the other half at the end of the round.
Fasten off. The base now measures 9.5 in (24.1 cm) across. It’s divided into 6 increase sections of 20 sts each. You’ll use these sections to place the cups and to work the border.
Hen Body
Work in a continuous spiral with cream. Mark the first st of each round.
- Rnd 1: 6 sc in MR. (6)
- Rnds 2–9: Add 6 sts evenly in each round, the same way as the base. Round 6 has 36 sts and Round 9 has 54 sts.
- Rnds 10–16: sc in each st around. (54)
- Rnd 17: (sc 7, sc2tog) 6 times. (48)
- Rnd 18: (sc 6, sc2tog) 6 times. (42)
- Rnd 19: (sc 5, sc2tog) 6 times. (36)
- Rnd 20: (sc 4, sc2tog) 6 times. (30)
- Rnd 21: (sc 3, sc2tog) 6 times. (24)
- Rnds 22–31: sc in each st around. (24)
Sl st into the next st and fasten off. Leave the top open. The neck is 1.9 in (4.8 cm) across.
Insert the safety eyes between Rounds 25 and 26, 5 sts apart, centered on the front. Drop the cardboard circle into the body so it lies flat on Rounds 1–6. Stuff the body firmly up to about 0.5 in (1.3 cm) below the rim, so the open neck still shows.
Beak
With yellow:
- Rnd 1: 4 sc in MR. (4)
- Rnd 2: (sc 1, inc) 2 times. (6)
- Rnd 3: (sc 2, inc) 2 times. (8)
Fasten off, leaving a long tail. Flatten the beak into a small teardrop about 0.6 in (1.5 cm) long, with the point facing down. Sew it on centered across Rounds 23–25, just below the eyes.
Wings (Make 2)
Each wing is a heart worked into a magic ring. The tall stitches spread out from the center to make the fan texture.
- Rnd 1 (cream): Into the MR: ch 3, 3 tr, 4 dc, ch 2, 4 dc, 3 tr, ch 3, sl st into the ring. Pull the ring closed. (14 sts, one ch-2 sp at the point, two ch-3 sps at the top)
- Rnd 2 (cream): Sl st into the first ch-3 sp, ch 3, 2 dc in each of the next 7 sts (14), (2 dc, ch 2, 2 dc) in the ch-2 sp at the point (4), 2 dc in each of the next 7 sts (14), ch 3, sl st into the center dip. (32 dc, 16 on each side)
Fasten off cream.
- Rnd 3 (green): Join green in the first ch-3 sp. 3 sc in that sp, sc in each of the next 16 dc, 3 sc in the ch-2 sp at the point, sc in each of the next 16 dc, 3 sc in the last ch-3 sp, sl st to the first sc. (41 sc)
Fasten off, leaving a long tail. Each wing is about 3 in (7.6 cm) wide and 2.75 in (7.0 cm) tall.
Hat
Start with sage green and work in a spiral.
- Rnd 1: 6 sc in MR. (6)
- Rnds 2–5: Add 6 sts evenly in each round. (30 after Rnd 5)
- Rnds 6–10: sc in each st around. (30)
The crown is about 2.4 in (6.1 cm) across and 1.25 in (3.2 cm) tall. Change to cream.
- Rnd 11 (FLO): (sc 2, inc) 10 times. (40)
- Rnd 12: (sc 4, inc) 8 times. (48)
- Rnd 13: sc in next st, skip 1, (hdc, dc, hdc) in next st, skip 1 12 times, sl st to the first sc. (12 scallops; 12 sc + 36 = 48 sts)
Fasten off. The brim is about 4.2 in (10.7 cm) across.
Egg Cups (Make 10)
- Rnd 1 (green): 6 sc in MR, join. (6)
- Rnd 2: inc in each st. (12)
- Rnd 3: (sc 1, inc) 6 times. (18)
- Rnd 4: (sc 2, inc) 6 times. (24)
- Rnd 5 (BLO): sc in each st. (24) This round turns the wall upward.
- Rnd 6 (cream): sc in each st. (24)
- Rnd 7: ch 1, puff in next st, ch 1, skip 1 12 times, join to the first puff. (12 puffs + 12 ch-1 sps = 24)
- Rnd 8: sc in each puff and in each ch-1 sp. (24)
- Rnd 9: sl st into next st, ch 1, puff in next st, ch 1, skip 1 12 times, join. These puffs sit between the puffs of Rnd 7. (12 puffs + 12 ch-1 sps = 24)
- Rnd 10 (green): sc in each puff and in each ch-1 sp. (24)
- Rnd 11 (green): sl st in each st around. (24)
Fasten off, leaving a 12 in (30.5 cm) tail. Each cup is 1.9 in (4.8 cm) across and 1.75 in (4.4 cm) tall.
Make All Pieces
- Sage green: base Rnds 1–20, the bottoms and rims of all 10 cups, 2 wing outlines, hat crown
- Cream: hen body, 2 wing centers, hat brim, the walls of all 10 cups, base border
- Yellow: beak
Layout (seen from above, cups on base Round 15):
            C   C
        C           C
      C     [ HEN ]     C
        C           C
            C   C
The 10 cups are spaced evenly around the hen, one every 9 sts of Round 15 (90 ÷ 10 = 9).
Joining
Hen body: Center the body on the base. The bottom edge of the body is Round 6, which has 36 sts. Base Round 6 also has 36 sts, so whipstitch 1 body stitch to 1 base stitch all the way around. Use cream, and keep your stitches snug but not tight.
Egg cups: Place a marker every 9 sts on base Round 15, and center one cup over each marker. Use the cup’s green tail to sew through each of the 24 front loops left free on cup Round 4 and into the base. The cups sit about 0.3 in (0.8 cm) apart and about 0.4 in (1.0 cm) from the hen.
Wings: Pin a wing to each side of the body between Rounds 12 and 20, tilted slightly upward. Sew along the lower half of the green outline only, so the top lobes stand free.
Hat: Set the hat on the neck rim and tack it in 4 places with cream.
Ribbon: Tie one bow around the neck at Round 21 and a smaller bow on the hat where the crown meets the brim. Stitch through each knot so it stays in place.
Size checkpoint: The ring of cups measures 7 in (17.8 cm) across, from the center of one cup to the center of the opposite cup. The outer edges of the cups stay inside the 9.5 in (24.1 cm) green base.
Border
Work the border around base Round 20. If you like, you can do this before joining; the stitch counts stay the same.
Border gauge: Each finished scallop is about 1.2 in (3.0 cm) wide along the outer edge.
- Rnd 21 (cream): sc in each st around, join. (120; 20 per section)
- Rnd 22: sc in next st, skip 1, 5 dc in next st, skip 1 30 times, join. (30 shells; 30 sc + 150 dc = 180 sts; 5 shells per section)
- Rnd 23: sl st in the sc, sc in next 2 dc, (sc, ch 3, sc) in the center dc, sc in next 2 dc 30 times, join. (30 sl sts + 180 sc = 210 sts, plus 30 ch-3 picots; 35 sts and 5 picots per section)
Fasten off.
Why the math works: Each repeat uses 4 sts. 120 divides evenly by 4, giving 30 repeats, or 5 for each 20-st section. The border adds 1 in (2.5 cm) all around, so the outer edge is 11.5 in (29.2 cm) across. That gives an outer edge about 36.1 in (91.7 cm) long. Thirty scallops at 1.2 in (3.0 cm) each fill 36 in (91.4 cm), so the border lies flat without ruffling.
Final Blocking
- Lightly spray the border with water, or hold a steam iron just above it without touching the yarn.
- Pin the base to a foam mat in an 11.5 in (29.2 cm) circle, with one pin in each scallop.
- Ease each scallop into an even curve and open each picot.
- Pin the wings flat to 3 in (7.6 cm) wide and the hat brim to 4.2 in (10.7 cm) across.
- Slide an egg into each cup so it dries in a neat round shape.
- Let everything dry completely.
Final Quality-Control Checklist
- The base measures 9.5 in (24.1 cm) before the border and 11.5 in (29.2 cm) after
- The base lies flat, with 30 even scallops
- The hen stands upright without tipping
- The eyes are level and the beak is centered
- The two wings match in size and placement
- All 10 cups are evenly spaced on Round 15
- Every cup holds an egg upright
- All yarn ends are woven in securely
Troubleshooting
- Base looks six-sided: Shift where the increases fall on alternate rounds.
- Base ruffles: Go up one hook size, and check that you haven’t added extra increases.
- Cups flare open: Your puffs are too loose. Pull up shorter loops, or go down one hook size for Rounds 7 and 9.
- Hen leans: Make sure the cardboard circle lies flat, and stuff the lower body more firmly.
- Scallops curl: Block again with more pins and let them dry flat.
- Wings droop: Sew them on higher up the outline.
Care
Spot clean with a damp cloth and mild soap, then reshape and dry flat. Don’t machine wash it, because the body is stuffed and has a cardboard insert.

Final Notes
The key measurements build on each other:
- The cup bottom at 1.9 in (4.8 cm) confirms your gauge.
- Base Round 6, at 2.8 in (7.1 cm), matches the 36-stitch bottom of the body.
- Round 15, at 7 in (17.8 cm), holds the ring of cups.
- Round 20 reaches 9.5 in (24.1 cm).
- The border brings the base to 11.5 in (29.2 cm).
Check each step as you go, and the hen and her ten egg cups will fit together neatly.
Happy crocheting!