

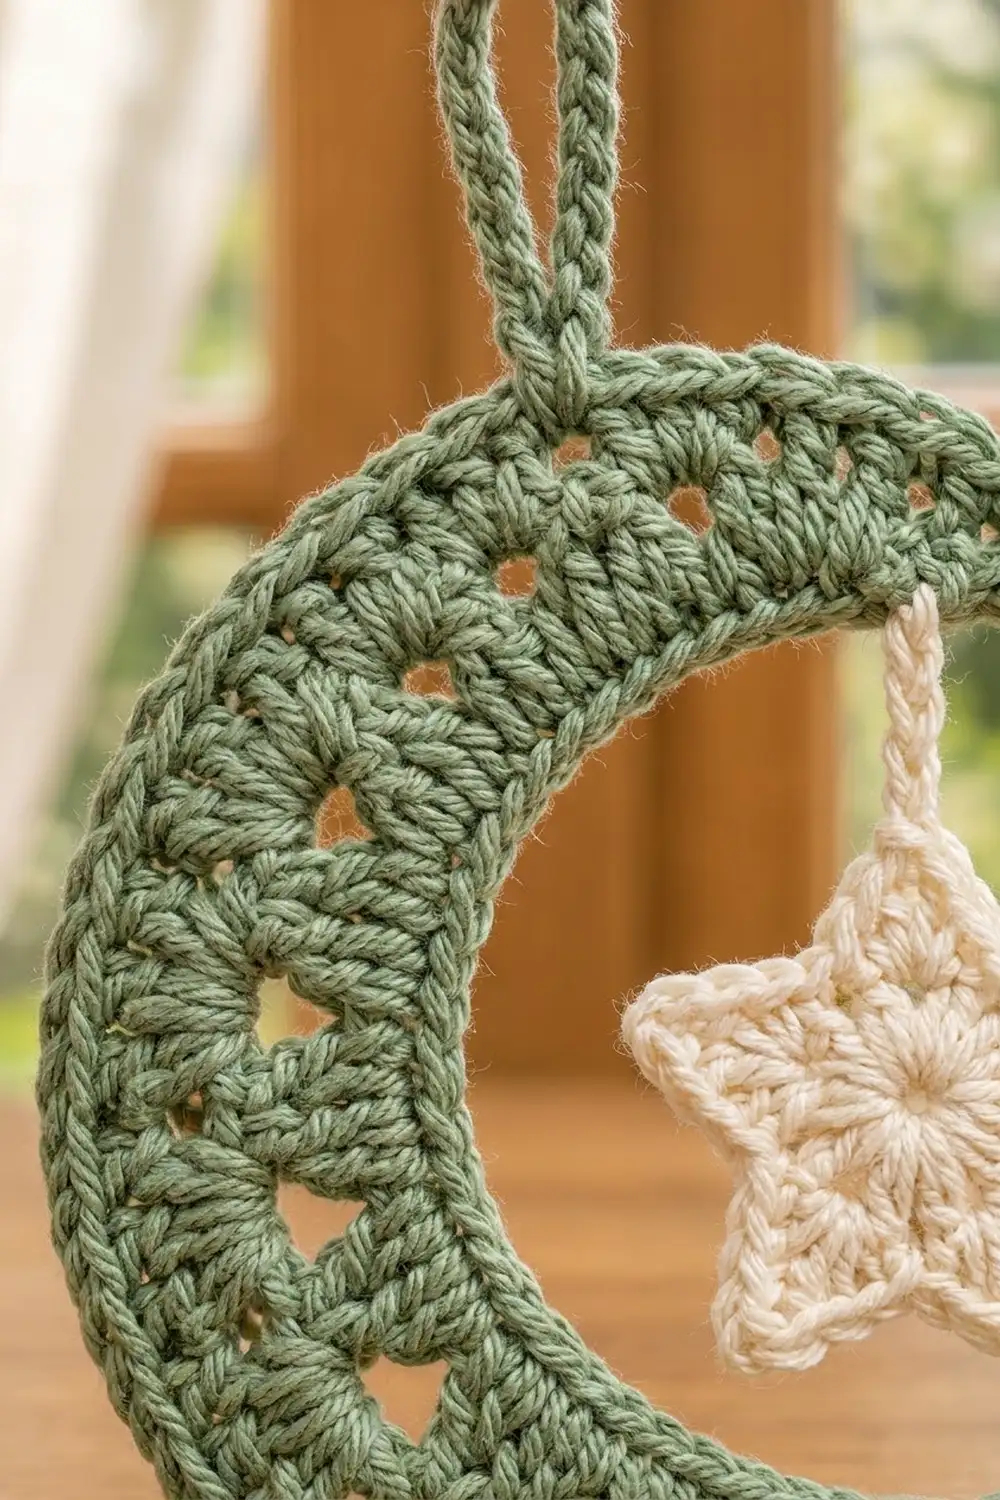
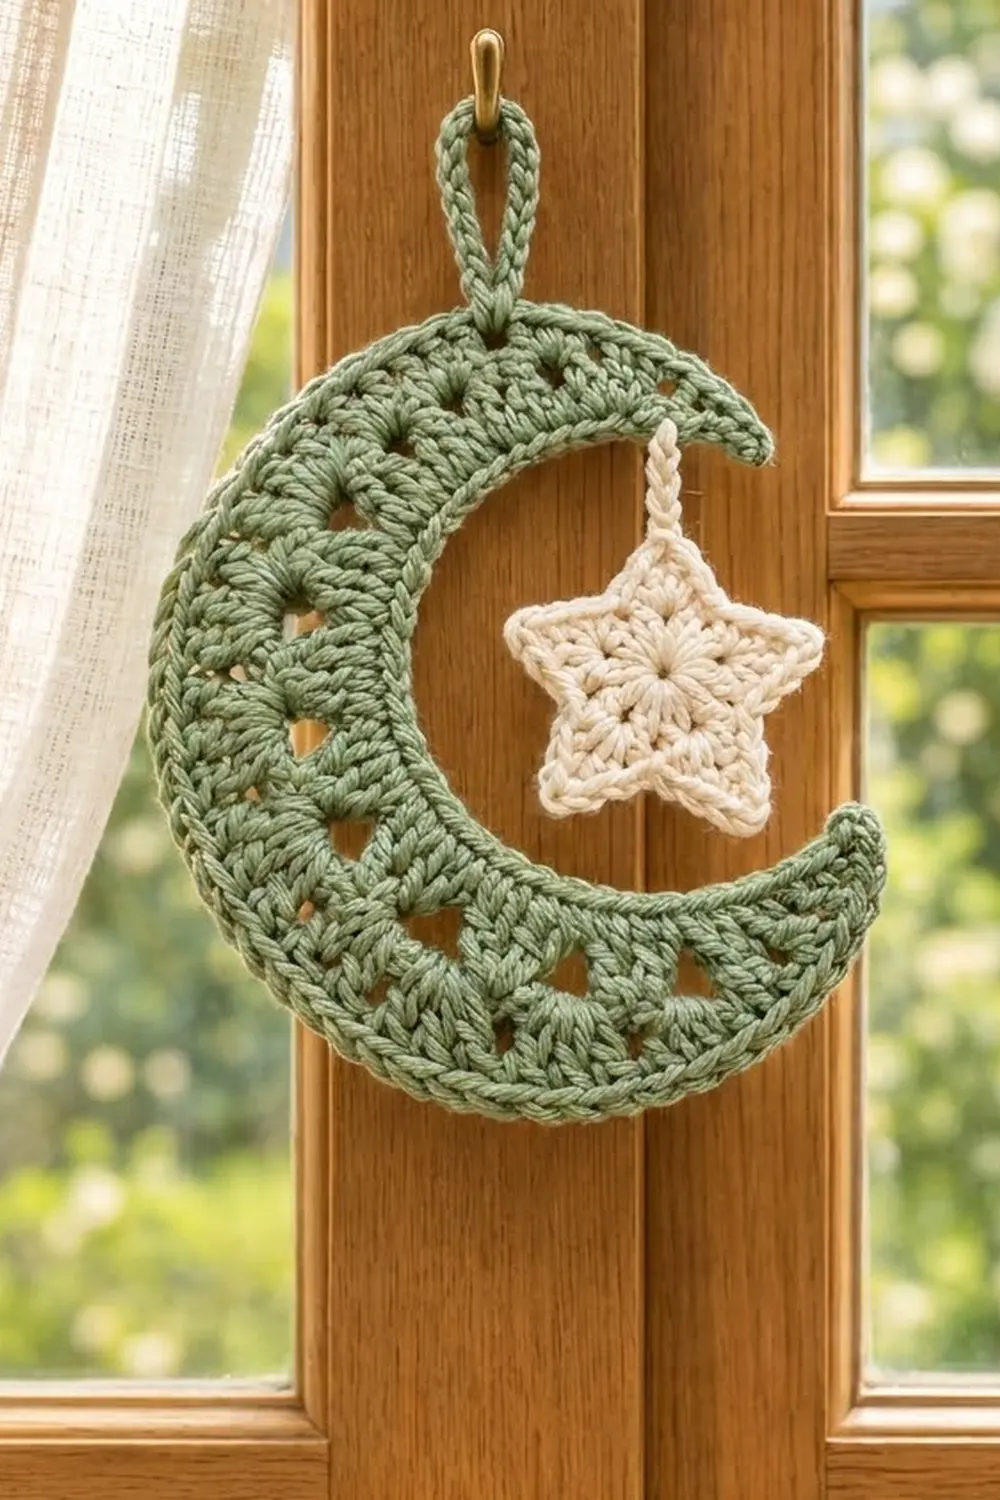
The Sage Lullaby Moon is a small crescent wall hanging with a cream star that dangles inside the curve. The moon is soft sage green with a row of triangular eyelets running through its middle. The cream star hangs on a short chain, so it moves a little when the air moves.
The style is calm and simple. It suits a nursery shelf, a window latch, a Ramadan or Eid display, or a quiet bedside corner. It is a quick project that uses two colors of DK cotton.
This pattern uses US crochet terms. The finished moon measures about 5 in (12.7 cm) tall and 4 in (10.2 cm) wide. The star measures 1.75 in (4.4 cm) point to point. With the hanging loop, the ornament is about 6 in (15.2 cm) long.
The moon is worked flat in three long rows. Short stitches at the ends taper the tips, and the extra stitches in the eyelet row and the outer row curve the strip into a crescent. A single crochet border finishes the edge. The star is worked in four rounds and hangs from the moon on a chain cord.
Finished Size and Construction
- Finished moon size: 5 in (12.7 cm) tall x 4 in (10.2 cm) wide
- Star size: 1.75 in (4.4 cm) point to point
- Total hanging length: about 6 in (15.2 cm), including the loop
- Skill level: Easy / advanced beginner
- Terminology: US
- Yarn weight: DK (#3), cotton or cotton blend
- Hook: 3.5 mm (E-4)
- Number of pieces: 2 (1 moon, 1 star)
- Layout: the star hangs inside the crescent from the upper horn
- Moon band width: 1.6 in (4.1 cm) at the widest point
- Moon size before border: 4.6 in (11.7 cm) tall x 3.6 in (9.1 cm) wide, with a 1.2 in (3.0 cm) band
- Border depth: 0.2 in (0.5 cm) on every edge
Materials
Choose a smooth, mercerized or combed DK cotton. Cotton shows the eyelets clearly and holds the crescent shape after blocking. Acrylic also works, but it will be softer and may need firmer blocking.
- Color A, sage green: 12 g / about 30 m (33 yd), for the moon and hanging loop
- Color B, cream: 5 g / about 12 m (13 yd), for the star and cord
Tools:
- 3.5 mm (E-4) crochet hook
- Tapestry needle
- Scissors
- Stitch markers (2)
- Rustproof pins and a blocking mat or folded towel
- Spray bottle with water
The yarn amounts include a margin of about 30% for swatching and weaving in ends.
Abbreviations (US Terms)
- ch: chain
- sl st: slip stitch
- sc: single crochet
- hdc: half double crochet
- dc: double crochet
- sc2tog: single crochet 2 together
- st(s): stitch(es)
- sp: space
- RS: right side
- rep: repeat
Special stitch: sc2tog. Insert the hook in the next st, yarn over and pull up a loop. Insert the hook in the following st, yarn over and pull up a loop. Yarn over and pull through all 3 loops on the hook.
Gauge and Checkpoints
Gauge: 20 sc = 4 in (10.2 cm). 10 rows of dc = 4 in (10.2 cm), so each dc row is 0.4 in (1.0 cm) tall.
This is a small piece, so the moon itself works as your gauge test. Make Row 1 and check it before going on.
- After Row 1: the strip is 6.6 in (16.8 cm) long and 0.4 in (1.0 cm) tall in the middle.
- After Row 2: the strip starts to curve, and the middle is 0.8 in (2.0 cm) tall.
- After Row 3: the crescent is 4.6 in (11.7 cm) tall x 3.6 in (9.1 cm) wide.
- After the border: the crescent is 5 in (12.7 cm) tall x 4 in (10.2 cm) wide.
- Star after Rnd 2: the circle is 1 in (2.5 cm) across.
If Row 1 is longer than 6.6 in (16.8 cm), go down to a 3.25 mm hook. If it is shorter than 6.25 in (15.9 cm), go up to a 3.75 mm hook. Small differences only change the overall size a little, and the stitch counts stay the same.
Moon
Use Color A.
Foundation: Ch 34.
Row 1 (inner band): Sc in 2nd ch from hook and in next 2 ch, hdc in next 3 ch, dc in next 21 ch, hdc in next 3 ch, sc in last 3 ch, turn. (33 sts: 6 sc, 6 hdc, 21 dc)
The foundation chain becomes the inner, concave edge of the moon. The sc and hdc at each end start the tapered tips.
Row 2 (eyelet band): Ch 1 (does not count as a st). Sc in first 3 sts, hdc in next 3 sts, dc in next st, ch 2, skip next st, 2 dc in next st; rep from * 9 more times (10 eyelets made), hdc in next 3 sts, sc in last 3 sts, turn. (33 sts: 6 sc, 6 hdc, 21 dc, plus 10 ch-2 sps)*
Check the middle section: 1 dc + (10 x 2 dc) = 21 dc, worked over 21 sts of Row 1. Each ch-2 sp sits over a skipped stitch and opens into a triangle between two dc pairs. The ch-2 sps make this row longer than Row 1, so the strip begins to bend.
Row 3 (outer band): Do not ch. Sl st in first 2 sts, sc in next 2 sts, hdc in next 2 sts, dc in next dc, 2 dc in next ch-2 sp, dc in each of next 2 dc; rep from * 9 more times, hdc in next 2 sts, sc in next 2 sts, sl st in last 2 sts. (53 sts: 6 sl st, 4 sc, 4 hdc, 41 dc)*
Middle check: 1 dc + (10 x 4 dc) = 41 dc, worked over the 21 dc and 10 ch-2 sps of Row 2. The 6 end sts on each side are worked over Row 2’s 6 end sts. The sl sts keep the tips low and pointed, and the 41 dc make the outer edge long enough to curve the strip into a crescent.
Do not fasten off. Go straight into the border.
Star
Use Color B.
Rnd 1: Make a magic ring. Ch 3 (counts as dc), 9 dc in ring, sl st to top of ch-3 to join. Pull the ring closed. (10 dc)
Rnd 2: Ch 1, 2 sc in each st around, sl st to first sc to join. (20 sc)
Checkpoint: the circle is 1 in (2.5 cm) across.
Rnd 3 (points): Ch 1. Sc in next st, (hdc, dc) in next st, ch 2, (dc, hdc) in next st, sc in next st; rep from * 4 more times, sl st to first sc to join. (30 sts plus 5 ch-2 sps: each point has 1 sc, 1 hdc, 1 dc, ch 2, 1 dc, 1 hdc, 1 sc)*
Each point uses 4 sts of Rnd 2, so 5 points x 4 = 20 sts.
Rnd 4 (outline): Ch 1. Skip the first sc of the round, which you will use in the final sc2tog. Sc in next hdc, sc in next dc, (sc, ch 1, sc) in ch-2 sp, sc in next dc, sc in next hdc. Sc2tog over next 2 sc (the valley), sc in next hdc, sc in next dc, (sc, ch 1, sc) in ch-2 sp, sc in next dc, sc in next hdc; rep from * 3 more times. Sc2tog over the last sc and the skipped first sc, then sl st to first sc to join. (35 sc plus 5 ch-1 tips)*
Each point has 7 sc: 1 sc2tog, 2 sc, 2 sc in the tip, and 2 sc. The sc2tog in each valley pulls it inward, and the (sc, ch 1, sc) sharpens each tip.
Cord: Do not fasten off. Sl st into the ch-1 tip of the nearest point. Ch 6, which measures about 0.75 in (1.9 cm). Fasten off and leave a 6 in (15.2 cm) tail for sewing.
Checkpoint: the star is 1.75 in (4.4 cm) point to point.
Make All Pieces
Make:
- 1 moon in Color A (Rows 1–3 plus the border)
- 1 hanging loop in Color A (worked onto the border)
- 1 star in Color B (Rnds 1–4)
- 1 cord in Color B (worked from the star’s top point)
Layout (opening faces right):
        [ loop ]
     ( ( ( upper horn
    ( (      |  cord
   ( (     [STAR]
    ( (
     ( ( ( lower horn
Joining
Work the border (next section) before you attach the star, because the cord is sewn to a border stitch.
Method: Hold the moon with RS facing, the opening to the right, and the upper horn at the top. Thread the cord tail onto the tapestry needle. Count the inner-edge border sc from the upper tip and find the 6th one. Pass the tail through both loops of that sc from front to back. Bring it back through the last ch of the cord, then go through the same sc again.
Stitch-to-stitch logic: The cord attaches to one stitch only, so it adds nothing to the moon’s stitch count. Placing it on the 6th sc lets the star hang near the middle of the open curve, as in the layout.
Tension: Pull the tail just firm enough that the last ch sits against the border. If you pull harder, the inner edge puckers. Weave the tail back through the cord chains so it doesn’t show.
Size checkpoint: Hold the moon up by its loop. The top point of the star should hang about 0.75 in (1.9 cm) below the inner edge, and the star should not touch the lower horn.
Border
Border gauge: 1 sc per st along both long edges, which is 5 sc per inch (2.5 cm). Each tip gets 4 sc to round it.
The upper horn is the end where Row 3 began.
Border Rnd (Color A): Continue from the end of Row 3. Ch 1 and turn so the RS is facing. You are at the upper tip.
- Outer edge: Sc in each st of Row 3. (53 sc)
- Lower tip: Work down the short end with 1 sc in the side of Row 2’s last st and 3 sc in the side of Row 1’s last st. (4 sc)
- Inner edge: Sc in the free loop of each foundation ch. (33 sc)
- Upper tip: Work 3 sc in the side of Row 1’s first st and 1 sc in the side of Row 2’s first st. (4 sc)
- Sl st to first sc to join. (94 sc total)
Why the math works: The outer edge has 53 sts, so it gets 53 sc. The inner edge has 33 foundation ch, so it gets 33 sc. One sc per st keeps both curves flat, with no ruffling or cupping. The tips are only about 0.4 in (1.0 cm) deep, so 3 sc at the point turn the corner and 1 sc covers the short side. The total is 53 + 4 + 33 + 4 = 94 sc. The border adds 0.2 in (0.5 cm) all around, which takes the moon from 4.6 x 3.6 in (11.7 x 9.1 cm) to 5 x 4 in (12.7 x 10.2 cm).
Hanging Loop: Do not fasten off yet. Sl st along the outer-edge border sts until you reach the 8th sc from the upper tip. Ch 14, then sl st into the same sc. The loop stands about 1 in (2.5 cm) tall. Fasten off and weave in the ends.
Final Blocking
- Weave in all ends before blocking, except the cord tail if you haven’t sewn the star on yet.
- Pin the moon flat, RS up, on a mat. Shape the outer curve into a smooth arc that is 5 in (12.7 cm) tall and 4 in (10.2 cm) wide.
- Pin each tip to a rounded point. Make the two horns mirror images of each other.
- Push a pin into each eyelet’s opening to open the triangles evenly.
- Pin the star to 1.75 in (4.4 cm), with one pin at each ch-1 tip and one in each valley.
- Mist both pieces until they are damp but not soaked.
- Let them dry completely, usually 6–8 hours.
- Unpin, attach the star if you haven’t already, and hang the moon to check the balance.
Final Quality-Control Checklist
- Row 1 has 33 sts, Row 2 has 33 sts plus 10 ch-2 sps, and Row 3 has 53 sts.
- There are 10 eyelets, evenly spaced, with none missing or doubled.
- The border has 94 sc: 53 on the outer edge, 33 on the inner edge, and 4 at each tip.
- The moon measures 5 x 4 in (12.7 x 10.2 cm).
- Both tips are tapered and rounded and match each other.
- The star has 35 sc plus 5 ch-1 tips and measures 1.75 in (4.4 cm).
- The cord is sewn to the 6th inner-edge sc from the upper tip.
- The loop is on the 8th outer-edge sc from the upper tip and is 1 in (2.5 cm) tall.
- All ends are woven in and hidden.
Troubleshooting
The moon stays a straight strip. Row 3 is probably short of stitches. Make sure you worked 2 dc in every ch-2 sp. The middle needs 41 dc.
The moon cups or ruffles. Your Row 3 tension is looser than Row 1. Rework Row 3 more firmly, or block it hard while it’s damp.
The tips are blunt. Check that Row 3 starts and ends with 2 sl st, not sc.
The eyelets are uneven. Count 2 dc in the same st every time, and skip exactly 1 st under each ch 2.
The star points curl. Your Rnd 3 tension is too tight. Go up 0.25 mm for Rnds 3–4 only.
The star valleys bulge. Check that each valley has an sc2tog, not 2 separate sc.
The ornament hangs crooked. Move the loop 1 sc toward or away from the tip until the moon hangs level.
Care
Hand wash in cool water with mild soap. Press out the water in a towel, then reshape and dry flat. Re-pin if the crescent loses its curve.
Final Notes
The measurement chain is simple. A 33-st Row 1 measures 6.6 in (16.8 cm). The eyelet row and the 53-st outer row bend that strip into a crescent 4.6 in (11.7 cm) tall. A one-sc-per-st border of 94 sc adds 0.2 in (0.5 cm) on every edge, for a finished moon of 5 x 4 in (12.7 x 10.2 cm). A 1.75 in (4.4 cm) star hangs on a 0.75 in (1.9 cm) cord, and a 1 in (2.5 cm) loop completes a 6 in (15.2 cm) ornament. Check your gauge at Row 1, count at each checkpoint, and the rest follows.
Happy crocheting!