

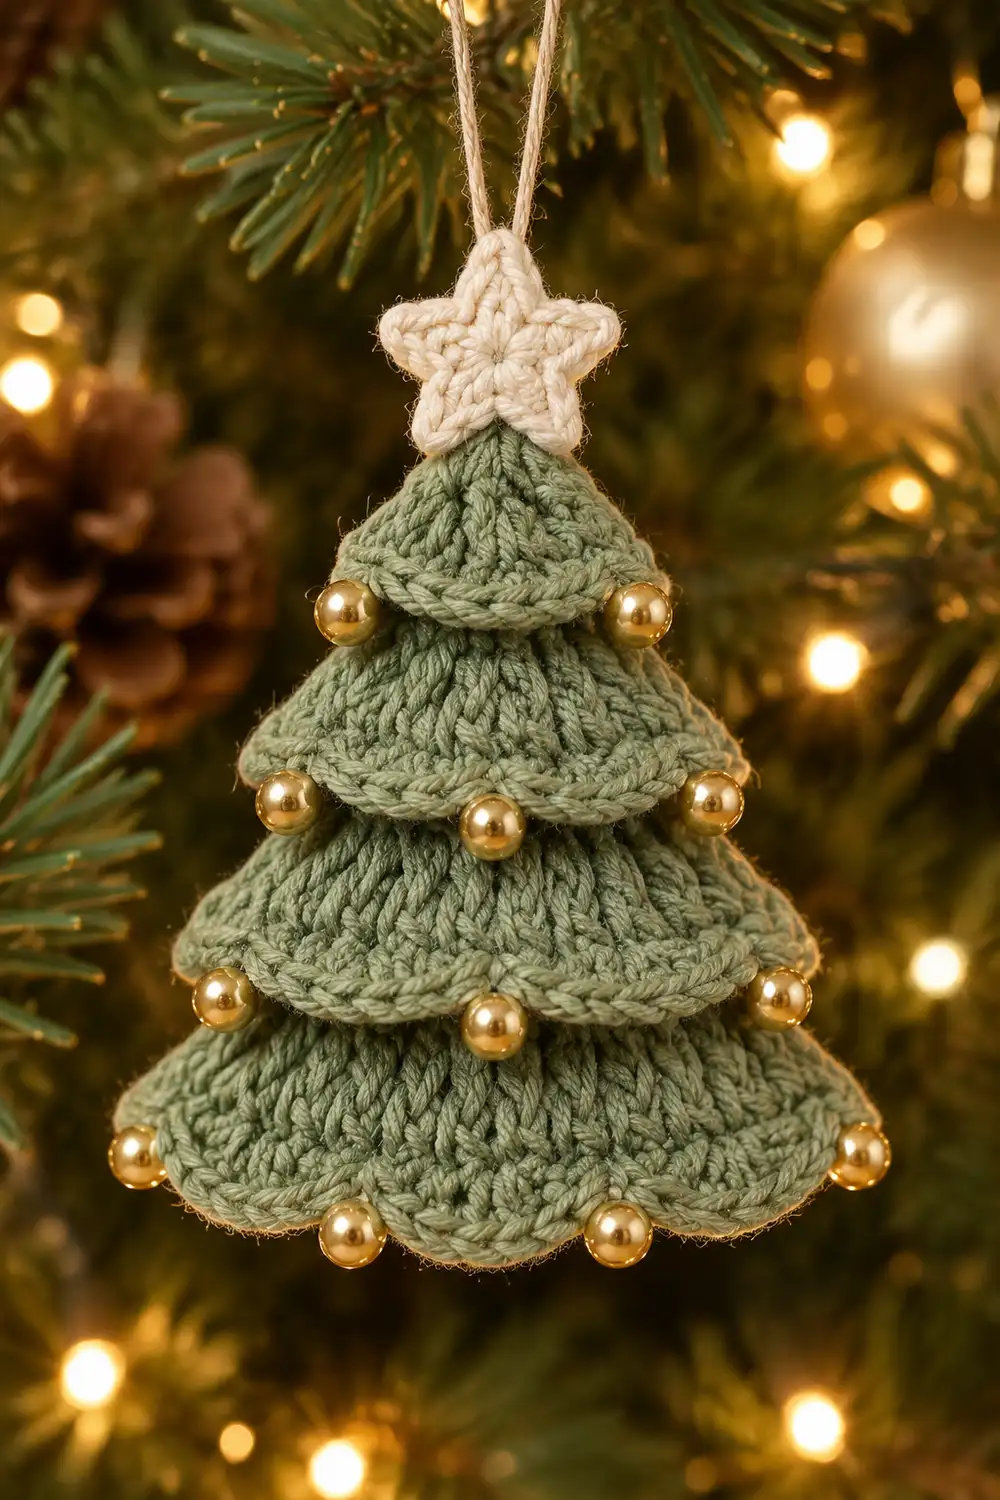
These little trees are soft, simple, and very festive. Each ornament is a sage green tree made of stacked scalloped tiers that widen from top to bottom. A small cream star sits on top, and tiny gold beads on every tier look like miniature baubles.
The palette is calm and natural: sage green, cream, and warm gold. They look lovely among real pine branches, gold ball ornaments, and warm white lights. Make several identical trees and hang them separately on gold cord.
This pattern uses US crochet terms. One finished ornament measures about 3 in (7.6 cm) tall, including the star, and about 2.5 in (6.4 cm) wide across the bottom tier.
The tree body is a flat triangle worked in single crochet rows from the bottom up. On four rows you work through one loop only, which leaves a ridge of free loops on the right side. Scalloped shell tiers are then worked into those free loops and into the foundation chain. A smooth single crochet edging neatens the slanted sides and forms a hanging space at the tip. Finally, you sew on a small crocheted star and gold beads.
Finished Size and Construction
- Finished size: about 3 in (7.6 cm) tall x 2.5 in (6.4 cm) wide
- Skill level: Easy-Intermediate
- Terminology: US crochet terms
- Yarn weight: Sport weight (Category 2) cotton
- Hook: 3.25 mm (US D/3)
- Number of pieces: 1 tree body (all tiers worked directly onto it) + 1 small star appliqué, sewn on
- Layout: 5 scalloped tiers (6, 5, 4, 3, and 2 shells, bottom to top) plus a plain tip
- Body size (before border): 2.2 in (5.6 cm) wide at Row 1 x 2.5 in (6.4 cm) tall
- Size after border: 2.4 in (6.1 cm) wide at Row 1
- Border depth: about 0.1 in (0.3 cm) per side
- Star: about 0.75 in (1.9 cm) across
Materials
Yarn advice: Use a smooth, mercerized or matte sport weight cotton. Cotton holds the shell shapes crisply and blocks well. Avoid fuzzy or very stretchy yarns, because the scallops will lose their definition.
Quantities per ornament (based on about 3 m per gram):
- Sage green: 5 g (15 m)
- Cream: 1 g (3 m)
For a set of three ornaments, multiply by three: 15 g (45 m) sage green and 3 g (9 m) cream. All quantities include a small margin for swatching and weaving in ends.
Tools and notions:
- 3.25 mm (US D/3) crochet hook
- Tapestry needle
- Sewing needle and gold or green sewing thread (thin enough to pass through the beads)
- 20 gold beads, 3 mm, per ornament
- 8 in (20.3 cm) of metallic gold cord per ornament, for the hanger
- 2 stitch markers
- Scissors
- Blocking mat, rustproof pins, and a spray bottle
Abbreviations (US Terms)
- ch – chain
- sl st – slip stitch
- sc – single crochet
- dc – double crochet
- sc2tog – single crochet 2 together: (insert hook in next st, yarn over, pull up a loop) twice, yarn over, pull through all 3 loops
- sc3tog – single crochet 3 together: (insert hook in next st, yarn over, pull up a loop) 3 times, yarn over, pull through all 4 loops
- BLO – back loop only
- FLO – front loop only
- st(s) – stitch(es)
- RS / WS – right side / wrong side
- sp – space
Special stitch – Shell: Work 3 dc in the same stitch or loop.
Free-loop rule: On RS rows, BLO leaves the unused loop on the RS. On WS rows, FLO (the loop closest to you) also leaves the unused loop on the RS. Every tier ridge therefore sits on the front of the tree.
Gauge and Checkpoints
Gauge: 6 sc and 6 sc rows = 1 in (2.5 cm), worked firmly.
Test one tree body first, before you commit to a full set. The body works as your gauge swatch.
Checkpoints:
- After Row 1: 13 sc measures 2.2 in (5.6 cm) wide.
- After Row 8: The piece is about 1.3 in (3.3 cm) tall, and the 7 sc row is about 1.2 in (3.0 cm) wide.
- After Row 15: The body is 2.5 in (6.4 cm) tall.
- After Tier 1: The total height is about 2.8 in (7.1 cm), because the bottom shells hang about 0.3 in (0.8 cm) below Row 1.
- After the border: Row 1 measures 2.4 in (6.1 cm) wide.
- After the star: The total height is about 3 in (7.6 cm).
If your piece is too big: Change to a 3.0 mm hook, or crochet more tightly.
If your piece is too small: Change to a 3.5 mm hook.
Keep the gauge consistent across a set so your trees match when they hang side by side.
Tree Body
Use sage green. Each row begins with ch 1, which does not count as a stitch.
Row 1 (RS): Ch 14. Sc in 2nd ch from hook and in each ch across, turn. (13 sc) Place a marker on this side to mark the RS.
Row 2 (WS): Ch 1, sc2tog, sc in next 9 sts, sc2tog, turn. (11 sc)
Row 3 (RS, ledge row): Ch 1, working in BLO, sc in each st across, turn. (11 sc) This leaves 11 free loops of Row 2 on the RS.
Row 4 (WS): Ch 1, sc in each st across, turn. (11 sc)
Row 5 (RS): Ch 1, sc2tog, sc in next 7 sts, sc2tog, turn. (9 sc)
Row 6 (WS, ledge row): Ch 1, working in FLO, sc in each st across, turn. (9 sc) This leaves 9 free loops of Row 5 on the RS.
Row 7 (RS): Ch 1, sc in each st across, turn. (9 sc)
Row 8 (WS): Ch 1, sc2tog, sc in next 5 sts, sc2tog, turn. (7 sc)
Row 9 (RS, ledge row): Ch 1, working in BLO, sc in each st across, turn. (7 sc) This leaves 7 free loops of Row 8 on the RS.
Row 10 (WS): Ch 1, sc in each st across, turn. (7 sc)
Row 11 (RS): Ch 1, sc2tog, sc in next 3 sts, sc2tog, turn. (5 sc)
Row 12 (WS, ledge row): Ch 1, working in FLO, sc in each st across, turn. (5 sc) This leaves 5 free loops of Row 11 on the RS.
Row 13 (RS): Ch 1, sc2tog, sc in next st, sc2tog, turn. (3 sc)
Row 14 (WS): Ch 1, sc in each st across, turn. (3 sc)
Row 15 (RS): Ch 1, sc3tog. (1 sc) Fasten off, leaving a 6 in (15.2 cm) tail.
Decrease check: The decreases fall on Rows 2, 5, 8, 11, 13, and 15, and each one removes 2 stitches. Six decreases x 2 = 12 stitches removed, and 13 – 12 = 1 stitch at the tip.
Scalloped Tiers
Each tier uses the same repeat: sc, then (shell, sc). Because the repeat is 2 stitches, it needs an odd number of loops. Every ledge count above is odd (13, 11, 9, 7, 5), so each tier begins and ends with a sc at the tree edges.
For every tier, hold the tree upside down (tip toward you) with the RS facing. This way, the shells grow toward the bottom of the tree and hang down when it is turned upright. Join the yarn at the right-hand end of the row, and fasten off at the end of each tier.
Tier 1 (bottom, in the foundation chain): Join green in the first free loop of the foundation chain. Sc in the same loop, shell in next loop, sc in next loop 6 times. (7 sc + 18 dc = 25 sts, 6 shells)
Tier 2 (free loops of Row 2): Join, sc in first loop, shell in next loop, sc in next loop 5 times. (6 sc + 15 dc = 21 sts, 5 shells)
Tier 3 (free loops of Row 5): Join, sc in first loop, shell in next loop, sc in next loop 4 times. (5 sc + 12 dc = 17 sts, 4 shells)
Tier 4 (free loops of Row 8): Join, sc in first loop, shell in next loop, sc in next loop 3 times. (4 sc + 9 dc = 13 sts, 3 shells)
Tier 5 (free loops of Row 11): Join, sc in first loop, shell in next loop, sc in next loop 2 times. (3 sc + 6 dc = 9 sts, 2 shells)
Weave all tier ends into the WS of the body.
Shell total: 6 + 5 + 4 + 3 + 2 = 20 shells. You will sew one bead to each shell.
Star
Use cream.
Round 1: Make a magic ring. Ch 1, work 5 sc in the ring, then sl st to the first sc. Pull the ring tight. (5 sc)
Round 2: Ch 3, sl st in 2nd ch from hook, sc in next ch, sl st in next sc of Round 1 5 times. (5 points)
Fasten off, leaving a 12 in (30.5 cm) tail for sewing. The star measures about 0.75 in (1.9 cm) across.
Border
The border is a single round of smooth sc in sage green. It runs up one slanted side, around the tip, and down the other side. The bottom edge gets no border, because Tier 1 already finishes it.
Border gauge: The border uses the same gauge as the body, 6 sc = 1 in (2.5 cm). It is not worked tighter or looser.
Border round: With the RS facing and the tree upright, join green in the row end of Row 1 at the bottom right corner. Fold the tier shells down and out of the way.
- Right side: Work 1 sc in each row end of Rows 1–14, with 2 sc in the row end of Row 8. (15 sc)
- Tip: Work (sc, ch 1, sc) in the top of the Row 15 stitch. (2 sc + 1 ch-1 sp)
- Left side: Work 1 sc in each row end of Rows 14–1, with 2 sc in the row end of Row 8. (15 sc)
Fasten off. Total: 15 + 2 + 15 = 32 sc + 1 ch-1 sp.
Why the math works: Rows 1–14 rise 2.3 in (5.8 cm). Over that height, each edge moves inward about 0.8 in (2.0 cm), from 13 sc wide to 3 sc wide. The slanted edge is therefore about 2.5 in (6.4 cm) long. At 6 sc per inch, 15 sc covers 2.5 in (6.4 cm).
Fourteen row ends give 14 sc, and the extra sc at Row 8 brings each side to 15. The edge lies flat without pulling or rippling. The ch-1 sp at the tip becomes the opening for the hanger.
Final Blocking
- Weave in all remaining ends on the WS. Do not trim them closer than 0.5 in (1.3 cm) yet.
- Lightly mist the tree and the star with water until they are damp, not soaked.
- Pin the tree RS up on the mat. Pin the tip, then the two bottom corners, so Row 1 measures 2.4 in (6.1 cm) across.
- Ease each shell into a round scallop with your fingertips. Let every tier overlap the one below.
- Pin the star into a neat five-point shape.
- Let everything dry completely, usually overnight.
- Unpin the pieces and trim the ends.
- Sew on the star with its tail. Center it so it covers Rows 13–15 and extends about 0.2 in (0.5 cm) above the tip. Keep the ch-1 sp clear.
- Sew one gold bead onto the center dc of each shell (20 beads). Knot the thread on the WS after every few beads.
- Thread the gold cord through the ch-1 sp and knot the ends together. This makes a hanging loop about 3 in (7.6 cm) long.
Final Quality-Control Checklist
- The body is 2.5 in (6.4 cm) tall and 2.4 in (6.1 cm) wide at the base after the border.
- The total height is about 3 in (7.6 cm) with the star.
- The tiers have 6, 5, 4, 3, and 2 shells from bottom to top.
- Every tier starts and ends with a sc at the tree edges.
- All tier ridges sit on the RS.
- Each side of the border has 15 sc, and the tip has a ch-1 sp.
- There are 20 beads, one per shell, sewn on securely.
- The star is centered and the hanger is knotted tightly.
- All trees in the set match in size.
Troubleshooting
Tier ridges appear on the back: You used the wrong loop. Use BLO on RS ledge rows and FLO on WS ledge rows.
Shells ruffle or curl: Your dc are too loose. Tighten your tension, or work the tiers with a hook 0.25 mm smaller.
Shells look flat and cramped: Your tension is too tight. Relax it, and check that you skipped no loops.
A tier doesn’t end with a sc: Recount the free loops. They should be 13, 11, 9, 7, and 5.
Edges pull inward: Make sure you worked the extra sc at Row 8 on each side.
The edges wave: You worked too many border stitches. Rework with exactly 15 sc per side.
The tree leans: Re-block it, pinning the tip directly above the center of Row 1.
Beads flop around: Stitch through each bead twice and anchor the thread to the body, not just to the dc surface.
Care
Spot clean with cool water and mild soap, then reshape and dry flat. Store the ornaments flat in tissue so the scallops and star keep their shape.

Final Notes
The measurement chain is simple. At 6 sc and 6 rows per inch, Row 1 measures 2.2 in (5.6 cm) and the 15-row body reaches 2.5 in (6.4 cm). Five shell tiers add about 0.3 in (0.8 cm) below the base. The 15-sc border on each side brings the width to 2.4 in (6.1 cm), and the star finishes the ornament at about 3 in (7.6 cm) tall.
Optional: To make a matching set, simply repeat the full pattern for each tree. You don’t need to change anything.
Happy crocheting!