
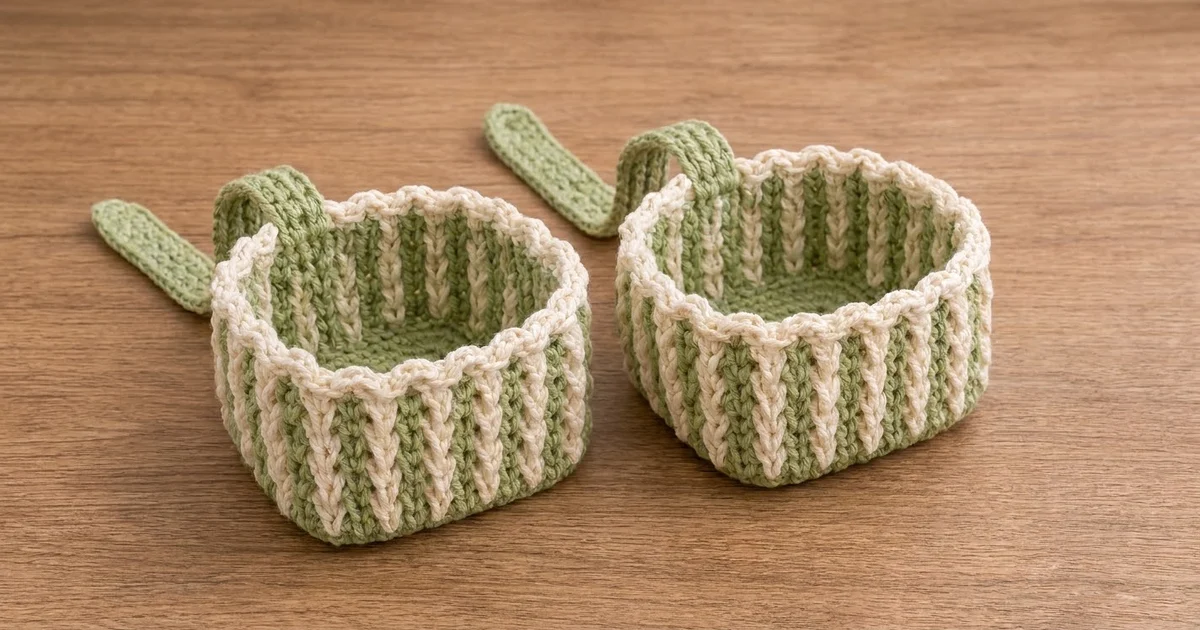
The Sage Stripe Hanging Basket is a small, sturdy storage basket that holds one spare toilet roll and hangs from a towel rod or wall rail. This pattern makes a matching pair of two separate baskets, each with its own strap, so you can hang them side by side.
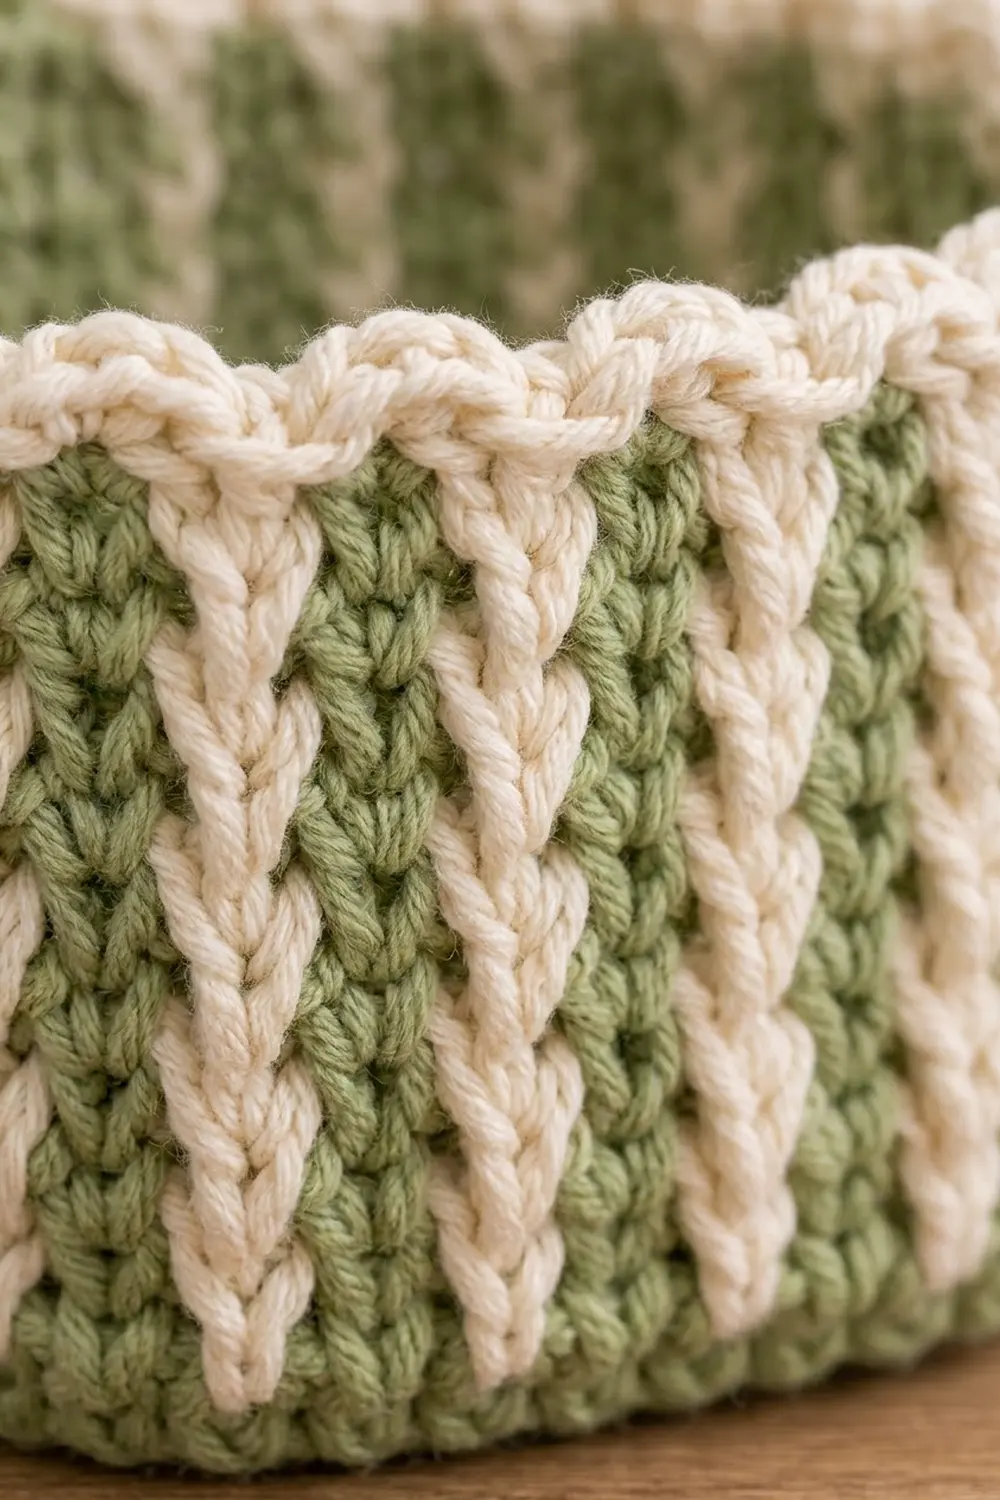
Each basket pairs soft sage green with cream. The base and walls are solid green single crochet. Vertical cream columns of surface slip stitch run up the walls and give a ribbed, braided look. A cream rope rim finishes the top edge. The style is calm, modern and Scandinavian-inspired, and it fits a bathroom, laundry room or nursery.
The pattern uses US crochet terms. Each finished basket measures 6 in (15.2 cm) square at the base and 5 in (12.7 cm) tall, with a 7 in (17.8 cm) strap.
Construction is simple. You crochet a square base in joined rounds, turn the walls up with a back-loop round, and work straight rounds of single crochet. Then you add the cream columns over the surface, crochet the cream rim, and sew a green strap to the back wall.
Finished Size and Construction
- Finished size (each basket): 6 in × 6 in (15.2 cm × 15.2 cm) base, 5 in (12.7 cm) tall
- Skill level: Easy
- Terminology: US crochet terms
- Yarn weight: Worsted (#4) cotton
- Hook: 4.5 mm (US 7)
- Number of pieces: 2 baskets, each made of 1 body and 1 strap (4 crocheted pieces in total)
- Layout: 2 baskets hung side by side on one rod (1 row × 2), not joined to each other
- Piece size: body 6 in (15.2 cm) square; strap 1.25 in × 7 in (3.2 cm × 17.8 cm)
- Size before border: 6 in (15.2 cm) square × 4.5 in (11.4 cm) tall
- Border (rim) depth: 0.5 in (1.3 cm), 2 rounds
Materials
Choose a smooth, firm 100% cotton or cotton blend in worsted weight. Cotton holds its shape, doesn’t fuzz in humid rooms and can be washed. Avoid soft, loosely plied yarns, because the walls will slump.
- Color A, sage green: 180 g (approx. 306 m)
- Color B, cream: 30 g (approx. 51 m)
These quantities make both baskets and include a margin of about 15–20% for gauge differences and swatching.
Tools:
– 4.5 mm (US 7) crochet hook
– Tapestry needle
– 6 locking stitch markers
– Scissors
– Measuring tape
– Wooden rod or towel bar for hanging (optional)
Abbreviations (US Terms)
- ch: chain
- sc: single crochet
- sl st: slip stitch
- st(s): stitch(es)
- BLO: back loop only
- rnd(s): round(s)
- reverse sc: reverse single crochet (crab stitch)
Surface slip stitch (surface sl st): Hold the working yarn on the inside (wrong side) of the basket. Insert the hook from the outside through the fabric between two stitches, yarn over on the inside, and pull up a loop. Insert the hook into the same gap one round higher, yarn over, and pull the loop through the fabric and through the loop on your hook. Repeat from * to *. Each one forms a raised V-chain on the outside.
Reverse sc: Work from left to right (right-handers). Insert the hook into the next stitch to the right, yarn over, pull up a loop, yarn over and draw through both loops.
Gauge and Checkpoints
Gauge: 16 sc and 16 rnds = 4 in (10.2 cm) in joined rounds.
This is a tight, firm gauge, and the basket depends on it to stand up. Test one basket body before you buy all your yarn or start the second basket.
Checkpoints:
– After Rnd 4: each side measures 2 in (5.1 cm) from corner to corner.
– After Rnd 8: each side measures 4 in (10.2 cm).
– After Rnd 12: each side measures 6 in (15.2 cm), and the base lies flat.
– After Rnd 30: the walls measure 4.5 in (11.4 cm) from the fold line.
– After Rnd 32: total height is 5 in (12.7 cm).
If your base is too big, go down to a 4 mm hook. If it’s too small, go up to a 5 mm hook. If the base ruffles, your increases are too loose, so tighten your tension. If it cups, check that you work exactly 3 sc in every corner stitch.
Basket Body
Work joined rounds. Start each round with ch 1, which does not count as a stitch, and work the first sc in the same stitch as the join. The join seam marks the back wall.
Base (Color A, Sage Green)
Rnd 1: Make a magic ring. Ch 1, 8 sc in ring, sl st to first sc. (8 sts)
Rnd 2: Ch 1, sc in first st, 3 sc in next st, [sc in next st, 3 sc in next st] 3 times, sl st to first sc. (16 sts)
The center sc of each 3-sc group is a corner stitch. Mark the corners if you like and move the markers up each round.
Rnds 3–12 (corner method): Ch 1, [sc in each st to next corner st, 3 sc in corner st] 4 times, sc in each remaining st, sl st to first sc. Each round adds 8 sts.
- Rnd 3: 24 sts
- Rnd 4: 32 sts
- Rnd 5: 40 sts
- Rnd 6: 48 sts
- Rnd 7: 56 sts
- Rnd 8: 64 sts
- Rnd 9: 72 sts
- Rnd 10: 80 sts
- Rnd 11: 88 sts
- Rnd 12: 96 sts
Rnd 12 check: 96 sts. Each side has 25 sts, counting both corner sts (23 sts between corners plus 2 corners). The total is 4 × 24 = 96, because each corner stitch is shared by two sides. The base measures 6 in (15.2 cm) square.
Walls (Color A)
From here on, each wall side is defined as 24 stitches: the 23 sts after a corner plus the next corner st. Every corner is counted once, so 4 × 24 = 96.
Rnd 13 (turning round): Ch 1, sc BLO in each st around, sl st to first sc. (96 sts)
This round leaves a ridge on the outside and makes the walls stand up at a crisp fold line.
Rnds 14–30: Ch 1, sc in each st around, sl st to first sc. (96 sts per rnd)
That makes 18 wall rounds (Rnds 13–30) at 4 rnds per inch, so the walls measure 4.5 in (11.4 cm). Fasten off Color A and weave in the tail on the inside.
Cream Columns (Color B)
The surface columns go on before the rim, so the rim covers their tops neatly.
Placement: On each wall side, number the stitches 1 to 24, starting with the first stitch after a corner. Work a column in the gap after sts 2, 6, 10, 14, 18 and 22. That gives 6 columns per side and 24 columns around.
The columns are spaced 4 sts apart, including across each corner (2 sts at the end of one side + 2 sts at the start of the next = 4). The pattern looks the same on all four walls.
Each column: Start at Rnd 13, just above the fold ridge. Work 1 surface sl st into each round from Rnd 13 to Rnd 30. (18 surface sl sts per column) At the top, pull the loop to the inside, cut the yarn and leave a 4 in (10.2 cm) tail.
Keep the chain relaxed. Each V should be as tall as one round, about 0.25 in. If you pull too tight, the wall puckers.
Count check: 24 columns × 18 surface sl sts = 432 surface sl sts per basket.
Make All Pieces
Make 2 basket bodies and 2 straps in total.
| Piece | Quantity | Color |
|---|---|---|
| Basket body (base + walls) | 2 | A |
| Cream columns | 24 per basket (48 total) | B |
| Rim | 1 per basket (2 total) | B |
| Strap | 2 | A |
Layout (hung on the rod):
[ ROD ============================== ]
     |strap|            |strap|
  [ Basket 1 ]  1 in  [ Basket 2 ]
Leave about 1 in (2.5 cm) between the baskets so the rims don’t rub.
Strap (Make 2, Color A)
Row 1: Ch 6, sc in 2nd ch from hook and in each ch across, turn. (5 sts)
Rows 2–28: Ch 1, sc in each st across, turn. (5 sts per row)
Fasten off and leave a 16 in (40.6 cm) tail for sewing.
Check: The strap is 5 sts at 4 sts per inch, so it’s 1.25 in (3.2 cm) wide. At 28 rows, it’s 7 in (17.8 cm) long.
Joining: Attaching the Strap
The two baskets are never joined to each other. The only join is the strap sewn to each basket’s back wall. Sew it on after the rim is finished (see Border below).
- Find the center of the back wall, between sts 12 and 13 of that side.
- Lay one end of the strap against the inside of the back wall, centered, with 4 rows (1 in / 2.5 cm) overlapping below the rim.
- Loop the strap over your rod. Lay the other end against the outside of the back wall in the same position, also overlapping 4 rows.
- Whipstitch both strap ends to the wall with the tail. Sew stitch-to-stitch: each strap edge stitch goes to the wall stitch directly beside it, and stitch through all three layers across the bottom row of the overlap.
- Whipstitch the sides of the overlap as well.
Tension advice: Pull each stitch snug but not tight. Tight sewing draws the wall inward and makes a dent below the strap.
Size checkpoint: 28 rows − 4 − 4 = 20 rows (5 in / 12.7 cm) of free strap, which forms a loop that fits rods up to 1.25 in (3.2 cm) in diameter. If your rod is mounted on brackets, unscrew one end to slide the loops on, or sew the straps closed around the rod.
Border: Cream Rope Rim
Border gauge: 2 rnds of sc in Color B = 0.5 in (1.3 cm).
Rnd 31: Join Color B with a sl st in the first st of Rnd 30 on the back wall. Ch 1, sc in each st around, sl st to first sc. (96 sts: 24 per side × 4)
Pull the cream column tails to the inside before you work over them.
Rnd 32: Ch 1, reverse sc in each st around, sl st to first st. (96 sts: 24 per side × 4) Fasten off.
Why the math works: The walls have no increases, so every round stays at 96 sts. The rim works 1 st into each existing st with nothing added or skipped, which keeps the top edge exactly as wide as the base and keeps the sides straight. Because 96 divides evenly by 4 (sides) and by 4 (column spacing), the columns and rim line up on every side. Reverse sc twists each stitch into a rope ridge without changing the count.
Final Blocking
- Weave in all remaining tails on the inside of the basket and trim them.
- Dampen the basket with a spray bottle or a quick soak, then press out the water in a towel.
- Fill it with a box or a rolled towel about 6 in (15.2 cm) square so the walls stand upright.
- Pinch each corner into a gentle rounded edge and straighten the fold line at the base.
- Smooth the cream columns so the V’s sit flat and vertical.
- Lay the strap flat and straight.
- Let it dry completely, about 24 hours, before removing the form.
Final Quality-Control Checklist
- Base measures 6 in (15.2 cm) square and sits flat.
- Walls are 4.5 in (11.4 cm) tall and the rim is 0.5 in (1.3 cm), for a total height of 5 in (12.7 cm).
- There are 24 cream columns, 6 per side, evenly spaced 4 sts apart.
- Every column runs from Rnd 13 to Rnd 30 with 18 even V’s.
- The rim has 96 sts with no gaps at the join.
- The strap is centered on the back wall and sewn through all layers.
- Both baskets match in size and hang at the same height.
Troubleshooting
The base ruffles. Your tension is loose at the corners. Rework with a smaller hook or tighter tension.
The base cups upward. Check for missed increases. Each round must gain exactly 8 sts.
The walls slump. Your gauge is too loose. Go down a hook size, or use a firmer cotton.
The columns pucker the wall. Your surface sl sts are too tight. Rework them with longer loops.
The columns drift diagonally. Joined rounds can lean a little. Follow the gap straight up by eye instead of counting stitches.
The rim flares. Work Rnd 31 with a 4 mm hook.
The basket tips forward when full. Move the strap down to overlap 6 rows instead of 4, or hang the basket lower on the rod.
Care
Hand wash in cool water with mild soap, reshape while damp and dry flat around a form. Don’t tumble dry, as heat can shrink cotton and distort the walls.

Final Notes
Everything in this pattern follows one measurement chain. A gauge of 16 sc = 4 in (10.2 cm) gives a 96-stitch base 6 in (15.2 cm) square. Eighteen straight wall rounds add 4.5 in (11.4 cm), and the two-round cream rim adds 0.5 in (1.3 cm), for a 5 in (12.7 cm) basket. A 28-row strap, 7 in (17.8 cm) long, leaves a 5 in (12.7 cm) loop for the rod. Check your gauge first and the rest will follow. Make two, hang them side by side, and your spare rolls will always have a tidy home.
Happy crocheting!