
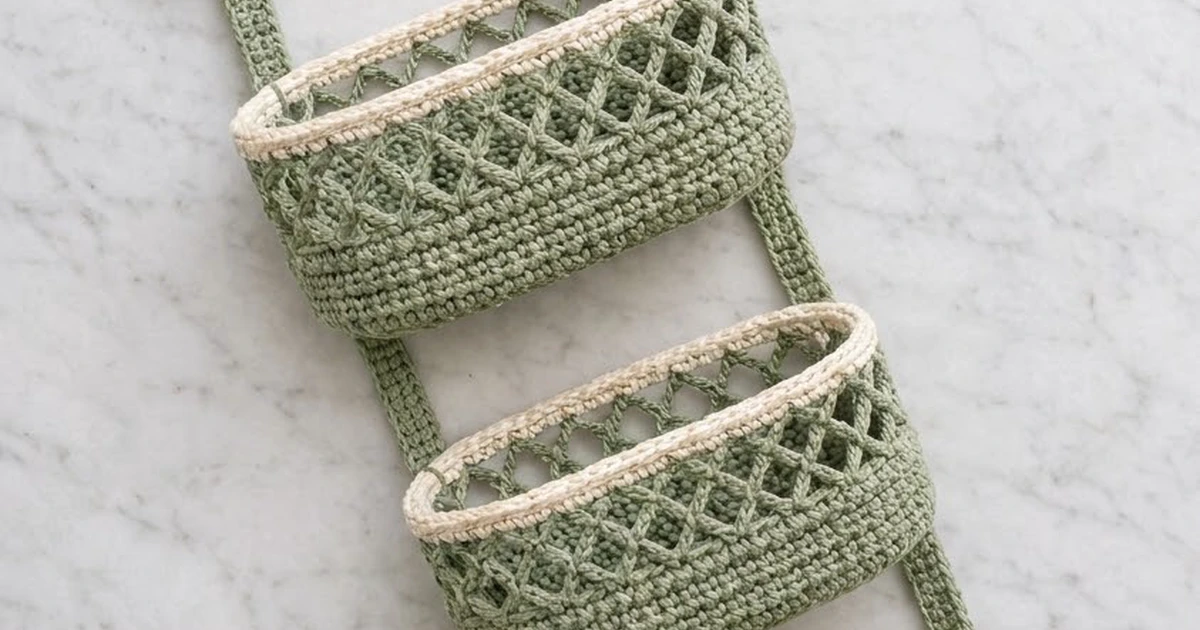
This hanging organizer stacks three oval baskets on two soft straps below a simple wooden dowel. Each basket has a sturdy solid base, a firm lower wall, an open diamond lattice band, and a twisted cream rim along the top edge. It looks calm and useful in a bathroom, nursery, or entryway.
The design uses two colors. Sage green is used for every structural piece and cream for the three rims. The contrast is gentle, but it draws the eye to the lattice and makes each tier easy to see.
All instructions use US crochet terms. The assembled organizer is about 12 in (30.5 cm) wide at the dowel and about 27.5 in (69.9 cm) tall from the top of the hanging cord to the bottom of the strap loops. The baskets measure 11.5 in (29.2 cm), 10 in (25.4 cm), and 8.5 in (21.6 cm) long, and all three stand 4.25 in (10.8 cm) tall.
The construction is modular. You crochet three oval baskets from the base up and add a cream rim to each. Then you make two straps and one cord, sew the baskets to the straps, and slide the dowel through the folded strap tops.
Finished Size and Construction
- Finished size: about 12 in (30.5 cm) wide x 27.5 in (69.9 cm) tall, including the cord
- Skill level: Intermediate
- Terminology: US
- Yarn weight: Medium (#4) aran-weight cotton or cotton blend
- Hook: 5.0 mm (H-8)
- Number of pieces: 6 crocheted pieces (3 baskets, 2 straps, 1 cord) plus 1 wooden dowel
- Layout: 3 baskets stacked vertically, with the large one on top and the small one at the bottom
- Piece sizes: large 11.5 x 5.5 in (29.2 x 14.0 cm); medium 10 x 5 in (25.4 x 12.7 cm); small 8.5 x 4.5 in (21.6 x 11.4 cm); straps 1.25 in (3.2 cm) wide
- Basket height before rim: 3.75 in (9.5 cm)
- Rim (border) depth: 0.5 in (1.3 cm), for a final height of 4.25 in (10.8 cm)
Materials
Choose a firm aran-weight cotton or cotton blend. Cotton holds the oval shape and handles damp bathroom air better than soft acrylic. Avoid splitty yarn, because the lattice rounds are worked into chain spaces.
- Sage green (Color A): 200 g, about 340 m
- Cream (Color B): 50 g, about 85 m
These amounts include a margin of about 25 percent, so a slightly looser gauge won’t leave you short.
Tools:
- 5.0 mm (H-8) crochet hook
- Wooden dowel, 12 in (30.5 cm) long and 0.5 in (1.3 cm) in diameter
- Locking stitch markers (at least 6)
- Tapestry needle
- Scissors and measuring tape
- Rustproof pins for blocking
Abbreviations (US Terms)
- ch – chain
- sc – single crochet
- sl st – slip stitch
- sk – skip
- st(s) – stitch(es)
- sp(s) – space(s)
- BLO – back loop only
- rnd(s) – round(s)
- rev sc – reverse single crochet
Special stitch – reverse single crochet (rev sc, also called crab stitch): Work from left to right (right to left if you’re left-handed). Insert the hook into the next st to the right, yarn over, and pull up a loop. Yarn over again and pull through both loops. This makes the twisted, rope-like rim.
Gauge and Checkpoints
Gauge: 16 sc and 16 rnds = 4 in (10.2 cm), worked firmly with a 5.0 mm hook.
This gauge is tighter than most yarn labels suggest. That’s on purpose, because baskets need dense fabric to stand upright.
Make the small basket first. It’s the quickest piece and works as your gauge test.
Checkpoints:
- After small base Rnd 9: about 8.5 x 4.5 in (21.6 x 11.4 cm)
- After 8 solid wall rnds: wall is 2 in (5.1 cm) tall
- After 3 lattice rnds: wall is about 3.5 in (8.9 cm) tall
- Before the rim: wall is 3.75 in (9.5 cm) tall
If your piece is too big: go down 0.5 mm in hook size, or tighten your hold on the yarn.
If your piece is too small: go up 0.5 mm in hook size. Don’t add base rounds, because every later count depends on the base total.

Basket Base
All three bases use the same oval method. The foundation chain sets the straight sides. Each of the two curved ends gains 3 sts per rnd, so every rnd grows by 6 sts.
Work in joined rnds. Start each rnd with ch 1 (it doesn’t count as a st) and join with a sl st to the first sc. Each rnd begins at the first curved end.
Large Base
With Color A, ch 27.
Rnd 1: 3 sc in 2nd ch from hook, sc in next 24 ch, 3 sc in last ch; working along the opposite side of the foundation ch, sc in next 24 ch; join. (54 sts)
Rnd 2: 2 sc in each of next 3 sts, sc in next 24 sts, 2 sc in each of next 3 sts, sc in next 24 sts; join. (60 sts)
Rnd 3: (sc in next st, 2 sc in next st) 3 times, sc in next 24 sts, (sc in next st, 2 sc in next st) 3 times, sc in next 24 sts; join. (66 sts)
Rnd 4: (sc in next 2 sts, 2 sc in next st) 3 times, sc in next 24 sts, (sc in next 2 sts, 2 sc in next st) 3 times, sc in next 24 sts; join. (72 sts)
Rnds 5–11: Continue in the same way, working 1 more sc before each increase every rnd. Each of these rnds adds 6 sts.
Totals: Rnd 5 (78 sts), Rnd 6 (84 sts), Rnd 7 (90 sts), Rnd 8 (96 sts), Rnd 9 (102 sts), Rnd 10 (108 sts), Rnd 11 (114 sts).
In Rnd 11, each curved end has 33 sts and each straight side has 24 sts: 33 + 24 + 33 + 24 = 114.
Checkpoint: 11.5 x 5.5 in (29.2 x 14.0 cm). Don’t fasten off.
Medium Base
Ch 23. Work as for the large base, but with 20 sc along each straight side instead of 24. Work Rnds 1–10 only.
Totals: Rnd 1 (46), Rnd 2 (52), Rnd 3 (58), Rnd 4 (64), Rnd 5 (70), Rnd 6 (76), Rnd 7 (82), Rnd 8 (88), Rnd 9 (94), Rnd 10 (100).
Final split: 30 + 20 + 30 + 20 = 100. Checkpoint: 10 x 5 in (25.4 x 12.7 cm).
Small Base
Ch 19. Work as for the large base, but with 16 sc along each straight side. Work Rnds 1–9 only.
Totals: Rnd 1 (38), Rnd 2 (44), Rnd 3 (50), Rnd 4 (56), Rnd 5 (62), Rnd 6 (68), Rnd 7 (74), Rnd 8 (80), Rnd 9 (86).
Final split: 27 + 16 + 27 + 16 = 86. Checkpoint: 8.5 x 4.5 in (21.6 x 11.4 cm).
Basket Wall
The wall instructions are the same for all three baskets. Stitch counts are given as large / medium / small.
Wall Rnd 1: Working in BLO, sc in each st around; join. (114 / 100 / 86 sts) The unused front loops make a crisp fold where the base meets the wall.
Wall Rnds 2–8: Sc in each st around; join. (114 / 100 / 86 sts)
Checkpoint: the solid wall is 2 in (5.1 cm) tall.
Diamond Lattice Band
Wall Rnd 9 (Lattice Rnd 1): Ch 1, sc in first st, ch 3, sk next st, *sc in next st, ch 3, sk next st; repeat from * around; join with sl st to first sc. (57 / 50 / 43 ch-3 sps)
Wall Rnd 10 (Lattice Rnd 2): Sl st in first ch-3 sp, ch 1, sc in same sp, ch 3, *sc in next ch-3 sp, ch 3; repeat from * around; join. (57 / 50 / 43 ch-3 sps)
Wall Rnd 11 (Lattice Rnd 3): Repeat Wall Rnd 10. (57 / 50 / 43 ch-3 sps)
Each sc sits in the center of the arch below it. The chains lean in alternating directions and open into diamonds.
Checkpoint: the wall is about 3.5 in (8.9 cm) tall.
Closing Round
Wall Rnd 12 (conversion rnd): Sl st in first ch-3 sp, ch 1, 2 sc in each ch-3 sp around; join.
Large: 57 sps x 2 sc = 114 sts. Medium: 50 sps x 2 sc = 100 sts. Small: 43 sps x 2 sc = 86 sts.
This round brings each basket back to its exact base total. Fasten off Color A.
Checkpoint: the wall is 3.75 in (9.5 cm) tall.
Straps (Make 2)
Work the straps in rows. The ch 1 at the start of each row doesn’t count as a st.
With Color A, ch 6.
Row 1: Sc in 2nd ch from hook and in each ch across; turn. (5 sts)
Rows 2–88: Ch 1, sc in each st across; turn. (5 sts)
Checkpoint: each strap is 22 in (55.9 cm) long and 1.25 in (3.2 cm) wide. Fasten off.
Bottom loop: Join Color A at the right corner of Row 1. Ch 10, then sl st to the left corner of Row 1. Work 14 sc into the ch-10 loop, sl st to the strap edge, and fasten off. The loop is about 1 in (2.5 cm) long.
Hanging Cord (Make 1)
With Color A, ch 81.
Row 1: Sl st in the back bump of 2nd ch from hook and in each ch across. (80 sl sts)
The cord measures about 20 in (50.8 cm). Leave 3 in (7.6 cm) tails at both ends.
Make All Pieces
Color A (sage green):
- 1 large basket (base, wall, lattice, closing rnd)
- 1 medium basket
- 1 small basket
- 2 straps with bottom loops
- 1 hanging cord
Color B (cream):
- 3 rims, one per basket (see Border)
Layout (front view):
            /\        <- cord, knotted loop
           /  \
  [=======dowel=======]
     |S|          |S|
   [  LARGE BASKET   ]
     |S|          |S|
    [ MEDIUM BASKET ]
     |S|          |S|
     [SMALL BASKET]
      o            o   <- strap loops
Joining
Finish all three rims before you join anything (see Border), so the straps can be tacked to them.
Strap row map (counting from Row 1 at the bottom):
- Rows 1–3: tail below the small basket
- Rows 4–20: small basket (17 rows = 4.25 in / 10.8 cm)
- Rows 21–30: gap
- Rows 31–47: medium basket
- Rows 48–57: gap
- Rows 58–74: large basket
- Rows 75–80: gap below the dowel
- Rows 81–88: dowel casing
Total: 3 + 17 + 10 + 17 + 10 + 17 + 6 + 8 = 88 rows. Place a marker at the first row of each basket zone.
Placement: Find and mark the center of each basket’s back straight side. Mark a point 3.5 in (8.9 cm) to each side of it, measured straight across rather than around the curve. Center one strap on each mark, so the straps sit 7 in (17.8 cm) apart, center to center.
Stitch-to-stitch logic: Strap rows and wall rnds have the same gauge of 4 per inch. Line up strap Row 4 with Wall Rnd 1 of the small basket. Using a long tail of Color A, whipstitch both long edges of the strap to the wall through Wall Rnd 8, one strap row to one wall rnd. That’s 8 rows to 8 rnds.
Next, tack the strap to the closing rnd (Wall Rnd 12) and to the inside of the cream rim with 2 or 3 small stitches. Leave the strap loose behind the lattice.
Repeat for the medium basket starting at strap Row 31, and for the large basket starting at Row 58.
Tension advice: Sew snugly, but don’t pull. Seams that are too tight pucker the wall and make the basket tip forward when it’s full.
Dowel casing: Fold Rows 81–88 over the dowel to the back and whipstitch Row 88 to Row 80. The 8-row loop is 2 in (5.1 cm) around, which fits a 0.5 in (1.3 cm) dowel with a little ease. Slide the dowel through both casings and center it.
Cord: Tie each end of the cord around the dowel with an overhand knot, just outside a strap and about 0.5 in (1.3 cm) from the dowel tip. Tie a small overhand loop at the center of the cord for hanging.
Size checkpoint: The dowel is 12 in (30.5 cm) wide, the straps hang 20 in (50.8 cm) below it, and the cord peak sits about 6 in (15.2 cm) above it.
Border (Cream Rim)
Work the rim on each basket separately, directly into Wall Rnd 12.
Border gauge: 2 rim rnds = 0.5 in (1.3 cm) tall, with 4 sts per inch along the edge, the same as the wall.
Rim Rnd 1: Join Color B in the first st of a straight side at the back. Ch 1, sc in each st around; join. (114 / 100 / 86 sts)
Stitches per section:
- Large: 24 sts on each straight side and 33 sts on each curved end
- Medium: 20 sts on each straight side and 30 sts on each end
- Small: 16 sts on each straight side and 27 sts on each end
Rim Rnd 2: Ch 1, rev sc in each st around; join. (114 / 100 / 86 sts) Fasten off and weave in the ends.
Why the math works: The base sets the totals of 114 / 100 / 86. Every wall rnd keeps that number. The lattice halves it into spaces (57 / 50 / 43), the closing rnd doubles it back, and the rim keeps it. Because no stitches are added or lost, the rim doesn’t ruffle or pull in.
Final Blocking
- Before joining, lightly mist each basket with water.
- Fill each basket firmly with a rolled towel or an oval container.
- Pin the lattice band so the diamonds open evenly.
- Press the base flat and roll the rim upright between your fingers.
- Let everything dry completely, usually for 24 hours.
- Pin the straps flat to 22 in (55.9 cm) long and 1.25 in (3.2 cm) wide, mist them, and let them dry.
- Join the pieces only after everything is dry.
Final Quality-Control Checklist
- Base counts are 114 / 100 / 86 sts.
- Every wall rnd keeps the base total.
- Each lattice rnd has 57 / 50 / 43 ch-3 sps.
- The closing rnd has 114 / 100 / 86 sts.
- Rims lie smooth and upright without ruffling.
- All baskets are 4.25 in (10.8 cm) tall.
- Both straps have 88 rows and are the same length.
- Strap centers are 7 in (17.8 cm) apart on every basket.
- The baskets hang level when empty.
- All ends are woven in securely.
Troubleshooting
Base cups upward: You need more increases or a larger hook. Check your Rnd 1 count first.
Base ruffles: Your increase rnds are too loose. Use a smaller hook for the base only.
Lattice looks uneven: Make sure each sc sits in the center of the ch-3 sp below, not at its edge.
Wrong closing count: Recount the lattice spaces. Each missed sp removes 2 sts from the closing rnd.
Basket tips forward: Tack the strap higher on the rim, or tighten the side seams slightly.
Rim flares: Work the rev sc with a hook 0.5 mm smaller.
Care
Remove the dowel, then hand wash in cool water with mild soap. Press out the water in a towel and reshape each basket before laying it flat to dry.

Final Notes
The measurement chain is short and reliable. A gauge of 16 sc x 16 rnds = 4 in (10.2 cm) gives bases of 114 / 100 / 86 sts. Those totals carry through the 8 solid wall rnds, become 57 / 50 / 43 lattice spaces, return to 114 / 100 / 86 in the closing rnd, and stay the same in the cream rim.
Each basket stands 4.25 in (10.8 cm) tall. Two 88-row straps space the tiers 2.5 in (6.4 cm) apart under a 12 in (30.5 cm) dowel. Check each stage before moving on, and the finished organizer will hang straight and keep its shape.
Happy crocheting!