
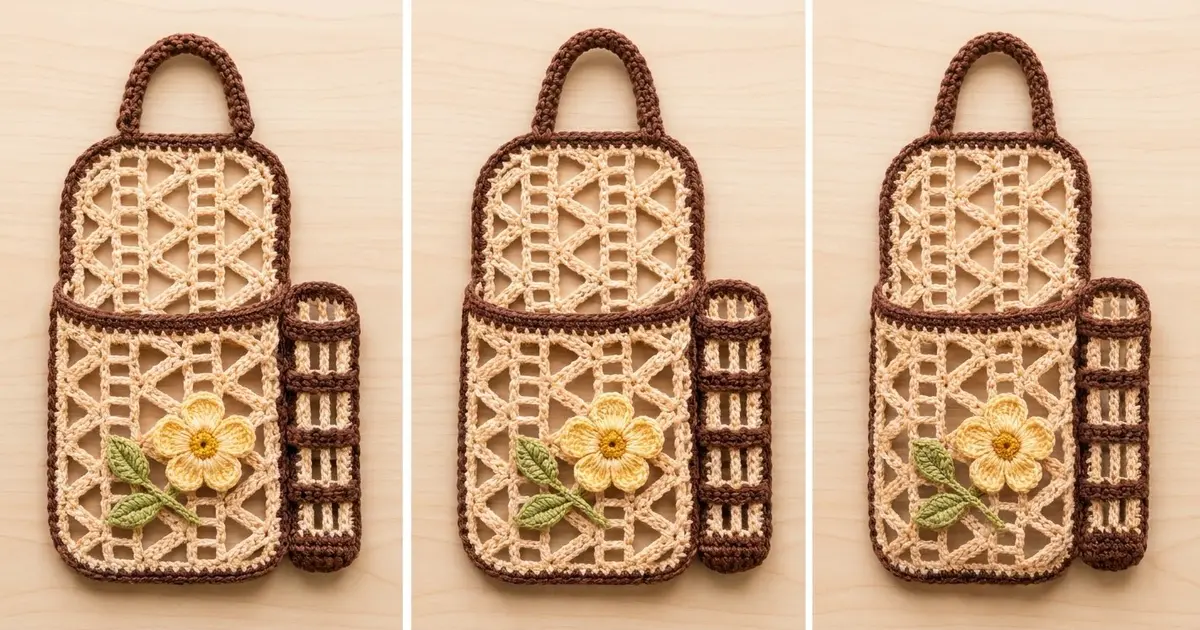
This hanging charging holder keeps your phone off the floor while it charges. It has a cream lattice back panel, a matching front pocket, a slim tube on the side for the coiled cable, and a sturdy handle that hooks over a peg below the outlet.
The colors are warm and simple. The lattice is cream and every edge is dark chocolate brown. A butter-yellow flower with a mustard center and a sage-green leaf sprig decorate the pocket. The open lattice is light and airy but still holds a phone securely.
The pattern uses US crochet terms. Without the handle, the holder measures 7.25 in wide x 9 in tall (18.4 x 22.9 cm). The handle arch adds about 3 in (7.6 cm), so the full height is about 12 in (30.5 cm).
To make it, you work the back and pocket flat in rows using the same 19-stitch lattice. The pocket gets a brown top band and is joined to the back by working the first border round through both layers. Then you sew on the tube, handle, flower, and sprig.
Finished Size and Construction
- Finished holder: 7.25 x 9 in (18.4 x 22.9 cm), not counting the handle
- Skill level: Intermediate
- Terminology: US
- Yarn weight: Worsted (#4) cotton
- Hook: 5.0 mm (H-8)
- Number of pieces: 6 (back, pocket, tube, handle, flower, sprig)
- Layout: pocket lines up with the bottom of the back; tube on the right side; handle centered at the top; appliqués on the lower left of the pocket
- Back panel before border: 5 x 8 in (12.7 x 20.3 cm)
- Pocket before border: 5 x 5 in (12.7 x 12.7 cm)
- Border depth: 0.5 in (1.3 cm) per side (two rounds of 0.25 in / 0.6 cm each)
- Bordered back: 6 x 9 in (15.2 x 22.9 cm)
- Tube: 1.25 in wide x 6 in tall (3.2 x 15.2 cm), measured flat
Materials
Use a smooth, firm worsted cotton or cotton blend. Cotton holds the lattice shape and won’t stretch under the weight of a phone. Avoid fuzzy or very soft acrylics, because they blur the openwork and the holder may sag.
- Cream (A): 50 g / 85 m
- Chocolate brown (B): 40 g / 70 m
- Butter yellow (C): 5 g / 9 m
- Mustard gold (D): 2 g / 4 m
- Sage green (E): 4 g / 7 m
Tools: 5.0 mm (H-8) hook, tapestry needle, locking stitch markers, pins, scissors, measuring tape, spray bottle, blocking mat.
All quantities include a margin of about 15% for gauge swatches and weaving in ends.
Abbreviations (US Terms)
- ch – chain
- sl st – slip stitch
- sc – single crochet
- hdc – half double crochet
- dc – double crochet
- sk – skip
- sp – space
- st(s) – stitch(es)
- RS / WS – right side / wrong side
Lattice stitch count: Each chain counts as 1 stitch. Each sc or dc also counts as 1 stitch. Beginning ch-3 counts as a dc, and beginning ch-4 counts as a dc + ch 1. Every lattice row totals 19 stitches.
Lattice structure (19 sts): ladder (3) + zigzag (5) + ladder (3) + zigzag (5) + ladder (3).
Gauge and Checkpoints
Gauge: 19 sts = 5 in (12.7 cm) wide, and 4 rows = 2 in (5.1 cm) tall in the lattice. In sc, 16 sts = 4 in (10.2 cm).
Make the pocket first and use it as your gauge test, since it is the smallest lattice piece.
Checkpoints:
– After pocket Row 4: 5 in (12.7 cm) wide, 2 in (5.1 cm) tall
– Finished pocket: 5 x 5 in (12.7 x 12.7 cm)
– Finished back before border: 5 x 8 in (12.7 x 20.3 cm)
– Back after border: 6 x 9 in (15.2 x 22.9 cm)
If your piece is too big, go down one hook size (to 4.5 mm). If it’s too small, go up to 5.5 mm. Don’t add or remove stitches. The border counts depend on exactly 19 stitches and 2 rows per inch.

Lattice Panels
Pocket (make 1, Color A)
Foundation: Ch 21.
Row 1 (RS): Dc in 4th ch from hook and in each ch across. Turn. (19 sts)
Row 2 (A-row, zigzag dip): Ch 4 (counts as dc + ch 1), sk next dc, dc in next dc. Ch 2, sk 2 dc, sc in next dc, ch 2, sk 2 dc, dc in next dc, ch 1, sk 1 dc, dc in next st. Repeat from * once more, working the last dc into the top of the turning ch. Turn. (19 sts: 3 ladder + 2 x [5 zigzag + 3 ladder])
Row 3 (B-row, zigzag peak): Ch 4, sk ch-1 sp, dc in next dc. Ch 2, sk ch-2 sp, dc in sc, ch 2, sk ch-2 sp, dc in next dc, ch 1, sk ch-1 sp, dc in next dc. Repeat from * once more, working the last dc into the 3rd ch of the turning ch. Turn. (19 sts)
Row 4 (A-row): Ch 4, sk ch-1 sp, dc in next dc. Ch 2, sk ch-2 sp, sc in center dc, ch 2, sk ch-2 sp, dc in next dc, ch 1, sk ch-1 sp, dc in next dc. Repeat from * once more. Turn. (19 sts)
Rows 5–9: Alternate B-rows (odd numbers) and A-rows (even numbers), ending with a B-row on Row 9. (19 sts each)
Working the ch-1 spaces directly above each other builds the ladders. The sc on A-rows pulls the chain arcs down into V shapes, and the dc on B-rows pushes them back up. Stacked together, these rows make the zigzag triangles.
Row 10 (solid row): Ch 3 (counts as dc), dc in each ch and each st across. (19 dc) Fasten off.
Checkpoint: 5 x 5 in (12.7 x 12.7 cm).
Back Panel (make 1, Color A)
Work the Foundation and Rows 1–9 exactly as for the pocket.
Rows 10–15: Keep alternating: even rows are A-rows and odd rows are B-rows. (19 sts each)
Row 16 (solid row): Ch 3, dc in each ch and each st across. (19 dc) Fasten off.
Checkpoint: 5 x 8 in (12.7 x 20.3 cm). Rows 1–10 of the back match Rows 1–10 of the pocket exactly. This matters for joining.
Cable Tube (make 1, Colors B and A)
You work the tube in joined rounds without turning. Start with Color B.
Rnd 1: Ch 5. Sc in 2nd ch from hook, sc in next 2 ch, 3 sc in last ch. Working along the other side of the chain, sc in next 2 ch, 2 sc in the same ch as the first sc. Join with a sl st. (10 sts)
Rnds 2–4: Ch 1, sc in each st, join. (10 sts)
Rnd 5 (Color A): Ch 4 (counts as dc + ch 1), sk next st. Dc in next st, ch 1, sk next st 4 times. Join to 3rd ch of beg ch-4. (5 dc + 5 ch-1 = 10 sts)
Rnd 6: Sl st in ch-1 sp, ch 4, sk next dc. Dc in next dc, ch 1 4 times. Join. (10 sts) The bars stack straight up.
Rnd 7 (Color B): Ch 1, sc in each dc and each ch-1 sp. Join. (10 sc)
Rnds 8–16: Repeat Rnds 5–7 three more times, ending with a brown sc round on Rnd 16. Fasten off.
Checkpoint: 1.25 in (3.2 cm) wide flat, 6 in (15.2 cm) tall. The height comes from 4 base rounds at 0.25 in, 8 cream rounds at 0.5 in, and 4 bands at 0.25 in: 1 + 4 + 1 = 6 in (15.2 cm).
Handle (make 1, Color B)
Ch 33. Sc in 2nd ch from hook and in each ch across (32 sc). Don’t turn. Rotate the work and sc in each loop along the other side of the chain (32 sc). Fasten off.
Checkpoint: 8 in (20.3 cm) long and about 0.5 in (1.3 cm) wide.
Flower (make 1, Colors D and C)
Rnd 1 (D): Make a magic ring. Ch 1 and work 10 sc into the ring. Pull the ring closed and join. (10 sts) Fasten off.
Rnd 2 (C): Join C in any st. Sc in next st, ch 3, sk next st 5 times. Join to first sc. (5 sc + 5 ch-3 loops)
Rnd 3: In each ch-3 loop work (sc, hdc, 3 dc, hdc, sc), then sl st in the next sc. Repeat around. (5 petals of 7 sts = 35 sts) Fasten off, leaving a long tail.
Checkpoint: 2.25 in (5.7 cm) across.
Leaf Sprig (make 1, Color E)
Stem: Ch 13.
Top leaf: Ch 7. Working back along those 7 ch: sl st in 2nd ch from hook, then sc, hdc, dc, hdc, sc in the next 5 ch. Working along the other side of the same chains: sc, hdc, dc, hdc, sc, sl st. (12 sts) Sl st into the last stem ch.
Side leaves: Sl st in next 3 stem ch, make a second leaf, then sl st in next 3 stem ch and make a third leaf. Turn the sprig over between these leaves so they sit on opposite sides of the stem. Sl st in the remaining 6 stem ch. Fasten off.
Checkpoint: 3 in (7.6 cm) long, with leaves about 1.25 in (3.2 cm) long.
Make All Pieces
| Piece | Qty | Colors |
|---|---|---|
| Back panel | 1 | A |
| 1 | A, plus B for top band | |
| Tube | 1 | B, A |
| Handle | 1 | B |
| Flower | 1 | D, C |
| Leaf sprig | 1 | E |
Layout (front view):
        [ HANDLE ]
   +---------------+
   |  BACK PANEL   |
   |               |+--+
   +---------------+|T |
   |    POCKET     ||U |
   |  (flower +    ||B |
   |   sprig)      ||E |
   +---------------++--+
Joining
Do Steps 1–2 now, work the border in the next section, then come back for Steps 3–5.
Step 1 – Pocket top band: Join B in the first st of pocket Row 10. Ch 1, sc in each st across (19 sc). Turn. Ch 1, sc in each st (19 sc). Fasten off. The pocket is now 5.5 in (14.0 cm) tall.
Step 2 – Align the layers: Lay the pocket RS up on top of the back RS, with the bottom edges matched. The foundation chains line up stitch for stitch (19 to 19). On each side, pocket Rows 1–10 match back Rows 1–10. The two brown band rows sit next to back Row 11. Pin every row.
Step 3 – Tube: Flatten the tube and line its bottom up with the bottom of the back. Whipstitch one folded edge to the right edge of Border Rnd 2. Sew through the last 3 sts of the bottom-right corner group plus the first 21 side sts (24 sts = 6 in / 15.2 cm).
Step 4 – Handle: On the WS, skip 2 sts in from each top corner group and sew one handle end at each of those points. The ends sit 12 sts apart, which is 3 in (7.6 cm). Overlap each end by 0.75 in (1.9 cm). This leaves a 6.5 in (16.5 cm) arch.
Step 5 – Appliqués: Sew the flower to the lower left of the pocket front, about 1.25 in (3.2 cm) up from the bottom border. Tuck the sprig under the left petals so it angles down to the left. Sew only through the pocket layer so the pocket stays open.
Tension: Make whipstitches snug but not tight. If they’re pulled too hard, the lattice puckers.
Checkpoint after joining: 7.25 x 9 in (18.4 x 22.9 cm), not counting the handle.
Border (Color B)
Border gauge: 4 sc per inch along the sides (2 sc per dc row). Along the top and bottom, work 1 sc per stitch.
Rnd 1 (joins the pocket): Join B in the top-right corner of the back.
– Top: 3 sc in the first st, sc in the next 17 sts, 3 sc in the last st.
– Left side: 2 sc in each row end (16 rows x 2 = 32 sc). For Rows 11–1, insert the hook through both layers. In the row next to the pocket band, work 1 sc through each band row end together with back Row 11.
– Bottom: Working through both foundation chains: 3 sc in the first ch, sc in the next 17, 3 sc in the last.
– Right side: 32 sc, mirroring the left side, through both layers on Rows 1–11.
– Join.
Count: top 17 + bottom 17 + sides 32 + 32 + four corner groups of 3 (12) = 110 sts. Each side includes its corner stitches: top and bottom have 21 sts each (1 corner center + 19 + 1 corner center), and the sides have 34 each. Check: 21 + 21 + 34 + 34 = 110, minus the 4 shared corner centers = 106… so count each corner center once only: 2 x 19 + 2 x 34 + 4 = 110.
Rnd 2 (rounding): Ch 1, sc in each st, working 2 sc in each of the 3 stitches of every corner group. Join and fasten off.
Count: 17 + 17 + 32 + 32 + four corner groups of 6 (24) = 122 sts.
Why the math works: 16 rows x 0.5 in = 8 in, and at 4 sc per inch that is 32 sc per side, so the sides lie flat. The 19-st top edge becomes 17 straight sts plus the corner stitches. Doubling the corners on Rnd 2 turns square corners into soft curves. Both rounds add 0.5 in (1.3 cm) per side, so 5 x 8 in becomes 6 x 9 in (15.2 x 22.9 cm).
Final Blocking
- Weave in all ends along the brown border so they don’t show through the lattice.
- Spray the holder until it is damp, not soaked.
- Pin the panel flat to 6 x 9 in (15.2 x 22.9 cm).
- Line up the ladder columns so they run straight up and down.
- Pin the tube flat to 1.25 in (3.2 cm) wide.
- Shape the flower petals with your fingers.
- Let everything dry completely before unpinning.
Final Quality-Control Checklist
- Each lattice row has 19 sts and the ladders stack straight
- Back is 5 x 8 in (12.7 x 20.3 cm) before the border
- Border Rnd 1 has 110 sts and Rnd 2 has 122 sts
- Pocket is caught along both sides and the bottom, and its top is open
- Tube bottom is level with the panel bottom
- Handle ends are 3 in (7.6 cm) apart and securely sewn
- Appliqués are sewn through the pocket layer only
Troubleshooting
- Zigzags lean to one side: You skipped the wrong number of stitches. Each zigzag must be exactly 5 sts: 2 ch, 1 center st, 2 ch.
- Border ruffles: You worked too many sc per row end. Use exactly 2 per dc row.
- Border cups or pulls in: Go up one hook size for the border rounds only.
- Pocket gapes at the top: Tighten the two brown band rows, or work them with a hook one size smaller.
- Tube twists: Line up the joins in a straight column at the back, and sew the tube along that line.
- Holder sags: Your yarn is too stretchy. Switch to 100% cotton.
Care
Hand wash in cool water, press out the water in a towel, and dry flat in shape. Don’t tumble dry, because heat distorts the lattice.

Final Notes
Each measurement leads to the next. 19 sts = 5 in (12.7 cm) wide, and 2 rows = 1 in (2.5 cm). That gives a 5 x 5 in (12.7 x 12.7 cm) pocket and a 5 x 8 in (12.7 x 20.3 cm) back. The border rounds of 110 and 122 sts bring the back to 6 x 9 in (15.2 x 22.9 cm), and the 1.25 in (3.2 cm) tube brings the width to 7.25 in (18.4 cm). If your gauge matches at the first checkpoint, everything after it will fit.
Happy crocheting!