

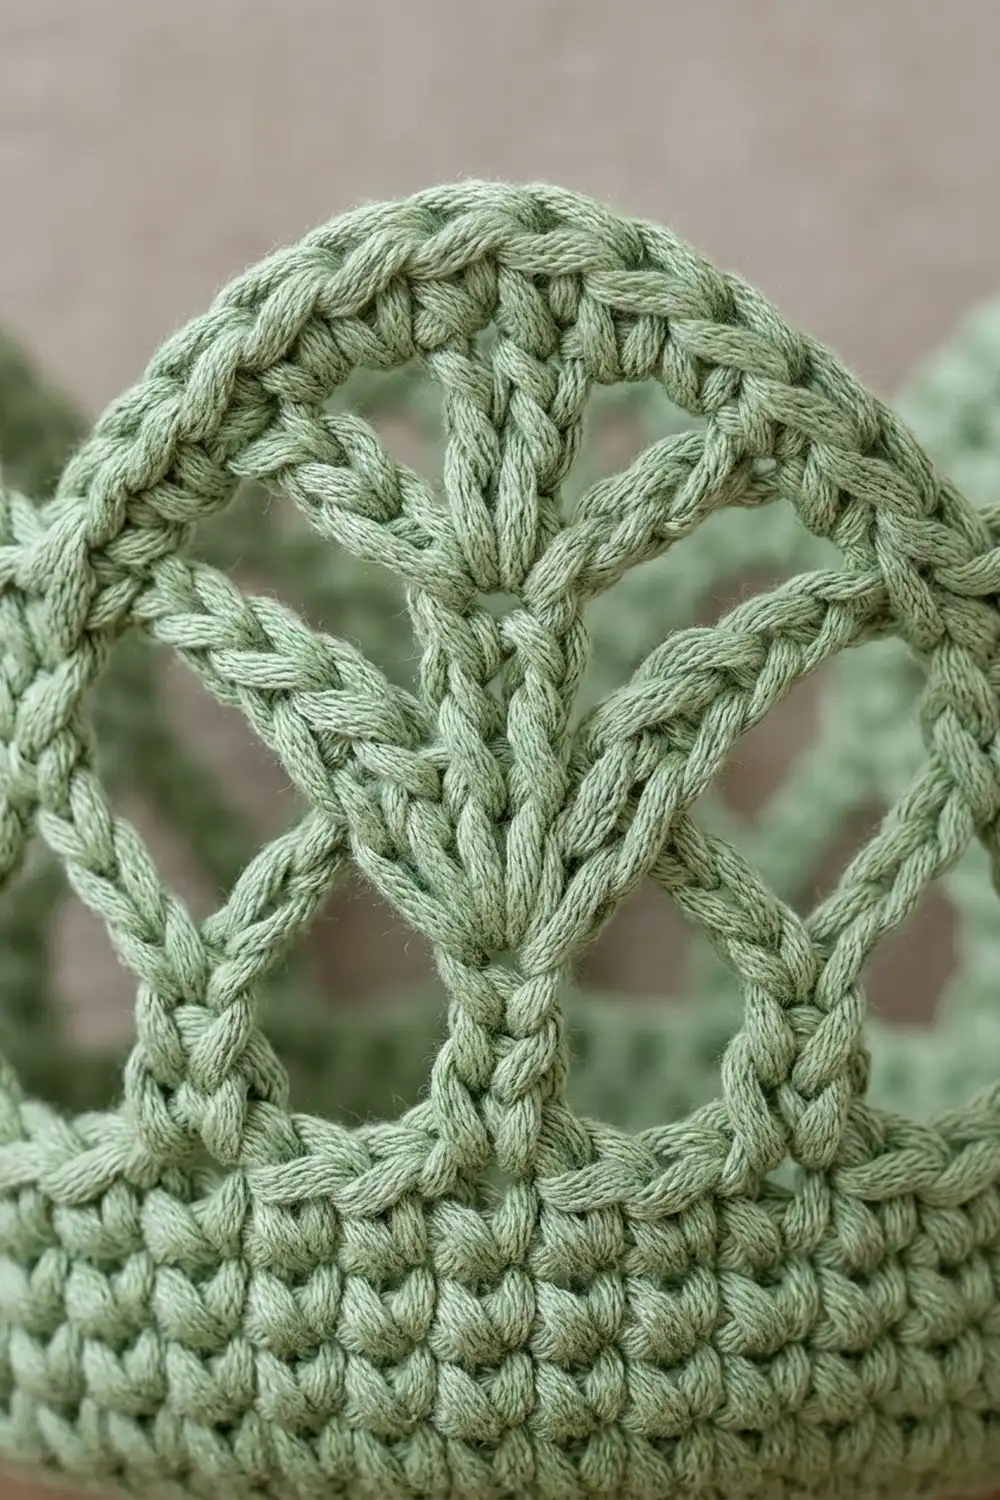
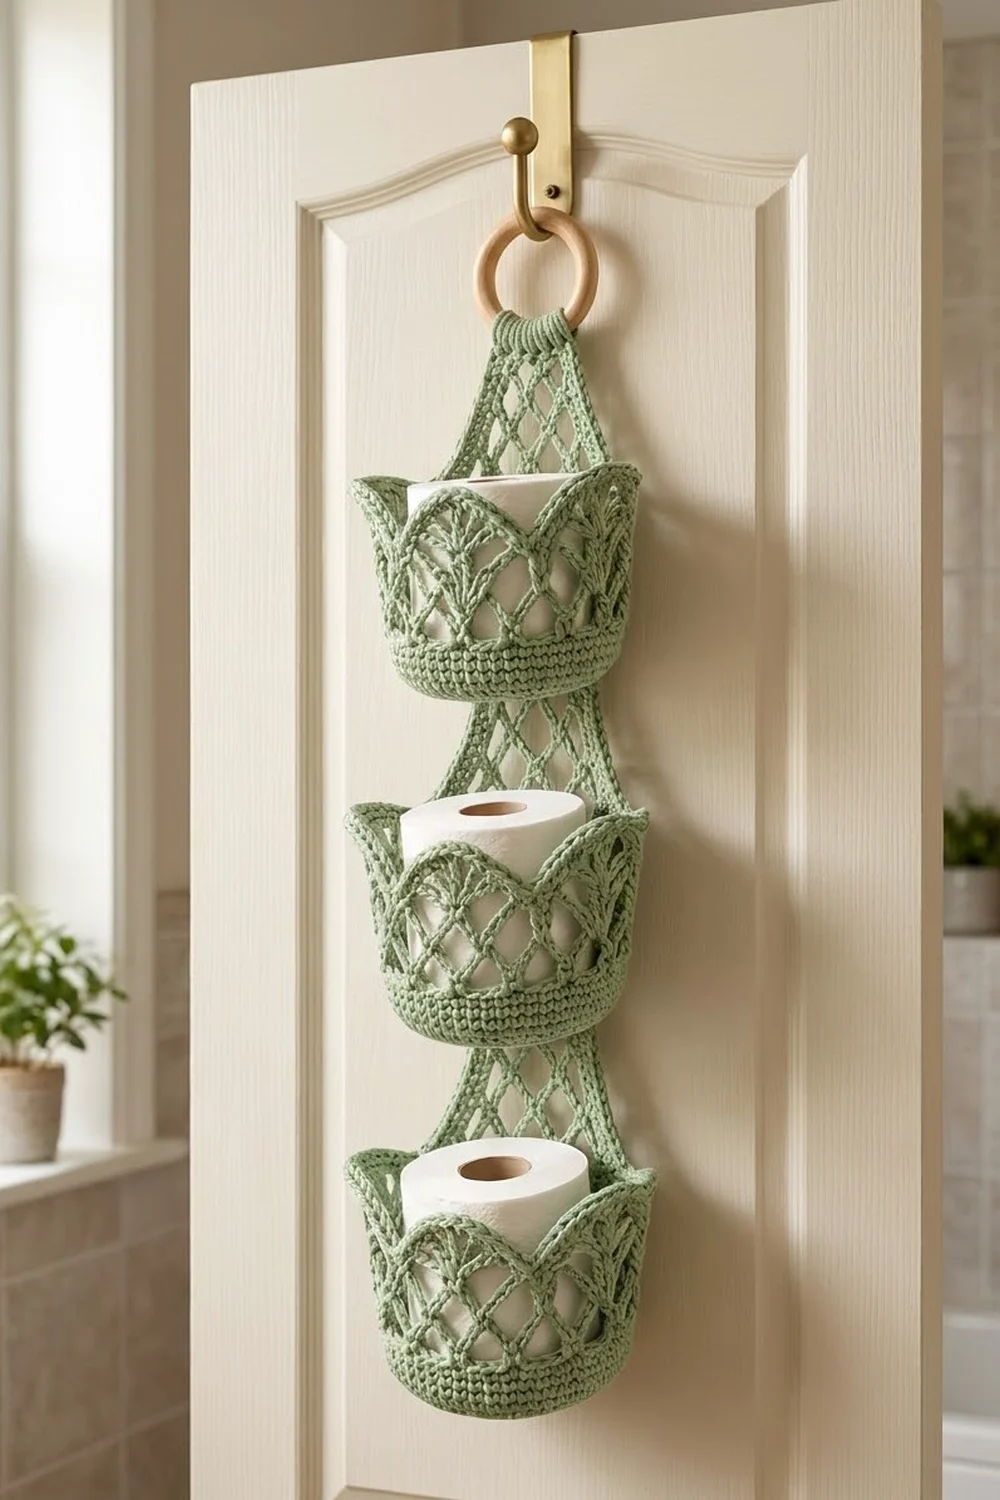
This hanging holder stacks three small baskets on a tapered mesh panel, so it holds three spare rolls on the back of a bathroom door. Each basket has a solid base, a lattice middle, and a tulip-shaped top of rounded fan arches with raised points in between.
The sample uses one color, a soft sage green cotton. The look is light and airy without being flimsy. Cotton keeps the stitches crisp and helps the baskets stand up on their own.
All terms are US crochet terms. Each basket measures about 5.25 in (13.3 cm) across the base and 4.5 in (11.4 cm) tall at the point tips. The finished holder hangs about 24.5 in (62.2 cm) long, including the ring.
You make three baskets from the bottom up in continuous rounds, then make the mesh panel in rows from the bottom edge up to the top. A two-row border neatens the panel. A solid tab wraps the wooden ring, and the baskets are sewn onto the panel at fixed heights.
Finished Size and Construction
- Finished size: about 6.1 in (15.5 cm) wide at the bottom x 24.5 in (62.2 cm) long, including the ring
- Skill level: Intermediate
- Terminology: US
- Yarn weight: worsted (#4) cotton
- Hook: 4.5 mm (US 7)
- Number of pieces: 4 crocheted pieces (3 baskets, 1 back panel) plus 1 wooden ring
- Layout: 1 column of 3 baskets on 1 panel
- Basket size: 5.25 in (13.3 cm) base diameter x 4.5 in (11.4 cm) tall
- Panel before border: 5.25 in (13.3 cm) wide at the bottom x 21.5 in (54.6 cm) long
- Border depth: about 0.45 in (1.1 cm), 2 rows of sc
Materials
Yarn: Use a smooth worsted weight cotton or cotton blend, about 170 m per 100 g. Cotton holds the basket shape better than acrylic. Avoid very fuzzy or stretchy yarns, because the baskets carry weight.
- Sage Green: 130 g (221 m)
These amounts include a margin of about 15%. The sample used about 114 g (195 m).
Tools:
- 4.5 mm (US 7) crochet hook
- 1 wooden ring, 2.5 in (6.4 cm) across
- 4 stitch markers
- Tapestry needle
- Scissors
- Measuring tape
- Rust-proof pins and a blocking mat
- Spray starch (optional)
- 3 plastic canvas circles, 4.75 in (12.1 cm) across (optional, to stiffen the bases)
Abbreviations (US Terms)
- ch = chain
- sl st = slip stitch
- sc = single crochet
- dc = double crochet
- BLO = back loop only
- sk = skip
- st(s) = stitch(es)
- sp = space
- rep = repeat
- RS / WS = right side / wrong side
Special stitches:
- Point shell: (3 dc, ch 3, 3 dc) in the stated sp.
- Fan: (dc, ch 1) 4 times, then dc, all in the stated loop. That gives 5 dc and 4 ch-1 sps.
Gauge and Checkpoints
Gauge: 16 sc x 18 rounds = 4 in (10.2 cm). Mesh gauge: 4 mesh rows = 3 in (7.6 cm).
Make one basket first, before you commit to all three. Check it at each stage:
- After Rnd 6: the base is 2.75 in (7.0 cm) across.
- After Rnd 12: the base is 5.25 in (13.3 cm) across.
- After Rnd 19: the solid band is 1.5 in (3.8 cm) tall above the base fold.
- After Rnd 26: the basket is 4.5 in (11.4 cm) tall at the point tips and about 3.5 in (8.9 cm) at the lowest dips.
If the base measures more than 5.5 in, go down a hook size. If it measures under 5 in, go up one size. A standard roll is about 4.5 in (11.4 cm) across, so check the fit as soon as Rnd 12 is done.
If the base cups up, you are working too tightly. If it ruffles, you are working too loosely. Adjust your tension before you change hooks.
Basket (Make 3)
Work in continuous rounds with the RS facing. Join every round with a sl st to the first st.
Base
Rnd 1: Make a magic ring, ch 1, 6 sc in the ring, join. (6 sts)
Rnd 2: Ch 1, 2 sc in each st around, join. (12 sts)
Rnd 3: Ch 1, sc in next st, 2 sc in next st, rep around, join. (18 sts)
Rnd 4: Ch 1, sc in next 2 sts, 2 sc in next st, rep around, join. (24 sts)
Rnds 5–12: Keep increasing 6 sts per round. Work one more sc between increases in each round, and stagger the increases so the base stays round. Rnd 5 has 30 sts, Rnd 6 has 36 sts, and Rnd 12 has 72 sts.
Checkpoint: the base is 5.25 in (13.3 cm) across and lies flat.
Walls
Rnd 13: Ch 1, sc in BLO of each st around, join. (72 sts) This round folds the base up into a crisp edge.
Rnds 14–19: Ch 1, sc in each st around, join. (72 sts)
Checkpoint: the solid band is 1.5 in (3.8 cm) tall. Mark the join, because this will be the center back.
Lattice
Rnd 20: Ch 1, sc in first st, ch 4, sk 2 sts, sc in next st, rep around, ending ch 4, sk 2, join to first sc. (24 ch-4 loops)
Rnd 21: Sl st into the center of the first loop, ch 1, sc in the same loop, ch 4, sc in next loop, rep around, ending ch 4, join. (24 ch-4 loops)
Rnd 22: Rep Rnd 21. (24 ch-4 loops)
The 24 loops make 6 repeats of 4 loops each. Every repeat gets one point, one sc, one fan, and one more sc.
Tulip Top
Rnd 23: Sl st into the center of the first loop. Ch 3 (counts as dc), (2 dc, ch 3, 3 dc) in the same loop. Ch 2, sc in next loop, ch 2, fan in next loop, ch 2, sc in next loop, ch 2, point shell in next loop. Rep from * 4 more times. Then ch 2, sc in next loop, ch 2, fan in next loop, ch 2, sc in next loop, ch 2, and join to the top of the beginning ch-3.
(78 sts: 6 point shells, 6 fans, 12 sc)
Rnd 24: Sl st in the next 2 dc and into the ch-3 sp. Ch 3, (2 dc, ch 3, 3 dc) in the same sp. Ch 3, sk to the next fan, dc in first dc of fan, (2 dc in next ch-1 sp, dc in next dc) 4 times, ch 3, point shell in the next ch-3 sp. Rep from * around, leaving out the last point shell, and join.
(114 dc: 6 point shells of 6 dc and 6 arches of 13 dc, plus 6 ch-3 tips and 12 ch-3 side sps)
The 5-dc fan opens into a 13-dc arch. The ch-1 gaps of the fan stay visible as the veins inside the arch.
Rnd 25: Ch 1. Sc in the same st as the join and in the next 2 dc, then work (sc, ch 2, sc) in the ch-3 tip, sc in next 3 dc, 3 sc in ch-3 sp, sc in next 13 dc, and 3 sc in ch-3 sp. Sc in next 3 dc, (sc, ch 2, sc) in ch-3 tip, sc in next 3 dc, 3 sc in ch-3 sp, sc in next 13 dc, 3 sc in ch-3 sp. Rep from * around and join.
(162 sc, 27 per repeat, plus 6 ch-2 tips)
Rnd 26 (outline): Working loosely, sl st in each sc around. Work (sl st, ch 1, sl st) in each ch-2 tip. Fasten off. (162 sl sts, plus 6 tips)
This sl st round makes the raised outline along the scallops. Weave in the ends on the WS.
Back Panel
The panel is worked in rows from the bottom up. To decrease, sl st in the first 3 ch of the first loop, ch 1, sc in the same loop, then ch 5, sc in next loop to the end. This removes 1 loop. The decreases switch sides because they are placed on both odd and even rows.
Row 1: Ch 22, sc in 2nd ch from hook and in each ch across. (21 sc)
Row 2: Ch 1, turn, sc in first sc, ch 5, sk 3 sc, sc in next sc, rep 5 times. (5 loops; 1 + 5 x 4 = 21 sts used)
Rows 3–11: Ch 5, turn, sc in first loop, ch 5, sc in next loop, rep across. (5 loops)
Checkpoint: the panel is 5.25 in (13.3 cm) wide and 7.75 in (19.7 cm) long.
Row 12 (dec): Decrease. (4 loops)
Rows 13–18: Work even. (4 loops, about 4.25 in or 10.8 cm wide)
Row 19 (dec): Decrease. (3 loops)
Rows 20–25: Work even. (3 loops, about 3.25 in or 8.3 cm wide)
Row 26 (dec): Decrease. (2 loops)
Rows 27–29: Work even. (2 loops, about 2.25 in or 5.7 cm wide)
Row 30: Ch 1, turn, 3 sc in each loop. (6 sc) Fasten off.
Checkpoint: the panel is 21.5 in (54.6 cm) long.
Make All Pieces
All pieces use Sage Green:
- Basket: make 3, at 28 g (48 m) each
- Back panel with border and tab: make 1, at 30 g (51 m)
Layout (front view, measured from the bottom of the bordered panel):
        ( wooden ring )
          [ tab ]
         /  mesh  \
   [ Basket 3 ]   fold at 14.5 in (36.8 cm)
   [ Basket 2 ]   fold at 7.5 in (19.1 cm)
   [ Basket 1 ]   fold at 0.5 in (1.3 cm)
   ===== bottom border =====
Border
Border gauge: 16 sc = 4 in (10.2 cm), the same as the basket gauge. Each mesh row is 0.75 in tall, so 3 sc per mesh row end gives 0.75 in of edge. The edge will not pull in or ruffle.
The border covers the two long sides and the bottom. The top edge is finished by the tab.
Border Row 1: With the RS facing, join at the top right corner, at the end of Row 30.
- Right side: 1 sc in the end of Row 30, 3 sc in each mesh row end from Row 29 down to Row 2, and 1 sc in the end of Row 1. That is 1 + 84 + 1 = 86 sc.
- Bottom: working into the foundation chain, 3 sc in first ch, sc in next 19 ch, 3 sc in last ch. That is 25 sc.
- Left side: the same as the right side, 86 sc.
(197 sc)
Border Row 2: Ch 1, turn. Sc in each sc, working 3 sc in the center sc of each bottom corner group. (201 sc: 86 per side, 29 across the bottom) Fasten off.
The corner increases round off the bottom corners. Blocking will soften them into the rounded shape shown.
Ring tab: With the RS facing, join at the top left corner. Sc in the end of each of the 2 border rows, sc in each of the 6 sc of Row 30, and sc in the end of each of the 2 border rows on the other side. (10 sc)
Tab Rows 2–8: Ch 1, turn, sc in each st across. (10 sc)
The tab is 1.75 in (4.4 cm) long. Fold it over the wooden ring to the WS and whipstitch the last row to the base of the tab. The tab will gather a little around the ring.
Joining
Method: whipstitch with a long tail of matching yarn.
Stitch-to-stitch logic: On each basket, the marked join sits at center back. Count 9 sts each side of the marker in Rnd 19 to get 18 back sts, which is 4.5 in (11.4 cm). Mark the same 18 sts in the Rnd 13 fold line.
- Basket 1: Center it on the panel with the Rnd 13 fold 0.5 in (1.3 cm) above the bottom border. Whipstitch each of the 18 fold sts around the nearest mesh strand. Then whipstitch the 18 sts of Rnd 19 the same way.
- Basket 2: Place the fold at 7.5 in (19.1 cm) and attach it the same way.
- Basket 3: Place the fold at 14.5 in (36.8 cm). The panel is narrower here, so use only the center 12 sts, 3 in (7.6 cm), on each line.
On every basket, also tack the 2 back point tips to the mesh.
Tension: Pull each stitch snug but not tight. The mesh should lie flat behind the basket, not pucker. Spread the stitches evenly, about 4 per inch.
Size checkpoint: The baskets sit 7 in (17.8 cm) apart. Basket 1’s tips reach about 5 in (12.7 cm) from the bottom, and Basket 3’s tips reach about 19 in (48.3 cm). Overall length is 24.5 in (62.2 cm).
Final Blocking
- Wash the holder gently, or mist it evenly until damp.
- Lay the panel flat and pin it to 6.1 in (15.5 cm) wide at the bottom and 22 in (55.9 cm) long without the ring.
- Pin each diamond open so the mesh is even.
- Stuff each basket with a toilet roll wrapped in plastic so it dries in shape.
- Pin the arches and points upright. Spray with starch if you want firmer tops.
- Let everything dry completely before you hang it.
- Slip a plastic canvas circle into each base if you want extra support.
Final Quality-Control Checklist
- Each base measures 5.25 in (13.3 cm) across and lies flat.
- Each basket has 6 arches and 6 points, all evenly spaced.
- Rnd 25 counts 162 sc on every basket.
- The panel border counts 201 sc in Row 2.
- The tab wraps the ring firmly with no gaps.
- The baskets are centered, level, and 7 in (17.8 cm) apart.
- All ends are woven in on the WS.
Troubleshooting
- Base cups or ruffles: Recount the increases. Each round should add exactly 6 sts.
- Basket walls flare: Your Rnd 13 BLO round is too loose. Rework it with tighter tension.
- Points lean over: Starch the tops and block them on a roll.
- Arches look uneven: Check that each fan has 5 dc and each arch has 13 dc.
- Mesh edges wavy: Rework the border at exactly 3 sc per mesh row end.
- Basket sags forward: Add more tacking at the Rnd 19 line and the back point tips.
- Panel twists on the hook: Make sure the tab is folded straight and sewn evenly across all 10 sts.
Care
Hand wash in cool water and lay flat to dry, reshaping the baskets over a roll. Remove the wooden ring before washing if you can.
Final Notes
The measurement chain is short and easy to check:
- The 72-st base is 5.25 in (13.3 cm) across.
- The solid band is 1.5 in (3.8 cm) tall.
- Each finished basket is 4.5 in (11.4 cm) tall.
- The panel is 21.5 in (54.6 cm) before the border and 6.1 in (15.5 cm) wide after it.
- The baskets sit 7 in (17.8 cm) apart.
- The full holder hangs 24.5 in (62.2 cm) long.
Check each number as you go, and the three baskets will line up neatly.
Happy crocheting!