

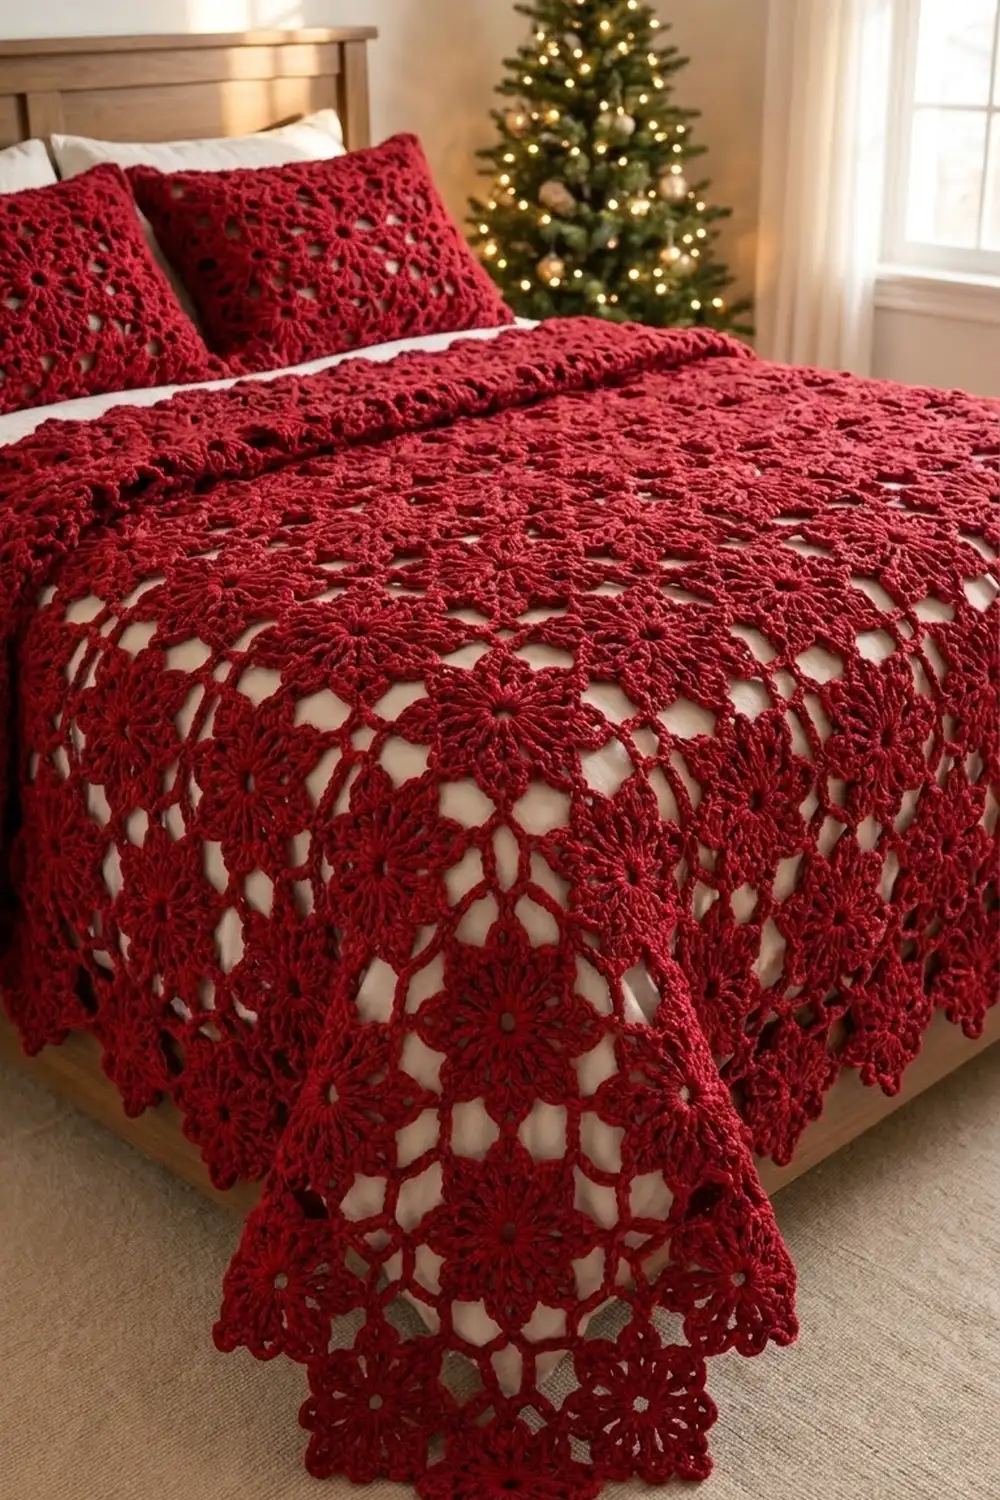
The Scarlet Snowflake Bedspread is made of six-pointed lace snowflakes joined tip to tip into one large holiday coverlet. Each motif has a small open center, a round of chain spokes, six long pointed arms with picot edges, and a little picot lobe between each pair of arms.
The whole spread uses one color, a deep cranberry red. A smooth mercerized cotton shows off the stitch definition and gives the lace a soft shine. The look is traditional and cozy, and it works well over a white bed skirt so the open spaces show up.
This pattern uses US crochet terms. The finished bedspread measures about 78 × 79.8 in (198.1 × 202.7 cm).
You make 137 motifs and join them as you go on the last round, arranged in offset rows. A two-round picot border then follows the pointed outline and firms up the edge.
Finished Size and Construction
- Finished size: 78 × 79.8 in (198.1 × 202.7 cm)
- Skill level: Intermediate
- Terminology: US
- Yarn weight: DK (light worsted, #3) mercerized cotton
- Hook: 4.0 mm (G-6)
- Number of pieces: 137 snowflake motifs
- Layout: 13 offset rows that alternate between 11 motifs and 10 motifs
- Piece size: 7 in (17.8 cm) from one tip to the opposite tip
- Size before border: 77 × 78.8 in (195.6 × 200.2 cm)
- Border depth: 0.5 in (1.3 cm)
Materials
Yarn: DK mercerized cotton, about 110 m (120 yd) per 50 g. A smooth, tightly plied yarn gives the crispest picots. Buy everything from one dye lot, because red can vary a lot between lots.
- Cranberry Red: 950 g / 2,090 m (19 balls)
This covers about 6 g / 13 m per motif plus 30 g / 66 m for the border. The quantities already include a margin of roughly 10%.
Tools:
– 4.0 mm (G-6) crochet hook
– Tapestry needle
– Rust-proof pins and blocking mats
– Spray bottle
– Measuring tape
– Stitch markers
Abbreviations (US Terms)
- ch – chain
- sl st – slip stitch
- sc – single crochet
- hdc – half double crochet
- dc – double crochet
- tr – treble crochet
- sp(s) – space(s)
- beg – beginning
- rep – repeat
Special stitch: Picot. Ch 3, then sl st into the 3rd ch from the hook.
Gauge and Checkpoints
Make and block one complete motif before you start the rest. These are the checkpoints, measured flat:
- After Rnd 1: 1.25 in (3.2 cm) across
- After Rnd 2: 2.75 in (7.0 cm) across
- After Rnd 3: 3.5 in (8.9 cm) across
- After Rnd 4: 4.5 in (11.4 cm) across the shell tips
- After Rnd 5: 5.75 in (14.6 cm) from tip to tip
- After Rnd 6: 7 in (17.8 cm) from tip to tip once blocked, and about 5 in (12.7 cm) from one lobe to the opposite lobe
If your motif is more than 0.25 in (0.6 cm) too large, go down half a hook size. If it is more than 0.25 in (0.6 cm) too small, go up half a size. An error of 0.25 in (0.6 cm) per motif adds up to almost 3 in (7.6 cm) across one row of 11 motifs, so check before you go on.
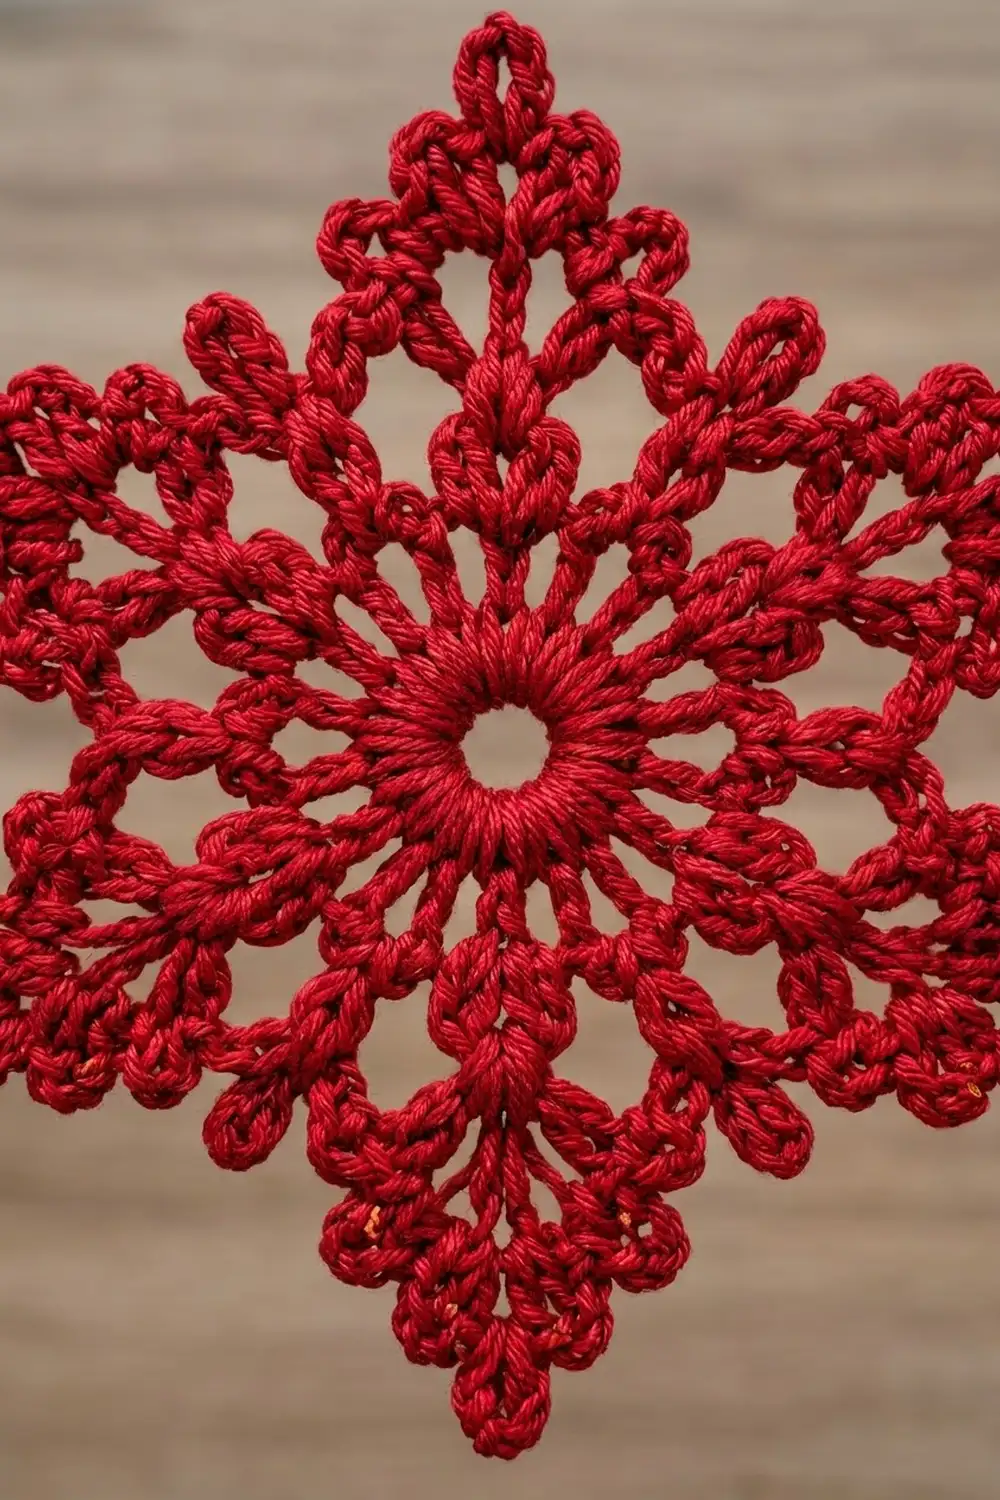
Snowflake Motif
Rnd 1: Make a magic ring. Ch 3 (counts as dc), then work 23 dc into the ring. Pull the ring closed, leaving a 3/8 in (1.0 cm) opening. Sl st to the top of the beg ch-3. (24 dc)
Rnd 2: Ch 4 (counts as tr), ch 2. Tr in next dc, ch 2; rep from * 22 more times. Sl st to the 4th ch of the beg ch-4. (24 tr, 24 ch-2 sps)
Rnd 3: Sl st into the first ch-2 sp, ch 1, sc in the same sp. Ch 4, sc in next ch-2 sp; rep from * 22 more times. Ch 4, then sl st to the first sc. (24 sc, 24 ch-4 loops)
These chain loops make the spoke ring. Every 4 loops become one repeat: one arm and one lobe.
Rnd 4: Sl st in the first 2 ch of the next ch-4 loop. Ch 3 (counts as dc), then work (dc, ch 3, 2 dc) in the same loop to make the first shell.
Ch 2, sc in next loop, ch 2, (dc, ch 3, dc) in next loop for the lobe base, ch 2, sc in next loop, ch 2, (2 dc, ch 3, 2 dc) in next loop for the shell.
Rep from * 5 more times, ending the last rep at *. Sl st to the top of the beg ch-3.
(6 shells, 6 lobe bases, 36 dc, 12 sc, 12 ch-3 sps, 24 ch-2 sps)*
Rnd 5: Sl st in the next dc and into the shell ch-3 sp. Ch 3 (counts as dc), then work (2 dc, ch 4, 3 dc) in the same sp to make the first point.
Ch 3, skip the next ch-2 sp, sc in the next ch-2 sp. Work (hdc, dc, picot, dc, hdc) in the lobe ch-3 sp. Sc in the next ch-2 sp, ch 3, skip the next ch-2 sp. Work (3 dc, ch 4, 3 dc) in the next shell ch-3 sp.
Rep from * 5 more times, ending at *. Sl st to the top of the beg ch-3.
(36 dc in points, 6 ch-4 tips, 6 finished lobes [12 hdc, 12 dc, 6 picots], 12 sc, 12 ch-3 sps)*
Rnd 6 (first motif only): Sl st in the next 2 dc and into the ch-4 tip. Ch 3 (counts as dc). In the same tip, work (dc, picot, 2 dc, ch 5, 2 dc, picot, 2 dc).
Ch 3, sc in next ch-3 sp, ch 3, sc in lobe picot, ch 3, sc in next ch-3 sp, ch 3. In the next ch-4 tip, work (2 dc, picot, 2 dc, ch 5, 2 dc, picot, 2 dc).
Rep from * 5 more times, ending at *. Sl st to the top of the beg ch-3 and fasten off.
(48 dc, 12 picots, 6 ch-5 tips, 18 sc, 24 ch-3 sps)*
Each arm now has three stacked layers (shell, point, and outer fan) that narrow to a ch-5 tip, with a picot on each side. Those ch-5 tips are the only places where motifs connect.
Make All Pieces
You need 137 motifs in total, all in Cranberry Red:
– 7 long rows × 11 motifs = 77
– 6 short rows × 10 motifs = 60
Lay each motif flat with two of its points horizontal (pointing left and right). Short rows sit half a motif in from each side:
Row 1  (11):  * * * * * * * * * * *
Row 2  (10):   * * * * * * * * * *
Row 3  (11):  * * * * * * * * * * *
Row 4  (10):   * * * * * * * * * *
 ... alternate through ...
Row 13 (11):  * * * * * * * * * * *
Joining (Join-As-You-Go)
Method: Every motif after the first is joined while you work its Rnd 6. When you reach a point that needs to connect, replace the “ch 5” at its tip with: ch 2, sl st into the ch-5 tip of the neighboring motif, ch 2. This still uses 5 stitches, so the tip length stays the same.
Stitch logic: Hold the finished motif right side up. Insert the hook from the front under its ch-5 tip and work the sl st.
- Row 1: Each new motif joins 1 tip, its left point, to the right point of the motif before it.
- Rows 2 to 13: Each new motif joins to its left neighbor (if it has one), its upper-left neighbor, and its upper-right neighbor. Long-row end motifs have only one upper neighbor.
These are always neighboring points. Work them one after another, then finish the round normally.
Tension: Keep the ch-2 on each side of the join loose and even. If they are tight, the joined points pucker and the rows bow.
Size checkpoint:
– Row 1 should measure 77 in (195.6 cm) from tip to tip.
– Row centers should be 6.06 in (15.4 cm) apart vertically.
– After all 13 rows, check that the size is 77 × 78.8 in (195.6 × 200.2 cm).
Border
Border gauge: 12 sts = 3.5 in (8.9 cm), worked as chain spans and as sc.
Around the outside there are 94 unjoined points: 22 on the top edge, 25 on each side, and 22 on the bottom edge. In this layout, each exposed tip is exactly 3.5 in (8.9 cm) from the next one, which is half a motif width.
Rnd 1: Join the yarn with sc in the upper-left tip of the top-left motif. Ch 11, sc in next exposed tip; rep around. Work ch 11 after the last tip, then sl st to the first sc. Each tip counts as the sc plus the ch-11 that follows it.
- Top: 11 motifs × 24 sts (2 tips × 12) = 264 sts
- Right side (top to bottom):
- Row 1: 2 tips = 24 sts
- Long rows 3–11 (5 rows): 3 tips each = 36 sts per row, 180 sts total
- Short rows (6 rows): 1 tip each = 12 sts per row, 72 sts total
- Row 13: 2 tips = 24 sts
- Side total = 300 sts
- Bottom: 11 motifs × 24 sts = 264 sts
- Left side: same breakdown as the right = 300 sts
- Total: 94 sc + 94 ch-11 spans = 1,128 sts
Rnd 2: Sl st into the first ch-11 sp. In each ch-11 sp, work (6 sc, picot, 6 sc). Skip the Rnd 1 sc. Sl st to the first sc and fasten off.
- Top: 264 sc + 22 picots
- Right side: 300 sc + 25 picots
- Bottom: 264 sc + 22 picots
- Left side: 300 sc + 25 picots
- Total: 1,128 sc + 94 picots
Why the math works:
– Each span is 3.5 in (8.9 cm), and 12 sts at border gauge also equal 3.5 in (8.9 cm). Rnd 1 therefore lies flat without pulling the points inward.
– In Rnd 2, each 12 sc replaces exactly 11 ch + 1 sc, so the length stays the same and the edge doesn’t ruffle.
– Skipping the sc at each tip lets the edge turn the sharp corners neatly.
– The border adds 0.5 in (1.3 cm) on each side, so 77 + 1 = 78 in (198.1 cm) and 78.8 + 1 = 79.8 in (202.7 cm).
Final Blocking
- Weave in all ends along the dc stitches, never through the open chains.
- Lay the spread on blocking mats or a clean carpet covered with towels, working one section at a time if needed.
- Spray until the yarn is evenly damp, but not dripping.
- Pin the outer tips first, keeping them 3.5 in (8.9 cm) apart.
- Pin each inner point so every motif is 7 in (17.8 cm) from tip to tip and the arms are straight.
- Pin the lobe picots out gently so the lobes look round.
- Let it dry completely, at least 24 hours, before you unpin.
Final Quality-Control Checklist
- [ ] All 137 motifs have 6 arms, 6 lobes, and 12 side picots.
- [ ] Every interior join is a ch 2, sl st, ch 2 at a tip, with no skipped joins.
- [ ] Short rows sit centered between long rows.
- [ ] Border Rnd 1 has 94 tips and 1,128 sts.
- [ ] Border Rnd 2 has 12 sc and 1 picot in every span.
- [ ] The blocked size is about 78 × 79.8 in (198.1 × 202.7 cm).
- [ ] All ends are secure and hidden.
Troubleshooting
- The motif cups: Rnd 2 chains are too tight. Loosen the ch-2s, or go up a hook size for Rnd 2 only.
- The motif ruffles: Check that Rnd 4 has exactly 24 ch-2 sps and that you skipped the correct sps in Rnd 5.
- Arms come out different lengths: You probably used a ch 3 instead of a ch 4 at a Rnd 5 tip. Count every tip.
- Joins pull into a cluster: Work the ch-2 on each side of the join with a looser wrap.
- The border waves: Your border gauge is loose. Use 10 ch spans with (6 sc, picot, 5 sc) only if your sample span measures more than 3.75 in (9.5 cm).
- The border cups the edge: Your chains are too tight. Go up one hook size for border Rnd 1.
Care
Hand wash or machine wash cold on a gentle cycle inside a large laundry bag. Lay flat and reshape the tips while damp, and do not tumble dry.
Final Notes
The measurement chain is simple:
– Rnd 2 at 2.75 in (7.0 cm) leads to a blocked motif of 7 in (17.8 cm).
– 11 motifs make a row of 77 in (195.6 cm), and 13 rows make 78.8 in (200.2 cm).
– Exposed tips sit 3.5 in (8.9 cm) apart, and 12 border sts cover each span.
– The border brings the finished size to 78 × 79.8 in (198.1 × 202.7 cm).
Check each link and the scarlet snowflakes will come together flat and even. Happy crocheting!