

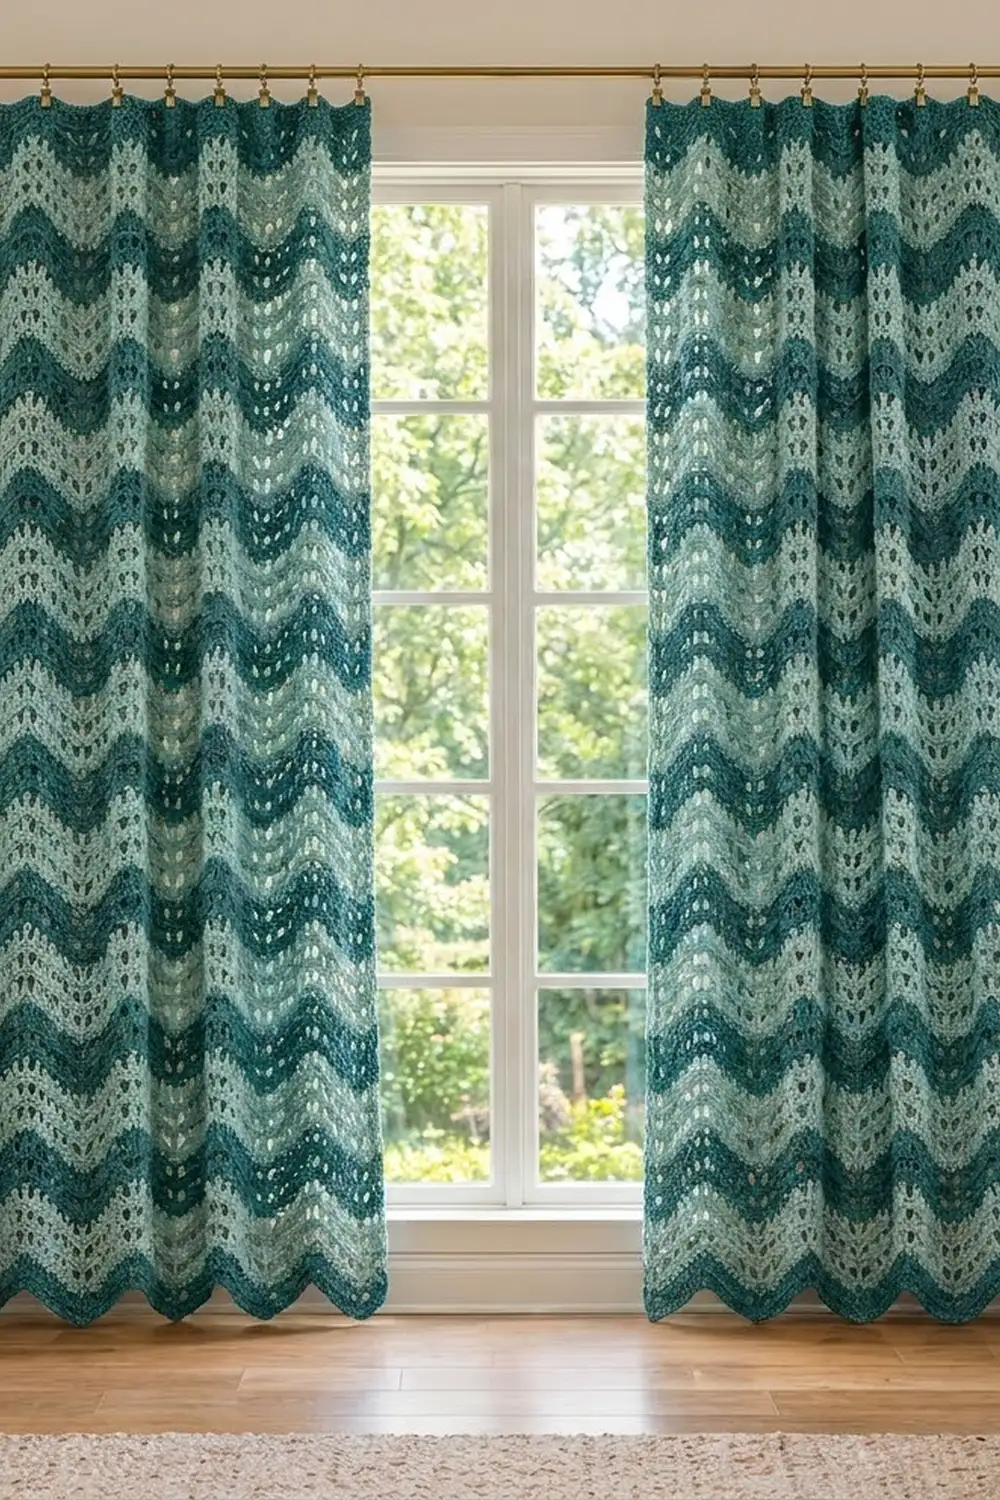
This curtain panel has rolling chevron waves in two shades of teal. The dark teal stripes are worked in solid double crochet ripple rows. The light seafoam stripes are an eyelet version of the same ripple, so these bands let in more daylight. A V-stitch forms each wave’s soft peak, and a dc3tog pulls in each valley.
The style is relaxed coastal cottage. The panel is lacy enough to filter light but sturdy enough to hang straight. The top is straightened into a firm dark teal band that holds clip rings well, and the bottom hem keeps the natural wavy ripple edge.
The pattern uses US crochet terms. One finished panel measures 37¼ in (94.6 cm) wide by 81¼ in (206.4 cm) long, measured along a side edge. For a window pair, make two identical panels. They hang side by side and are never joined.
Construction is simple. You work one piece in rows, from the wavy bottom edge up to the top, and change color every 4 rows. Two straightening rows level the top. A 2-row single crochet border finishes the sides and top.
Finished Size and Construction
- Finished size (one panel): 37¼ in (94.6 cm) wide x 81¼ in (206.4 cm) long
- Skill level: Intermediate
- Terminology: US
- Yarn weight: Worsted (#4)
- Hook: 5.5 mm (I-9)
- Number of pieces: 1 per panel (make 2 for a pair)
- Layout: one rectangle worked in rows, bottom to top
- Piece size before border: 36¼ in (92.1 cm) x 80¾ in (205.1 cm)
- Border depth: ½ in (1.3 cm) on the sides and top; the bottom hem has no border
Materials
Choose a smooth worsted weight cotton or cotton blend. Cotton drapes well, stretches less than pure acrylic, and keeps the eyelets crisp. The quantities below assume about 190 m per 100 g.
Per panel:
– Color A, dark teal: 800 g (about 1,520 m)
– Color B, light seafoam: 600 g (about 1,140 m)
For a pair, double these amounts. All quantities include a margin of about 10 percent for gauge differences and swatching.
Tools:
– 5.5 mm (I-9) crochet hook
– Stitch markers (at least 10)
– Tapestry needle
– Scissors
– Measuring tape
– Blocking mats or a clean floor area, plus rust-proof pins
– Spray bottle
– 9 curtain clip rings per panel
Abbreviations (US Terms)
- ch – chain
- sc – single crochet
- hdc – half double crochet
- dc – double crochet
- tr – treble crochet
- sk – skip
- sp – space
- st(s) – stitch(es)
- dc2tog – double crochet 2 together (makes 1 st)
- dc3tog – double crochet 3 together (makes 1 st)
Special stitch – V-st: (dc, ch 1, dc) in the same st or sp.
Stitch counting rule: Every ch-1 sp counts as 1 st. Each V-st counts as 3 sts. Each dc2tog and dc3tog counts as 1 st. In the next row, work into every ch-1 sp as if it were a stitch.
Gauge and Checkpoints
Gauge: 14 sts and 8 rows = 4 in (10.2 cm) in the ripple pattern, measured flat and relaxed. One wave repeat, peak to peak, is 14 sts and measures 4 in (10.2 cm).
Make a test piece first. Ch 31. Work Row 1 as written below, but with only 2 peaks:
- Dc2tog over 3rd and 4th ch from hook, dc in next 5 ch, V-st in next ch, dc in next 5 ch, dc3tog over next 3 ch, dc in next 5 ch, V-st in next ch, dc in next 5 ch, dc2tog over last 2 ch. (29 sts)
- Work 3 more rows of Row S in A, then 4 rows of Row E in B.
Checkpoint: The swatch should measure about 8¼ in (21.0 cm) wide and 4 in (10.2 cm) tall. Measure straight across and straight up, not along the zigzag.
- Too big: Go down to a 5 mm (H-8) hook.
- Too small: Go up to a 6 mm (J-10) hook.
Row gauge matters as much as stitch gauge because the panel is long. If your rows are taller than ½ in (1.3 cm), you will need fewer stripe repeats. Use the length checkpoints below to adjust.

Panel Pattern
Foundation
With A, ch 129.
Row 1 (A, right side): Dc2tog over 3rd and 4th ch from hook (the 2 skipped ch do not count). Dc in next 5 ch, V-st in next ch, dc in next 5 ch, dc3tog over next 3 ch; rep from * 7 more times, then from * to ** once. Dc2tog over last 2 ch. (127 sts: 9 V-sts, 8 dc3tog)*
Chain check: 2 skipped ch + 2 + (8 x 14) + 11 + 2 = 129 ch.
The Two Row Types
Row S (solid ripple): Ch 2 (does not count as a st), turn. Dc2tog over first 2 sts. Dc in next 5 sts, V-st in next ch-1 sp, dc in next 5 sts, dc3tog over next 3 sts; rep from * 7 more times, then from * to ** once. Dc2tog over last 2 sts. (127 sts)*
Row E (eyelet ripple): Ch 2 (does not count as a st), turn. Dc2tog over first 2 sts. Dc in next st, (ch 1, sk next st, dc in next st) twice, V-st in next ch-1 sp, (dc in next st, ch 1, sk next st) twice, dc in next st, dc3tog over next 3 sts; rep from * 7 more times, then from * to ** once. Dc2tog over last 2 sts. (127 sts, including 45 ch-1 sps)*
Why the count holds:
– Each repeat uses 14 sts (5 + 1 + 5 + 3) and makes 14 sts (5 + 3 + 5 + 1).
– Each V-st adds 2 sts at a peak, and each dc3tog removes 2 sts at a valley.
– Each edge dc2tog uses 2 sts and makes 1.
– Every row therefore totals 1 + (8 x 14) + 13 + 1 = 127 sts.
Place a marker in each V-st ch-1 sp on Row 1 and move the markers up every few rows. They keep the peaks stacked.
Stripe Sequence
- Rows 2–4 (A): Work Row S. (127 sts) Rows 1–4 form the first dark stripe.
- Rows 5–8 (B): Work Row E. (127 sts)
Every color change happens at the same edge, so carry the unused color loosely up the side. The border will cover the carried strands.
Rows 9–160: Repeat Rows 1–8 19 more times: Row S in A for 4 rows, then Row E in B for 4 rows. You will have 20 stripe repeats, ending with a B stripe. Fasten off B. (127 sts)
Length checkpoints (flat, measured straight up a side edge):
– After Row 8: width 36¼ in (92.1 cm), length 4 in (10.2 cm)
– After Row 40: 20 in (50.8 cm)
– After Row 80: 40 in (101.6 cm)
– After Row 120: 60 in (152.4 cm)
– After Row 160: 80 in (203.2 cm)
Top Straightening Band
The top of Row 160 is a zigzag. The next 2 rows use graded stitch heights to fill the valleys and make a straight edge for the clip rings.
Row 161 (A, straightening row): Pick up A. Ch 4 (counts as first tr), turn. Work 1 st into each st and ch-1 sp, as follows:
Tr in next st, dc in next 2 sts, hdc in next 2 sts, sc in next 3 sts (dc, ch-1 sp, dc of the V-st), hdc in next 2 sts, dc in next 2 sts, tr in next st, tr in next st (the dc3tog); rep from * 7 more times, then from * to ** once. Tr in last st. (127 sts)*
The tallest stitches sit in the low valleys and at the edges. The shortest sit on the high peaks, so the top comes out level.
Row 162 (A): Ch 1, turn. Sc in each st across. (127 sc) Fasten off.
The top band adds about ¾ in (1.9 cm). The piece now measures 36¼ in (92.1 cm) x 80¾ in (205.1 cm).
Border
Border gauge: 14 sc = 4 in (10.2 cm), or 3.5 sc per inch, matching the body. On the side edges, work 7 sc over every 4 dc row ends. That puts 3.5 sc in each 1 in (2.5 cm).
The border is worked in rows across 3 sides: up the right side, across the top, and down the left side. The wavy bottom hem has no border.
Border Row 1 (A): With the right side facing, join A at the bottom of the right side edge, at the row end of Row 1.
– Right side: Work 7 sc evenly over every 4 dc rows (40 groups over Rows 1–160 = 280 sc). Work 2 sc in the row end of Row 161 and 1 sc in the row end of Row 162. (283 sc)
– Top: Work 3 sc in first st of Row 162 (corner), sc in next 125 sts, 3 sc in last st (corner). (131 sc, including both corner groups)
– Left side: Work as for the right side, from top to bottom. (283 sc)
Total: 283 + 131 + 283 = 697 sc.
The top count comes from the 127 sts of Row 162: 125 sts get 1 sc each, and the 2 corner sts get 3 sc each, so 125 + 6 = 131. The side counts do not include the corner groups, so no stitch is counted twice.
Border Row 2 (A): Ch 1, turn. Sc in each sc, working 3 sc in the center sc of each corner group.
– Left side: 283 sc
– Top, including corners: sc, 3 sc in center sc, sc (5 sc), then sc in next 125, then sc, 3 sc in center sc, sc (5 sc). (135 sc)
– Right side: 283 sc
Total: 283 + 135 + 283 = 701 sc. That is 697 sc plus 2 extra sts at each of the 2 corners.
Fasten off and weave in all ends.
Why the math works:
– The side edge is 80¾ in (205.1 cm) long, and 80.75 x 3.5 = 282.6, which rounds to 283 sc.
– The top is 36¼ in (92.1 cm) wide, and 36.25 x 3.5 = 126.9, which rounds to 127 sts.
– The border gauge matches the body gauge, so the edges stay flat instead of ruffling or pulling in.
– The two sc rows add ½ in (1.3 cm) on each side and on top. The finished size is 37¼ in (94.6 cm) x 81¼ in (206.4 cm).
Final Blocking
- Before blocking, weave in all ends along the stripe lines, following the same color.
- Lay the panel flat on mats or a clean sheet, right side up.
- Pin the top border straight to 37¼ in (94.6 cm).
- Pin both side edges straight to 81¼ in (206.4 cm). Measure diagonally corner to corner both ways to check that the panel is square.
- Pin the bottom wave points so they sit evenly, about 4 in (10.2 cm) apart.
- Spray with water until damp but not soaked. Pat the eyelets open with your fingers.
- Leave the panel until it is completely dry, ideally 24 hours.
- Unpin and clip 9 rings to the top, one above each peak column. Let the panel hang for a day before you judge the length, because heavy cotton lace can relax by up to 1 in (2.5 cm).
Final Quality-Control Checklist
- Every row has 127 sts, including ch-1 sps.
- All 9 peaks stack in straight vertical lines.
- Each dark and light stripe is 4 rows, and the panel has 20 full stripe repeats.
- The top edge is level after Row 161, with no dips over the valleys.
- After Border Row 2, each side has 283 sc and the top has 135 sc.
- The sides hang straight, with no ruffles or puckers.
- The carried strands are fully hidden under the border.
- For a pair, the two panels match in length to within ½ in (1.3 cm).
Troubleshooting
Peaks drift sideways. You missed a ch-1 sp or worked into one twice. Count back to the last correct row and check that each repeat has 14 sts.
Stitch count changes. Check the edges first. Each edge needs a dc2tog over 2 sts, and the ch 2 does not count as a stitch.
Eyelets close up. Your ch 1 is too tight. Make each chain as tall as the top of a loose dc.
Side edges ripple. The border has too many sc. Work 3 sc per 2 rows along the sides instead.
Side edges pull in. The border has too few sc. Work 2 sc into each row end for a few rows, then check again.
Panel is too long after hanging. For the second panel, leave out one 8-row stripe repeat before the top band.
Top edge waves. Check that each tr in Row 161 sits exactly in a dc3tog or an edge stitch.
Care
Machine wash on a cool, gentle cycle in a mesh bag, or hand wash. Lay flat to dry, and never hang the panel wet, because the weight will stretch it.
Final Notes
Here is the full measurement chain:
– One 14-st repeat measures 4 in (10.2 cm).
– Nine peaks plus the edges give 127 sts, or 36¼ in (92.1 cm).
– Each 8-row stripe repeat measures 4 in (10.2 cm), so 20 repeats give 80 in (203.2 cm).
– The top band adds ¾ in (1.9 cm), and the border adds ½ in (1.3 cm).
– The finished panel measures 37¼ in (94.6 cm) x 81¼ in (206.4 cm).
Check gauge early and count every row, and your panel will hang straight.
Happy crocheting!